
Automatic Wire Cutter
ATTENTION: This unit has moving parts that can cause injury. Keep your fingers away from the unit during use. MHPro.net will not be responsible for any injury, damage or loss caused by this device. Please read this manual in its entirety.
 Presentation
 Presentation
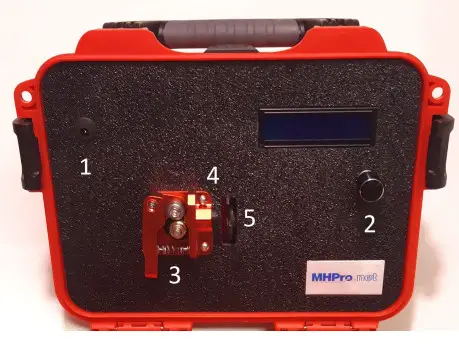
- Power inlet
- Rotary knob & click
- Tension lever
- Nozzle
- Cutter
Default menu

Len: Determines the length of the wire be cut. In metric or imperial defined in the SETUP menu.Qty: Determines the amount of wire to be cut.SETUP: To enter in setup sub-menu.START: Starts the task of cutting (Qty) wires with a length of (Len).
To select an option, simply rotate the knob slowly until the desired menu is blinking then push the knob.
“Len” menu

To set length, rotate the knob until the desired length then presses the knob to save and exit. NOTE: Imperial units have 0.25” steps.
“Qty” menu
 To set quantity, rotate the knob until the desired quantity then press the knob to save and exit.
“SETUP” menu

To select a SETUP option, simply rotate the knob slowly until the desired menu is blinking then push the knob.
“SPEED” menu
 To set up speed, simply rotate the knob from 10% to 100% then push the knob to save and exit.
“UNITS” menu

To select the unit option, simply rotate the knob slowly until the desired unit is blinking then push the knob to save and exit. You can also select the back icon if no change. Do not rely on this function to convert mm to inches and vice versa. Changing units is only a round conversion.
“TRIM” menu

This device has been calibrated for one meter long of 2 mm OD wire. Depending on the precision you need and the wire diameter, you may want to adjust the accuracy. “TRIM CORRECTION” add/remove microns of the traction wheel circumference. Increasing this number decreases the length of the wire and conversely decreasing this number increases the length of the wire. Again, simply rotate the knob until the desired correction then push the knob to save and exit.
PAUSE (experimental)
During the execution of the task, it is possible to pause the device. Simply press the button to pause and press again to resume.

Setting up the wire

Press the tension lever to insert the wire from the left side between the traction wheel and the bearing up to over the cutter. Be sure to leave the wire of the cutter protruding. It may be necessary to roll the wire between your fingers to help get in the way.
Accessories
Depending of the wire diameter, it may be necessary to change the tip and/or the bearing.
| Recommended combination | |
| Wire size from 1 mm to 1,5 mm | reen tip with larger bearing (do not use the lock washer)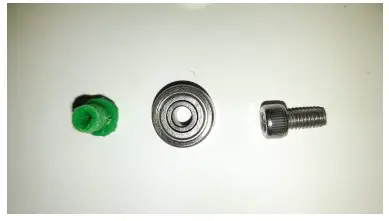 |
| Wire size from 1,5 mm to 2,5 mm | Black tip with smaller bearing (use the lock washer) |
 NOTE: Make sure that the tension lever can move freely after changing the bearing. DO NOT TIGHTEN TOO MUCH THE TIP to avoid breaking it. Simply tighten it with your fingers or gently with pliers.
| Specifications | |
| Feed speed | Max: Up to 9,2 meters per minute (30 feet per minute) |
| Min: About 1,5 meters per minute (5 feet per minute) | |
| Wire size capacity | From 1 mm to 2,5 mm Ø (OD) (Note that the use of a wire that approaches the lower and upper limit may cause some problems depending on the stiffness/flexibility of the wire.) |
| Power supply | External 12v 2 amperes DC (positive center)5,5 mm x 2,1 mm power jack connector |
| Units | Metric and imperial |
Automatic Wire Cutter manual v1.0MHPro.net
References
[xyz-ips snippet=”download-snippet”]