microlite BGM 200 GlucoTeq Blood Glucose
 Monitoring System Instruction Manual
1. Before you begin
Please read this before using.The following basic safety precautions should always be taken.
- Close supervision is necessary when the device is used by, on, or near children or people with disabilities.
- Use the device only for the intended use described in this user guide.
- Do not use test strips and control solutions which are not supplied by the manufacturer.
- Do not use the device if it is not working properly, or if it has suffered any damage.
- Before using any product to test your blood glucose, read all instructions thoroughly and practice the test. Do all quality control checks as directed and consult with a diabetes healthcare professional.
Keep this user guide with you.Intended use:The system is intended for use outside the body (in vitro diagnostic use only). It should be used only for self-testing blood glucose (blood sugar) and only with fresh capillary whole blood samples. The system is intended for use in the home and in clinical settings. The system should not be used for the diagnosis of diabetes or for the testing of newborns.
Principle of MeasurementBlood glucose is measured by an electrical current that is produced when a blood sample mixes with the reagent (special chemicals) of the test strip. The electrical current changes with the amount of glucose in the blood sample. The Microlite GlucoTeq meter measures the strength of the electrical current, calculates your blood glucose level and then displays your result in either milligrams of glucose per deciliter (mg/ld.) or millimoles of glucose per liter (mold/L).
Caution
- The user should not take any decision of medical relevance without first consulting his or her medical practitioner.
- Call your doctor immediately if you experience symptoms that are not consistent with your blood glucose test results.
- High altitudes above 3,402 meter (11,161 ft) may affect the test results.
- Temperatures outside the range of 10°C to 40°C (50°F to 104°F) may affect the test results. Do not test outside of these temperature ranges.
- Do not perform servicing and maintenance while the meter is in use.
- Modification of this equipment is not allowed. If the equipment is used in a manner not specified by the manufacturer, the protection provided by the equipment may be impaired.
- Do not use this meter near cellular or cordless telephones in a call, walkie-talkies, garage door openers, radio transmitters, or other electrical or electronic equipment that are sources of electromagnetic radiation, as these may interfere with the proper operation of the meter.
Important Health-Related Information
- Apply only capillary whole blood sample to test your blood glucose. Applying other substances or plasma, serum will cause wrong results.
- Severe dehydration and excessive water loss may cause false low results. If you believe you are suffering from severe dehydration, consult your healthcare professional immediately.
- Test results below 60 mg/ld. (3.3 mold/L)*1 indicates low blood glucose (hypoglycemia). Test results greater than 240 mg/ld. (13.3 mold/L)*2 indicates high blood glucose (hyperglycemia).If your results are below 60 mg/ld. (3.3 mold/L) or above 240 mg/ld. (13.3 mold/L), repeat the test, and if the results are still below 60 mg/ld. (3.3 mold/L) or above 240 mg/ld. (13.3 mold/L), consult your healthcare professional immediately.
- Inaccurate results may occur in severely hypotensive individuals or patients in shock. Inaccurate low results may occur for individuals experiencing a hyperglycemic-hyperosmolar state, with or without ketosis. Critically ill patients should not be tested with blood glucose meters.
- Abnormal red blood cell counts may cause false results. Please consult your healthcare professional if you do not know your hematocrit level.
- Interference: Reducing substances occurring in the blood naturally (uric acid, bilirubin) or from therapeutic treatments (ascorbic acid, acetaminophen) will not significantly affect Microlite GlucoTeq test results. However, elevated concentrations of these substances may affect test results. The compounds listed in the table were found to have no affect at the concentration indicated.
REFERENCE: Kahn, R. and Weir, G.: Joslin is Diabetes Mellitus, 13thed Philadelphia: Lea and Fibiger (1994), 489. *1 Krall, L.P. and Beazer, R. S.: Joslin Diabetes Manual. Philadelphia: Lea and Fibiger (1989), 261-263. *2
2. Getting to know your System
The Microlite GlucoTeq Glucose Monitoring SystemThe Microlite GlucoTeq system uses the latest technology to provide you with easy and comfortable testing. The system requires only 0.5uL blood sample to complete the testing in only 5 seconds. Please review the contents of your purchase to confirm that all the components are included as listed on the side of your meter box.
- Illuminated Test Strip SlotInsert the test strip here. The meter will turn on automatically and the slot LED light will illuminate. To track the position of test strip slot without strip inserting, press main button and the slot LED light will be flashing.
- LCD DisplayGuides you through the test using symbols and simple messages.
- Main ButtonTurns the meter on or performs other functions described in this user guide.
- Data PortAllows you to transfer the information stored in the meter to a computer to view, analyze and print.
- Set ButtonLocated on the back of the meter, inside the battery compartment; used to set up the meter.
- Battery CompartmentHolds ONE 3V Lithium battery (battery type CR2032). Please install battery into meter before you start testing.
- Meter LabelEach meter has its unique number on it. Do not alter or tear the label off.
- Contact BarsInsert this end of the test strip into the meter. Push it in firmly until it will not go any further.
- Test Strip HandleHold this part to insert the test strip into the test strip slot on the meter.
- Confirmation WindowShows whether enough blood has been drawn into the test strip’s absorbent channel.
- Absorbent ChannelApply a drop of blood and it will be drawn in automatically.
- Test Result AreaDisplays test results.
- Appears when test result is lower than 70 mg/ld. (3.9 mold/L) or higher than 180 mg/ld. (10 mold/L). Appears when test result is within the range of 70 to 120mg/ld. (3.9 mold/L to 6.7 mold/L)
- Ketone SymbolAppears when test result is higher than 240 mg/ld. (13.32 mold/L).
- Alarm SymbolAppears when you are setting alarms
- Test Strip SymbolAppears when the meter is in testing mode.
- Blood Drop SymbolFlashes when sample should be applied.
- Low Battery SymbolAppears when the battery power is low.
- Unit of MeasureIndicates what unit of measure the test result is displayed in.
- Temperature SymbolAppears when temperature is outside of operating range
- Control Solution Test SymbolShows that you are in control solution mode.
- Memory SymbolAppears when you review the memory
- After MealIndicates that your test is an After Meal test.
- Before MealIndicates that your test is a Before Meal test.
- Date
- Time
If any part of the display is not working, contact your local distributor for help.
BatteryMicrolite GlucoTeq meters come with one (1) CR2032 lithium battery. The battery is manufactured in a charged state and not designed for recharging. Recharging the battery can cause battery leakage, or in some cases, high pressure rupture.
Warning: Batteries can explode or leak and cause burns if installed backwards, disassembled, charged or exposed to water, fire or high temperatures.
Low BatteryThe meter will alert you when the power is getting low by displaying two different messages:
- When the battery symbol AR appears alone on the display, the meter is functional and the results remain accurate, but you should change the battery as soon as possible.
- When the battery symbol AR appears together with the «E-b» symbol on the display, the battery does not have enough power for a test. You must change the battery before using the meter

Replacing the battery does not affect the meter’s memory (previous test results stored in memory). However, the date, time and unit settings may need to be updated; update the settings by following the steps in «Setting Time and Date».
As with all small objects, the battery should be kept away from small children. If the battery is swallowed, seek medical assistance immediately.Remove the battery if you are not going to use the device for a long period of time (i.e. 3 months or more), or the battery might leak chemicals.
![]() Please discard the product or the batteries properly according to the regulations of your country.
Please discard the product or the batteries properly according to the regulations of your country.
Setting ModePlease install battery first and complete the setting before you begin to test
![]()
![]()
3. Prepare for blood sampling
If your lancing device did not come with a lancing device insert, the following information shall take the place of the insert.
Microlite LD-100 Lancing Device
Your lancing device and lancets are used for obtaining blood samples from the puncture site.
- A stylish, slim and ergonomic design is very convenient and user friendly.
- Big window to show the penetration depth with numeric display which is easy for the user to read.
- Big release button, comfortable and easy to operate.
- Patented feature of lancet ejection by one thumb pushing with only one hand operation.
- Patented safety switch design: when the cap is closed, it allows only load but lock the function of lancet ejection. When cap is open, it allows lancet ejection but release the trigger automatically to prevent accidental pricking.
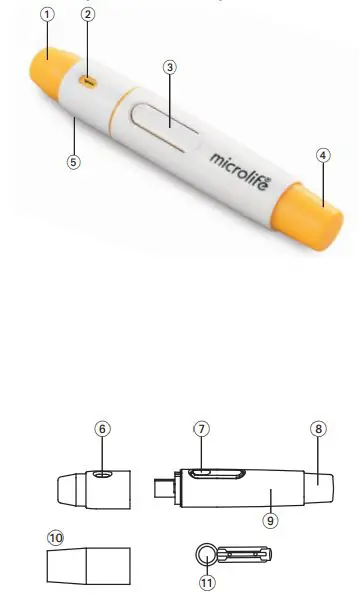
- Depth adjustable cap
- Release button
- Plunger
- Hub
- AT Clear cap (optional)
- Disposable lancet (optional)
Special Features
- Intended Use: The lancing device is intended for use by a single person with the lancet puncturing through the skin for collecting blood sample.
- Safety Switch design: when the depth adjustable cap is open, the trigger will be relieved automatically which prevents users from being pricked if you are not intended to start the test. You can eject the used disposable lancet on one hand operation by pushing the plunger with your thumb at this status.
- When the cap is closed, it will lock the lancet eject function and prevent the lancet from being removed when you are intended to start the test.
- Stable and sophisticated structure design ensures almost no vibration, so that the lancet pricking is steadier with almost no pain. It lowers the psychological pressure of users very much and let people recover the test frequencies which recommended by HCPs.
- A stylish, slim and ergonomic design is very convenient and user friendly.
- Clear indication for depth penetration (numeric display): easy to read and adjust for users.
Important Lancing Device and Lancets Information
- Lancet is for single use only.
- Keep lancing device and lancets clean.
- Use caution when removing the used lancet from the device and when disposing the used lancet.
The meter and lancing device are for single patient use.
Do NOT share them with anyone including family members.Do NOT use on multiple patients.
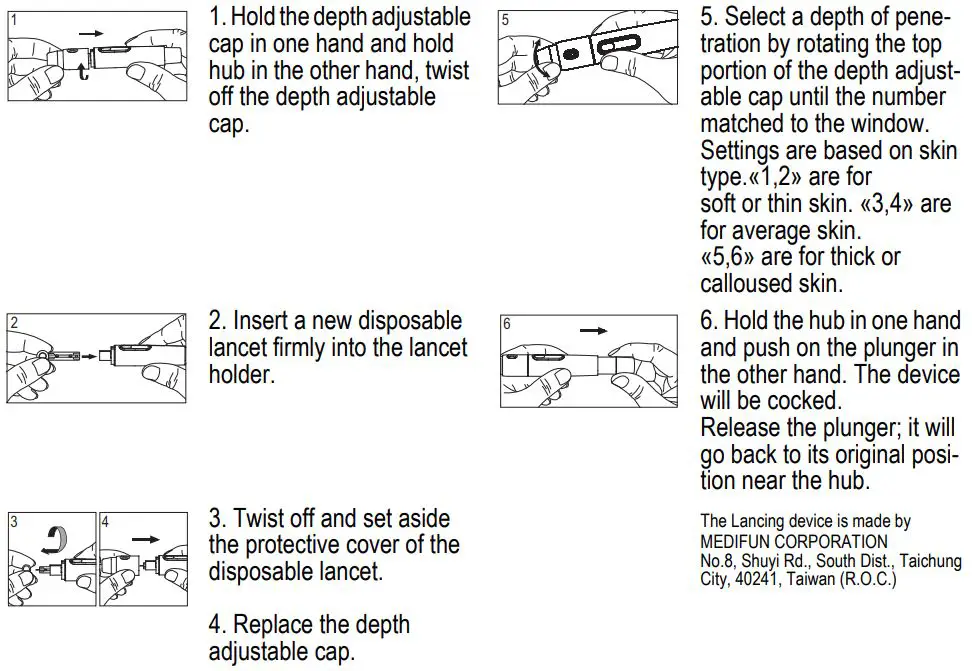
Setting your Lancing Device
4. Performing a Blood Test
5. Alternative Site Testing (AST)
 There are important limitations for doing AST. Please consult your healthcare professional before you perform AST.
What is AST?Alternative Site Testing (AST) means you can use parts of the body other than your fingertips to check your blood glucose levels. The system allows you to test from the palm, forearm, upper arm, calf or thigh, with equivalent results to fingertip testing.
What is the advantage?Fingertips feel pain more readily because they are full of nerve endings (receptors). At other body sites, nerve endings are not so numerous and you will not feel as much pain as you will experience at the fingertip.
When to use AST?Food, medication, illness, stress and exercise can affect blood glucose levels. Capillary blood at fingertip reflects these changes faster than capillary blood at other sites. Therefore, if you are testing blood glucose level during or immediately after meal, physical exercise or stressful event, take the blood sample from your fingertip only.
Use AST only:
- In a pre-meal or fasting state (more than 2 hours since the last meal).
- Two hours or more after taking insulin.
- Two hours or more after exercise.
- During steady state blood glucose conditions.
Do NOT use AST if:
- You have reason to believe you have hypoglycemia or hyperglycemia.
- Your routine glucose results are often fluctuating.
- The test result is to be used to calibrate continuous glucose monitors (CGMs).
- The test result is to be used for insulin dose calculations.
How to increase the blood volume?Increase the blood flow by rubbing the puncture site for more than 20 seconds before extracting blood. This helps to reduce the risk of insufficient blood sample for a blood glucose test.
6. Control Solution Testing
If your Microlite control solution did not come with Microlite Control Solution instructions, the following information shall take the place of the instructions.
Microlite Control Solution contains a known amount of glucose that reacts with Microlite GlucoTeq Blood Glucose Test Strips. By testing your control solution and comparing the test results with the expected range printed on the test strip vial label, you can make sure that the meter and the test strips are working properly together as a system and that you are performing the test correctly. It is very important that you do this simple check routinely to make sure you get accurate results.The standard GlucoTeq Blood Glucose Monitoring System DOES NOT contain the control solution. To purchase Microlite Control Solution, please contact your local distributor.
Important Information:
- Use only Microlite Control Solution with your Microlite GlucoTeq meter.
- Check the expiration date on the bottle. Do not use if expired.
- Use within a period of 90 days from the date that you first open it. Record the discard date on the control solution bottle when you first open it to serve as a reminder to discard after 90 days.
- The control solution ranges are printed on the label of the Microlite Blood Glucose Test Strip vial. They are not recommended target ranges for your blood glucose.
- For in vitro diagnostic use.
- Do not add any liquid to the Microlite Control Solution.
- Do not take internally or inject.Why Perform a Control Solution Test:
- To ensure that your meter and test strips are working properly together.
- To allow you to practice testing without using your own blood.When to Use:
- Whenever you suspect that the meter or test strips are not working properly.
- When your blood glucose test results are not consistent with how you feel, or when you think your results are not accurate.
- When test strips have been exposed to extreme environmental conditions.
- If you drop the meter.Performing a Control Solution TestStart with the meter off.
STEP 1: Wash your Hands.Wash your hands with mild soap and water before performing any test. Be sure to dry them thoroughly.
STEP 2: Insert Test StripInsert a test strip with the contact bar end entering into the test strip slot first. Push the test strip as far as it will go without bending it. The meter turns on automatically.
7. Memory Recall
The Microlite GlucoTeq meter stores a maximum of the 500 most recent blood glucose test results with date and time in its memory. It also provides you with 7, 14, 28, 60 and 90-day averages of your blood glucose test results. You can review the individual or average test results by entering the memory mode
Recall the memory

8. Caring For Your Meter And Test Strip
To avoid the meter and test strips getting dirt, dust or other contaminants, please wash and dry your hands thoroughly before use.CleaningYour meter does not require special maintenance. As long as no blood or control solution comes in direct contact with the meter, there is no special cleaning required. To clean the meter exterior, wipe with a cloth moistened with tap water or a mild cleaning agent, then dry the device with a soft and dry cloth. Do not flush with water.Do not use organic solvents to clean the meter. Your meter is a precision instrument. Please handle it with care.
Storage1. Meter Storage
- Storage condition: -20 °C~50 °C (-4 °F~122 °F), below 90 % relative humidity.
- Avoid dropping and strong impact.
- Avoid direct sunlight and humidity.
2. Strip Storage
- Storage condition: 4 °C~40 °C (39 °F~104 °F), and 10~85 % relative humidity. Do not freeze.
- Store your test strips in their original vial only. Do not transfer to other container.
- Store test strip packages in a cool and dry place. Keep away from direct sunlight and heat.
- After removing a test strip from the vial, immediately replace the vial cap and close it tightly.
- You may touch the test strip anywhere with clean, dry hands when removing it from the vial or inserting it into the meter.
- Use each test strip immediately after removing it from the vial.
- Do not bend, cut, or alter a test strip in any way.
- Keep the strip vial away from children since the cap and the test strip can be a potential choking hazard. If swallowed, please seek medical assistance immediately.
3. Control solution storage
- Storage condition: Store the control solution tightly closed at temperatures between 4 °C (39 °F) and 30 °C (86 °F). Do not freeze.
9. Technical Specifications
10.System Troubleshooting
Special messages and error messages help to identify certain problems but do not appear in all cases when a problem has occurred. Improper use may cause an inaccurate result without producing an error message.
In the event of a problem, refer to the information under «Actions» in the «Error Messages» section. If you continue to have a problem, please refer to the «Troubleshooting Guide» section. If you follow the actions recommended but the problem is not resolved, please contact your local distributor for assistance.
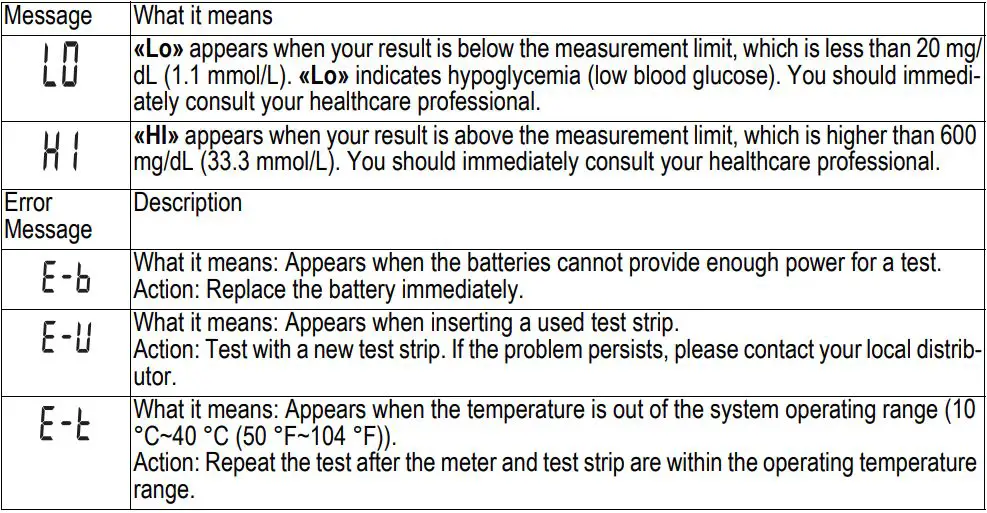
Only the most common error messages are listed. If your meter displays an error message that is not listed, please contact your local distributor.
Troubleshooting Guide▶ The meter does not display a message after inserting a test strip

11.Performance Characteristics
PrecisionStandard deviation (SD) for each glucose concentration < 100 mg/ld. (5.55 mold/L) and coefficient of variation (CV) for each glucose concentration ≥ 100 mg/ld. (5.55 mold/L) is ≤ 5.0 mg/ld. (0.278 mold/L) and ≤ 5.0%, respectively.
Intermediate precision
Repeatability
System Accuracy
The Microlite GlucoTeq Blood Glucose Monitoring System meets the requirements for System Accuracy as stated in ISO 15197:2013.
User PerformanceA study evaluating glucose values from fingertip, palm, forearm, upper arm, calf, and thigh capillary blood samples obtained by 100 lay persons showed the following results: 100% within ± 15 mg/dL (± 0.83 mmol/L) of the medical laboratory values at glucose concentrations below 100 mg/dL (5.55 mmol/L), and ≥ 95% within ±15% of the medical laboratory values at glucose concentrations at or above 100 mg/dL (5.55 mmol/L)
12.Guarantee
This device is covered by a 5 year guarantee from the date of purchase. During this guarantee period, at our discretion, Microlife will repair or replace the defective product free of charge. The above warranty will be valid when following conditions are completed:
- The complete device is returned to authorized after-sale center.
- The original purchase invoice is returned with the returned device.
The following shall be excluded from or not covered by the warranty:
- Accessories (lancing device, pouch) and consumables (batteries, test strips, lancets).
- Parts that are subjected to wear and tear, including without limitation to LCD screen, flip cover, etc.).
- Packaging materials and wearing parts.
- Regular check and maintenance (calibration).
- Damage caused by incorrect application or non-compliance with the instructions for use (including but not limited to improper storage).
- Damage caused by accident or negligence (including but not limited to battery leakage).
- Damage cause by force majeure.
- The device has been unauthorized modified, altered or disassembled.
- The serial number on meter is removed/ made illegible or tampered.
EXCEPT AS THE ABOVE LIMITED WARRANTY, NO OTHER WARRANTIES, EXPRESS OR IMPLIED, ARE MADE. THE INDEMNITY OR COMPENSATION ARISING OUT OF OR IN CONNECTION WITH THE WARRANTY SHALL BE ONLY LIMITED TO THE VALUE OF THE DEVICE.These terms shall be without prejudice to the rights of the consumer in accordance with applicable national law.
NOTE: Should guarantee service be required, please contact the dealer from where the product was purchased, or your local Microlife service. You may contact your local Microlife service through our website: www.microlife.com/supportRepair or replacement will not prolong or renew the original warranty period of the device.
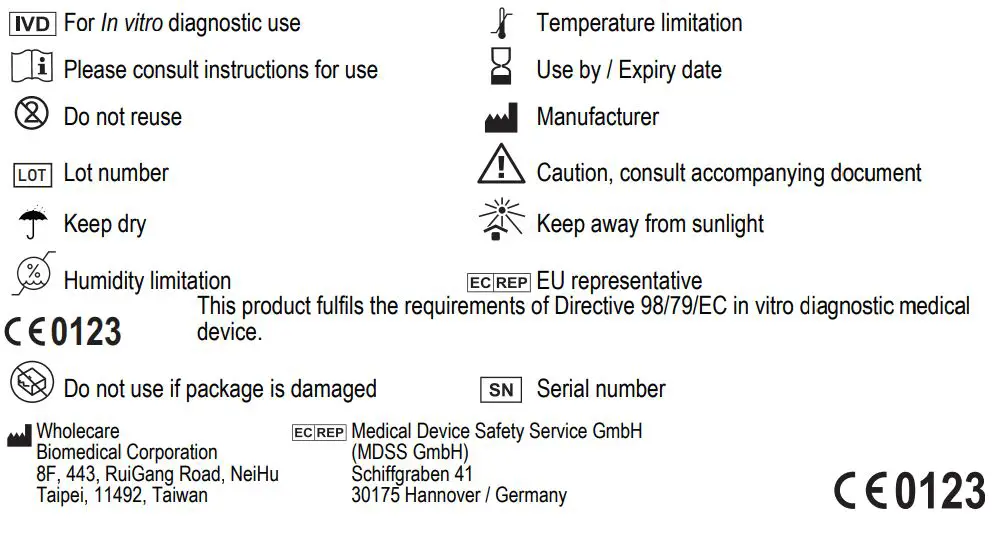
Explanation of Symbols
References
[xyz-ips snippet=”download-snippet”]