 Cube 60G ac (CubeG-5ac60ad)It is the customer’s responsibility to follow local country regulations, including operation within legal frequency channels, output power, cabling requirements, and Dynamic Frequency Selection (DFS) requirements. All Mikrotik radio devices must be professionally installed. Note. The information contained here is subject to change. Please visit the product page on www.mikrotik.com for the most up to date version of this document.
Quickstart
- Connect the device to the included PoE injector with Ethernet cable;
- Connect the PoE injector into the PC or to the network switch;
- Connect the power adapter to the PoE injector;
- Download WinBox configuration tool https://mt.lv/winbox;
- Open WinBox and connect to the device;
- Default IP: 192.168.88.1, user name: admin and there is no password;
- Download the latest RouterOS software from https://mikrotik.com/download;
- Choose ARM packages, and save them to your PC;
- Open WinBox and upload downloaded packages, drag and drop into any windows;
- Restart the device;
- Connect again and select your Region in the Wireless menu, W60G tab, and in QuickSet menu set your Country, to apply country regulation settings.If the device RX blocking condition has happened device will restore its signal after a few seconds.
MikroTik mobile app
Use the MikroTik smartphone app to configure your router in the field, or to apply the most basic initial settings for your MikroTik home access point. https://mikrotik.com/mobile_app
- Scan QR code and choose your preferred OS.
- Install and open the application.
- By default, the IP address and user name will be already entered.
- Click Connect to establish a connection to your device through a wireless network.
- Choose Quick setup and application will guide you through all basic configuration settings in a couple of easy steps.
- An advanced menu is available to fully configure all necessary settings.
Configuration
Once logged in, we recommend clicking the “Check for updates” button in the QuickSet menu, as updating your RouterOS software to the latest version ensures the best performance and stability. For wireless models, please make sure you have selected the country where the device will be used, to confirm with local regulations.RouterOS includes many configuration options in addition to what is described in this document. We suggest starting here to get yourself accustomed to the possibilities: https://mt.lv/help. In case an IP connection is not available, the Winbox tool (https://mt.lv/winbox) can be used to connect to the MAC address of the device from the LAN side (all access is blocked from the Internet port by default). For recovery purposes, it is possible to boot the device from the network (see Reset button). If the device loses connection, wait for few seconds and then the device will recover connection automatically.
Safety Warnings
Before you work on any equipment, be aware of the hazards involved with electrical circuitry, and be familiar with standard practices for preventing accidents.Read the installation instructions before connecting the system to the power source. This equipment is to be installed by trained and qualified personnel, as per these installation instructions. The installer is responsible for obtaining any required local or national safety inspections of the structural integrity of the installation by the local authority/inspection department. All installation methods for mounting an access point on any wall surface is subject to the acceptance of local jurisdiction.The Installation of the equipment must comply with local and national electrical codes. This unit is intended to be mounted outdoors on a pole. Please read the mounting instructions carefully before beginning installation. Failure to use the correct hardware and configuration or to follow the correct procedures could result in a hazardous situation to people and damage to the system. We cannot guarantee that no accidents or damage will occur due to the improper use of the device. Please use this product with care and operate at your own risk.
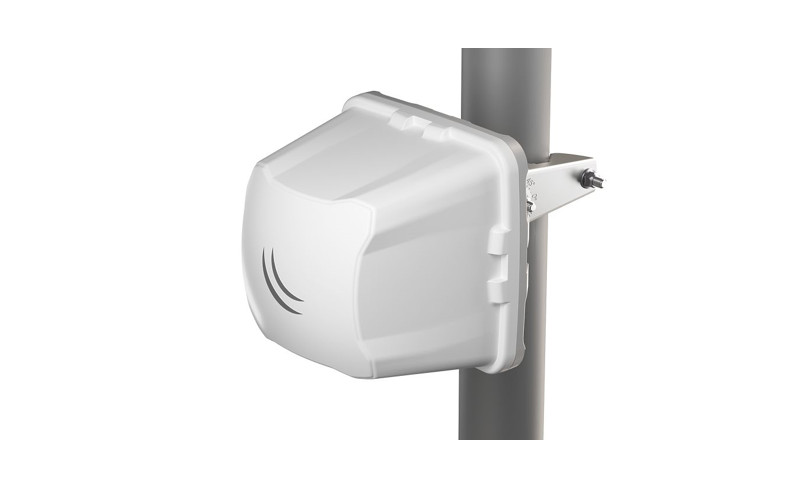
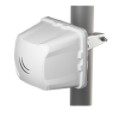
Assembly and mounting
The device can be mounted on the vertical or horizontal pole as shown in pictures A and B. Please note that a device needs to be mounted with the bottom latch facing down. The maximum pole diameter is 51 mm. Mounting and configuration of this device should be done by a certified person.Choose your desired position, the device will require precise adjustment for best performance.
- Attach provided mount to the back of the device with provided screws using a ph0 screwdriver.
- Mount on pole with U bolt bracket using 8 mm ratchet.
- Place a bolt in one of the three positions, they will allow for fine adjustment, when placed in the middle you can adjust in a 23-degree range if an adjustment needs to go further replace the screw in a different position.
 The IP rating scale for this device is IP54. When mounting outdoors, please ensure that any cable openings are directed downwards. We recommend using the POE injector and proper grounding with Cat6 shielded cable. When using and installing this device please pay attention to the Maximum Permissible Exposure (MPE) safety distance with a minimum of 20 cm between the radiator and your body. Alternatively, the device can be mounted on one of the three mounting slots on the backside of the device.• You can use a metal ring for example.• Use a Phillips screwdriver to loosen the metal ring.• Slide one end of it through the most convenient of the three mounting slots.• Position the device on the pole where it will be mounted.• Slide the loose end of the mounting ring back to its closing latch and use the screwdriver to tighten it.It’s recommended to secure Ethernet cable to the pole using zip ties. With the distance from the device approximately 30 cm.As an additional option, you can use “quickMOUNT-X” mounting bracket for an easy adjustment that can be obtained separately. Product web page: https://mikrotik.com/product/qm_xSpecially designed enables vertical and horizontal adjustment on the pole.
 The IP rating scale for this device is IP54. When mounting outdoors, please ensure that any cable openings are directed downwards. We recommend using the POE injector and proper grounding with Cat6 shielded cable. When using and installing this device please pay attention to the Maximum Permissible Exposure (MPE) safety distance with a minimum of 20 cm between the radiator and your body. Alternatively, the device can be mounted on one of the three mounting slots on the backside of the device.
 • You can use a metal ring for example.• Use a Phillips screwdriver to loosen the metal ring.• Slide one end of it through the most convenient of the three mounting slots.• Position the device on the pole where it will be mounted.• Slide the loose end of the mounting ring back to its closing latch and use the screwdriver to tighten it.It’s recommended to secure Ethernet cable to the pole using zip ties. With the distance from the device approximately 30 cm.As an additional option, you can use “quickMOUNT-X” mounting bracket for an easy adjustment that can be obtained separately. Product web page:
 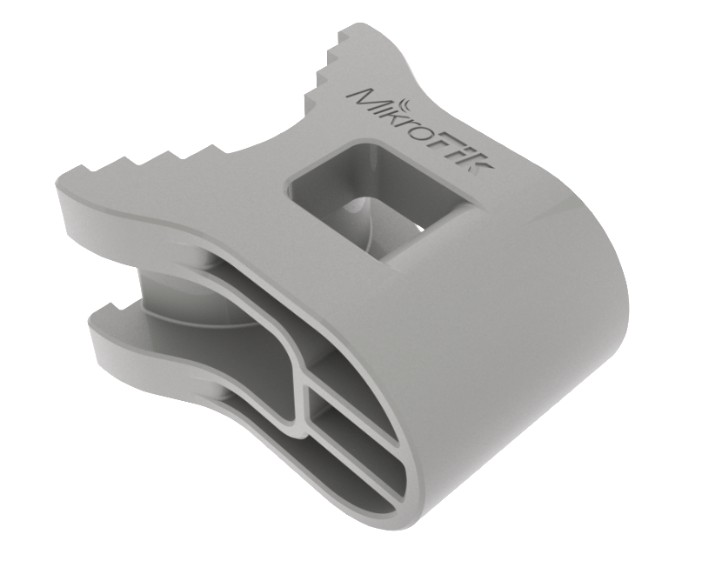 Specially designed enables vertical and horizontal adjustment on the pole.
Grounding
The device includes a grounding connection (marked ) which you should connect to the grounding installation of the tower or building where the device will be used. This is to substantially reduce the risk of ESD and lightning damage.
Powering
The device accepts DC power from Passive PoE injectors (one power supply and PoE injector are included) accepts 12-28 V DC consuming at maximum load 4 W. Connecting to a PoE Adapter:
- Connect the Ethernet cable from the device to the PoE+DATA port of the PoE adapter.
- Connect an Ethernet cable from your local network (LAN) to the PoE adapter.
- Connect the power cord to the adapter, and then plug the power cord into a power outlet.
Extension Slots and Ports
- 10/100 Ethernet port.
- Integrated 5 GHz 802.11a/n/ac interface with built-in antenna.
- WiGig chipset QCA6335.
The routerBOOT reset button has the following functions. Press the button and apply the power, then:
- Release the button when green LED starts flashing, to reset RouterOS configuration to defaults.
- Release the button when the LED turns solid green to clear all configuration and defaults.
- Release the button after LED is no longer lit (~20 seconds) to cause the device to look for Netinstall servers (required for reinstalling RouterOS over the network).Regardless of the above option used, the system will load the backup RouterBOOT loader if the button is pressed before power is applied to the device. Useful for RouterBOOT debugging and recovery.
Accessories
Package includes the following accessories that come with the device:
- EU/US Switching Power Supply 24V DC , 0.8 A, 9 W, Level VI, cable:1.5 m.
- POE Injector with shielded ethernet cable/connector (RBPOE).
- Cube mount.
- K-70 Fastening set for Cube mount.
Operating system support
The device supports RouterOS software version v6.47.2. The specific factory-installed version number is indicated in the RouterOS menu /system resource. Other operating systems have not been tested.
Notes
This device meets the Maximum TX power limit per ETSI regulations. The frequency and the maximum transmitted power in the EU are listed below: 57-66GHz: 34.92 dBm. An Operational mode in the 60 GHz band: 58.32 GHz, 60.48 GHz, 62.64 GHz, 64.80 GHz. This device is certified for outdoor use in Point to Multipoint applications. In the following countries this device cannot be used in Fixed Point-to-Point applications: Federal Communication Commission Interference StatementFCC ID: TV7CB5A60
![]() This equipment has been tested and found to comply with the limits for a Class A digital device, pursuant to Part 15 of the FCC Rules. These limits are designed to provide reasonable protection against harmful interference in a commercial installation.
This equipment has been tested and found to comply with the limits for a Class A digital device, pursuant to Part 15 of the FCC Rules. These limits are designed to provide reasonable protection against harmful interference in a commercial installation.
This equipment generates, uses, and can radiate radio frequency energy and, if not installed and used in accordance with the instruction manual, may cause harmful interference to radio communications. Operation of this equipment in a residential area is likely to cause harmful interference in which case the user will be required to correct the interference at his own expense.
FCC Caution: Any changes or modifications not expressly approved by the party responsible for compliance could void the user’s authority to operate this equipment.
This device complies with Part 15 of the FCC Rules. Operation is subject to the following two conditions: (1) This device may not cause harmful interference, and (2) this device must accept any interference received, including interference that may cause undesired operation.
This device is not to be operated on aircraft except for the conditions listed on FCC CFR §15.255 (b)
IMPORTANT NOTE:
FCC Radiation Exposure Statement:This equipment complies with FCC radiation exposure limits set forth for an uncontrolled environment.
This equipment should be installed and operated with a minimum distance of 21cm between the radiator & your body.
All cables used to connect peripherals must be shielded and grounded. Operation with cables connected to peripherals that are not shielded and grounded may result in interference to radio and television reception.
Innovation, Science and Economic Development CanadaIC: 7442A-CB5A60
This device contains license-exempt transmitter(s)/receiver(s) that comply with Innovation, Science, and Economic Development Canada’s license-exempt RSS(s). Operation is subject to the following two conditions: (1) This device may not cause interference. (2) This device must accept any interference, including interference that may cause undesired operation of the device.
This Class A digital apparatus complies with Canadian ICES-003.
Cet appareil numérique de la classe [A] est conforme à la norme NMB-003 du Canada.CAN ICES-003 (A) / NMB-003 (A)
This device is not to be operated on aircraft except for the conditions listed on ISED RSS-210 Annex J.1.
IMPORTANT NOTE:
IC Radiation Exposure Statement:
This equipment complies with IC RSS-102 radiation exposure limits set forth for an uncontrolled environment. This equipment should be installed and operated with a minimum distance 21cm between the radiator & your body.
CE Declaration of Conformity
Hereby, Mikrotīkls SIA declares that the radio equipment type CubeG-5ac60ad is in compliance with Directive 2014/53/EU. The full text of the EU declaration of conformity is available at the following internet address: https://mikrotik.com/products
WiGig
| Operational channels / Maximum output power | 58.32 GHz / <40 dBm |
| 60.48 GHz / <40 dBm | |
| 62.64 GHz / <40 dBm |
WLAN
| Operating Frequency / Maximum output power | 5470-5725 MHz / 27 dBm |
References
[xyz-ips snippet=”download-snippet”]