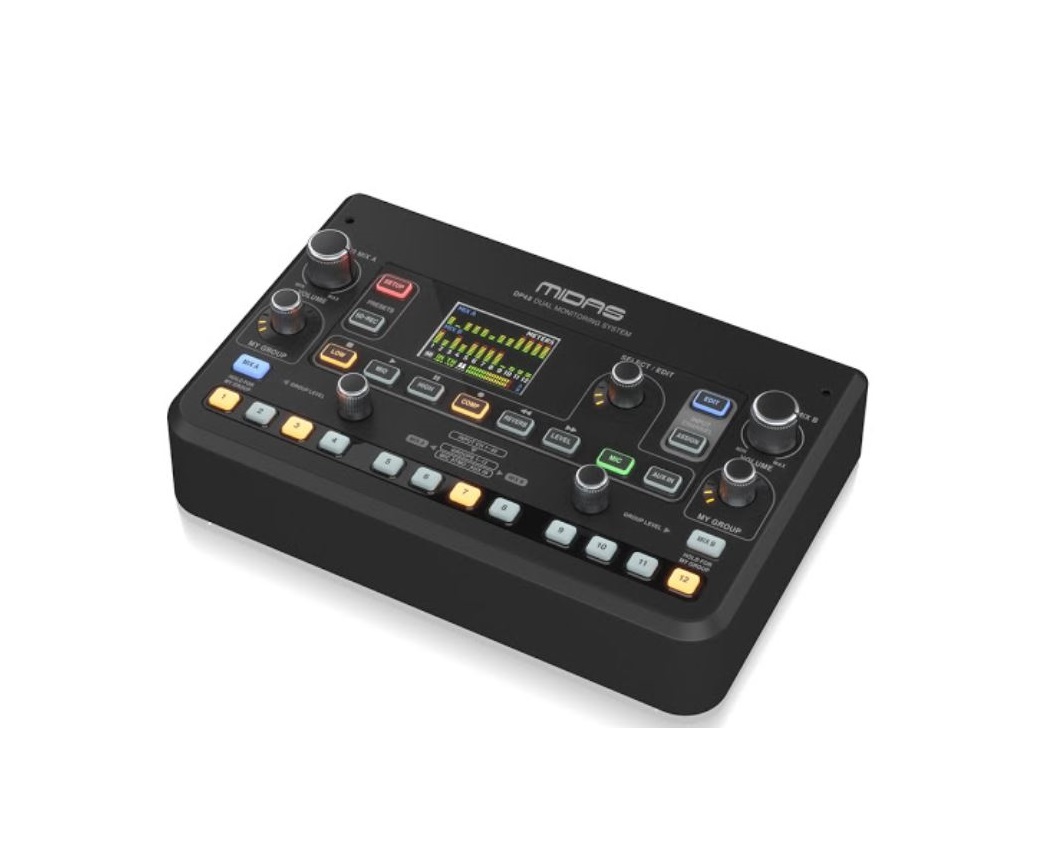
MIDAS Dual 48 Channel Personal Monitor Mixer with SD Card Recorder, Stereo Ambience Microphone Remote Powering

Important Safety Instructions
![]() Terminals marked with this symbol carry an electrical current of sufficient magnitude to constitute a risk of electric shock. Use only high-quality professional speaker cables with ¼” TS or twist-locking plugs pre-installed. All other installation or modification should be performed only by qualified personnel.
Terminals marked with this symbol carry an electrical current of sufficient magnitude to constitute a risk of electric shock. Use only high-quality professional speaker cables with ¼” TS or twist-locking plugs pre-installed. All other installation or modification should be performed only by qualified personnel.
![]() This symbol, wherever it appears, alerts you to the presence of uninsulated dangerous voltage inside the enclosure – voltage that may be sufficient to constitute a risk of shock.
This symbol, wherever it appears, alerts you to the presence of uninsulated dangerous voltage inside the enclosure – voltage that may be sufficient to constitute a risk of shock.
![]() This symbol, wherever it appears, alerts you to important operating and maintenance instructions in the accompanying literature. Please read the manual.
This symbol, wherever it appears, alerts you to important operating and maintenance instructions in the accompanying literature. Please read the manual.
![]() CautionTo reduce the risk of electric shock, do not remove the top cover (or the rear section). No user-serviceable parts inside. Refer servicing to qualified personnel.
CautionTo reduce the risk of electric shock, do not remove the top cover (or the rear section). No user-serviceable parts inside. Refer servicing to qualified personnel.
![]() CautionTo reduce the risk of fire or electric shock, do not expose this appliance to rain and moisture. The apparatus shall not be exposed to dripping or splashing liquids and no objects filled with liquids, such as vases, shall be placed on the apparatus.
CautionTo reduce the risk of fire or electric shock, do not expose this appliance to rain and moisture. The apparatus shall not be exposed to dripping or splashing liquids and no objects filled with liquids, such as vases, shall be placed on the apparatus.
![]() CautionThese service instructions are for use by qualified service personnel only. To reduce the risk of electric shock do not perform any servicing other than that contained in the operation instructions. Repairs have to be performed by qualified service personnel.
CautionThese service instructions are for use by qualified service personnel only. To reduce the risk of electric shock do not perform any servicing other than that contained in the operation instructions. Repairs have to be performed by qualified service personnel.
- Read these instructions.
- Keep these instructions.
- Heed all warnings.
- Follow all instructions.
- Do not use this apparatus near water.
- Clean only with a dry cloth.
- Do not block any ventilation openings. Install in accordance with the manufacturer’s instructions.
- Do not install near any heat sources such as radiators, heat registers, stoves, or other apparatus (including amplifiers) that produce heat.
- Do not defeat the safety purpose of the polarized or grounding-type plug. A polarized plug has two blades with one wider than the other. A grounding-type plug has two blades and a third grounding prong. The wide blade or the third prong are provided for your safety. If the provided plug does not fit into your outlet, consult an electrician for the replacement of the obsolete outlet.
- Protect the power cord from being walked on or pinched particularly at plugs, convenience receptacles, and the point where they exit from the apparatus.
- Use only attachments/accessories specified by the manufacturer.
 Use only with the cart, stand, tripod, bracket, or table specified by the manufacturer, or sold with the apparatus. When a cart is used, use caution when moving the cart/ apparatus combination to avoid injury from tip-over.
- Unplug this apparatus during lightning storms or when unused for long periods of time.
- Refer all servicing to qualified service personnel. Servicing is required when the apparatus has been damaged in any way, such as power supply cord or plug is damaged, liquid has been spilled or objects have fallen into the apparatus, the apparatus has been exposed to rain or moisture, does not operate normally, or has been dropped.
- The apparatus shall be connected to a MAINS socket outlet with a protective earthing connection.
- Where the MAINS plug or an appliance coupler is used as the disconnect device, the disconnect device shall remain readily operable.
- Correct disposal of this product: This symbol indicates that this product must not be disposed of with household waste, according to the WEEE Directive (2012/19/EU) and your national law. This product should be taken to a collection center licensed for the recycling of waste electrical and electronic equipment (EEE). The mishandling of this type of waste could have a possible negative impact on the environment and human health due to potentially hazardous substances that are generally associated with EEE. At the same time, your cooperation in the correct disposal of this product will contribute to the efficient use of natural resources. For more information about where you can take your waste equipment for recycling, please contact your local city office or your household waste collection service.
- Do not install in a confined space, such as a bookcase or similar unit.
- Do not place naked flame sources, such as lighted candles, on the apparatus.
- Please keep the environmental aspects of battery disposal in mind. Batteries must be disposed of at a battery collection point.
- Use this apparatus in tropical and/or moderate climates.
LEGAL DISCLAIMERMusic Tribe accepts no liability for any loss which may be suffered by any person who relies either wholly on or in part upon any description, photograph, or statement contained herein. Technical specifications, appearances, and other information are subject to change without notice.
All trademarks are the property of their respective owners. Midas, Klark Teknik, Lab Gruppen, Lake, Tannoy, Turbosound, TC Electronic, TC Helicon, Behringer, Bugera, Auratone, and Coolaudio are trademarks or registered trademarks of Music Tribe Global Brands Ltd. © Music Tribe Global Brands Ltd. 2019 All rights reserved.
LIMITED WARRANTYFor the applicable warranty terms and conditions and additional information regarding Music Tribe’s Limited Warranty, please see complete details online at musictribe.com/warranty.
Zhongshan Eurotec Electronics LimitedNo.10 Wanmei Road, South China Modern Chinese Medicine Park, Nanyang Town, 528451, Zhongshan City, Guangdong Province, ChinaInstrucciones de seguridad
1. Introduction
Welcome!Thank you for purchasing the DP48 Personal Monitor Mixer!
The DP48 unit is housed in a compact format suitable for mounting on microphone stands with the optional DP48MB mounting bracket system (sold separately).
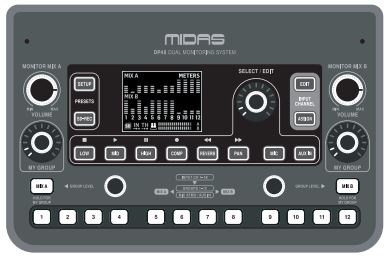
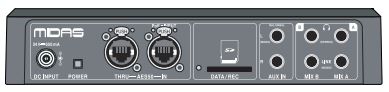
All user controls are laid out for ease of use on the top panel, while all primary connectors are on the DP48’s rear panel.
The DP48 Dual Monitoring Mixer uses a low-latency, floating-point audio engine to provide an excellent stage and IEM (In-Ear Monitoring) sound with independent mixes for one or two users. The mixer can be operated in two different modes: SINGLE (one mix for one musician, with dual MY GROUP knobs available) and DUAL (separate mixes for two musicians).
The DP48’s AES50 connection provides 48 individual input channels at 48 kHz/24-bit resolution that can freely be mixed into 12 stereo groups. All 12 stereo groups feature semi-parametric 3-band EQ, compression, and reverb send. Mixes A and B each have their own EQ processing and an adjustable brick wall limiter to prevent excessive levels on the phone’s outputs.
DP48 also includes an automatic configuration function to simplify Channel-to-Group assignments when setting up mixes. Now, instead of manually setting up your Groups from scratch, DP48 can automatically evaluate the AES50 datastream and assign to Groups 1-12 all channels that share specific common features, such as channel colors or channel names. This auto-configuration function thereby allows the engineer to easily distribute his mixed structure throughout the connected IEM (In-Ear Monitoring) world.
Features
- Dual 48 channel personal monitor mixer compatiblewith MIDAS personal monitoring system hubs
- 12 stereo groups enable the rapid creation and balancing of personal mixes from fully configurable stem groups
- The dual mix feature allows independent control of two complete monitor mixes
- Integrated SD card interface for stereo recording and playback of rehearsal sessions and performances
- Built-in stereo ambiance microphone provides on-stage sound feed to remove the sense of isolation with in-ear monitors
- Studio-quality reverb adds spatial ambiance to personal in-ear mixes, independent from the main console
- Remotely powered via direct AES50 connection from MIDAS hubs featuring Power over Ethernet (PoE)
- Separate DC power supply allows daisy-chaining of DP48 personal monitor mixers and uses without any PoE hub
- Compatible with any 44.1/48 kHz AES50-equipped devices including Midas and Behringer digital consoles and I/O boxes
- Midas PRO SERIES and M32 console input channel labeling and color information transmitted to DP48 personal monitor mixer via AES50 input channels
- AES50 return channels allow personal mixes to be sent back to the console or hub for connection to wireless IEM transmitters
- Remote operation up to 100 m via screened CAT5/5e cable
- Remote setup and control of DP48 personal monitor mixer via MIDAS hubs
- Full remote control of another DP48 when both connected to the same hub or used in a daisy chain configuration
- High-contrast 2.4″ color TFT display screen provides a clear overview of mixed parameters, meters, and group assignments
- Analog stereo auxiliary input for local click track
- High power headphone output for use in all stage monitoring environments
- A fully adjustable limiter allows for safe monitoring levels within sound exposure limits
- Mounts securely on a microphone stand with DP48MB adaptor (not included)
- 10-Year Warranty Program*
- Designed and engineered in the U.K.
*Warranty details can be found at musictribe.com/support
About this manualThis is the operation manual for the DP48 Personal Monitor Mixer. This manual is intended to help get your unit installed and in operation as quickly as possible by giving you unpacking, installation, connection, setting up, and operating instructions. To help familiarise you with the DP48, there is a description of the top and rear panels, along with easy-to-follow user instructions.
For additional informationFor an extra overview and summary of DP48’s signal flow and architecture, see the supplemental Block Diagram/ Operations Chart posted to the DP48 product page online at www.midas.com/p/P0BMX/Downloads.
2. Getting Started
UnpackingCarefully unpack your DP48 unit. Then, inspect the unit carefully for any signs of damage that may have occurred during transit and notify the courier immediately if you discover any.
Check the contents of your DP48 equipment package. If there are any parts missing, incorrect or faulty, please contact your local distributor or MIDAS support.
Inside this box, you should find the following items:
- DP48 personal mixer
- external power supply
- Quick Start Guide
Please retain the original packing in case you should need to return the equipment to the manufacturer or supplier, or transport or ship the unit later.
PowerThe DP48 unit can be powered remotely over the AES50 connection or by directly connecting the included external power supply.NOTE: When powering on, if the position of the MONITOR MIX A or MONITOR MIX B knob is higher than approx. 25% (9 o’clock), the device will remain locked, audio is muted, and the following indication will appear on the display:
This security mechanism protects your ears and saves your headphones from damage due to excessive-high volume. To unlock the device and reactivate audio, just turn both knobs fully counter-clockwise.
Connecting up
The DP48 unit uses the following leads and connectors:
AES50 Connections: Neutrik EtherCON with status indication
Primary Analogue Inputs: Aux Inputs Balanced ¼” TRS connectors
Primary Analogue Outputs: Phones Stereo dual ¼” TRS connectors
Mono Line Out Balanced ¼” TRS connectorsPower Connections:Remote power over AES50External DC power supply
3. Top and Rear Panels
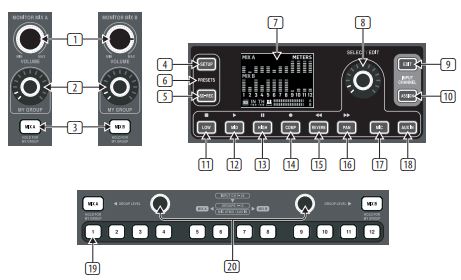
(1) VOLUME knob controls the overall output volume for the knob’s respective mix.
(2) MY GROUP knob can be assigned to one of the 12 Groups to permanently control that Group’s level on the respective MIX A/MIX B output
(3) MIX A/MIX B buttons allow you to select the mix’s processing, including EQ, Limiter, and Reverb return.
(4) SETUP button accesses the settings mixer modes, SD recorder, reverb type, AUX-IN input, ambiance mic, brightness, remote control, and other general preferences.
(5) SD-REC button opens the 2-track recording/playback operations when a FAT32 formatted SD card is present in the rear panel slot (see 24)
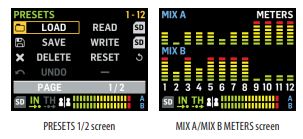
(6) PRESETS (SETUP and SD-REC pressed concurrently) allows you to store and load complete mix presets. You can import/ export mix presets on SD cards, or use one of the 12 internal memory slots. Use the RESET function to clear the 12 memory slots and re-establish the preferred factory status.
(7) DISPLAY shows data about the current mix, including parameters, channel levels, and channel groups.
(8) SELECT/EDIT push encoder allows you to select and adjust various parameters.
(9) EDIT button allows access to the Level and Pan adjustments for input signals assigned to the selected Group. The default setting for Level and Pan is 0 dB center. The selected Group will be soloed automatically while making adjustments in Edit Mode.
(10) ASSIGN button is used to assign channels to groups.NOTE: Please note the following:• the selected AES50 input channel will be soloed automatically to make channel assignments easier.• when either a MIX A/MIX B button OR any Group button is active, then the processing (i.e., EQ, Compressor, and Reverb) for that Group or mix can be adjusted.
(11) LOW ( ![]() ) button selects the bass equalization parameter for the currently-selected group, or for the selected Mix A or B. Make adjustments by rotating the SELECT/EDIT push encoder. The LOW (
) button selects the bass equalization parameter for the currently-selected group, or for the selected Mix A or B. Make adjustments by rotating the SELECT/EDIT push encoder. The LOW (![]() ) button also acts as a control for SD recording/playback.
) button also acts as a control for SD recording/playback.
(12)MID (![]() ) button selects the mid-range equalization parameter for the currently-selected group, or for the selected Mix A or B. Make adjustments by rotating the SELECT/EDIT push encoder. The MID(
) button selects the mid-range equalization parameter for the currently-selected group, or for the selected Mix A or B. Make adjustments by rotating the SELECT/EDIT push encoder. The MID(![]() ) button also acts as a control for SD recording/playback.
) button also acts as a control for SD recording/playback.

(13) HIGH ( ![]() ) button selects the treble equalization parameter for the currently-selected group, or for the selected Mix A or B. Make adjustments by rotating the SELECT/EDIT push encoder. The HIGH(
) button selects the treble equalization parameter for the currently-selected group, or for the selected Mix A or B. Make adjustments by rotating the SELECT/EDIT push encoder. The HIGH(![]() ) button also acts as a control for SD recording/playback.
) button also acts as a control for SD recording/playback.
(14) COMP(![]() ) button opens the Group COMPRESSOR or LIMITER windows, depending on the selected GROUPS 1-12 or MIX A/MIX B button:• when GROUPS 1-12 buttons are selected, you can adjust that Group’s compression settings• when MIX A or MIX B buttons are selected, you can adjust the peak limiting threshold for the selected mix. (NOTE: The limiter is always on.)The COMP( ) button also acts as a control for SD recording/playback.
) button opens the Group COMPRESSOR or LIMITER windows, depending on the selected GROUPS 1-12 or MIX A/MIX B button:• when GROUPS 1-12 buttons are selected, you can adjust that Group’s compression settings• when MIX A or MIX B buttons are selected, you can adjust the peak limiting threshold for the selected mix. (NOTE: The limiter is always on.)The COMP( ) button also acts as a control for SD recording/playback.
(15) REVERB(<<) button opens adjustment dialogs with these parameters:• Reverb sends level for the selected group• Reverb return level for the selected mixThe REVERB(<<) button also acts as a control for SD recording/playback.
(16) PAN (>>) button accesses panorama settings for the currently-selected Group, sent to MIX A and MIX B.The PAN (>>) button also acts as a control for SD recording/playback.
(17) MIC button selects the ambient mic audio for equalizer or mix level adjustment. Any of the illuminated neighboring buttons (LOW, MID, HIGH, or PAN) may be selected for editing.
(18) AUX IN button selects the auxiliary audio input for equalizer or mix level adjustment. Any of the illuminated neighboring buttons (LOW, MID, HIGHor PAN) may be selected for editing.
(19) GROUPS 1-12 buttons select Group audio for equalizer or mix level adjustment. Any of the illuminated buttons (LOW, MID, HIGH, COMP, REVERB, or PAN) may be selected for editing.
(20) GROUP LEVEL knobs allow direct level adjustment for any Group currently selected by the GROUPS 1-12 buttons, going to MIX A or MIX B.
(21) DC INPUT connects the included external power supply. Please use only MIDAS external power supplies.
(22) POWER button switches the unit on and off.
(23) AES50 THRU/IN EtherCON sockets provide a connection to digital consoles. The AES50 connection can pass audio and control data in both directions via shielded Cat-5e Ethernet cables. The AES50 IN socket also accepts remote PoE (Power over Ethernet) for adapter-free operation for the first DP48 connected over AES50. Each socket has a pair of red and green LEDs, which indicate the following:• Green pulsating and red extinguished = valid audio and valid control data; active link.• Green constantly illuminated and red extinguished = valid audio and valid control data; standby link.• Green extinguished and red illuminated = no clock sync available, no audio; link has failed.
(24) DATA/REC slot allows you to record a personal stereo mix directly to SD card media. Mixes recorded to an SD card can be played back to Mix A or Mix B directly (the playback Level is set in pg. 3/8 of the Setup menu).
(25) AUX IN inputs allow additional line-level stereo (L and R inputs) or mono (L input only) inputs to be routed into the mix using cables with ¼” TRS connectors (e.g., for inserting a local click track or metronome signal).
(26) PHONES A/B outputs send the active mix out for monitoring over headphones or other monitoring systems.
(27) MONO output jacks can be used to send out a line-level, balanced mono signal over cables with ¼” TRS connectors (e.g., for feeding a localstage monitor).
4. Operation
Controls and indicatorsFor any operation, the function buttons usable for that operation will illuminate with a white backlight to show the buttons are active. For example, the LOW/MID/HIGH equalizer or COMP (compressor) buttons will illuminate when either a GROUPS 1-12 or MIX A/MIX B button is pressed.
Any selection can be toggled on/off by pressing the button repeatedly. When a specific function button is not available, please consider switching other active functions off first.
In some menus, the REVERB(<<) and PAN(>>) buttons are used to navigate between pages.
Choosing a mixed-modeAs a first step, you should choose a mixed-mode to suit your needs. For example, are you sharing the same DP48 mixer with another musician, or will you be the only musician using the mixer?Each of the mix modes–SINGLE and DUAL–define what parameters are in common for both MIX A and MIX B:• SINGLE mode only uses MIX A, but this mode also allows you to assign the left and right MY GROUP knobs to different Groups for extra control on the fly. Use shortcut “MIX A” [“MIX B”] + any of the GROUPS 1-12 number buttons to assign the left [right] group to the MY GROUP knobs.• DUAL mode permits the same Groups to have different level and panorama settings for MIX A and MIX BNOTE: For both MIX A and MIX B, the underlying channel-to-Group configurations remain the same.
To choose a mixed-mode
- Press the SETUP button to access the SETUP screens.
- Select page 1/8 by rotating the SELECT/EDIT push encoder or pressing the REVERB(<<) and PAN(>>) buttons.
- Rotate the SELECT/EDIT push encoder to reach the first entry, MIXER MODE.
- Press the SELECT/EDIT push encoder to activate the parameter for adjustment.
- Rotate the SELECT EDIT push encoder to choose your desired mix mode.
Saving and managing mix presetsYou may save entire mix setting presets, including all Group and parameter assignments, to any of 12 internal storage slots. The storage slots will save presets even after the DP48 has been powered off.
To save a mixed preset
- Press the SETUP and SD-REC buttons together to access the PRESETS screen.
- Rotate the SELECT/EDIT push encoder to scroll to the SAVE option.
- Press the SELECT/EDIT push encoder. A prompt will appear that asks you to choose a storage slot in which to save your current mix preset.
- Press one of the GROUPS 1-12 buttons to choose a storage slot. For storage slots that already contain a saved mix preset, the matching GROUPS 1-12 button will be illuminated.
- If you select a slot that already contains a saved preset, a prompt will appear asking if you wish to overwrite the preset already in the storage slot.
- Use the SELECT/EDIT push encoder to choose the YES option if you wish to overwrite the storage slot.
- The system will take you back to the PRESETS page.
- Press either SETUP or SD-REC individually to exit back to the top-level MIX A/MIX B METERS screen.
To load a saved mix preset
- Press the SETUP and SD-REC buttons together to access the PRESETS screen.
- Rotate the SELECT/EDIT push encoder to scroll to the LOAD option.
- Press the SELECT/EDIT push encoder. A prompt will appear that asks you to choose a storage slot from which to load a mix preset.
- Press one of the GROUPS 1-12 buttons to choose a storage slot. For storage slots that already contain a saved mix preset, the matching GROUPS 1-12 button will be illuminated.
- The system will then automatically take you back to the PRESETS page.
- Press either SETUP or SD-REC individually to exit back to the top-level MIX A/MIX B METERS screen.
To reset mix parameters back to default settings
- Press the SETUP and SD-REC buttons together to access the PRESETS screen.
- Rotate the SELECT/EDIT push encoder to scroll to the RESET option.
- Press the SELECT/EDIT push encoder. A prompt will appear that asks you to confirm your decision to reset.
- Use the SELECT/EDIT push encoder to choose the YES option if you do indeed wish to reset and initialize.
- The system will then automatically take you back to the PRESETS page.
- Press either SETUP or SD-REC individually to exit back to the top-level MIX A/MIX B METERS screen.
NOTE: To control which parameters are protected from a Reset/Preset Load command, go to the PRESETS LOCK section on pg. 2/2 of the PRESETS screen to choose your lock preferences from the following options:

- LOCK ASSIGN (on/off) allows you to protect the input channel-to-Group assignments from any Reset or Preset Load actions
- LOCK A (on/off) protects the MIX A processing (without the Group levels) from any Reset or Preset Open/Load actions
- LOCK B (on/off) protects the MIX B processing (without the Group levels) from any Reset or Preset Load actions
- LOCK GROUPS (on/off) protects the Group processing settings (e.g., equalizer, limiter, aux including MIX levels) from any Reset or Preset Load actions.The RESET function will return DP48 to a default state, as follows:
- Internal Preset memory will not be cleared with Reset
- If any AES50 input signals are available to DP48, and you slowly turn up the VOLUME control, all AES50 signals should become audible immediately, without further configuration
- All 48 input channels are spread over the 12 Groups (i.e., 4 channels per Group)
- Default Group channel panning is centered
- Default Group member level setting is 0 dB individual level · Mix A and B
- all EQ 0 dB, Low=200Hz, Mid=2kHz, High= 6kHz
- Limiter -30 dB and Reverb Return off
- Mic centered at -10 dB, with +20dB switch on
- Aux In centered at -10 dB, with +12dB switch on
- HALL Reverb selected
- Remote functions off
- All Group default levels are set as follows:
- set to -10 dB level, center panning
- all EQ gain = 0 dB (Low = 200Hz, Mid = 2kHz, High = 6kHz)
- Compressor 0% and Reverb Sendoff
- All groups mixed to both Mix A and B
- MY GROUP is not assigned yet
Auto-Configuration of Channels and GroupsDP48’s “ASSIGN BY” macro features automatic mapping of incoming AES50 channels to Groups. This mapping can be done by using channel color and channel name information, as set up by the FOH or monitor engineer at the mixing board.NOTE: The SETUP/ASSIGN BY macros only map channels once, according to the AES50 channel colors/names at the time the function is launched. The function does NOT automatically update, so if the engineer subsequently changes his setup, you will need to re-launch the AutoConfig function to capture the new configuration to your DP48. You can also change the automatic mappings manually at any time if you are not satisfied with the results.To auto-configure the channel-group assignments, press the SETUP button and choose your preferred ASSIGN BY function on the SETUP screen: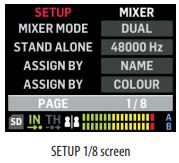
- ASSIGN BY NAME uses channel name information in the AES50 datastream to automatically map input channels to DP48Groups, including the following details:
- Confirm/cancel that channels will be assigned to Groups 1-12 by channel name
- Function clears all previous Group channel assignments
- Channels with specific leading characters such as – ` * ( ) ,. / [ ] < > will be mixed to their assigned Group with 0 dB level and panned to center · Input channels with different leading characters will not be assigned automatically
- Channels can later be re-assigned manually by pressing the ASSIGN button
- ASSIGN BY COLOUR uses channel color information in the AES50 datastream to automatically map input channels to DP48 Groups, including the following details:
- Confirm/cancel that channels will be assigned to Groups 1-12 by color
- Function clears all previous Group channel assignments
- Input channels colored WH (white) or BK (black) will not be assigned
- By default, channels will be mixed to their assigned Group with 0 dB level and panned to center
- Channels can later be re-assigned manually by pressing the ASSIGN button
- GROUP NAMES IMPORT is an alternative method that allows you to name all Groups by using an external word processor (e.g., Microsoft Word, Open Office Writer, or a simple text editor) or a spreadsheet/calculation program, such as Microsoft Excel or Open Office Calc.
- Example procedure using a text editor:1. Open the text editor and start a new empty document.2. Write the group names in one line, separated by “, ” or “; “.3. Save the file in .csv format to an SD Card.4. Insert this SD card in your DP48.5. Go to SETUP screen page 8/8.6. Select GRP NAMES.7. Select IMPORT.
- Example procedure using a spreadsheet/calculation program:
- Open the spreadsheet/calculation program, and start with an empty chart.
- Insert one group name per cell (from left to right).
- Save the file in .csv format to an SD Card.
- Now follow Steps 4-7 as described in the text editor procedure.
NOTES:
- Do NOT use special characters, such as umlauts/vowels (Ä, Ö, Ü).
- Case shift (large/small letters) is generally supported.
- Group names are limited to max. 7 characters (incl. blank spaces).

The SETUP 7/8 screen allows you to choose a preference for the channel group when a RESET is done. Default is “12 STEREO”.
- CLEAR ALL deletes all input channel assignments from all Groups.
- ULTRANET 12 automatically creates 12 mono Groups:
- Function clears all existing channel assignments from all Groups
- A function maps AES50 input channels 33-44 to Groups 1-12.
- ULTRANET 16 automatically creates 8 mono and 4 stereo Groups:
- Function clears all existing channel assignments from all Groups
- A function assigns AES50 channels as follows:
- Input channels 33-40 are assigned to Groups 1-8
- Input channels 41-48 are assigned as stereo pairs to Groups 9-12
- 12 STEREO automatically creates 12 stereo Groups from the first 24 AES50 channels:
- Function architecture assumes the FOH engineers will provide stereo stem groups for monitoring, rather thanindividual sources
- The function will work best with groups of instruments, such as drums, horns, strings, choir, keys, bass, guitars,and so on, that mainly need level adjustments by the musician using DP48
Configuring input Channels and GroupsTo access ASSIGN mode, first make sure the SETUP, SD-REC, MIX A, and MIX B buttons are not illuminated. In ASSIGN mode, the GROUP/CHANNEL ASSIGN screen will show the 48 available AES50 channels as a series of boxes with varying colors. The Group number and channel number will appear on the left side of the screen.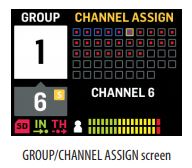 In the GROUP/CHANNEL ASSIGN screen, you can judge the assignment status of an individual channel by the following color cues:•Amber frame — channel is selected•Blue frame — channel is assigned to the currently-active Group•Flashing — an audio signal is present in the channel
To assign/unassign a channel to Group1. Press the INPUT CHANNEL/ASSIGN button to enter the GROUP/CHANNEL ASSIGN screen.2. Choose a Group by pressing one of the GROUPS 1-12 buttons along the lower edge of the DP48 top panel. Channels assigned to the currently selected Group will appear blue.NOTE: For easy channel identification, soloed audio from the selected AES50 channel will replace the MIX A/B audio.3. Rotate the SELECT/EDIT push encoder to scroll to the desired channel. When the desired channel is ready for selection, the channel’s box will change color from a gray to an amber frame.4. Press the SELECT/EDIT push encoder to assign/unassign the selected channel to the current Group. The selected channel’s box will change color to a blue fill with an amber frame to indicate the channel has successfully been assigned to the current Group.*The incoming AES50 data stream may also include channel name and color-coding information, depending on the AES50 source.
Setting the input channel levels and panoramaThe top-level MIX A/MIX B METERS screen only displays level settings for Groups.
Levels and panning for individual channels can only be adjusted and set individually within Groups. Once channel levels and panning are set within a Group, you can then balance levels and panning between entire Groups in the MIX A/MIX B METERS screen.
 To edit levels and panning within a Group
- Before editing channel levels and panning, make sure your overall Mix Volume and Group levels are loud enough that you can hear audio from the input channels.
- Press the INPUT CHANNEL/EDIT button to enter the INPUT CHANNEL screen.
- Choose a specific Group by pressing one of the GROUPS 1-12 buttons. The selected Group is automatically soloedand will replace the MIX A/MIX B audio.
- Channels assigned to the currently selected Group will appear as blue boxes. If no blue boxes are visible, then theThe selected Group is still empty.
- Use the REVERB(<<) and PAN(>>) buttons to select an input channel within the group. The selected channel will appear as an amber box with a blue fill.
- Rotate the SELECT/EDIT push encoder to adjust the currently-active Level or Pan parameter. Push the encoder to select between LEVEL and PAN.
- Repeat steps 5-6 until the mix for Members in this Group is set, then consider moving on by pressing another Group button.
- When done, pressing the EDIT button again will bring you back to the selected Group processing page, and Group Solo will be switched off automatically.
- You can then take the following actions:• adjust that Group’s mix level in relation to the other Groups by turning the respective GROUP LEVEL control• make adjustments to that Group’s processing, i.e., Compressor, Reverb Send, or Equaliser.• press that Group’s button again to go back to the metering overview (idle) screen
To set Group levels in your final mix
To begin creating your final mix, you will be directly setting levels for entire Groups of channels by using the GROUP LEVEL knob.
- Select a Group for level set by pressing one of the GROUPS 1-12 buttons. The system will take you to that Group’s GROUP/LEVEL screen.
- Rotate the GROUP LEVEL knob to adjust the Group’s overall level by .5 dB increments. The left GROUP LEVEL knob will control LEVEL A going to MIX A, while the right GROUP LEVEL knob controls LEVEL B for MIX B.
- Select another Group for level adjustment by pressing one of the GROUPS 1-12 buttons.
- Repeat steps 1-3 until satisfactory levels have been set for all Groups.
- To exit, de-select the currently active Group by pressing that Group’s GROUPS 1-12 button.
NOTE: At any time, you may adjust a Group’s level by selecting that Group’s GROUPS 1-12 button and then rotating the GROUP LEVEL knob for the currently active mix.
To set Group panning in your final mixIf necessary, entire Groups can be shifted together in the stereo field. Most of the time you will be setting up stereo panning when you first configure your AES50 channels into Groups, but when needed you can shift the entire Group’s overall panning at once.
- Select a Group for panning adjustment by pressing the GROUPS 1-12 button.
- Press the SELECT/EDIT push encoder to toggle between PAN A and PAN B (sent to MIX A and MIX B).
- Rotate the SELECT/EDIT push encoder until the Group’s overall left-to-right panning is in the desired spot.
- Repeat steps 1-3 until panning for all Groups has been set.
- To exit, de-select the currently active Group by pressing that Group’s GROUPS 1-12 button.
Assigning one of the 12 Groups to the MY GROUP knobUse the MY GROUP knob to make quick adjustments to your personal Group level versus the rest of the mix. The MY GROUP knob is available at all times for your personal level adjustments, no matter what operation menu is active in the display.
Your personal Group assigned to the MY GROUP knob may contain a single channel (e.g., vocals or guitar only) or several channels (e.g., vocals and guitar together, with levels balanced internally within the Group).
NOTE: Each MY GROUP knob can only be assigned ONE Group at any given time.
To assign a Group to the MY GROUP knob
- Press and hold the MIX A or MIX B button.
- Press the GROUPS 1-12 button of the Group you wish to assign to the MY GROUP knob. The screen will show the active MIX (A or B) in the big blue field, while the lower corner of the blue field will show the Group number assigned to the MY GROUP knob.
- Rotate the MY GROUP knob to adjust the Group’s LEVEL indicated by the LED ring around the MY GROUP knob.
- To see the LEVEL change expressed in dB values, press the assigned Group’s GROUPS 1-12 button. Then, when you turn the assigned MY GROUP knob, you will see the dB value changing for LEVEL A (MIX A) / LEVEL B (MIX B).NOTE: If a Group is not assigned to MIX A/B, the LEVEL A/B will not change by turning one of the MY GROUP knobs.
- Press the Group’s illuminated GROUPS 1-12 button or the illuminated MIX A/B button (from Step 1 above), to exit back to the top-level MIX A/MIX B METERS screen.
- You may now use the MY GROUP knob to make immediate adjustments to your personal Group’s mix level without having to access any additional screens.
- To assign a different Group to MIX A or MIX B, repeat steps 1-2 and press a different GROUPS 1-12 button. To un-assign, the currently assigned Group from an MY GROUP knob, repeat steps 1-2 and press the GROUPS 1-12 button for the currently assigned Group. Now, the white field showing the Group number in the bottom corner will disappear from the big blue MIX A (or MIX B) field.NOTE: The first time you rotate the un-assigned MY GROUP knob, the system will launch a prompt window telling you how to assign a Group to the knob. Once you have assigned a Group to the MY GROUP knob, the automated prompt will no longer appear unless you later un-assign the Group without assigning another Group.
Adding EQ and reverb to your final mixTo add EQ and reverb to your final mix, follow these steps:
- Press the MIX A/MIX B button to enter the MIX screen.
- Press the LOW/MID/HIGH buttons to access the equalizer settings. Control buttons for LOW, MID, HIGH, COMP andREVERB will illuminate.
- Rotate the SELECT/EDIT push encoder to raise or lower the level of the selected frequency band.
- Press and rotate the SELECT/EDIT push encoder to adjust the selected frequency band’s cutoff (shelving) or centerpoint (parametric). The composite equalization curve created by your adjustments will appear at the top of the screen.
- Press the REVERB button to access the REVERB level settings.
- Rotate the SELECT/EDIT push encoder to raise the REVERB level to your desired setting.
- When you are done, press the MIX A/MIX B button to exit.NOTE: To change the reverb type, press SETUP and go to page 4/8 of the SETUP menu to choose between AMBIENCE, CLUB, HALL, or CATHEDRAL reverb programs.
Protect your hearing (setting Volume and Limiter)The Limiter comes AFTER the final VOLUME control in the signal chain, so the specific Limiter threshold you choose will depend on how loud you set the final mix Volume.
For best results, we recommend you set your final MIX A/MIX B Volume first and then bring down the Limiter threshold to place a hard cap over the output that can contain any volume spikes and surges.
To prevent hearing fatigue or damage, consider setting the Limiter threshold as low as possible. With the right threshold setting, you will have a safe upper limit you cannot exceed no matter what happens in the heat of the performance.
To set the final VOLUME and LIMITER parameters, play some audio through your headset and follow these steps:
- Press the MIX A/MIX B button to enter the MIX screen. Control buttons for LOW, MID, HIGH, COMP, and REVERB will illuminate.
- Slowly turn up the VOLUME to the maximum level you will need for your headset.
- Press the COMP button to access the LIMITER threshold for adjustment.
- Rotate the SELECT/EDIT push encoder to lower the LIMITER threshold downward to your desired setting. We recommend you lower the threshold until the “L” indicator on the screen begins to light, which shows that the LIMITER is beginning to react to volume peaks in the signal.
- When you are done, press the MIX A/MIX B button to exit.
SOLO modeTo help with identification, DP48 will automatically solo the audio for specific functions and under specific conditions, such as the following:
- ASSIGN—While assigning input channels to a Group, the selected input channel will be soloed for easy identification. When you exit ASSIGN, the channel solo will be deactivated automatically.
- EDIT—While editing the Group mix of the assigned input channels, the selected Group will be soloed automatically. When you exit EDIT, the Group solo will be deactivated automatically.
- Group Processing—If you wish to listen to a Group solo, e.g., to adjust that Group’s processing, just press and hold the respective GROUPS 1-12, MIC, or AUX IN buttons. That button’s LED will begin flashing, and the Group display will show a yellow “S” above the group number.
Solo Mode will also behave in the following ways:
- When you switch to a different Group or select the MIC or AUX IN buttons while in Solo Mode, the solo will follow your selection to the newly-selected Group or input.
- When you de-select the soloed Group or press any other button, such as MIX A/MIX B or SETUP, the solo is switched off automatically.
- You can also press and hold the soloed Group button again to switch off the solo.
Specifications

Other important information
Important information
1. Register online.Please register your new Music Tribe equipment right after you purchase it by visiting midasconsoles.com. Registering your purchase using our simple online form helps us to process your repair claims more quickly and efficiently. Also, read the terms and conditions of our warranty, if applicable.
2. Malfunction.Should your Music Tribe Authorized Reseller not be located in your vicinity, you may contact the Music Tribe Authorized Fulfiller for your country listed under “Support” at midasconsoles.com. Should your country not be listed, please check if your problem can be dealt with by our “Online Support” which may also be found under “Support” at midasconsoles.com. Alternatively, please submit an online warranty claim at midasconsoles.com BEFORE returning the product.
3. Power Connections.Before plugging the unit into a power socket, please make sure you are using the correct mains voltage for your particular model. Faulty fuses must be replaced with fuses of the same type and rating without exception.
FEDERAL COMMUNICATIONSCOMMISSION COMPLIANCEINFORMATIONSUPPLIER’S DECLARATION OFCONFORMITY (SDoC)
![]()
Midas DP48
Responsible Party Name: Music Tribe Commercial NV Inc.Address: 5270 Procyon Street Las Vegas, NV 89118 USAPhone Number: +1 702 800 8290
DP48complies with the FCC rules as mentioned in the following paragraph:This equipment has been tested and found to comply with the limits for a Class A digital device, pursuant to part 15 of the FCC Rules. These limits are designed to provide reasonable protection against harmful interference when the equipment is operated in a commercial environment. This equipment generates, uses, and can radiate radio frequency energy and, if not installed and used in accordance with the instruction manual, may cause harmful interference to radio communications. Operation of this equipment in a residential area is likely to cause harmful interference in which case the user will be required to correct the interference at his own expense.This equipment complies with Part 15 of the FCC Rules. Operation is subject to the following two conditions:(1) this device may not cause harmful interference, and(2) this device must accept any interference received, including interference that may cause undesired operation.
Caution!Any changes or modifications not expressly approved by the party responsible for compliance could void the user’s authority to operate the equipment.
Warning: Operation of this equipment in a residential environment could cause radio interference.
References
[xyz-ips snippet=”download-snippet”]