![]() Hitron CODA-4582 Wireless ModemModemSelf-Install Guide
Hitron CODA-4582 Wireless ModemModemSelf-Install Guide
Use this guide for easy steps to get online.Prefer to follow along on your mobile device?Go to Midco.com/Setup.MODEM SELF-INSTALL GUIDE
Let’s Get You Connected
Plug-In Your Modem
![]()
- Find the best location for your modem. It’s best to place it in a central spot in your home, off the floor, and near an active cable outlet. (Some cable outlets in your home may not be active.)
 Tip: If you’re installing your modem in a hard-to-access spot, take a picture of the white label on the back of the modem, so you can easily reference the default Wi-Fi network and password later.
 - Connect the coax cable from the wall outlet to the connection on your modem.
- Plug your modem into a power outlet.Make sure all connections are finger-tight.
Wait for the Light

Wait up to 15 minutes for the Online light (shown here) to appear steady green.
Online light isn’t on or still flashing after 15 minutes?
Here are a couple of quick things to check:
- Make sure you’re using the coax cable we shipped to you and that the connections are finger-tight.
- Confirm that the green power light on your modem is on. If not, try a different power outlet.
Still not working? Go to page 6 for troubleshooting steps.
What’s next?
Set Up Your Wi-Fi NetworkOn the back of your modem, fi nd these settings for your own equipment.A. Default Wi-Fi network (This is your network name.)B. Default key (This is your password.)Alternatively, use your mobile phone’s camera to scan the QR code C. on the back of the modem to get your default network details. (Not all mobile devices support QR codes.)
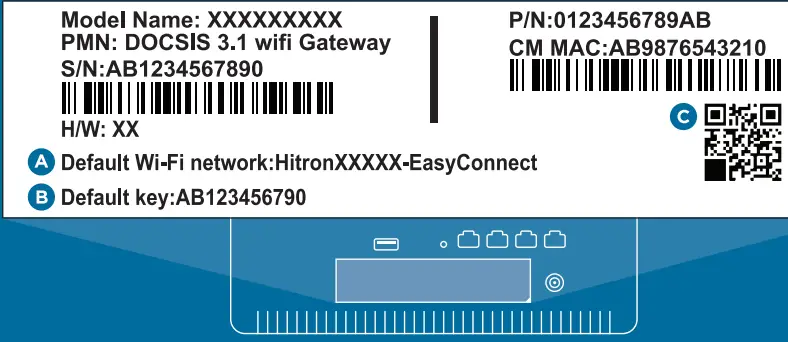
This example is not your modem’s default network name, password or QR code.
Connect Your Devices
With one device (such a smartphone), connect to the default network using your device’s Wi-Fi settings. This will launch Easy Connect to guide you through setting up your personal Wi-Fi network. (If Easy Connect doesn’t launch, enter 192.168.0.1 into your browser.)Once you’ve arrived at Easy Connect, choose LET’S GO, and follow the on-screen steps. When you save your new Wi-Fi network details, the modem will automatically disconnect from the default network.Go to your device’s Wi-Fi settings. Follow the steps to connect to Wi-Fi. (Make sure you’re not using your mobile data.) Open a website to make sure it loads. Then, get more devices on Wi-Fi.![]() Tip: For the first device you connect with Easy Connect, use the modem’s default network and key. After setting up your new customers and secure network with Easy Connect, use the new Wi-Fi name and password for additional devices.
Tip: For the first device you connect with Easy Connect, use the modem’s default network and key. After setting up your new customers and secure network with Easy Connect, use the new Wi-Fi name and password for additional devices.
iPhone and iPad
- Go to the Settings app, and then tap Wi-Fi.
- Confirm Wi-Fi is set to on. When Wi-Fi is enabled, you’ll see a list of available Wi-Fi networks.
- Tap your Wi-Fi network name.
- Enter your Wi-Fi password.Tap Join.
You’ll know you’re connected when there’s a checkmark next to your Wi-Fi network name and a Wi-Fi symbol at the top of your screen.Windows Computer
- Click the wireless network icon (near the clock on your screen).
- Select your Wi-Fi network name. Click Connect.
- Enter your Wi-Fi password.Click Next or OK to confirm your password.
You’ll know you’re connected when you hover over the wireless network icon, and it shows Connected.
Android Devices
- Tap the Apps icon.
- Tap Settings, and then select Wi-Fi.
- Tap your Wi-Fi network name.
- Enter your Wi-Fi password.Tap Connect.
You’ll know you’re connected when your Wi-Fi network name shows Connected.Apple Computer
- Click the wireless icon. Confirm Wi-Fi is set to on.
- Select your Wi-Fi network name.
- Enter your Wi-Fi password.Click OK.
You’ll know you’re connected when the Airport list displays a checkmark next to your Wi-Fi network name and there’s a Wi-Fi symbol at the top of your screen.
Have a different device?Visit Midco.com/WiFiSupport for instructions. If you want a wired connection, plug the Ethernet cord into your modem and the device (such as a gaming system or desktop computer). You’re good to go if you’ve completed Easy Connect already!
You’re all set!
If you’re having trouble, go to the next page for help.
Troubleshooting
What are the lights on the front of your modem showing?
The down arrow is blinking, and the up arrow isn’t lit.
STEP 1Try a different cable outlet.Not all cable outlets are active. The easiest thing to do is move your modem to another location and plug the coax into a different outlet.STEP 2Wait 10 minutes to see if it connects.If the lights turn solid blue, go to the Set Up Your Wi-Fi steps on page 4. If you’ve tried multiple outlets and still can’t connect, call support at 1.800.888.1300 or text 64326.
Both the arrow lights are blinking in unison.
STEP 1: MODEM UPDATEWait for your modem to update.Like all hardware, your modem sometimes needs an update (even if it’s new). This can take up to 60 minutes, so feel free to check back in a bit.When the update is done, both lights will show solid blue.If the two lights are still blinking after 60 minutes, reboot your modem. Unplug it from power, wait 30 seconds, and plug it back in. Then, give it up to 60 minutes for a completereboot and update.When the lights show solid blue, it’s complete and time for you to go to the Set Up Your Wi-Fi Network steps on page 4.STEP 2 (IF YOU’RE STILL HAVING ISSUES)
Perform a factory reset.
Reset button
If you’ve tried everything else and those two lights are still blinking, then it’s time to try a factory reset.With your modem still powered on, press and hold the Reset button – found on the back of the modem – for 10 seconds. (The button is near the Ethernet ports, and you need a pen or paper clip to push it.) Once lights are solid blue, go to the Set Up Your Wi-Fi Network steps on page 4.If this doesn’t work, please call support at 1.800.888.1300 or text 64326.
What do all these lights mean?
|
GreenThe modem is running with AC power. | OffThe modem is not powered. |
|
Green-BlinkingThe modem is searching for the downstream frequency.Green-SteadyDownstream frequency is locked (one channel only).Blue-SteadyDownstream frequency is locked (channel bonding). | OffThe modem is not scanning. |
|
Green-BlinkingThe modem is searching for the upstream frequency.Green-SteadyUpstream frequency is locked (one channel only).Blue-SteadyUpstream frequency is locked (channel bonding). | OffThe modem is not scanning. |
|
Green-BlinkingRegistration is in progress with the Midco® Network.Green-SteadyThe modem is operational. | OffModem is offline. |
 |
Green-BlinkingEthernet device is connected. | OffNo active Ethernet device is connected. |
|
Green-BlinkingThe 2.4GHz wireless network is enabled, and data is being transmitted or received.Green-SteadyThe 2.4GHz wireless network is enabled, and no data is being transmitted or received. | OffThe modem is not powered.ORThis network is not enabled. |
 |
Green-BlinkingThe 5GHz wireless network is enabled, and data is being transmitted or received.Green-SteadyThe 5GHz wireless network is enabled, and no data is being transmitted or received. | OffThe modem is not powered.ORThis network is not enabled. |
|
Green-BlinkingThe unit is searching for a MoCA device.Green-SteadyMoCA device has been detected, and the unit has successfully made a connection. | OffMoCA function is not enabled. |
|
This feature is not enabled on your modem. |
Additional Resources
Check out Midco.com/InternetSupport for a variety of resources. Learn how Wi-Fi works, how to reboot your modem, how to avoid interference, and more.
Return Old Modem
If we mailed you a new modem and you have an old one from Midco, it will remain active for up to 14 days. If you leased it from us, be sure to return it. Just package it up in the box that came with your new modem. You can either use the enclosed, prepaid return label – or drop the box off at your local Midco Customer Experience Center.
Wi-Fi Network Name:Wi-Fi Network Password:
Note: If you change your Wi-Fi network name or password, your equipment will no longer be paired to your system.This material includes references to products, services, and/or equipment not manufactured by Midco. The respective companies retain trademark and registered trademark ownership for those referenced items.
WARNING
Risk of electrical shock. Do not expose the device to water or moisture. The device is a high-performance communications device designed for home and office environments. Do not use the device outdoors. Keep the device in an environment between 0° C ~ 40° C (32° F ~ 104° F). To avoid overheating, do NOT place any object on top of the device. Do not restrict the flow of air around the device. The manufacturer assumes no liabilities for damage caused by any improper use of the device.
DISCLAIMER
The manufacturer assumes no liabilities with respect to the contents of this document. The manufacturer also reserves the right to revise this document or update the content thereof without any obligation to notify any person of such revisions or amendments. Specifications are subject to change without notice.
CAUTION
The cable distribution system should be grounded (earthed) in accordance with ANS/NFPA 70, the National Electrical Code (NEC), in particular Section 820.93, Grounding of Outer Conductive Shield of a Coaxial Cable.
FCC STATEMENTS
Federal Communication Commission Interference StatementThis equipment has been tested and found to comply with the limits for a Class B digital device, pursuant to Part 15 of the FCC Rules. These limits are designed to provide reasonable protection against harmful interference in a residential installation. This equipment generates, uses, and can radiate radio frequency energy and, if not installed and used in accordance with the instructions, may cause harmful interference to radio communications. However, there is no guarantee that interference will not occur in a particular installation. If this equipment does cause harmful interference to radio or television reception, which can be determined by turning the equipment off and on, the user is encouraged to try to correct the interference by one of the following measures:
- Reorient or relocate the receiving antenna.
- Increase the separation between the equipment and receiver.
- Connect the equipment into an outlet on a circuit different from that to which the receiver is connected.
- Consult the dealer or an experienced radio/TV technician for help.
FCC Caution: Any changes or modifications not expressly approved by the party responsible for compliance could void the user’s authority to operate this equipment.This device complies with Part 15 of the FCC Rules. Operation is subject to the following two conditions: (1) This device may not cause harmful interference, and (2) this device must accept any interference received, including interference that may cause undesired operation.For products available in the USA/Canada market, only channel 1~11 can be operated. Selection of other channels is not possible.This device and its antennas(s) must not be co-located or operating in conjunction with any other antenna or transmitter except in accordance with FCC multi-transmitter product procedures.For operation within 5.15 ~ 5.25GHz / 5.47 ~5.725GHz frequency range, it is restricted to the indoor environment. This device meets all the other requirements specified in Part 15E, Section 15.407 of the FCC Rules.
IMPORTANT NOTE:
FCC Radiation Exposure Statement:This equipment complies with FCC radiation exposure limits set forth for an uncontrolled environment. This equipment should be installed and operated with a minimum distance of 21cm between the radiator & your body.
Need help?
Setup GuideMidco.com/SetupOnline SupportMidco.com/SupportContactText: 64326Social & Chat Support: Midco.com/ContactPhone: 1.800.888.1300
![]()
report this ad© 2020 Midcontinent Communications. All rights reserved. Updated April 2020.RS11_001_01_0420
References
[xyz-ips snippet=”download-snippet”]