Midea MB-FS5077 Rice Cooker User Manual
Thank you for purchasing the Midea Electric Rice Cooker. Please read the Operation Instructions carefully before using and keep it cautiously after reading for future reference. Pictures are for reference only, subject to the final product.
Important Safety Instructions
When using electrical appliances, please take the basic safety precautions that include the following: please read the full description.
- This appliance is for household use only. Do not use outdoors.
- This appliance is not intended for use by persons (including children) with reduced physical, sensory or mental capabilities, or lack of experience and knowledge, unless they have been given supervision or instruction concerning use of the appliance by a person responsible for their safety.
- Children should be supervised to ensure that they do not play with the appliance.
- This appliance is intended to be used in household and similar applications such as:– Staff kitchen areas in shops, office and other working environments;– farm houses;– by clients in hotels, motels and other residential type environments;– bed and breakfast type environments;
- If the supply cord is damaged, it must be replaced by a special cord or assembly available from the manufacture or its service agent.
- Please turn off and unplug the appliance before cleaning, maintenance or relocation and whenever it is not in use.
- Do not immerse any part of the appliance in water or other liquid.
- The heating element surface is subject to residual heat after use, do not touch.
- Warning: Avoid spillage on the connector.
- Warning: Misuse may cause potential injury.
- The appliance is not intended to be operated by means of an external timer or a separate remote-control system.
Product Description
Accessories
Instructions for Use
- Wipe dry the exterior of cooking pot with cloth and place in the body; rotate the pot around for 2-3 times to ensure close attachment between the pot bottom and heating plate; press the lid until you hear a click.Do not place the cooking pot on other stoves for heating to avoid deformation due to high temperature; do not replace the cooking pot with other containers and operate on the heating plate.
- Plug in the power supplyEnsure plugs of the body and power source are properly connected.
- Press function button to select functions as you need and then press the “Start” button to start operation. Or press button of the selected function to directly enter operation mode.
ON/OFF/START buttonPlug in power supply, press “ON/OFF/START” button to turn on the power, LED displays “— —”, “ON/OFF/START” light flashes, multi-cooker is on “ON” state (Standby mode). Press “ON/OFF/START” again and return to “OFF” state (ECO mode, the panel has no display). Under the “ON” state (standby mode), select the desired function and press “ON/OFF/START” to start the program. If there is not any operation for more than two minutes under the ON state, it will enter the OFF state automatically.
Warm/Cancel button
- Under the “ON” state (standby mode), press “Warm/Cancel” button to start the temperature preservation program.
- Under the working state: press “Warm/Cancel” button to exit the working state and return to the “ON” state (standby mode).
- Temperature preservation mode will start when cooking is completed, the timer displays from 0 to 12 hours. The LED displays “— —” after 12 hours and returns to the “ON” state (standby mode). Food is best to be consumed within 5 hours after cooking, so that flavor and taste does not deteriorate.Note: Sauté and Yogurt mode do not have temperature preservation feature.
Menu buttonUnder the “ON” state (standby mode), press the “Menu” button to select various functions. The functions cycle as follow:Steam-Yogurt-Pasta-Saute-Porridge-Meat-Manual/DIY-Bread.
Soup/Stew buttonUnder the “ON” state (standby mode), press “Soup/Stew” button, “Soup/Stew” light flashes on, press “Start” button to start the “Soup/Stew” program.
Rice buttonUnder the “ON” state (standby mode), press “Rice” button, “Rice” light flashes on, press “Start” button to start the “Rice” program.
Slow Cook buttonUnder the “ON” state (standby mode), press “Slow Cook” button, “Slow Cook” light flashes on, press “Start” button to start the “Slow Cook” program.
TIMER/TEMP buttonAfter selecting the function need to pre-set the cooking time, press “TIMER/TEMP” button, both “TIMER/TEMP” and the corresponding function lights flash on, set the time and press “Start” button. The pre-set time is the cooking completion time. “+” and “-” button
- After selecting the required function, use “+” or “-” buttons to adjust the pre-set timer to set the cooking completion time.
- Under the manual function, use the “+” or “-” buttons to select the temperature value under the temperature setting state.
- Adjust the cooking time.
Instructions for Use
Sauté
- Under the standby mode, press the “Menu” button and the “Sauté” light on.
- Press the “Start” button to start the “Sauté” function, “Start” light stays on and “Sauté” light flashes, and digital screen display “running circle”. The rice cooker cover is in the open state at this point, add olive oil according to the proportion (refer to the proportiontable) and heat for 5 minutes.
- Once the oil heated, add in Thai fragrant rice, stir fry till the rice turn golden or yellowish(about 10-13 minutes);
- Add in soup, and then close the cover. The program detects the closed cover and the “Sauté” light stays on.
- The cooker enters the stew stage and the digital display shows the countdown timer.
- The cooker returns to standby mode when Sauté program completes.
Steam
- Under the standby mode, press the “Menu” button, select “Steam” function, “Steam” light on.
- Press “+” or “-” button to adjust the steaming time, the default timing is 5 minutes. Time can be adjusted between 5 to 30 minutes.
- Press the “Start” button to start the “Steam” function, “Start” and “Steam” lights stay on, the digital screen displays the “running circle”.
- When the water is boiled, the digital screen displays the countdown timer.
- Steam function automatically enters the temperature preservation function when program completes.
Pasta
- Under the standby mode, press the “Menu” button, select “Pasta” function, “Pasta” light on.
- Press “+” and “-” button to adjust Pasta cooking time, the default timing is 10 minutes. Time can be adjusted between 10 to 35 minutes.
- Add water and salt (refer to the proportion table, no more than 5 scales).
- Press the “Start” button to start the “Pasta” function, “Start” and “Pasta” lights stay on,the digital screen displays the “running circle”.
- When the water is boiled, the digital screen displays the countdown timer, open the cover, add the corresponding amount of pasta according to water level and start mixing (refer to the proportion table), stir 1 to 2 minutes, close the cover and continue cooking.
- Pasta function automatically enters the temperature preservation function when program completes.
Porridge
- Under the standby mode, press the “Menu” button, select “Porridge” function, “Porridge” light on.
- Press “+” and “-” button to adjust Porridge cooking time, the default timing is 2 hours. Time can be adjusted between 2 to 4 hours.
- Press the “Start” button to start the “Porridge” function, “Start” and “Porridge” lights stayon, the digital screen display Soup/Stew countdown timer.
- Porridge function automatically enters the temperature preservation function when program completes.
Manual/DIY
- Under the standby mode, press the “Menu” button, select “Manual/DIY” function, “Manual/DIY” light on.
- Press “+” or “-” button to adjust the Manual/DIY program time, the default timing is 1 minute. Time can be adjusted between 1 minute to 4 hours.
- Press the “TEMP” button, “TEMP” light stays on, select cooking temperature, the defaulttemperature is F95 (other options include F95, F105, F120, F140, F160, F175, F195, F210, F230, F250 and F275), when the cooking time is > 2 hours, F250 and F275 are not available. Digital screen displays selected temperature value.
- Press “Start” to start the “Manual/DIY” function. The “Start” and “Manual/DIY” lights stay on. The digital screen displays the “running circle” before reaching the specified cooking temperature. After reaching the specified cooking temperature, the screen displayscountdown timer. (Press “TEMP” at this point, the digital screen displays the set cookingtemperature and returns to normal screen after 3 seconds)
- Manual function automatically enters the temperature preservation function when program completes.
Meat
- Under the standby mode, press the “Menu” button, select “Meat” function, “Meat” light on.
- Press “+” or “-” button to adjust the Meat cooking time, the default timing is 20 minutes.Time can be adjusted between 10 minutes to 1 hour.
- Pour a tablespoon of cooking oil into the pot, add the tasty meat into it, and close the cover.
- Press the “Start” button to start the “Meat” function, “Start” and “Meat” lights stay on, anddigital screen shows steaming countdown timer.
- Meat function automatically enters the temperature preservation function when programcompletes.
Bread
- Defrost frozen dough thoroughly before use. Don’t use more than 500g, or the doughmight overwhelm the appliance.
- Under the standby mode, press the “Menu” button, select “Bread” function, “Bread” lighton.
- Press “+” or “-” button to adjust the Bread cooking time, the default timing is 3 hours. Time can be adjusted between 2 hours to 4 hours.
- Wipe the bowl with cooking oil, put the dough into the bowl.
- Press the “Start” button to start the “Bread” function, “Start” and “Bread” lights stay on, and digital screen shows steaming countdown timer.
- Bread function automatically enters the temperature preservation function when programcompletes.
Yogurt
- In a sauce pan, heat milk to 180°F on the stovetop, stirring constantly to prevent scaulding.
- Allow milk to cool to 115°F for approximately 1-2 hours. Add yogurt culture. Stir mixturethoroughly.
- Pour milk mixture into the inner pot.
- Be sure inner pot is clean and dry before placing into the rice cooker.
- Under the standby mode, press the “Menu” button, select “Yogurt” function, “Yogurt” lighton.
- Press “+” or “-” button to adjust the Yogurt cooking time, the default timing is 8 hours. Time can be adjusted between 6 hours to 12 hours.
- Press the “Start” button to start the “Yogurt” function, “Start” and “Yogurt” lights stay on,and digital screen shows steaming countdown timer.
- The cooker returns to standby mode when Yogurt program completes.
- Once incubation is complete, store the yogurt in an air tight container in the refrigerator.Do not leave in the rice cooker.
Soup/Stew
- Under the standby mode, press the “Soup/Stew” button, select “Soup/Stew” function,“Soup/Stew” light on.
- Press “+” and “-” button to adjust Soup/Stew cooking time, the default timing is 2 hours.Time can be adjusted between 2 to 4 hours.
- Press the “Start” button to start the “Soup/Stew” function, “Start” and “Soup/Stew” lightsstay on, the digital screen display Soup/Stew countdown timer.
- Soup/Stew function automatically enters the temperature preservation function when program completes.
Rice
- Under the standby mode, press the “Rice” button, select “Rice” function, “Rice” light on.
- Press the “Start” button to start the “Rice” function, “Start” and “Rice” lights stay on, digitalscreen display “running circle”.
- The Rice function automatically enters the stew stage after cooking and display countdown timer in the digital screen.
- Rice function automatically enters the temperature preservation function when program completes.
Slow Cook
- Under the standby mode, press the “Slow Cook” button, select “Slow Cook” function, “Slow Cook” light on.
- Press “+” or “-” button to adjust the slow cook program time, the default timing is 2 hours. Time can be adjusted between 2 to 10 hours.
- Press the “Start” button to start the “Slow Cook” function, “Start” and “Slow Cook” lightsstay on, and digital screen shows slow cook countdown timer.
- Slow Cook function automatically enters the temperature preservation function when program completes.
Cooking time setting method
- Steam Cooking time: default setting is 5 minutes, adjustable between 5 to 30 minutes. Press “+” to increase 1 minute, press “-” to decrease 1 minute.
- Slow Cook Cooking time: t default setting is 2 hours, adjustable between 2 to 10 hours. Press “+” to increase 1 hour, press “-” to decrease 1 hour.
- Manual Cooking time: default setting is 1 minute, adjustable between 1 minute to 4 hours. Press “+” to increase 10 minutes, press “-” to decrease 10 minutes.
- Soup/Stew/Bread/Porridge Cooking time: default setting is 2 hours, adjustable 2 to 4 hours. Press “+” to increase 30 minutes, press “-” to decrease 30 minutes.
- Pasta Cooking time: default setting is 10 minutes, adjustable between 10 to 35 minutes. Press “+” to increase 1 minute, press “-” to decrease 1 minute. After setting the cooking time, press “Start” button to start the program.
- Yogurt Cooking time: default setting is 8 hours, adjustable between 6 to 12 hours. Press “+” to increase 1 hour, press “-” to decrease 1 hour.
- Meat Cooking time: default setting is 20 minutes, adjustable between 10 minutes to 1 hour. Press “+” to increase 5 minutes, press “-” to decrease 5 minutes.
Timer per-set method (Bread, Porridge, Steam, Slow Cook, Soup/Stew, Rice and Pasta)
- Select the function requires pre-set timer, press the “TIMER/TEMP” button, “TIMER/ TEMP” light on and enter the setting state. Press “+” or “-” to pre-set the completion time. Press “+” once to increase 1 hour, press “-” once to decrease 1 hour. Long press to increase automatically.
- Press “Start” button to start the pre-set timer function. The screen displays the completion time and starts the countdown.
- Timer can be pre-set up to 24 hours.
- Temperature preservation: Meat, Rice, Bread, Porridge, Steam, Slow Cook, Manual, Soup/Stew and Pasta. The cooker enters to temperature preservation mode once cooking completed. The temperature preservation time is up to 12 hours, cooker returnsto standby mode after 12 hours. The shorter the preservation time, the better the taste.Note: Recommended timer pre-setting is no more than 12 hours to avoid food deterioration.
Cleaning and Maintenance

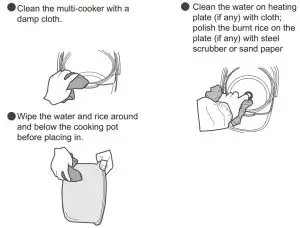
Disassembly, Cleaning and Assembly of Steam Valve.Note: The valve should be cleaned frequently to ensure smooth venting. Please clean when the appliance cools down to avoid burns.
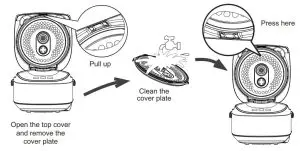
Cover plate cleaning methods
Circuit Principle Diagram
ENVIRONMENTAL PROTECTIONThe appliance must not be disposed of with regular household waste.At the end of its service life, the appliance must be properly delivered to a collection point for the recycling of electrical and electronic equipment. By Collection and recycling of old appliances, you are making an important contribution to the conservation of our natural resources and provide for environmentally sound and healthy disposal.
report this ad[xyz-ips snippet=”download-snippet”]