MILAGROW Seagull Multi-function Robotic Vacuum Cleaner User Manual

Thank you for purchasing the robot. Please read through the instructions before use.
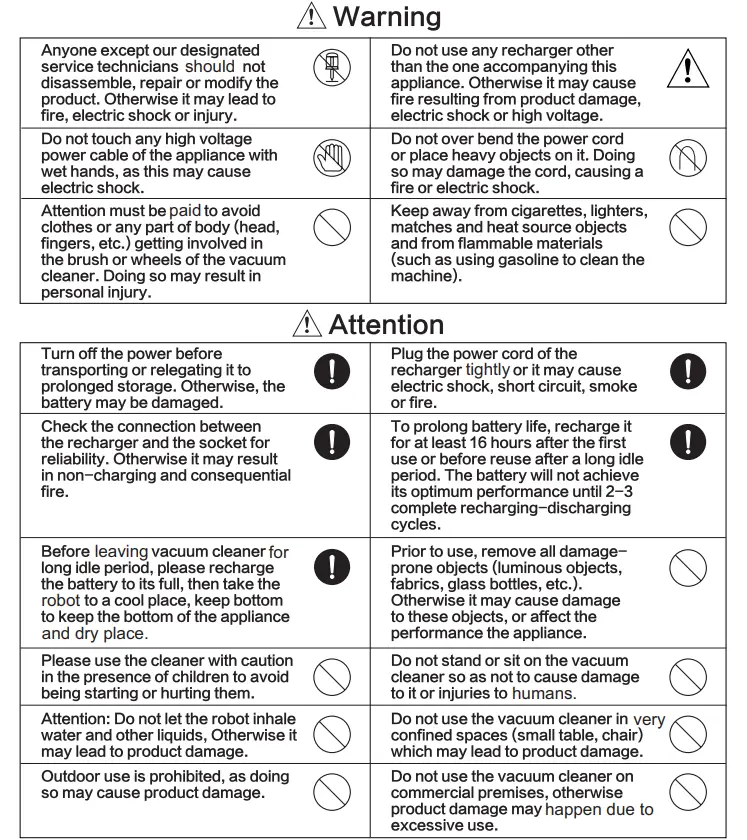
Safety Instructions
Before using this product, please read the following safety instruction and follow all routine safety precautions!
- Please read these instructions carefully.
- Please keep this manual of instructions for future use.
- Any operation not in compliance with this manual is likely to cause damage to the product.
- The right to final interpretation resides with the Company.
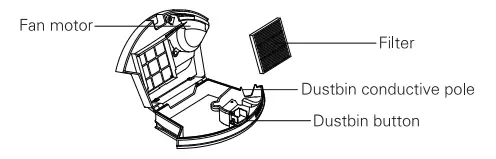
Structure of the Robot
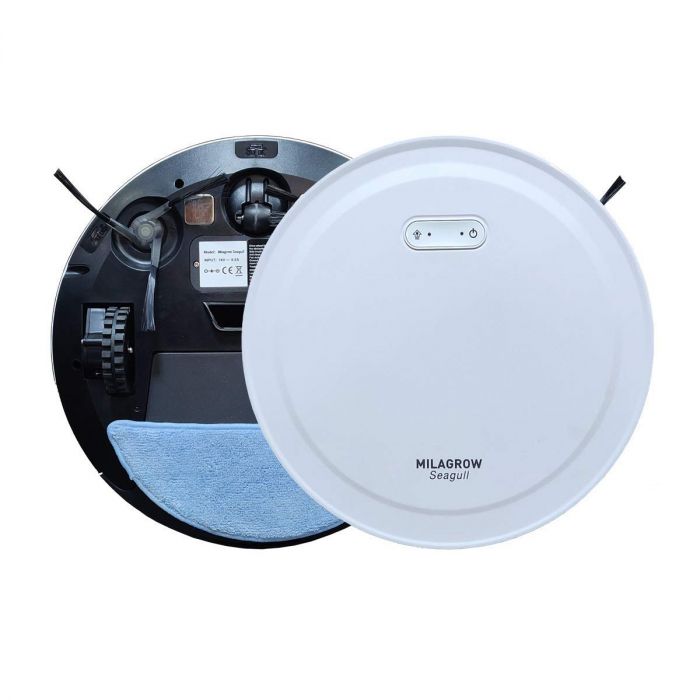
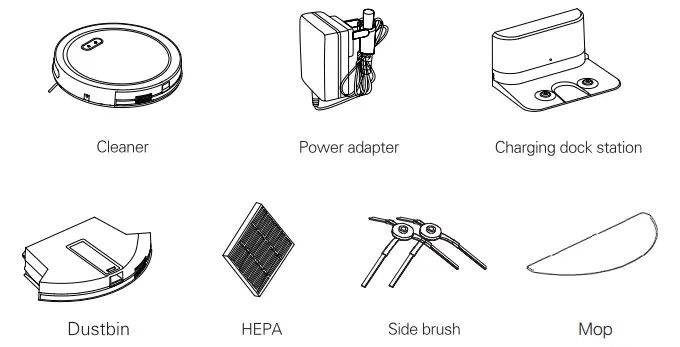
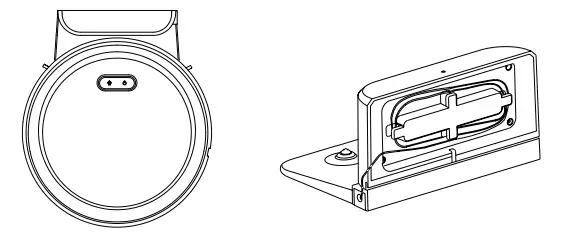
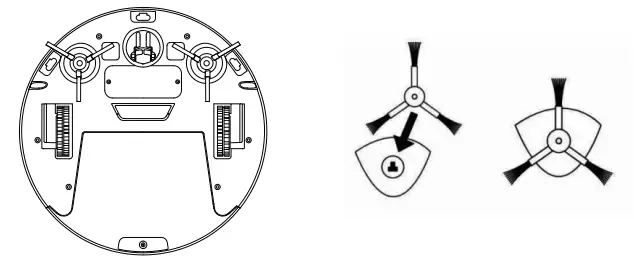
a. Structure of Robot
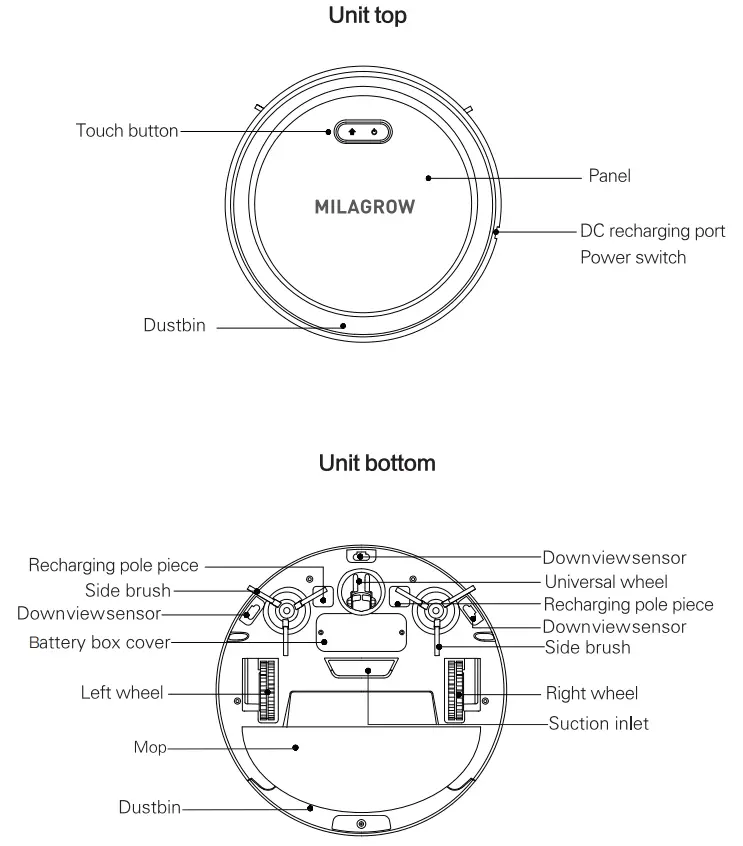
Cleaner and Accessories
b. Structure of Dustbin
c. Structure of Charging Doct

Robot Operation
a. Charging Preparation
- Connect the power adapter to the power adapter jack on the charging dock;
- Locate an electrical outlet on the wall close to the ground and plug-in the power adapter.
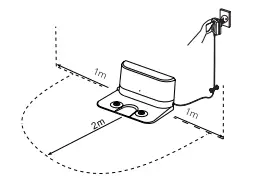
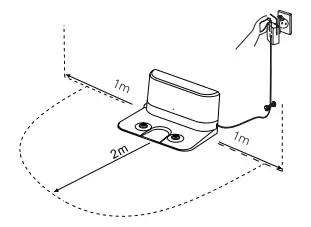
- Place the charging dock in a position flat on the ground with the back pushed up against a wallThere should be no other objects or obstructions two meters in front of and one meter to the left, right and above the charging dock.
b. Turn on the Robot
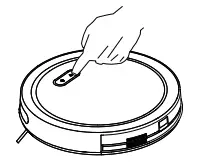
- Press and hold the robot left button for 5 seconds, till the indicator light flash is blue. Wait for the robot gyroscope to initialize successfully. After the indicator light is stable press the power button of the robot to start cleaning.
- When the robot finishes working, it is better to keep the power on, and let the robot go to the dock station for auto charging.
c. Charging Status
- During the charging process, if the battery power is less than 20%, the red light is blinking, if the battery power between 20% – 50%, the pink light is breathing, the battery power is above 50%, the blue light is breathing. After the robot is fully charged, the blue light will keep on for a few minutes, then turn off.
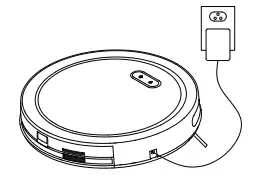
- Robot can also be charged by connecting the power adapter to the DC recharging port on the side of the robot directly.
e. Introduction of the Charging Dock
- Before using the docking station, please make sure it is connected to the power supply and adaptor.
- Place the charging dock in a position flat on the ground with the back pushed up against a wall. There should be no other objects with strong reflectors like mirror or obstructions two meters in front of and one meter to the left, right and above the charging dock. And also avoid direct sunlight.

- After the robot finishes the planed cleaning, it will return to the charging dock automatically.
- During the cleaning process, if the power is too low, the robot will go to docking station for charging, automatically. (The robot will stop cleaning and give alarm. Every 5 seconds it will repeat alarm.)
Product Features
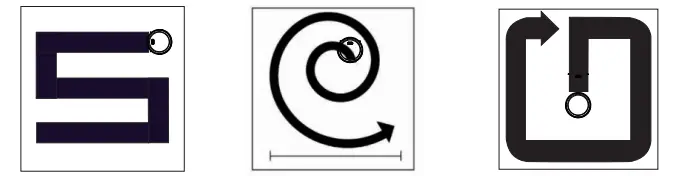
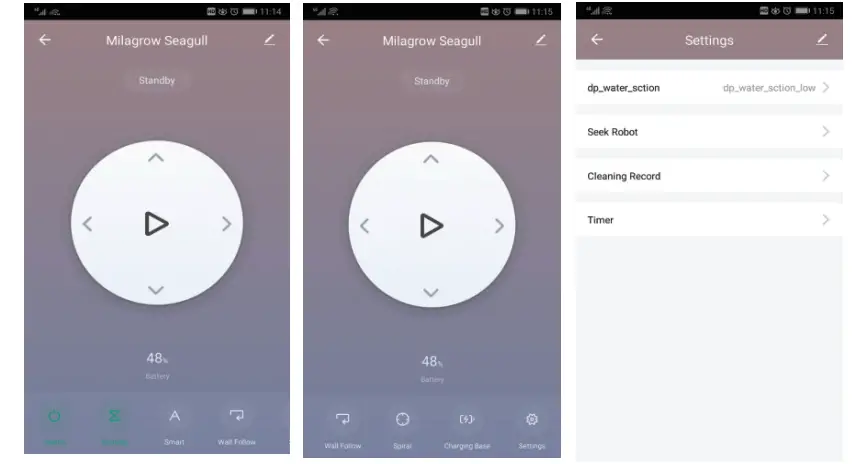
a. Automatic Cleaning Mode
- In the standby mode, press the right button or intelligent model button on APP, the robot enters automatic cleaning mode.
- In the automatic cleaning mode, press the left or right button or intelligent model again in APP, th robot enters standby mode. ( Figure 1 )
b. Spot Cleaning
- Under standby mode/working mode, press spot cleaning mode in the APP, the robot enters the spiral fixed point cleaning state.
- In the spot mode, press the left button/right button of the robot or the spot cleaning mode button on the APP to enter the standby state; press other cleaning mode on the APP to enter other cleaning states.
- Prompt after cleaning is completed (buzzer sounds three times, three times). ( Figure 2 )
c. Wall Follow Cleaning
- In standby mode. press the wall mode button on the APP interface, and the machine enters the edge cleaning state.
- In the wall follow mode, press the left/right button of the robot to enter the standby mode: press the other cleaning mode button on the APP interface to enter other cleaning states. ( Figure 3 )
d. Trouble Shooting
- If the robot is stuck & continues to perform the same function and rotation. the alarm will be triggered.
e. Appointment Mode
- Setting time and date:After the robot successfully connects to the mobile APP and opens the APP control interface, Click the settings button, then click “Timer” and select “Add Timing”; Click the “Only once” button to enter the time from Monday to Sunday; Go back to the previous level and click “Save”.
- Cancel appointment:In the APP control interface, click the Settings button, then click “Timer”, Long press the time you have reserved then prompt to delete:
Cleaning of the Robot
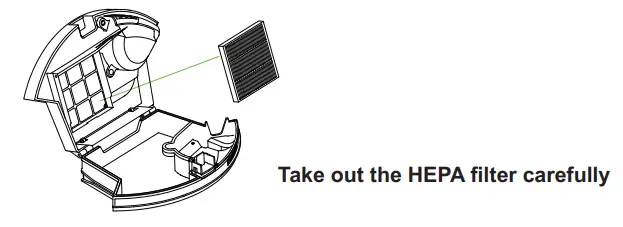
a. Removal and Cleaning of the Dustbin
- Press the dustbin button on the panel, take out the dustbin.
- Open the upper cover of the dustbin, pour out the dirt and other junk.
b. Removal and Cleaning of the Side Brushes
- Gently pick up the robot and lay it with its wheels facing up.
- Use the mop to clean the hair off the brush.
- Firmly grasp one of the plastic spokes containing the wire brushes and pull straight up.
- The side brush should only be replaced if the previous side brushes become damaged.
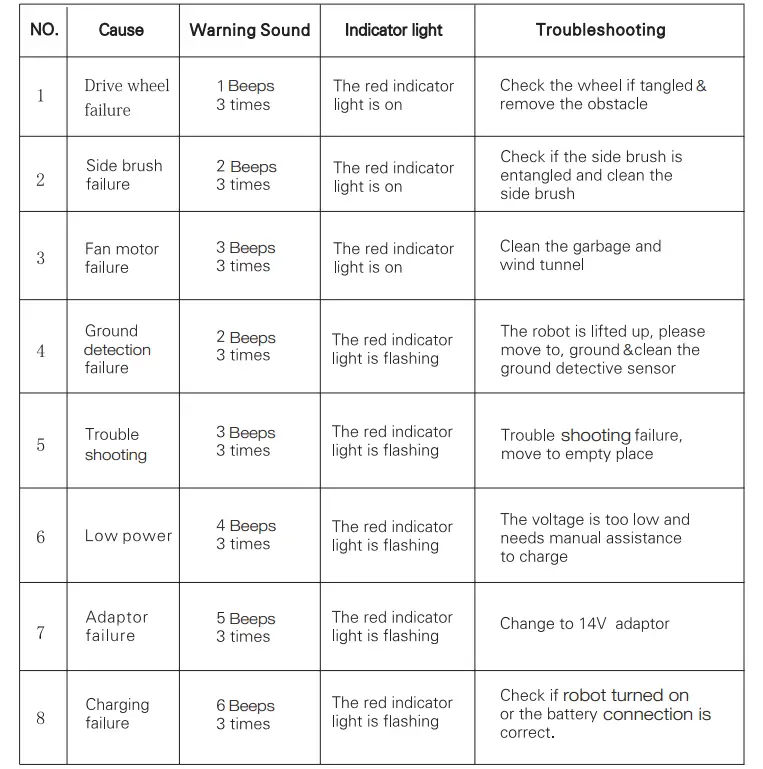
Common Failures and Troubleshooting
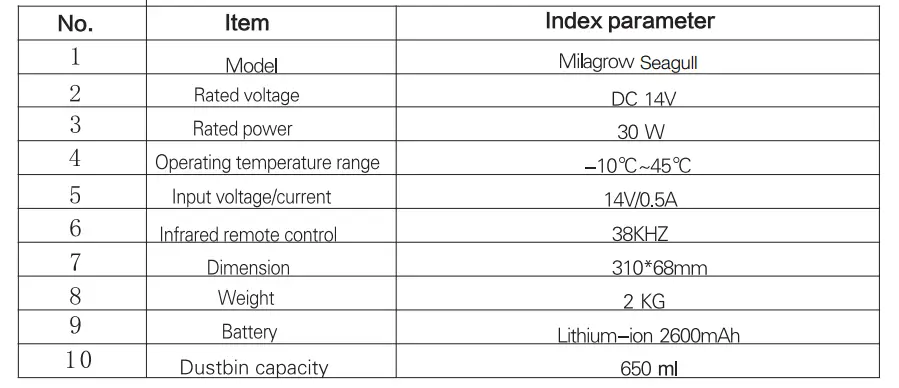
Dimensions and Parameters
Technical Specification for the Cleaner
Technical Specification for the Recharging Bay
 report this ad
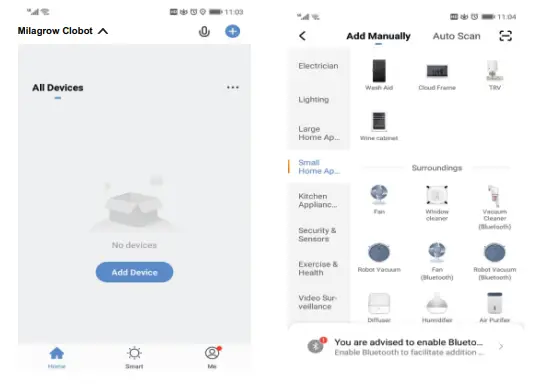
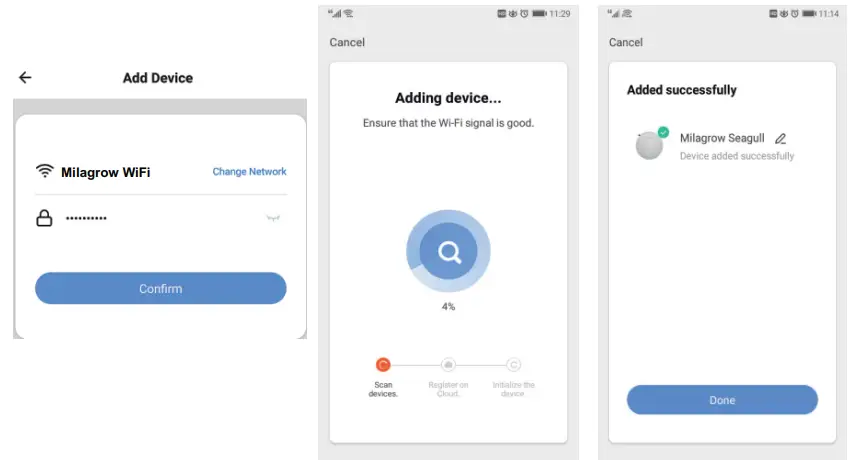
Wifi Manual
- Scan the QR code below to download Tuya WIFI APP– “smart life”.
- Open APP “smart life”, register your account by phone number or email etc.
- Enter “Add device” surface.
- Enter “Add Manually”, click “Smart Home Appliance”, then choose “Robot Vacuum”.
- First press and hold the right button for 5 seconds to turn on the robot, you will see the two lights flashing blue, after 5 seconds, once the lights do not flash and keep stable, then please press right button and left button at same time, until you hear a voice of “bee”
- Select the available network, the robot only supports 2.4GHz, Enter the correct WIFI password, click to confirm.
- After confirming, the “Connecting” progress of the robot will be displayed.
- After the connection is successful, it will appear “Device added successfully”
- You can enter the operation interface to control the robot now.
- Click “Settings”, you can see “Timer”, click it to add schedule cleaning for robot.


[xyz-ips snippet=”download-snippet”]