Smart Switch User GuideKS-602H
Precautions before product installation:
- WiFi only supports a 2.4GHz network (802.11 b/g/n). 5G network is not available.
- Only supports unidirectional/unipolar circuits, not compatible with mutual control switches.
- Need a neutral wire. (Please do not install if there is no neutral wire in the cassette).
- Basic electrical wiring knowledge or experience is required, or please consult a professional electrician.
- Never connect the neutral wire and the live wire reversely (Otherwise the electrical appliances will not work).
- Long press the ON / OFF button to restore the device to the factory default settings. Do this only when you are sure you want to delete all settings. (This operation will change the status of network distribution).
- A screwdriver, a test pencil, and other tools are needed.
Product Accessories:
Smart switch*1, Switch cover*1, Screw*2, Wire nuts*4 User manual*1 Mark labels*1 Before installation, please confirm whether the accessories are complete. If there are incomplete accessories or other problems, please email us or contact us on Amazon or via email on the after-sale card. (In addition, product styles and designs may be improved, and the accessories may be changed in due course).
Product installation guide:
1. Connect the mobile phone to the indoor WiFi and download the APP “Smart Life” that controls the switch (please scan the QR code below to download).
Find out the “Smart Life” app in the Apple app store, Google Play, or scan the QR code below and install it.The free app”Smart Life” is compatible with mobile devices the support IOS8.0 above, Android 4.4 above
https://smartapp.tuya.com/smartlife
Enter the register interface, input the email address/phone number for getting the verification code to register an account. Please just log in if you already have a Smart Life account.
2. Open the old switch and carefully pull it out of the wall, first use a test pen to distinguish the live wire and the load wires, meanwhile mark them with labels, and then find the main switch of the lamp in the circuit breaker to turn it off. (After turning off the main power switch, please use a test pencil to reconfirm whether the power has been cut off).
3. After turning off the power, find the white wire and other wires that need to be installed in the cassette and mark them. Remove the old switch after marking. (If you cannot find the white wire, you cannot do the installation by yourself. In this case, you must consult a professional electrician).
PS: Please remove the old switch after finding the four wires, otherwise please install the wires back to their original position or consult a professional electrician.Usually: White represents the neutral line. Black represents the fire line. The green or a single bare copper wire represents the ground wire. The above content is for reference only and cannot be used as a standard.
4. Connect the corresponding wire to the product with a wire nut:
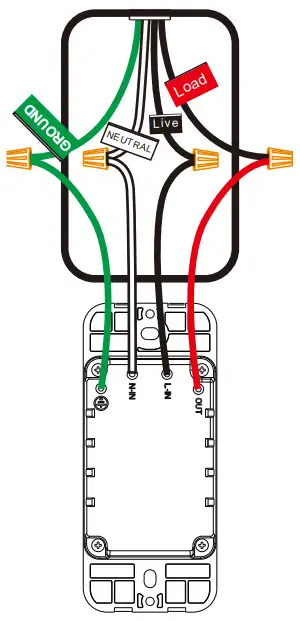 green wire on the switch connect with ground linewhite wire on the switch connect with neutral lineblack wire on the switch connect with fire linered wire on the switch connect with load lineAfter the installation is complete, turn on the circuit breaker. Then you can control the switch by pressing the button/touching it.
5. Network distribution instructions:
This product has two network connection modes: EZ mode and AP mode. Note: Each mode only lasts for three minutes in the state of “to be connected”. If the connection cannot be completed within three minutes, you need to press and hold the setting again to do the connection one more time (switching method between the two modes: press and hold the switch key for 5-10 seconds until the indicator light is on).EZ mode: After a long press, the switch indicator flashes once every 0.3 seconds, it shows that the switch is in the state of EZ mode, in this state, it supports APP “Auto Scan” mode and WiFi quick connection mode in“Add Manually” block. (Supports simultaneous connection of multiple switches).AP mode: After a long press, the switch indicator light flashes once per second, it shows that the switch is in the state of AP mode, in this state only the hotspot distribution network mode (compatible mode) in the APP “Add Manually” is supported.(Only supports one switch connection).
EZ mode network configuration method ①: Open the Smart Life APP→My Home interface →click the plus icon in the upper right corner→choose ”Auto Scan”→set WiFi password→confirm that the switch is in EZ mode→Start scanning→the next step.
EZ mode network configuration method ②: Open the smart life APP→My Home interface→click the plus icon in the upper right corner→Add manually→select the electrical switch (WiFi)→set WiFi password→Next→confirm that the switch is in the EZ mode→search device →Done

AP mode network configuration method: open the Smart Life APP→My Home interface→click the plus icon in the upper right corner→manually add→select the electrical switch (WiFi)→set the WiFi password→click the option on the upper right corner→select AP Mode → confirm that the switch is in AP Mode→Next→Go to connect→automatically switch to the wireless LAN interface of the mobile phone and select the wireless LAN signal named SmartLife-XXXX→back to the smart life APP interface to automatically complete the network configuration→Done.
Specifications
| Type | Smart Wall Light Switch |
| Model | KS-602H |
| Power supply mode | Neutral+Live Wire |
| Rated Current | 15A(Max) |
| Rated Voltage | AC110-125V~50/60Hz |
| Rated Power | 1650W |
| Wireless Frequency | 2.4GHZ |
| Wireless Standard | IEEE802.11 b/g/n |
Indicator light meaning
| Indicator | Status | Description |
| Green | Flash Rapidly | Ready for connection (Default Mode Only) |
| Green | Flash Slowly (1 time every 3 S) | Ready for connection (AP Mode Only) |
| Green light is always on | Off | Turn the light off |
| Red light is always on | On | Turn the light on |
| Green | Flash Slowly | No Internet |
Safety Notice:
- Cut off the power before installation
- Please use it only when it’s installed with RCD or current leakage protector at home
- A neutral wire is needed to power the switch.
Precautions:
- Do not modify or disassemble the product by yourself.
- Do not hit the equipment with sharp objects.
- The product is a household device, do not install it on an industrial environment.
- Do not install the switch in a metal house or a place that may shield the wireless signal.
- The live wire and neutral wire of the switch must be connected via the same leakage protector, otherwise, it is easy to cause tripping and other phenomena.
- After installation, please fix the panel firmly before powering on the switch. Live operation is strictly prohibited.
- The mobile phone control is related to the strength of the WiFi signal connected to the switch.It is recommended to use a router with a strong signal.
- There is an upper limit on the number of smart products controlled by ordinary routers. If it is overloaded, it will automatically squeeze out smart products with relatively weak signals. (Generally, the upper limit is 10-12, including computer phones, etc).
- If you do not install and use it for a long time, please store it in a dry environment and keep it out of the reach of children.
- Provide a one-year warranty.
For the connection method of Alexa, Google Assistant: Open the interface of “Me” in the smart life APP→”More Services”→”Alexa” or other devices→see more connection methods→tutorial. There is a detailed explanation about this in the tutorial.
report this ad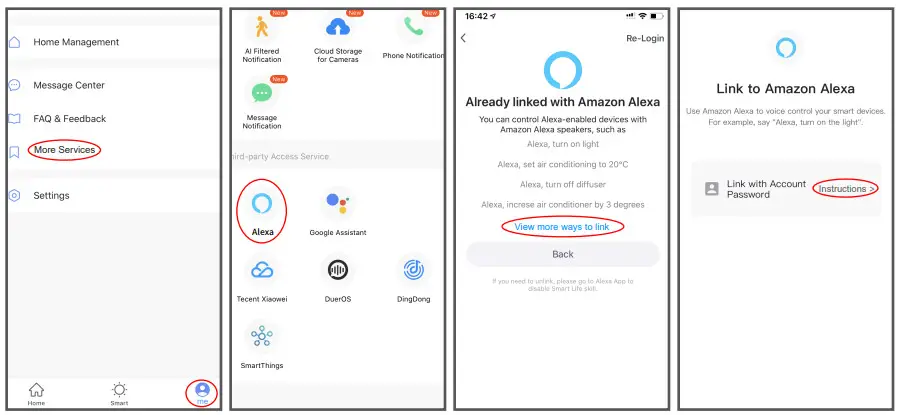
For more smart life APP applications, such as: “multi-control association” (up to four switches can be controlled at the same time); “create group” (control all the switches in all groups at the same time); “sharing device” (share switch control with all family members), and other functions. For more functions, please contact us. We will provide you with more functional descriptions of the APP.FCC NOTE:This device complies with Part 15 of the FCC Rules. Operation is subject to the following two conditions:
- this device may not cause harmful interference,
- this device must accept any interference received, including interference that may cause undesired operation.
The manufacturer is not responsible for any radio or tv interference caused by unauthorized modifications or changes to this equipment. Such modifications or changes could void the user’s authority to operate the equipment. This equipment has been tested and found to comply with the limits for a Class B digital device, pursuant to part 15 of the FCC Rules. These limits are designed to provide reasonable protection against harmful interference in a residential installation.This equipment generates, uses, and can radiate radio frequency energy and, if not installed and used in accordance with the instructions, may cause harmful interference to radio communications. However, there is no guarantee that interference will not occur in a particular installation. If this equipment does cause harmful interference to radio or television reception, which can be determined by turning the equipment off and on, the user is encouraged to try to correct the interference by one or more of the following measures:-Reorient or relocate the receiving antenna.-Increase the separation between the equipment and receiver.-Connect the equipment into an outlet on a circuit different from that to which the receiver is connected.-Consult the dealer or an experienced radio/TV technician for help. RF warning statement:To maintain compliance with FCC’s RF exposure guidelines, this equipment should be installed and operated with a minimum distance of 20cm between the radiator and your body.
[xyz-ips snippet=”download-snippet”]