
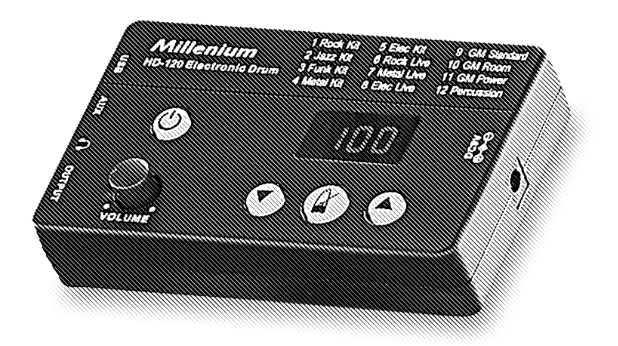
![]() HD-120e-drum module
HD-120e-drum module
Musikhaus Thomann Thomann GmbH Hans-Thomann-Straße 1 96138 Burgebrach, Germany.Telephone: +49 (0) 9546 9223-0E-mail: [email protected]Internet: www.thomann.de04.05.2021, ID: 461227
General information
This user manual contains important information on the safe operation of the device. Read and follow all safety notes and all instructions. Save this manual for future reference. Make sure that it is available to all persons using this device. If you sell the device to another user, be sure that they also receive this manual.
Our products and user manuals are subject to a process of continuous development. We therefore reserve the right to make changes without notice. Please refer to the latest version of the user manual which is ready for download under www.thomann.de
Further information
On our website (www.thomann.de) you will find lots of further information and details on the following points:
| Download | This manual is also available as a PDF file for you to download. |
| Keyword search | Use the search function in the electronic version to find the topics of interest for you quickly. |
| Online guides | Our online guides provide detailed information on technical basics and terms. |
| Personal consultation | For a personal consultation please contact our technical hotline. |
| Service | If you have any problems with the device the customer service will gladly assist you. |
Notational conventions
| This manual uses the following notational conventions: | |
| Letterings | The letterings for connectors and controls are marked by square brackets and italics.Examples: [VOLUME] control, [Mono] button. |
| Displays | Texts and values displayed on the device are marked by quotation marks and italics.Examples: ‘24ch’ , ‘OFF’ . |
| Instructions | The individual steps of instruction are numbered consecutively. The result of a step is indented and highlighted by an arrow.
Example:1. witch on the device.2 .Press [Auto]. ð Automatic operation is started.3. Switch off the device. |
| Cross-references | References to other locations in this manual are identified by an arrow and the specified page number. In the electronic version of the manual, you can click the cross-reference to jump to the specified location.Example: See Ä ‘Cross-references’ on page 8. |
Symbols and signal words
In this section, you will find an overview of the meaning of symbols and signal words that are used in this manual.
| Signal word | Meaning |
| DANGER! | This combination of symbols and signal words indicates an immediately dangerous situation that will result in death or serious injury if it is not avoided. |
| CAUTION! | This combination of symbol and signal words indicates a possible dangerous situation that can result in minor injury if it is not avoided. |
| NOTICE! | This combination of symbol and signal words indicates a possible dangerous situation that can result in material and environmental damage if it is not avoided. |
General information
| Warning signs | Type of danger |
 |
Warning – danger zone. |
Safety instructions
Intended use
Drum modules are intended to be used for converting digital trigger signals from drum pads to various percussion sounds. Use the unit only as described in this manual. Any other use or use under other operating conditions is considered to be improper and may result in personal injury or property damage. No liability will be assumed for damages resulting from improper use.This device may be used only by persons with sufficient physical, sensorial, and intellectual abilities and having corresponding knowledge and experience. Other persons may use this device only if they are supervised or instructed by a person who is responsible for their safety.
SafetyDANGER!Danger for childrenEnsure that plastic bags, packaging, etc. are disposed of properly and are not within reach of babies and young children. Choking hazard! Ensure that children do not detach any small parts (e.g. knobs or the like) from the unit. They could swallow the pieces and choke! Never let children unattended use electrical devices.
CAUTION!Possible hearing damageWith loudspeakers or headphones connected, the device can produce volume levels that may cause temporary or permanent hearing impairment. Do not operate the device permanently at a high volume level. Decrease the volume level immediately if you experience ringing in your ears or hearing impairment.![]() NOTICE!Operating conditionsThis device has been designed for indoor use only. To prevent damage, never expose the device to any liquid or moisture. Avoid direct sunlight, heavy dirt, and strong vibrations. Only operate the device within the ambient conditions specified in the chapter ‘Technical specifications’ of this user manual. Avoid heavy temperature fluctuations and do not switch the device on immediately after it was exposed to temperature fluctuations (for example after transport at low outside temperatures). Dust and dirt inside can damage the unit. When operated in harmful ambient conditions (dust, smoke, nicotine, fog, etc.), the unit should be maintained by qualified service personnel at regular intervals to prevent overheating and other malfunction.
NOTICE!Operating conditionsThis device has been designed for indoor use only. To prevent damage, never expose the device to any liquid or moisture. Avoid direct sunlight, heavy dirt, and strong vibrations. Only operate the device within the ambient conditions specified in the chapter ‘Technical specifications’ of this user manual. Avoid heavy temperature fluctuations and do not switch the device on immediately after it was exposed to temperature fluctuations (for example after transport at low outside temperatures). Dust and dirt inside can damage the unit. When operated in harmful ambient conditions (dust, smoke, nicotine, fog, etc.), the unit should be maintained by qualified service personnel at regular intervals to prevent overheating and other malfunction.![]() NOTICE!External power supplyThe device is powered by an external power supply. Before connecting the external power supply, ensure that the input voltage (AC outlet) matches the voltage rating of the device and that the AC outlet is protected by a residual current circuit breaker. Failure to do so could result in damage to the device and possibly the user. Unplug the external power supply before electrical storms occur and when the device is unused for long periods of time to reduce the risk of electric shock or fire.
NOTICE!External power supplyThe device is powered by an external power supply. Before connecting the external power supply, ensure that the input voltage (AC outlet) matches the voltage rating of the device and that the AC outlet is protected by a residual current circuit breaker. Failure to do so could result in damage to the device and possibly the user. Unplug the external power supply before electrical storms occur and when the device is unused for long periods of time to reduce the risk of electric shock or fire.
Features
- Space-saving, complete e-drum set for beginners
- 12 preprogrammed drum kits
- Metronome
- Connections for headphones, AUX, USB, and MIDI
- including drum tracks, cabling, sticks, stick holders, headphones, and seat
Installation
| Setup, connecting pads and pedals | Setup and assembly of the pads and pedals are described in detail in the enclosed assembly guide. Finally, check that all cables between the pads and the e-drum module have been properly connected. |
| Connecting the power adapter | Connect the included power adapter to the 9V input of the e-drum module. Then plug the mains plug into the socket. |
| Connecting headphones | Connect your stereo headphones to the phone’s output of the drum module. |
| Connecting audio devices | Connect the inputs of your amplifier or active monitors to the [OUTPUT] sockets of the drum module. |
| Connecting a CD or MP3 player | Connect a CD or MP3 player to the input socket [AUX] IN of the drum module. |
| Connecting USB devices | Connect external MIDI devices or your computer to the USB port of the drum module. |
Connections and controls
Front panel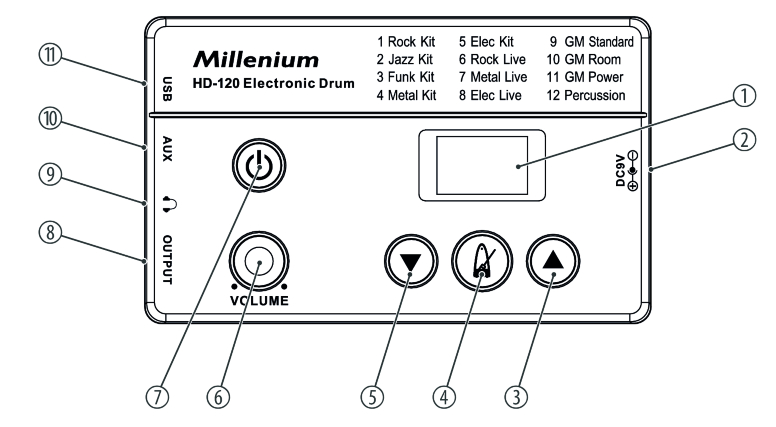
| 1 | Display |
| 2 | [DC 9V]
Connection socket for the power adapter |
| 3 | ⇑Selects an option or sets a value. |
| 4 | ⇓Turns the metronome on and off. |
| 5 | Selects an option or sets a value. |
| 6 | [VOLUME]
Volume control. Controls the volume of the drum kits. |
| 7 | Pressing turns the device on. Holding downturns the device off. |
| 8 | [OUTPUT]
Line output for external audio devices, designed as 3.5 mm jack socket |
| 9 | Headphones output, designed as 3.5 mm stereo jack socket. |
| 10 | [AUX]
Input for external audio devices like MP3 or CD players, designed as 3.5 mm stereo jack socket. |
| 11 | [USB] USB MIDI port, designed as USB-B socket |
Rear panel
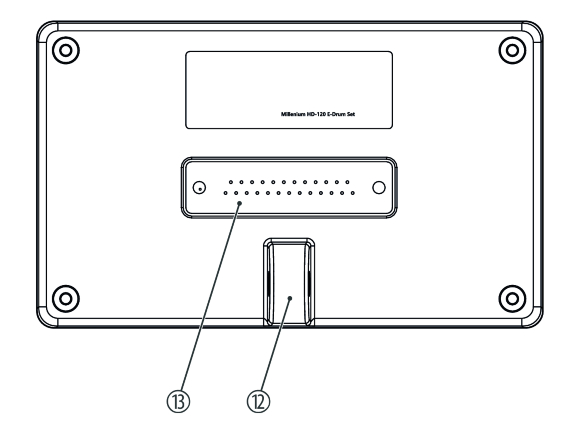
| 12 | Holder for attaching the drum module to the drum set |
| 13 | Connection socket for connecting cable to the drum set, designed as 25-pin D-sub connector socket |
Operating
Functions
| Turning on / off | Check all cable connections for correct fit before turning on Before switching on, turn the [VOLUME] control to a minimum. Press to turn on the drum module. Press and hold to turn off the drum module. |
| Adjusting the volume | To adjust the volume, hit a pad and at the same time adjust the volume of the drum module with the [VOLUME] control. |
| Software version | To view system information, press and hold for 3 seconds while the device is on. The current software version is displayed. |
| Reset to factory defaults | To reset the drum module to factory settings, turn it off first. Then press and hold |
Selecting drum kits
A drum kit is a compilation in which a certain sound (Voice) and several sound parameters are assigned to each pad. Selecting different drum kits lets you customize the sound in seconds to the desired music genre.To select a certain drum kit, proceed as follows:→Press⇑ or ⇓to select the desired drum kit.→The current kit name and kit number are displayed.
The following drum sets are available:
| Number | Drum kit |
| 1 | Rock Kit |
| 2 | Jazz Kit |
| 3 | Funk Kit |
| 4 | Metal Kit |
| 5 | Elec Kit |
| 6 | Rock Live |
| 7 | Metal Live |
| 8 | Elec Live |
| 9 | GM Standard |
| 10 | GM Room |
| 11 | GM Power |
| 12 | Percussion |
Playing the drum kit
Like on an acoustic drum kit, the pads respond to different playing techniques and dynamics. All pads are velocity-sensitive. Some voices change their timbre depending on the punch used.
- Bass Drum– Change the sound of the bass drum by striking the pedal with different strengths and speeds.
- Hi-hatChange the sound of the hi-hat by combining pedal and stroke techniques in different ways.– Strike the Hi-hat pad without pressing the pedal.– Strike the Hi-hat pad with a fully pressed pedal.– Step on the hi-hat pedal without hitting the hi-hat pad.– Play the Hi-hat with a fully pressed pedal and then open it suddenly.
Metronome function
Switch on the drum module. Press to enable the metronome. While the Metronome is on, the indicator LED of the button is flashing.
Settings
- Press to enable the metronome.
- To set the desired tempo, keep pressed until ‘b – (number)’ appears in the display.
- Use or to set a value ‘1’ … ‘5’ for the time signatures 1/4 … 5/4.
- Press to quit the setting mode.
- To turn off the metronome, press again.
Adjusting the pedals
Temperature fluctuations or humidity can alter the sensitivity of the pedals. To reset the sensitivity of the pedals to factory defaults:
- While the drum set is switched off, simultaneously press and hold and .⇒The display shows ‘bdF’ .
- Step on the bass drum pedal and hold the pedal in this position.⇒flashes green and orange during bass drum pedal setup.
- When stops flashing, the bass drum pedal setup is finished. Now release the bass drum pedal.⇒The display shows ‘HHF’ .
- Step on the Hi-hat pedal and hold the pedal in this position.⇒flashes green and orange during the Hi-hat pedal setup.
- When lights red, the Hi-hat pedal setup is finished. Now release the Hi-hat pedal.⇒Pedal adjustment is complete.
MIDI implementation
| Function | Transmitted | Recognized | Remarks | |
| Basic channel | Default | 1-8, 10-16 | 1-8, 10-16 | |
| Changed | No | No | ||
| Mode | Default | Mode 3 | Mode 3 | |
| Messages | No | No | ||
| Altered | ******** | ******** | ||
| Note number | 0…127 | 0…127 | ||
| True voice | ******** | 0…127 | ||
| Velocity | Note ON | 1…127 | 1…127 | |
| Note OFF | No | 1…127 | ||
| Aftertouch | Keys | No | No | |
| Channels | No | No | ||
| Pitch bend | No | Yes | Bank select | |
| Control change | 0 | No | Yes | Modulation |
| 1 | No | Yes | Foot control | |
| 4 | No | Yes | Portamento time | |
| 5 | No | Yes | Data entry | |
| 6 | No | Yes | Volume | |
| 7 | No | Yes | Bank select | |
| 10 | No | Yes | Pan | |
| 11 | No | Yes | Expression | |
| 64 | No | Yes | Sustain pedal | |
| 65 | No | Yes | Portamento ON/OFF | |
| 66 | No | Yes | Sostenuto pedal | |
| 67 | No | Yes | Soft pedal | |
| 71 | No | Yes | Resonance | |
| 72 | No | Yes | Release time | |
| 73 | No | Yes | Attack Time | |
| 74 | No | Yes | Cut off | |
| 80 | No | Yes | Reverb program | |
| 81 | No | Yes | Chorus program | |
| 91 | No | Yes | Reverb level | |
| 93 | No | Yes | Chorus level | |
| 120 | No | Yes | All Sound Off | |
| 121 | No | Yes | Reset All Controllers | |
| 123 | No | Yes | All Notes Off | |
| Program change | No | Yes | ||
| System exclusive | No | Yes | ||
| System common | Song Position | No | No | |
| Song Select | No | No | ||
| Tune | No | No | ||
| System real time | Clock | No | No | |
| Command | No | No | ||
| Aux messages | Local ON/OFF | No | No | |
| All Notes OFF | No | No | ||
| Active Sense | Yes | No | ||
| Reset | No | No |
Technical specifications
| Input connections | Power supply | Connector socket for external power adapter |
| AUX in | 1 × 3.5 mm stereo phone socket | |
| Signal transmission drum set | 1 × D-sub connector socket, 25-pin | |
| Output connections | Line out | 1 × 3.5 mm jack socket |
| Headphones | 1 × 3.5 mm stereo phone socket | |
| MIDI | USB-B | |
| Drum kits | 12 | |
| Power supply | External power adapter, 100 – 240 V 50/60 Hz | |
| Operating voltage | 9 V / 300 mA , centre negative | |
| Dimensions (W × H × D) | 451 mm × 726 mm × 286 mm | |
| Weight | 20.5 kg | |
| Ambient conditions | Temperature range | 0 °C…40 °C |
| Relative humidity | 20 %…80 % (non-condensing) |
Technical specifications
Further information
| Rack included | Yes |
| Seat included | Yes |
| Bass drum pedal included | Yes |
| Headphones included | Yes |
| Mesh Head Pads | No |
| Stereo pads | No |
| Number of direct outputs | 0 |
Plug and connection assignment
Introduction
This chapter will help you select the right cables and plugs to connect your valuable equipment in such a way that a perfect sound experience is ensured. Please note these devices, because especially in ‘Sound & Light’ caution is indicated: Even if a plug fits into the socket, an incorrect connection may result in a destroyed power amp, a short circuit or ‘just’ in poor transmission quality!
Balanced and unbalanced transmission
Unbalanced transmission is mainly used in semi-professional environments and in hifi use. Instrument cables with two conductors (one core plus shielding) are typical representatives of the unbalanced transmission. One conductor is ground and shielding while the signal is transmitted through the core.
Unbalanced transmission is susceptible to electromagnetic interference, especially at low levels, such as microphone signals and when using long cables.
In a professional environment, therefore, balanced transmission is preferred, because this enables an undisturbed transmission of signals over long distances. In addition to the conductors ‘Ground’ and ‘Signal’, in a balanced transmission, a second core is added. This also transfersthe signal, but phase-shifted by 180°.Since the interference affects both cores equally, by subtracting the phase-shifted signals, the interfering signal is completely neutralized. The result is a pure signal without any noise interference.
Three-pole 1/8″ mini phone jack (stereo, unbalanced)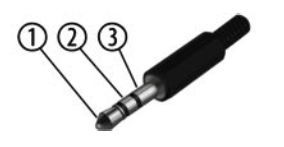
- Signal (left)
- Signal (right)
- Ground, shielding
Cleaning
Device componentsClean the externally accessible device parts regularly. The frequency of cleaning depends on the operating environment: wet, smoky or particularly dirty surroundings can cause more accumulation of dirt on the device parts.
- Clean with a soft dry cloth.
- Stubborn dirt can be removed with a slightly dampened cloth.
- Never use cleaners containing alcohol or thinner.
- Do not place vinyl objects on the device, as vinyl may stick to the surface or cause it to discolour.
Protecting the environment
Disposal of the packaging material For the transport and protective packaging, environmentally friendly materials have been chosen that can be supplied to normal recycling. Ensure that plastic bags, packaging, etc. are properly disposed of. Do not just dispose of these materials with your normal household waste, but make sure that they are collected for recycling. Please follow the notes and markings on the packaging.
Disposal of your old device
 This product is subject to the European Waste Electrical and Electronic Equipment Directive (WEEE) in its currently valid version. Do not dispose of with your normal household waste. Dispose of this device through an approved waste disposal firm or through your local waste facility. When discarding the device, comply with the rules and regulations that apply in your country. If in doubt, consult your local waste disposal facility.
Musikhaus Thomann · Hans-Thomann-Straße 1 · 96138 Burgebrach · Germany · www.thomann.de
References
[xyz-ips snippet=”download-snippet”]