
User Manual

minleaf ML-WT1
ATTENTION
For the correct installation and use of this equipment, please read carefully the requirements and strictly follow the instructions.
Basic requirements:
- Do not disassemble the equipment by yourself. Please contact a specialized serviceman if the equipment is out of order.
- Do not under any circumstance modify the structure, safety features, or blade design without guidance from a specialized serviceman.
- Obey local laws and regulations when using this product.
Assembly Requirements:
- Read the user manual before assembling the wind generator or starting maintenance.
- Don’t install the wind turbine on a rainy day or when the wind scale is at Level 3 or above.
- After opening the package, it is advised to short circuit the three leads of the wind turbine (the exposed copper parts should be screwed together).
- Before the installation of the wind turbine, lightning grounding must be prepared. Follow grounding according to national standards, or according to the local environment and soil condition.
- When assembling the Wind turbine, all parts should be fastened only with the fasteners specified.
- The battery must be connected before the wind turbine is connected to the controller.
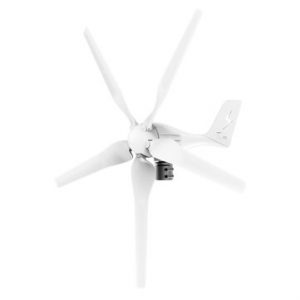
AT A GLANCE
- Body frame
- Hoop seat
- Axis
- Hub
- Blade
- Anti-slack nut
- Fairing
- Bolt for hoop
- Elastic washer
- Bolt for blades
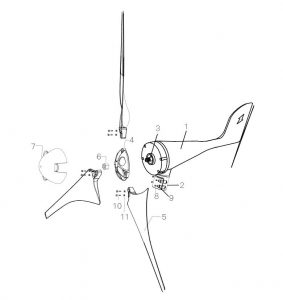
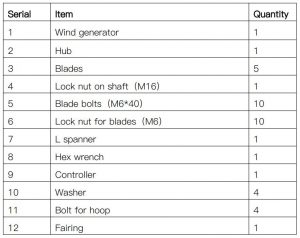
PRODUCT LIST
SPECIFICATIONS
- Model: ML-WT1
- Power: 1000 W
- Voltage: 12 V/24 V
- Starting wind speed: 2.0 m/s
- Rated wind speed: 13.0 m/s
- Number of blades: 5
- Generator type: Three-phase AC permanent magnet synchronous generator
- Blade material: Nylon fiber
- Host weight: 10.3 kg
INSTALLATION
- Use 5 blade bolts to fix blade and hub.
- Tighten blade bolts and nuts with the L wrench.
- Connect 3 wires to the transmission cables; make sure they are long enough to bepulled out from the bottom of the tower.
- Attach the hoop on top of the tower and tighten the screws with an L wrench (not included in the package)
- Insert a nut into the hexagonal hole on the hub to fix the hub onto the generator; tighten up by holding the wrench with your left hand and rotating the hub clockwise with your right hand.
- Tighten the cone onto the hub.
- Connect the controller to a battery, then attach transmission cables from the tower to the controller.
MAINTENANCE
- Wind turbines are always exposed, regularly check if the turbine moves in the wind and that the cables are connected. Use a telescope for extra visibility if required.
- Timely inspection should be made after a heavy storm. If there is any damage, put down the tower for maintenance. If mounted on a streetlight, an electrician should safely climb the pole to check if the generator is not short circuited and is operating properly.
- Maintenance-free batteries should be kept clean.
[xyz-ips snippet=”download-snippet”]