
MINN KOTA Engine Mount Trolling Motors User Manual

Please thoroughly read this user manual. follow all instructions and heed all safety & cautionary notices below. Use of this motor is only permitted for persons that have read and understood these user instructions. Minors may use this motor only under adult supervision.
Basic Operation
Note: Optimal operating condition is with outboard engine trimmed down
CAUTION:Continuous high speed operation with the unit submerged, can and will result in heavy steering and could cause severe damage to the motor or propeller.
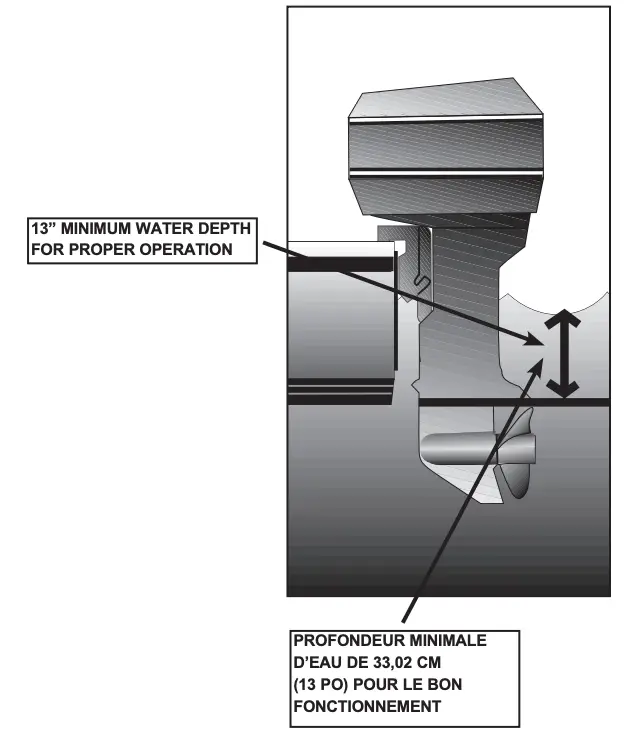
Once installed, the EM unit should be fully submerged when being used. See illustration right.
Trim the main engine, to bring the EM motor and propeller out of the water, before engaging in high speed propulsion with the main engine. Failure to properly trim the outboard can and will result in “heavy steering”. Since there are many different boat/ motor configurations, you should trim the outboard “up” until proper steering returns. See illustration right.
Applications
MINN KOTA ENGINE MOUNTED ELECTRIC FISHING MOTOR
Before installing your MINN KOTA Electric fishing Motor, make sure that the model you have selected is right for your boat and motor. Use the chart below to verify you have selected the right size motor based on the recommendations below.
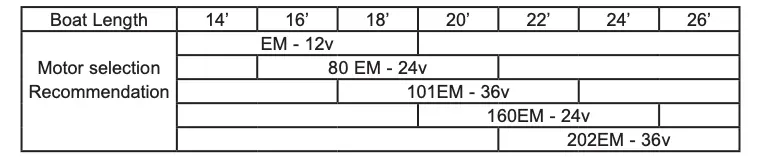
Measure the water depth to make sure that your boat rides low enough in the water so that the MINN KOTA motor and propeller will be fully submerged. Make sure you measure from the waterline to the top of the anti-cavitation plate of the outboard engine. Because of its unique mounting location, usage of Minn kota Engine Mounted Electric Fishing Motors may be restricted on certain smaller and /or lighter weight boats. A minimum water depth is required for proper operation. Use the chart and the illustration on page 3 to determine if your boat meets the minimum water depth.
WARNING: Engine Mount Trolling Motors are designed to be center mounted ONLY. Mounting an Engine Mount outside of a boats centerline can cause damage to the EM or to the boats engine. Water craft with more than a single outboard are generally not a proper application for the Engine Mount.
In addition, check your boat for possible interference that may be caused by swimming platforms, trim and tilt mechanisms and other attachments that could interfere with the Minn kota motor once it is installed. Be sure to check for clearances with your engine both in its down position and in its up or tilt position.
The following tools and items are required to complete the installation of your MinnKota Motor:
- An electric drill with a 3/8” and a 1/8” drill bit.
- A 9/16” wrench and 9/16” socket wrench with extension.
- A phillips head screw driver.
- Two clamps to help hold the mounting bracket in place while marking the holes for drilling.
- One, two, or three 12-volt batteries to connect to your MinnKota motor (See Battery Sections).
NOTE: Installation procedures are the same for both outboards and I/O’s.
Installation of Motor
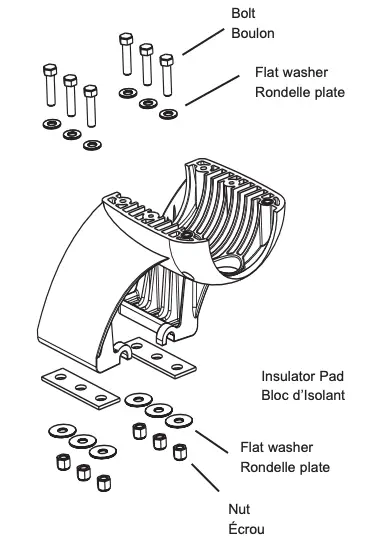
Position the MinnKota Engine Mount Motor on single EM units, or the lower mount bracket on dual EM units onto the anti-cavitation plate of the main engine. Place the MinnKota EM motor as close to the main engine as possible. In some cases the mounting bracket may need to be “flexed” in or out to insure a good fit on the anti-cavitation plate.
- Clamp or hold the motor in place and carefully mark and drill six 3/8” holes.
- Place the insulator pad between the feet of the EM lower mount bracket and the cavitation plate.
- Place the six 3/8” bolts in place along with the washers as shown, and attach with the hex nuts.
- On dual units it will be necessary to mount the dual upper mount bracket with motors to the lower mount bracket with the six 1/4” screws provided.
- Route the cable(s) from the MinnKota motor(s) through the cable hooks into the boat through a cable port or any other available opening.
- On some boats, it may be necessary to add a cable port through the transom. Consult your marine dealer for appropriate hardware.
- Be sure to leave enough slack in the cable to raise and lower the main engine. Use the cable ties supplied to secure the MinnKota EM cable(s) to the engine housing or to other cables on the boat to prevent snagging, and to make sure that the cable does not become lodged underneath the main engine bracket when it is raised and lowered.
- Check for cable pinch by turning the outboard or I/O from lock to lock.
- Be sure to use the adhesive filled heatshrink provided on the motor connections to prevent corrosion.
WARNING: Remove ignition key to prevent accidental starting of main engine during installation.

Installation of Module
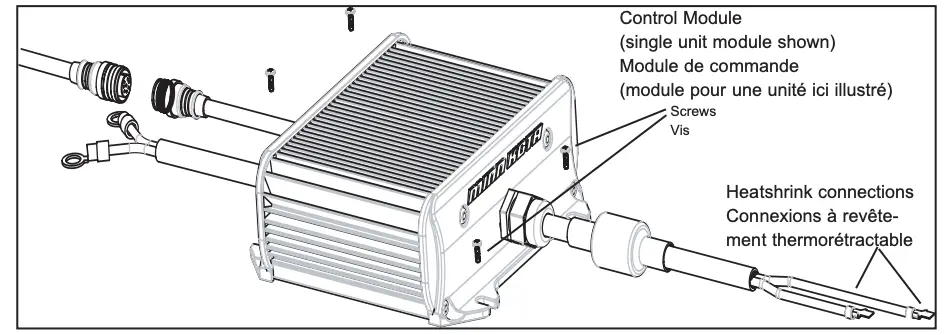
The control module contains all of the electronics that are used to control the speed of your MINN KOTA Motor. The control module should be mounted in or near your boat’s battery compartment.
- To mount the module, mark and drill 1/8-inch pilot holes and fasten securely with the four #10 screws provided.
Installation of Control
The hand controller comes equipped with approximately 18 feet of cable and is designed to be installed at or near the driver’s seat. Self-adhesive Velcro® fabric is supplied to mount the hand controller to any smooth surface. This allows you to remove the hand controller and operate it from anywhere in the boat. The controller, for example, can be mounted on or near the dash board, placed by the throttle control for the main engine or on the side of the driver’s seat.
- Be sure the surface where you are going to mount the controller is clean and dry. Attach the fabric pad Velcro® to the back of the hand controller box. Attach the hooked pad piece of Velcro® to the boat where the controller will be located.
- Route the cable from the controller through a side wall or along the edge of the floor of the boat to the battery area where the electronics module is located.
Installation of Cables
Complete the installation of the motor by connecting the remaining cables:
- Make sure the hand controller is in the “off” position
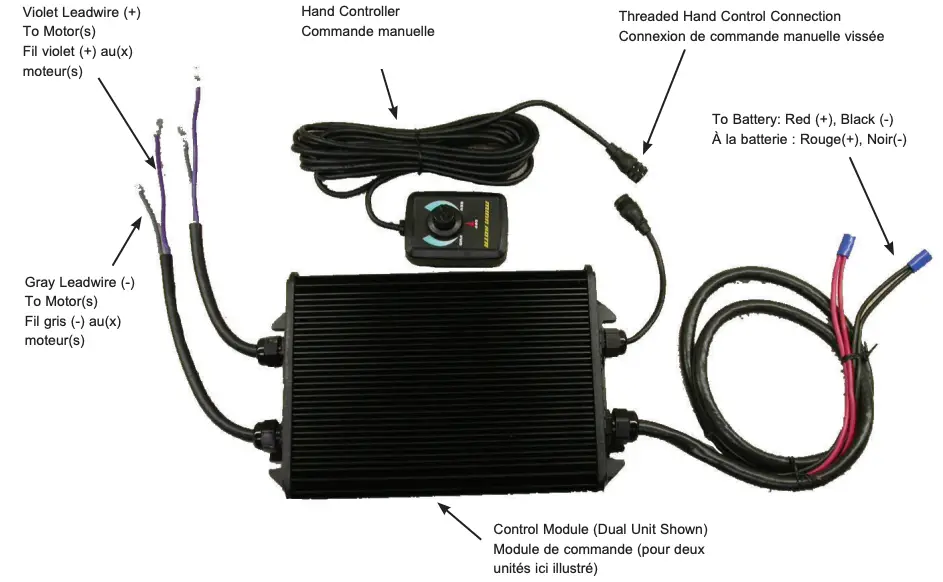
- Slide heat shrink over the cable(s) from the MinnKota Motor(s) and connect them to the control module. Center heatshrink and apply heat.
- Connect the battery cables according to your corresponding wiring diagram.
- Attach the red leadwire ring terminal to the ( + ) terminal.
- Attach the black leadwire ring terminal to the ( – ) terminal.
- Secure tightly with the wing nuts.
- Plug in the hand controller cable to the matching cable on the back side of the control module. Make sure this cable is threaded together snug and secure.
WARNING: Arcing (sparking) can cause batteries to explode. To prevent arcing, always place the speed control knob on OFF before connecting the cables.
NOTICE: DO NOT APPLY LUBRICANT OR ANY TYPE OF GREASE TO TROLLING MOTOR CONNECTORS
Cautions
Attention:
- Avoid running your motor with the propeller outside of the water. This may result in injuries from the rotating propeller.
- It is recommended to set the speed selector to zero and place the motor in the deployed position prior to connecting power cables. Disconnect power cables prior to stowing.
- Always ensure that the power cables are not twisted or kinked; and that they are securely routed to avoid a safety or trip hazard. Ensure cables are unobstructed in all locations to avoid damaging the wire insulation. Damage to the insulation could result in failure or injury.
- Always inspect the insulation of the power cables prior to use to ensure they are not damaged.
- Disregarding these safety precautions may result in an electrical short of the battery(s) and/or motor. Always disconnect the motor from the battery(s) before cleaning or checking the propeller.
Caution!
- Always operate the motor in a safe distance away from obstructions. Never approach the motor when the propeller is running. Contact with a spinning propeller may endanger you or others.
- Always exercise safe practices when using your motor; stay clear of other watercrafts, swimmers, and any floating objects. Always obey water regulations applicable to your area of operation.
- Never operate the motor while under the influence of alcohol, drugs, medication, or other substances which may impair your ability to safely operate equipment.
- This motor is not suitable for use in strong currents exceeding the thrust level of the motor.
The constant noise pressure level of the motor during use is less than 70dB(A). The overall vibration level does not exceed 2,5m/sec≈.
Circuit Breaker
Boat Rigging and Motor Installation:
An over-current protection device (circuit breaker or fuse) must be used with this system. Coast Guard requirements dictate that each ungrounded current-carrying conductor must be protected by a manually reset, trip-free circuit breaker or fuse. The type (voltage and current rating) of the fuse or circuit breaker must be sized accordingly to the trolling motor used. The following breaker sizes are recommended guidelines:
Maximum thrust Voltage Recommended circuit breaker rating
| EM55 12V | 12V | 60A @ 12VDC |
| EM80 24V | 24V | 60A @ 24VDC |
| EM101 36V | 36V | 50A @ 36VDC |
| EM160 24V | 24V | 120A @ 24VDC |
| EM202 36V | 36V | 100A @ 36VDC |
The appropriate wire size needed to connect your Engine Mount System to the trolling motor batteries varies depending on the length of cable needed and voltage of the motor. For additional information, please consult appropriate ABYC (American Boat and Yacht Council) and Coast Guard requirements.
Reference:United States Code of Federal Regulations: 33 CFR 183 – Boats and Associated Equipment ABYC E-11: AC and DC Electrical Systems on Boats
EM Riptide 5512V
This page provides MinnKota® WEEE compliance disassembly instructions. For more information about where you should dispose of your waste equipment for recycling and recovery and/or your European Union member state requirements, please contact your dealer or distributor from which your product was purchased.Tools required but not limited to: Flat Head screw driver, Phillips screw driver, Socket set, Pliers, wire Cutters.
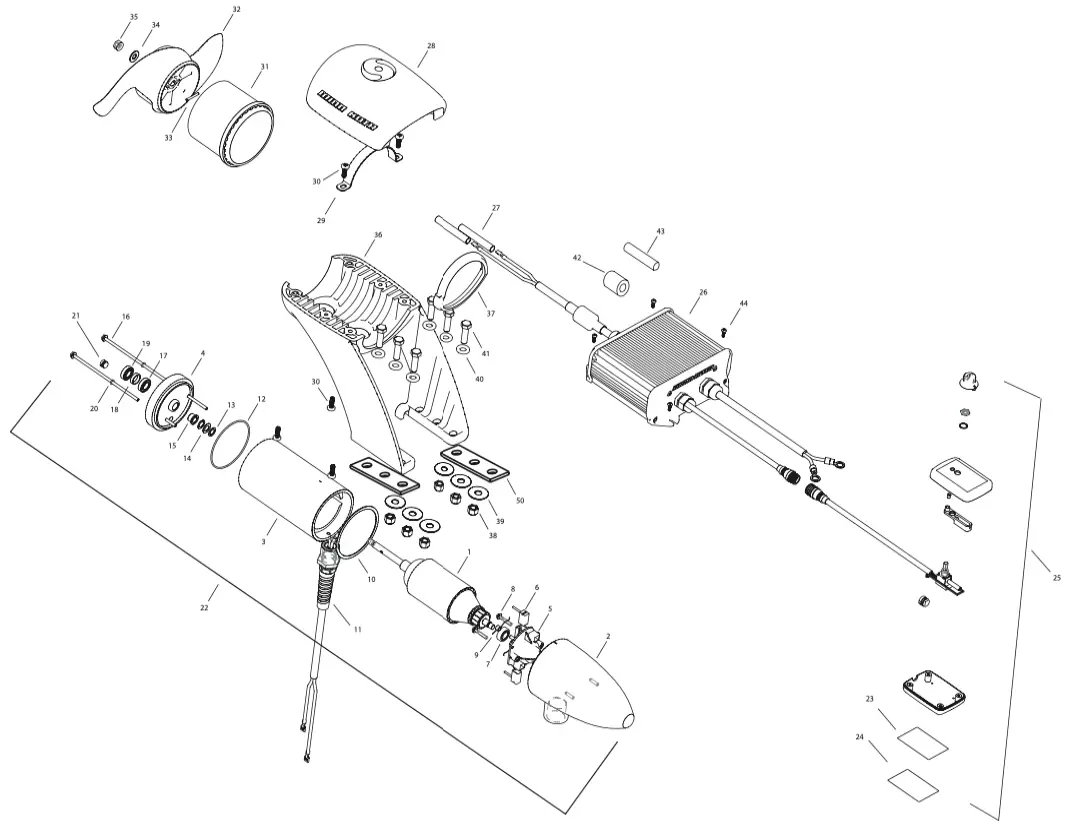
Parts List
Propeller
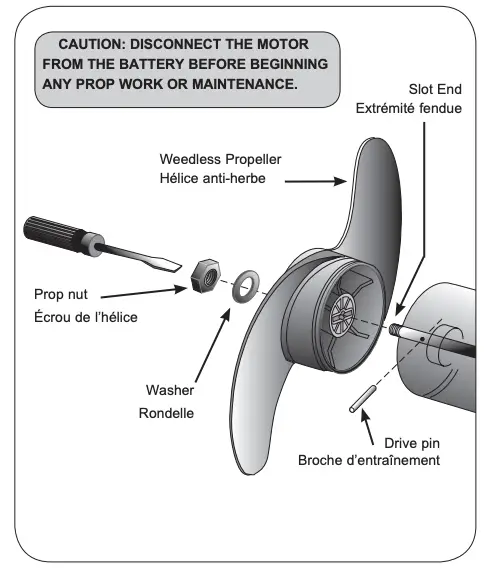
PROPELLER REPLACEMENT:
- Disconnect motor from battery prior to changing the propeller.
- Hold the propeller and loosen the prop nut with a pliers or a wrench.
- Remove prop nut and washer. If the drive pin is sheared/broken, you will need to hold the shaft steady with a screwdriver blade pressed into the slot on the end of the shaft.
- Turn the old prop to horizontal ( as illustrated ) and pull it straight off. If drive pin falls out, push it back in.
- Align new propeller with drive pin.
- Install prop washer and prop nut.
- Tighten prop nut 1/4 turn past snug. [25-35 inch lbs.] Be careful, over tightening can damage prop.
Troubleshooting
- Check to see if the hand controller cable is completely plugged into the control module.
- Check battery connections for proper polarity. If the connections are reversed, the motor will not run.
- Check motor(s) lead connections.
- Check the charge in the batteries to make sure they are not “dead.”
- Check motor(s) for obstructions, the motor(s) may have gone into current limit. To reset; return the speed control knob to the off position, remove obstructions and resume operation.
If the motor runs slowly:
- Use a battery gauge to see if the charge is low.
- Check for corrosion on battery terminals.
- Check for weeds or fishing line on the prop.
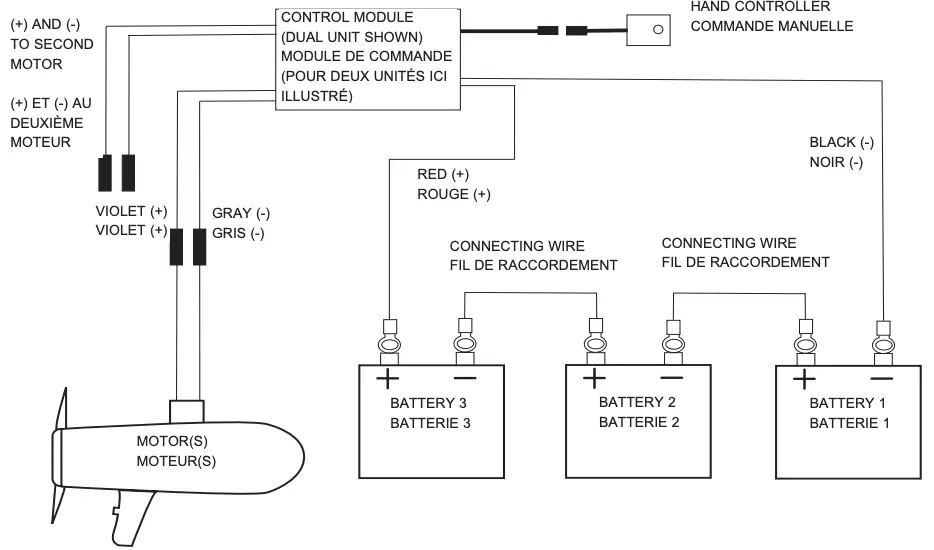
Wiring Diagram
24V Over-Current Protection Devices not shown in illustrations.
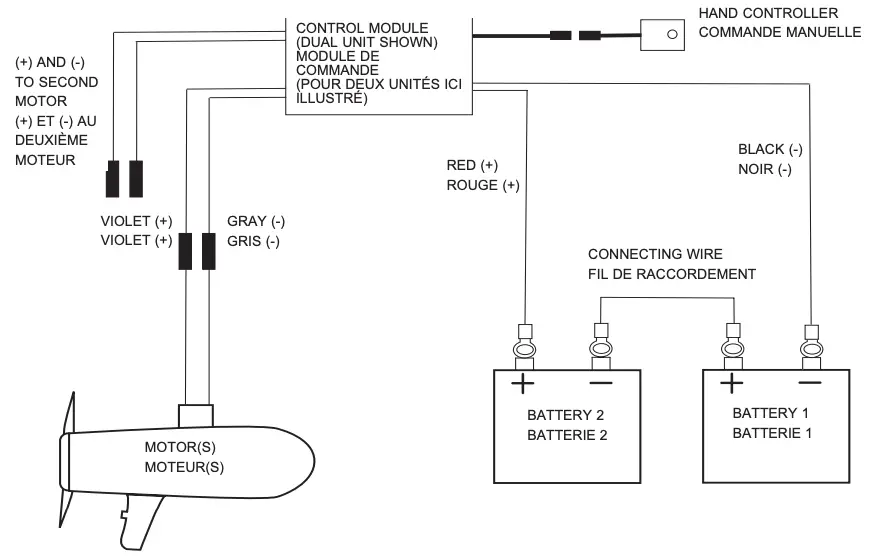
36V Over-Current Protection Devices not shown in illustrations.
Testing and Operation
Now that your MinnKota Motor is correctly installed, make sure everything is operating properly.
- Make sure that all objects and people are away from the prop.
- Slowly turn the speed control knob to FORWARD to a slow running position. If everything is hooked up properly, the prop will turn in a clock-wise motion as viewed from the inside of the boat.
- Slowly turn the speed control knob to REVERSE to a slow running position. If everything is hooked up properly, the prop will turn in a counter clockwise motion as viewed from the inside of the boat.
Operating your MinnKota Motor is as easy as switching on the lights.
- With your motor in a down position, select either a forward or reverse speed by turning the speed control knob in the desired direction.
- Steering is easy. Use your boat’s steering wheel to turn your main engine (and the MinnKota motor) either left or right.
- To stop the propeller, turn the speed control knob to OFF. The speed control switch should remain in the “off” position when operating your outboard or during storage.
Battery Connections
- Improper wiring of 24/36 volt system could cause battery explosion!
- Keep leadwire wing nut connection tight and solid to battery terminals.
- Locate battery in a ventilated compartment.
12 Volt Systems:
- Make sure that the motor is switched off (speed selector on “0”).
- Connect positive (+) red lead to positive (+) battery terminal.
- Connect negative (–) black lead to negative (–) battery terminal.
- For safety reasons do not switch the motor on until the propeller is in the water.
24 Volt Systems:
- Make sure that the motor is switched off (speed selector on “0”).
- Two 12 volt batteries are required.
- The batteries must be wired in series, only as directed in wiring diagram, to provide 24 volts.a. Connect a connector cable to positive ( + ) terminal of battery 1 and to negative ( – ) terminal of battery 2.b. Connect positive (+) red lead to positive (+) terminal on battery 2.c. Connect negative (–) black lead to negative (–) terminal of battery 1.
- For safety reasons do not switch the motor on until the propeller is in the water.
36 Volt Systems:
- Make sure that the motor is switched off (speed selector on “0”).
- Three 12 volt batteries are required.
- The batteries must be wired in series, only as directed in wiring diagram, to provide 36 volts.a. Connect a connector cable to positive ( + ) terminal of battery 1 and to negative ( – ) terminal of battery 2.b. Connect a connector cable to positive (+) terminal of battery 2 and to negative (–) terminal of battery 3.c. Connect positive (+) red lead to positive (+) terminal on battery 3.d. Connect negative (–) black lead to negative (–) terminal of battery 1.
- For safety reasons do not switch the motor on until the propeller is in the water.
If installing a leadwire plug, observe proper polarity and follow instructions in your boat owner’s manual.
See wiring diagram on following pages.
Battery Information
The motor will operate with any deep cycle marine 12 volt battery/batteries. For best results use a deep cycle, marine battery with at least a 115 ampere hour rating. As a general on the water estimate, your 12 volt motor will draw one ampere per hour and your 24 volt motor will draw .75 ampere per hour for each pound of thrust produced when the motor is running on high. The actual ampere draw is subject to your particular environmental conditions and operation requirements. Maintain battery at full charge. Proper care will ensure having battery power when you need it, and will significantly improve the battery life. Failure to recharge lead-acid batteries (within 12-24 hours) is the leading cause of premature battery failure. Use a variable rate charger to avoid overcharging.
If you are using a crank battery to start a gasoline outboard, we recommend that you use a separate deep cycle marine battery/batteries for your Minn Kota trolling motor.
Advice regarding batteries:
Never connect the (+) and the (–) terminals of the battery together. Take care that no metal object can fall onto the battery and short the terminals. This would immediately lead to a short and utmost fire danger.
Recommendation: Use battery boxes and covered battery terminal clamps like Minn Kota accessory #MK-BC-1.

ENVIRONMENTAL COMPLIANCE STATEMENT:
It is the intention of Johnson Outdoors Marine Electronics, Inc. to be a responsible corporate citizen, operating in compliance with known and applicable environmental regulations, and a good neighbor in the communities where we make or sell our products.
WEEE Directive:EU Directive 2002/96/EC “Waste of Electrical and Electronic Equipment Directive (WEEE)” impacts most distributors, sellers, and manufacturers of consumer electronics in the European Union. The WEEE Directive requires the producer of consumer electronics to take responsibility for the management of waste from their products to achieve environmentally responsible disposal during the product life cycle.
WEEE compliance may not be required in your location for electrical & electronic equipment (EEE), nor may it be required for EEE designed and intended as fixed or temporary installation in transportation vehicles such as automobiles, aircraft, and boats. In some European Union member states, these vehicles are considered outside of the scope of the Directive, and EEE for those applications can be considered excluded from the WEEE Directive requirement.
 This symbol (WEEE wheelie bin) on product indicates the product must not be disposed of with other household refuse. It must be disposed of and collected for recycling and recovery of waste EEE. Johnson Outdoors Marine Electronics, Inc. will mark all EEE products in accordance with the WEEE Directive. It is our goal to comply in the collection, treatment, recovery, and environmentally sound disposal of those products; however, these requirement do vary within European Union member states. For more information about where you should dispose of your waste equipment for recycling and recovery and/or your European Union member state requirements, please contact your dealer or distributor from which your product was purchased.
Disposal:Minn Kota motors are not subject to the disposal regulations EAG-VO (electric devices directive) that implements the WEEE directive. Nevertheless never dispose of your Minn Kota motor in a garbage bin but at the proper place of collection of your local town council.
Never dispose of battery in a garbage bin. Comply with the disposal directions of the manufacturer or his representative and dispose of them at the proper place of collection of your local town council.
 report this ad
Find out more about performance boat parts and hardware we have.
References
minnkotamotors.com/contact?_ga=2.127605770.603746578.1531245779-1812681345.1522875954
minnkotamotors.com/support/faqs?_ga=2.127605770.603746578.1531245779-1812681345.1522875954
minnkotamotors.com
minnkotamotors.com/support/service-providers/locate?_ga=2.97317784.603746578.1531245779-1812681345.1522875954
minnkotamotors.com/support/compatibility/battery-selection-and-rigging?_ga=2.168490662.603746578.1531245779-1812681345.1522875954
Search Parts
minnkotamotors.com/support
Welcome | Minn Kota
minnkotamotors.com/support/service-providers/locate?_ga=2.98701977.603746578.1531245779-1812681345.1522875954
[xyz-ips snippet=”download-snippet”]