![]() MKR-23ON-BOARD CHARGER POWER PORT1865110
MKR-23ON-BOARD CHARGER POWER PORT1865110
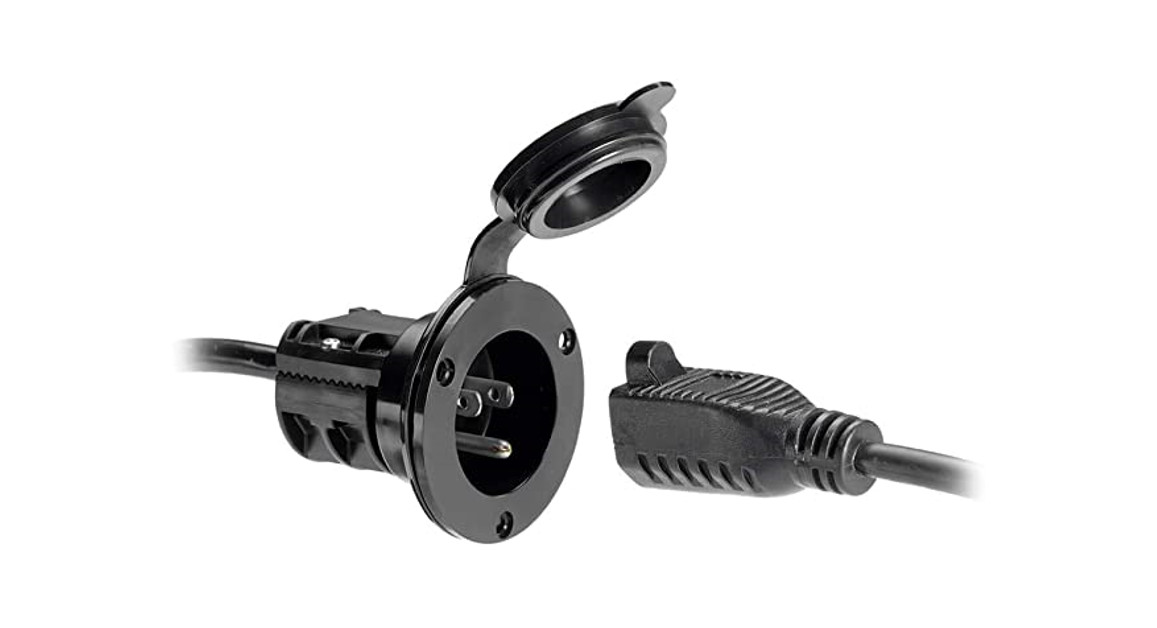
Convenient adapter that allows quick thru-hull connections to an AC extension cord – with no cutting or splicing of wires required – using the AC plug from any Minn Kota charger. The splash-resistant cover and gasket prevent corrosion on the AC plug when not in use.
| Item /
Assembly |
Part # | Description | Qty. |
| CARD-WARNING, POWER PORT | 1 | ||
| FASTENER, WARNING CARD, PWR PORT | 1 | ||
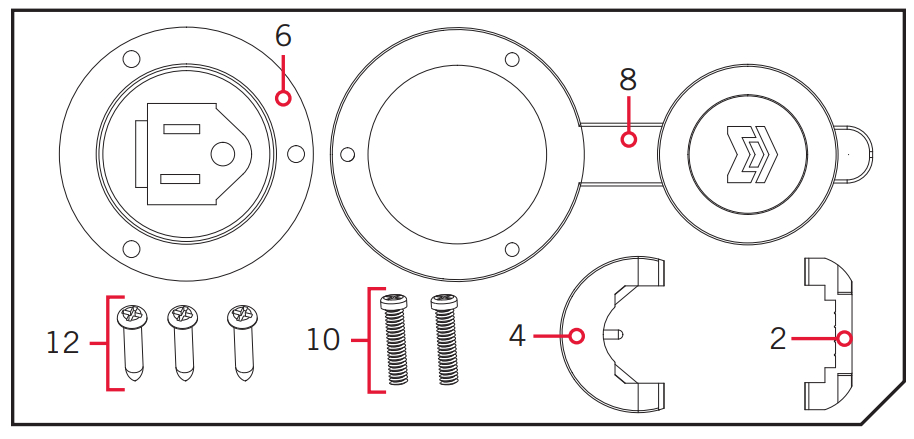
| 2 | BASKET, POWER PORT, WHT *INCLUDES 6* | 1 | |
| 4 | LUNE, POWER PORT, WHAT | 1 | |
| 6 | MAIN-PLUG, POWER PORT, WHT *INCLUDES 2* | 1 | |
| 8 | COVER-PLUG, POWER PORT, WHAT | 1 | |
| 10 | SCREW, SS-POWER PORT | 2 | |
| 12 | SCREW, PH-OVAL, SS | 3 | |
| INSERT, BRASS-POWER PORT | 2 |
![]() Not shown on Parts Diagram.
Not shown on Parts Diagram.![]() This part is included in an assembly and cannot be ordered individually.
This part is included in an assembly and cannot be ordered individually.
TOOLS AND RESOURCES REQUIRED
| • Drill | • 1/8” drill bit | • 1-7/8” hole saw |
| • Pen or similar marking tool | • 9/64” drill bit | • Screwdriver |
INSTALLATION
- Select a location on the boat that is at least 21” away from all batteries and fuel fill lines.NOTICE: Before drilling holes check for wires and supports on the area being drilled.
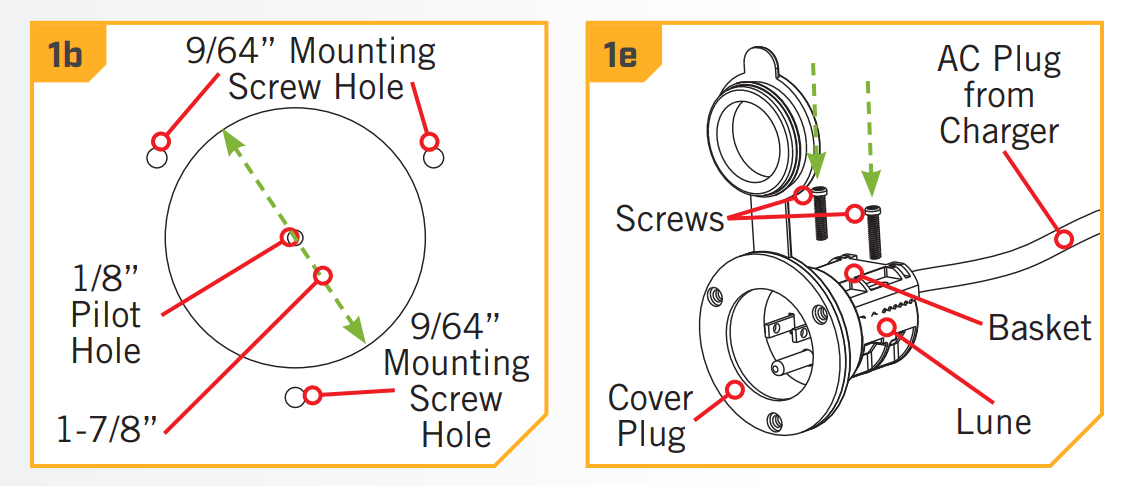
- Drill a 1/8” pilot hole in the center of the selected location.
- Using the pilot hole, align a 1-7/8” hole saw to cut the mounting hole.
- Place the AC Power Port in the 1-7/8” hole to mark and drill holes for the 3 mounting screws.
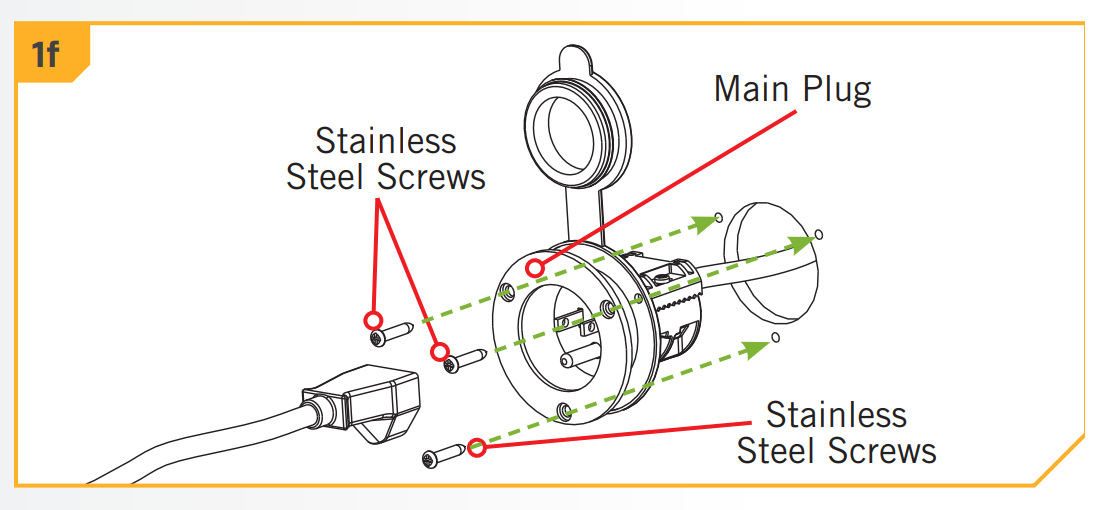
- Put the AC cord through the 1-7/8” hole from the inside the boat and place the AC plug into the AC Power Port and tighten the 2 screws (Item #10).
- Mount the AC Power Port in place with the 3 Stainless Screws (Items #12) provided. Your new AC Power Port is now ready for use.
 WARNING
Avoid serious injury or death from fire, explosion, or electrical shock. This device must be connected to a Ground Fault Circuit Interrupt (GFCI) protected AC outlet. When using an extension cord, connect the AC charger before connecting to the GFCI protected AC outlet. Make connections in a secure manner that will avoid contact with the water. TAG ONLY TO BE REMOVED BY CONSUMER.
![]()
![]() minnkotamotors.comPart #2377125Minn Kota Consumer & Technical Service Johnson Outdoors Marine Electronics, Inc.PO Box 8129, Mankato, MN 56001121 Power DriveMankato, MN 56001, Phone (800) 227-6433, Fax (800) 527-4464
minnkotamotors.comPart #2377125Minn Kota Consumer & Technical Service Johnson Outdoors Marine Electronics, Inc.PO Box 8129, Mankato, MN 56001121 Power DriveMankato, MN 56001, Phone (800) 227-6433, Fax (800) 527-4464![]() ©2021 Johnson Outdoors Marine Electronics, Inc.All rights reserved.
©2021 Johnson Outdoors Marine Electronics, Inc.All rights reserved.
References
[xyz-ips snippet=”download-snippet”]