
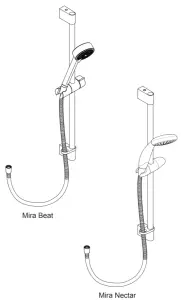
Mira Beat and Nectar Shower Fittings
GENERAL
- Make sure that the shower fittings are installed by a competent installer.
- Installations must comply with Water Regulations (Bye-Laws, Scotland), and any other Local Regulations and Building Regulations in force at the time of installation.
- The shower fittings should be positioned at a convenient height for all the family. Position the fittings to spray across rather than towards the opening of the cubicle and also away from the shower control. Avoid layouts where the shower hose will be sharply kinked. This may reduce the life of the hose.
- A hose retaining ring is supplied to prevent the showerhead from dropping below the spill over level of the bath or shower, which could lead to contamination from back-siphonage.The position of the shower and shower fittings must provide a minimum gap of 25 mm between the showerhead and the spill over level of any bath, shower tray or basin and 30 mm between the showerhead and the spill over level of any toilet or bidet.
- Do not fit any form of flow control in the outlet pipe work if the shower fittings are installed in conjunction with a product that requires the fittings to act as a vent (e.g. an electric shower).
- Wall screws and wall plugs are supplied with this product.Special consideration should be given to the fixing arrangements when installing onto a dry lined, stud partition, shower cubicle or laminated panel wall structures. Installers may wish to obtain alternative proprietary cavity fixings, or choose other options, however, these methods of fixing are beyond the scope of this guide.
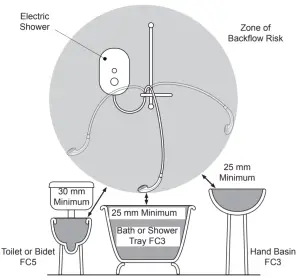
Hose retaining ring fitted and shower fittings fixed at a suitable height preventing dirty water backflow
INSTALLATION
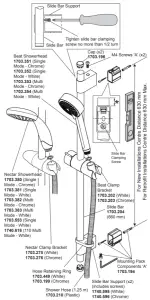
- We recommend that the slide bar is installed with the ends flush. Mark the wall fixing positions and drill two holes to suit the wall fixings. Caution! Do not drill into cables or pipes in the wall.Note! For new installation optimum fixing centres 630 mm. Replacement installation fixing centres 630 mm maximum.
- Install the wall plugs and the mounting brackets and secure with the wall screws.Note! Check for vertical alignment before tightening. The mounting brackets are slotted to aid this alignment. Then fully tighten.
- Install the clamp bracket, the hose retaining ring and the slide bar supports to the slide bar.
- Make sure that the wall screws are flush with the inside edge of the mounting brackets.Fit the slide bar supports over the mounting brackets, then adjust the slide bar vertically ensuring an equal length of slide bar protrudes from the top and bottom mounting bracket (or flush with the end of the slide bar for new installations).
- Remove the slide bar assembly carefully, preventing any further movement between the slide bar and the slide bar supports.
- Tighten the two slide bar clamping screws no more than half a turn to secure the slide bar supports to the slide bar.Caution! Overtightening these screws will cause damage.
- Install the slide bar assembly onto the mounting brackets. Tighten the 2 x M4 screws with the supplied 3 mm hexagonal key. Caution! Do not force assembly on to the mounting brackets, re-align a slide bar support if required.
Hose and Showerhead Installation
- Fit a hose seal into the conical nut and screw onto the outlet of the shower.Caution! Do not over tighten.
- Feed the hose through the hose retaining ring.
- Fit a hose seal into the conical nut and screw onto the showerhead.Caution! Do not over tighten.
- Place the showerhead assembly into the clamp bracket assembly.
Note! Do not overtighten the screws
* Note! Ensure an equal length of slide bar top and bottom.
SPECIFICATION – PRESSURES
Minimum maintained pressure: 0.1 bar (10 kPa) – Maximum maintained pressure: 5.0 bar (500 kPa)
USER MAINTENANCE
Cleaning
Many household cleaners contain abrasives and chemical substances, and should not be used for cleaning plated or plastic fittings. These finishes should be cleaned with a mild washing up detergent or soap solution, and then wiped dry using a soft cloth.
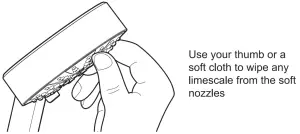
De-scaling the ShowerheadImportant! Keeping the showerhead clean and free from limescale will ensure that your shower and showerhead continue to perform to their maximum. A blocked showerhead can restrict the flow rate and may cause damage to your shower.
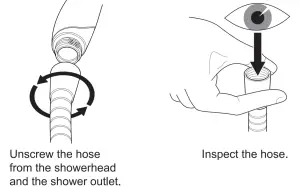
Inspecting the HoseImportant! The shower hose should be inspected periodically for damage or internal collapse, internal collapse can restrict the flow rate from the showerhead and may cause damage to the shower. Remove the shower hose from the shower, inspect and replace the hose if necessary.
GUARANTEE
The Mira Shower Fittings have been designed for domestic use only, Mira Showers guarantee the fittings against any defect in materials or workmanship for a period of one year from the date of purchase.For non-domestic installations, Mira Showers guarantee the fittings against any defect in materials or workmanship for a period of one year from the date of purchase.
For terms and conditions, refer to the back cover of this guide.
CUSTOMER SERVICE
Guarantee
Your product has the benefit of our manufacturer’s guarantee which starts from the date of purchase.Within the guarantee period we will resolve defects in materials or workmanship, free of charge, by repairing or replacing parts or product as we may choose.This guarantee is in addition to your statutory rights and is subject to the following conditions:
- The product must be installed and maintained in accordance with the instructions given in this user guide.
- Replacement under this guarantee does not extend the original expiry date. The guarantee on any replacement parts or product ends at the original expiry date.
The guarantee does not cover:
- Non product faults (such as damage or performance issues arising from incorrect installation, improper use, inappropriate cleaning, lack of maintenance, build up of limescale, frost damage, corrosion, system debris or blocked filters) or where no fault has been found with the product.
- Compensation for loss of use of the product or consequential loss of any kind.
- Damage or defects caused if the product is repaired or modified by persons not authorised by us or our appointed representative.
What to do if something goes wrongIf your product does not work correctly refer to this manual for fault diagnosis and check that it is installed and commissioned in accordance with our instructions.If this does not resolve the issue, contact us for help and advice.
 |
Helpdesk Service – Our Customer Services Team is comprehensively trained and can offer help and advice, spare parts and accessories. Please provide your model name or number and date of purchase. |
 |
Showers Website (www.mirashowers.co.uk)From our website you can download additional user guides, diagnose faults, purchase our full range of accessories and popular spares and refer to our FAQs. |
 |
Spares and Accessories – We hold the largest stocks of genuine Mira spares and accessories. Contact us for a price or visit our website to purchase items from our accessory range and popular spares. |
To Contact Us
 |
0844 571 5000 |
 |
Fax: 01 242 282595 |
 |
E-mail: Visit www.mirashowers.co.uk/contactus |
 |
Mira Customer Services Dept, Cromwell Road, Cheltenham, Gloucestershire, GL52 5EP |
To Contact Us: Eire Only
|
01 531 9337 |
|
E-mail: [email protected] |
|
|
 Mira is a registered trade mark of Kohler Mira Limited.The company reserves the right to alter product specifications without notice.
1230751-W2-B (L16A/B/C) © Kohler Mira Limited, February 2018
 report this ad
References
[xyz-ips snippet=”download-snippet”]