![]() LX CONNECTUser’s Manual
LX CONNECTUser’s Manual
![]()
Important Safety Instruction
 |
| WARNING: SHOCK HAZARD-DO NOT OPENAVIS: RISQUE DE CHOC ELECTRIQUE-NE PAS OUVRIR |
This lightning flash with an arrowhead symbol within an equilateral triangle is intended to alert the user to the presence of non-insulated “dangerous voltage” within the product’s enclosure that may be of sufficient magnitude to constitute a risk of electric shock.WARNING: To reduce the risk of electric shock, do not remove the cover (or back) as there are no user-serviceable parts inside. Refer servicing to qualified personnel.This exclamation point within an equilateral triangle is intended to alert the user to the presence of important operating and maintenance instructions in the literature accompanying the appliance.Read these instructions.Keep these instructions.Heed all warnings.Follow all instructions.Do not use this apparatus near water.Clean only with dry cloth.Do not block any ventilation openings. Install in accordance with the manufacturer’s instructions.Do not install near any heat sources such as radiators, heat registers, stoves, or other apparatus (including amplifiers) that produce heat.Do not defeat the safety purpose of the polarized or grounding plug. A grounding plug has two blades and a third grounding prong. The wide blade or the third prong is provided for your safety. If the provided plug does not fit into your outlet, consult an electrician forreplacement of the obsolete outlet.Protect the power cord from being walked on or pinched particularly at the plugs, convenience receptacles, and at the point where they exit from the apparatus.Use only with the cart, stand, tripod, bracket, or table specified by the manufacturer, or sold with the apparatus. When a cart or rack is used, use caution when moving the cart/apparatus combination to avoid injury from tip-over.Refer all servicing to qualified service personnel.Servicing is required when the apparatus has been damaged in any way, such as power supply cord or plug is damaged, liquid has been spilled or objects have fallen into the apparatus, the apparatus has been exposed to rain or moisture, does not operate normally, or has been dropped.
WARNING: Only use attachments/accessories specified or provided by the manufacturer (such as the recommended battery – not supplied).WARNING: The mains plug/appliance coupler/is used as a disconnection device; the disconnection device shall remain readily operable.CAUTION: These servicing instructions are for use by qualified service personnel only. To reduce the risk of electric shock, do not perform any servicing other than that contained in the operating instructions unless you are qualified to do so.Do not install this equipment in a confined or built-in space such as a bookcase or similar unit, and keep well ventilated in an open space. The ventilation should not be impeded by covering the ventilation openings with items such as newspapers, tablecloths, curtains, etc.WARNING: To reduce the risk of fire or electric shock, do not expose this apparatus to rain or moisture. The apparatus shall not be exposed to dripping or splashing and ensure that objects filled with liquids, such as vases, shall not be placed on the apparatus. No naked flame sources, such as lighted candles, should be placed on the apparatus.WARNING: Do not ingest the battery, Chemical Burn Hazard. This product requires a coin/button cell battery (not included). If the coin/button cell battery is swallowed, it can cause severe internal burns in just 2 hours and can lead to death. Keep new and used batteries away from children. If the battery compartment does not close securely, stop using the product and keep it away from children. If you think batteries might have been swallowed or placed inside any part of the body, seek immediate medical attention. Ground protection terminal. This product should be connected to a power outlet with ground protection.Denmark: Apparatets stikprop skal tilsluttes en stikkontakt med jord, som giver forbindelse til stikproppens jord.Finland: Laite on liitettävä suojakoskettimilla varustettuun pistorasiaan.Norway: Apparatet må tilkoples jordet stikkontakt.Sweden: Apparaten skall anslutas till jordat uttag.WARNING: No naked flame sources, such as lighted candles, should be placed on the apparatus.WARNING: Attention should be drawn to the environmental aspects of battery disposal.WARNING: Use of the apparatus in tropical climates.
Unpacking Your Loudspeaker
Lift the loudspeaker carefully out of the packing. DO NOT try and lift the loudspeaker using the protective bag.Unpack the accessories carefully.If there is any sign of damage or if the contents are incomplete, report this to your dealer as soon as possible.Retain the packing for future safe transport of the product. If you dispose of the packing, do so with respect to any recycling provisions in your area.
 WARNING: When an amplifier is driven beyond its power output capabilities it will produce distorted waveforms which will quickly damage your speakers by overheating. Make sure that your amplifier is not left unattended when playing, for example at parties, and turn the volume control down at the first sign of audible distortion.
![]() The Bluetooth® word mark and logos are registered trademarks, owned by Bluetooth SIG, Inc. and any use of such marks by IAG Group Ltd is under license. Other trademarks and trade names are those of their respective owners.
The Bluetooth® word mark and logos are registered trademarks, owned by Bluetooth SIG, Inc. and any use of such marks by IAG Group Ltd is under license. Other trademarks and trade names are those of their respective owners. aptX® software is copyright CSR plc. or its group companies. All rights reserved.The aptX® mark and the aptX® logo are trademarks of CSR plc. or one of its group companies and may be registered in one or more jurisdictions.
 Being Roon Tested means that IAG Group Ltd and Roon have collaborated to ensure you have the best experience using Roon, software, and IAG Group Ltd equipment together, so you can just enjoy the music.
 For applicable power supplies see user instructions
No dealer or distributor may vary the terms of this warranty which is personal to the original purchaser and is not transferable.Please retain the sales receipt as proof of purchase.Warranty claims must wherever possible be made through the dealer from whom the equipment was purchased. This warranty excludes:Damage caused through neglect, accident, misuse, wear, and tear, or through incorrect installation, adjustment or repairby unauthorized personnel. Any unauthorized servicing will result in loss of warranty. Liability for damage or loss occurring in the transit to or from the purchaser.Consequent damage, loss, or injury, arising from or in conjunction with this equipment.Equipment for attention under warranty should be considered return carriage paid. If equipment is found to complywith the published specification, Mission reserves the right to raise a charge.
Welcome to Mission!
The mission is a brand that purveys lifestyle audio that fuses Hi-Fi heritage with contemporary design.Music is the master, technology is the slave. Always.Mission LX CONNECT, wireless speaker system couples innovative wireless technology, an award-winning loudspeaker series and versatile Hi-Fi grade connectivity options for a ‘True Wireless’ speaker system and a new level of convenience and performance that changes the game for wireless speaker systems.LX CONNECT ofiers wireless connectivity via an advanced wireless hub that hosts all of the connectivity options for your listening pleasure.
The LX CONNECT Hub intelligently transmits left and right audio signals to the appropriate speaker via uncompressed 5.8GHz wireless audio signal transmission. There is no trailing cable between speakers or hub, with no need for the speakers to be connected together via a cable, for ‘True Wireless’ audio. The speaker system is based on the Mission LX-2 MKII speakers, with specially engineered, high-power digital amplificationmodules, offering 50w from each cabinet (100w per system).Following the LX MKII series design and performance, the LX CONNECT Speakers maintain the Mission trademark ‘Inverted Driver Geometry’ design and precision-tuned crossover to yield improved transient attack and astonishing detail. Mission DiaDrive bass units offer superior control of the low-frequency diaphragm while a refined high-frequency performance and a re-engineered cabinet bracing system further help create a loudspeaker system that outperforms its price-class.
General Information
 Please read these instructions carefully before installing your loudspeakers. A few minutes of studying this manual will ensure a superb performance from your loudspeaker for many years. Please attention to all cautions printed on the pages marked with this symbol.
Unpacking The Equipment The carton contains:
The LX CONNECT Hub
- The LX CONNECT Wireless Speakers (2 pieces)
- Two IEC mains cables suitable for your area
- One power adaptor for the hub
- One plug for the adaptor suitable for your area
- One remote controller
- One user manual and a quick start guide
Please note: The remote control requires a 1 x CR2025 type battery. Due to international shipping and courier regulations with Lithium-Ion batteries, the remote controller battery is not included in this package.Consult the dealer from whom you purchased the equipment if any item is not present. Carefully unpack the unit and accessories.Retain the packing materials for future use. Retain the user manual and information concerning the date and place of purchase of your equipment for future reference. If you transfer the unit to a third party please pass on this instruction manual along with the equipment.
USB Drivers & Firmware Updates
To download Windows Drivers for PC USB, please see the separate user guide included with this package. Any firmware updates will also be available from www.mission.co.UK download Windows Drivers for PC USB, please see the separate user guide included with this package.Any firmware updates will also be available from www.mission.co.uk
How It Works
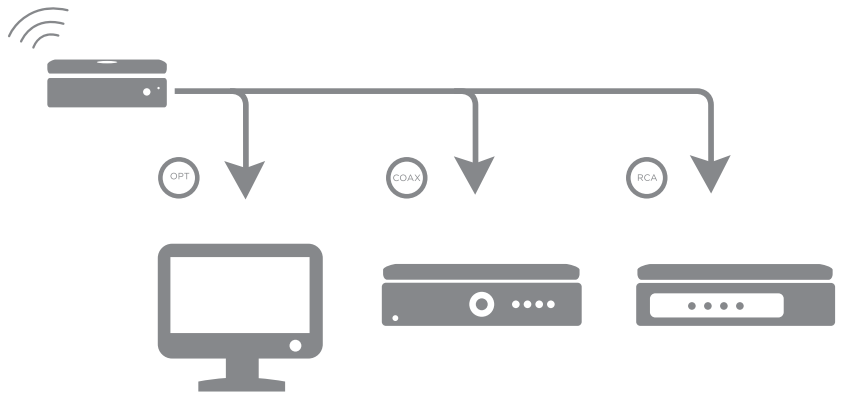
Unlike other wireless and active speakers where controls and inputs are often placed awkwardly on the back panel,Mission engineers have developed a unique hub, which works as the central console for your music. The LX CONNECTHub features optical, coaxial, PC USB, AV audio, and RCA inputs on the rear panel with an additional Bluetooth aptXconnection for wireless integration of laptops, smartphones, and tablet devices. It is controlled gracefully via the touch-sensitive display, or for even more convenience you can use the included remote control. Once connected to your source, the hub works independently from the speakers using the 5.8GHz wireless frequency band. Place it on your TV stand, desktop, or wherever you want, without the worry of speaker placement and trailing wires in between the units.The only wires needed for the speakers are the supplied power cables.LX CONNECT Hub will also work as a stand-alone DAC with a built-in headphone output and pre-output. You can connect it to your amplifier or existing system, for use as a Hi-Fi grade DAC.
The LX CONNECT Speakers and Hub work wirelessly, completely independently of each other with no interconnects.
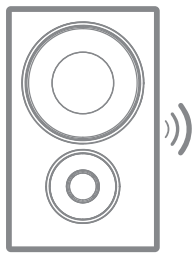
The units communicate with each other on the 5.8GHz frequency band for high-quality, lossless playback.
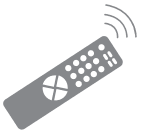
Change source/volume and menu parameters with the included remote.
Mission LX CONNECT Hub via RCA, optical, coaxial, PC USB, and AV audio connections.
Connect any Bluetooth device and enjoy wireless playback with the aptX codec for CD-like sound quality.
 Remote Handset
 Remote Handset
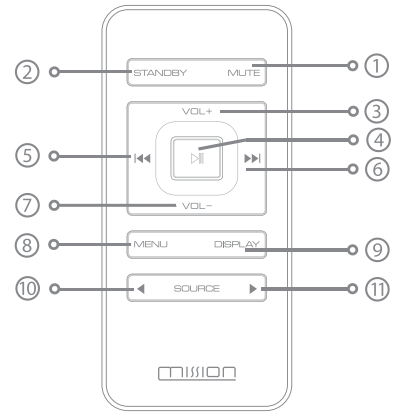 |
|
Controls & Functions
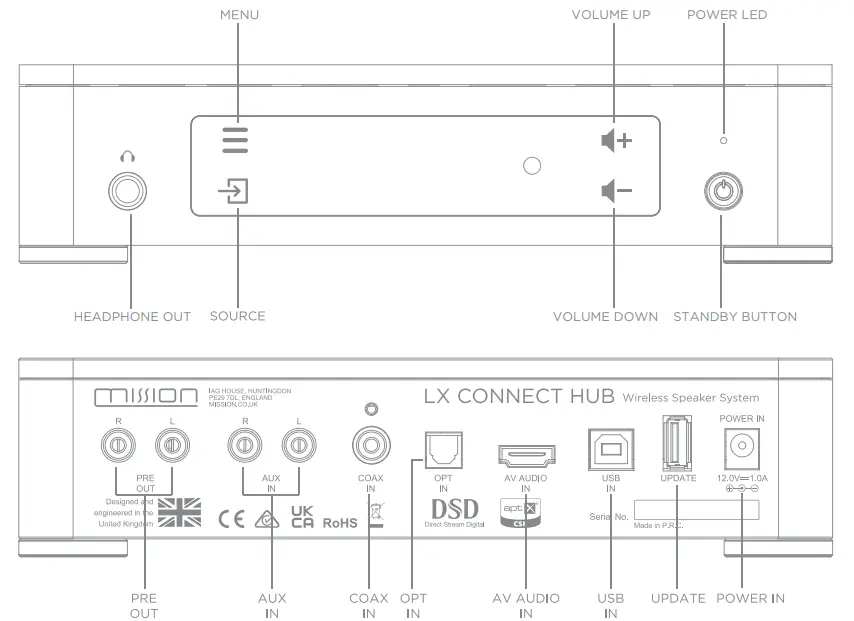

Installing & Operating the LX CONNECT Speakers
- Plug each LX CONNECT Speaker into the mains power supply and turn on the power switch to enter start-up mode.
- Upon initial power-on, the LED indicator will slowly flash green. This means the speakers are currently not connected to any LX CONNECT Hub device – you will need to pair the speakers with the hub (follow the LX CONNECT Hub installation section).
- After pairing, the LED light will remain illuminated green. After pairing for the first time, you will not need to do this again when turning the system on or off.
- Use the LEFT / MONO / RIGHT switch to assign each speaker’s output channel. LEFT / RIGHT options are designed for a conventional stereo setup. Alternatively, if you are placing the speakers around the room or living area in an unconventional way, you can set the speakers both to mono if you wish.
- The -6dB / 0 / 6dB switch attenuates the bass levels of the speakers. You can use this to adjust the sound to your personal preference and may find the bass will need reducing when placed near to a wall.Please note:– When the speakers are free-standing on suitable stands, use the 0dB or +6dB bass setting– When the speakers are placed close to a rear wall, use the 0dB setting– When the speakers are shelf mounted, use the -6dB or 0dB setting
- The UPDATE port is only used for updating the internal software or service purposes. This is a non-user serviceable connection. Please refer to the Mission website or your Mission dealer concerning updates or service.
- The PAIR button is used to connects the speakers and hub as a system. If you long-press the button until the LED indicator flashes then the software version will be displayed on the hub screen.
Installing & Operating the LX CONNECT Hub
- Connect your playback device via the auxiliary, optical, coaxial, PC USB, or AV audio inputs on the rear panel.
- Connect the LX CONNECT Hub mains supply.
- When powered on, the LX CONNECT Hub indicator light will then illuminate dimly, which means it is now in standby mode.
- Either press the STANDBY button on the unit, or press the STANDBY button on the remote control and the standby LED will turn on brightly. The screen will then briefly display the Mission logo, confirming the unit is powered on. To return to standby, press the STANDBY button once more.
- To pair the hub with the speakers, press the MENU button on the remote (or touch the MENU button on the unit) to enter menu setting.
- Select the ‘Enter Pairing’ option. The hub will then display ‘Pairing’. Press the PAIR button on the rear of one of the Mission LX CONNECT Wireless Speakers. The rear LED will change from flashing to staying on constantly once paired. Display screen will show ‘Connected’.
- Please note pairing of the speakers needs to be done individually. Once your first speaker is paired, repeat the process for the second speaker.
- To adjust the volume, press the ‘+’ and ‘-‘ buttons on the front panel of the hub or remote. Volume is adjustable from 0 to 50. When the system is restarted, the default volume is 25.
- The DISPLAY button on the remote control will toggle the front panel display ON/ OFF. When the display is OFF, use the front panel control or pressing any remote key will momentarily turn on the display. After 10 seconds, the display will automatically turn off again.
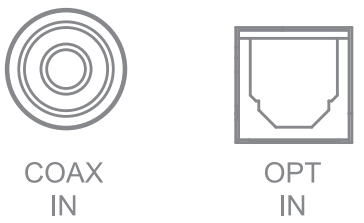
Connections for LX CONNECT HubAnalogue InputConnect your analog sources to the line-level input AUX IN. Coaxial Digital InputConnect your coaxial digital sources to COAX IN.Optical Digital InputConnect your optical digital sources to OPT-IN.
USB InputThe USB input enables you to connect a Mac or PC to the hub for playing audio files stored on a computer. To use the USB input for the first time, a Windows PC will require the installation of the USB driver. Download the driver via www.mission.co.uk. Please refer to the USB and DSD Setup Guide supplied with the driver files. Connect your computer to the hub via USB cable (type A to Type B).LX CONNECT has Roon Tested. Roon transforms the experience of browsing music; artist photos, credits, bios, reviews, lyrics, tour dates; and composers have located automatically, then interconnected by links to build a searchable digital magazine about your music collection. Roon finds all the same links between your personal files and the millions of tracks available on TIDAL, so youcan start with the music you know, then explore and discover new music from the world beyond your collection.Please note: In order to ensure optimum performance of the LX CONNECT system, the LX CONNECT Hub is limited to 32-bit / 192kHz operation when paired to the LX CONNECT Speakers. When the USB DAC functionality is utilized for headphone amplifier or pre-out functionality, you can activate higher resolution performance (DSD256 / 384kHz) by disabling ‘Wireless’ mode via the LX CONNECT Hub control menu. This will enable DSD256 / 384kHz operation for headphone amplifier or pre-outoperation only.

AV AUDIOAV AUDIO function allows you to send audio from your ARC-compliant TV to LX CONNECT through a single HDMI connection. To enjoy the AV AUDIO function, please ensure your TV is both HDMI-CEC and ARC compliant and set up accordingly.Please note: Your TV must support the HDMI-CEC and ARC function. HDMI-CEC and ARC must be set to on. The configuration method of HDMI-CEC and ARC may differ depending on the brand or model of your TV. For details about the ARC function, please refer to your TV owner’s manual.Only HDMI 1.4 cables can support the ARC function.

Bluetooth ConnectionWhen selecting the Bluetooth input, the hub will display ‘Pairing’ which means the hub is not yet connected to a Bluetooth device and is searching for one.To connect, turn on the Bluetooth function on your smartphone, tablet, or computer device.Search for active Bluetooth devices. You will then see LX CONNECT as an option to connect.Select the LX CONNECT option to pair to the device and the hub will then display “Connected” to confirm.If you switch to an alternative input Bluetooth will disconnect automatically in 60 seconds, however, when you switch back, Bluetooth will connect automatically to your device once more.
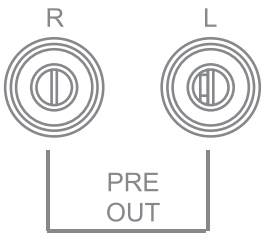
Pre-Amplifier OutputPre-amplifier (Pre Out) output for driving external power amplifiers, subwoofers, or signal processors.
Headphone OutputA stereo 6.3mm (1/4″) jack is provided on the front panel for connecting headphones. When headphones are connected the Pre Out signal will auto cut off.Software UpdateLX CONNECT Hub UPDATE port is only used for updating the internal software or service purposes.This is a non-user serviceable connection. Please refer to the Mission website or your Mission dealer concerning updates or service.

MenuTo access additional controls over the LX CONNECT system either press ‘MENU’ on your remote or touch the MENU button on the front panel of the hub. This will give you difierent options: Speakers, Mode, Digital Filter, DSD BW, DPLL BW, Balance, Pre Delay, Brightness, Default Channel, Auto Standby, Wireless, Pre Out Level, Default Volume, Factory Reset, Update, and Firmware. You can toggle through the difierent options by pressing the ‘+’ or ‘-‘ controls on the hub or left and right controls on the remote. The source button on the hub toggles between the menu select and the menu parameter, or you can press the VOL+/VOL+ button on the remote. When you have selected a parameter to adjust, press the ‘+’or’-‘ buttons on the hub, or left and right controls on the remote.
ModeThere are two performance modes for the LX CONNECT system:Music (recommended for listening to music),Movie (recommended for viewing movies).

Digital Filter (DAC, Only for Pre Out)The DAC in the LX CONNECT has a choice of 3 digital filters to offer the best performance and compatibility with your digital audio files and system:Fast roll-off: Standard flat response with fast frequency roll of above Fs/2 (half the sampling frequency).

Slow roll-off: Starts rolling off at a lower frequency than the Fast filter but has a more gentle rate of attenuation. This is the default filter for the LX CONNECT Hub.Minimum phase: Has a gentle attenuation slope similar to the Slow filter but with minimum phase characteristics. It can be likened to an analog filter applied in the digital domain.
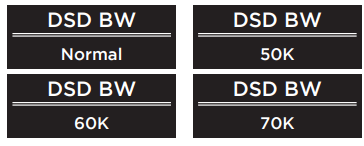
DSD BWThe DSD Bandwidth can be widened to suit high-performance Hi-Fi equipment and particular DSD audio files.
OPT DPLL BWDPLL setting is used for changing the bandwidth of the digital phase lock loop of the D/A converter to accommodate difierent levels of jitter on the incoming SPDIF signal.Normal mode should be selected for signals with low jitter, while Wide mode should be selected for signals with abnormal jitter. For best audio quality leave this setting at the default value Normal, only use Wide for a given input if the system is having problems locking onto the source.

BalanceThe balance of left and right channels can be adjusted in the hub’s menu. The setting is for all the speakers and Pre Out. The Balance setting ON/OFF can be controlled by the BALANCE SYNC button on the rear panel of each speaker.
Pre DelayPre Out delay time settings have 0ms, 20ms, 40ms, 60ms, 80ms, and 100ms. If the Pre Out is to be used for a wired and powered subwoofer, please use 20ms to sync with the wireless speakers to get the best performance.

BrightnessThe brightness can be adjusted from a low level to a bright level, adjustable in 8 increments.

Default ChannelAny channel can be set as the default channel. Additionally, this can be set, using the ‘Recall Last Input’ feature.

Auto StandbyLX CONNECT has three standby modes, editable via the menu.Auto Standby Never: LX CONNECT will only enter standby through user control.Auto Standby 20 Minutes: If there is no input signal for 20 minutes, the LX CONNECT will enter standby.Auto Standby 1 Hour: If there is no input signal for 1 hour, the LX CONNECT will enter standby.

WirelessLX CONNECT Hub can enable or disable the wireless transfer function on the menu. While only using the hub as DAC (without speakers), please disable the wireless to get the best performance.

Pre Out LevelThe Pre Out level can be set to adjustable or fixed.Adjustable level output is for purposes where the output level should change with the master level output (for instance, when connecting to powered subwoofers).Fixed level output is for use with sources with built-in volume control such as AV processors, where the input signal from the hub should be constant.

Default VolumeThe default volume setting is for the max volume after you restart the system. The default setting is 25, adjustable in 0 to 50.

Factory ResetThe LX CONNECT can be restored to factory default settings.

UpdateThe LX CONNECT Hub UPDATE port is only used for updating the internal software or service purposes. This is a non-user serviceable connection.Please refer to the Mission website or your Mission dealer concerning updates or service.

FirmwareThe final menu option displays the current firmware installed on the LX CONNECT.

Specifications
| Model | LX CONNECT | |
| General Description | Wireless Speaker System | |
| Design Philosophy And Core Technology | 5.8GHz Wireless Uncompressed TechnologyDAC ESS Sabre 9018Support Music And Movie ModeHeadphone AmplifierSupport USB UpgradePre Delay SettingRoon TestedTouch Control | |
| Analogue Input | RCA (AUX) | |
| Digital Input | OPT. COAX. PC USB, Bluetooth, AV Audio | |
| Analog Output | RCA Pre Out | |
| Pre Amplifier (hub) | ||
| Input Sensitivity | 300mV (AUX IN. volume = MAX) | |
| Input Impedance | 13K (AUX IN) | |
| Variable Output Voltage | 0 – 32V | |
| Output Impedance | 100 ohm | |
| Frequency Response | 20Hz -20k Hz (+1-0.3dB) | |
| Signal-to-noise Ratio (S/N) | > 100dB (AUX IN. A-weighted)> 110dB (digital Inputs. A-weighted) | |
| Total Harmonic Distortion | < 0.001% (digital sources )< 0.005% (analogue sources) | |
| Sampling Rate | 24bit -192kHz (OPT. COAX)32bit – 384kHz (USB. PCM)2.8M for DSD64. 5.6M for DSD128. 11.2M for DSD256 (USB. DSD) | |
| Digital Filters | Fast Roll-oft Slow Roll-oft Minimum Phase | |
| Active Speakers | ||
| Enclosure Type | Bass Reflex | |
| Transducer Complement | 2-way | |
| Drive Unit | ||
| Bass Unit | 130mm Composite Fibre Cone | |
| Treble Unit | 25mm Microfibre Dome | |
| AV Shielded | No | |
| Rated Power Output | 60W | |
| Peak Power Output | 100W | |
| Peak SPL | 99dB | |
| Frequency Response (+/-3dB) | 58Hz – 20kHz | |
| Bass Extension (-6d6) | 52Hz | |
| Crossover Frequency | 3.2kHz | |
| Wireless Reception Distance | 20m | |
| Cabinet Volume | 82L | |
| Dimensions | Speaker | Hub |
| Height (on feet) | 305mm | 55mm |
| Width | 200mm | I 225mm |
| Depth (with terminals) | (250+15)mm | 231mm |
| System | ||
| Carton Size | 545 x 440 x 400mm | |
| Net Weight | 6.55kg x 2 (speakers) 1.75kg (hub) | |
| Gross Weight | 17.8kg | |
| Finish | Walnut Pearl / Delux White / Delux Black (speakers): Black (hub) | |
| Power Requirements | Hub Adapter – Input: 100-240Vac (50/60Hz) Output: 12V 1A Speakers – Input:100-24 OVac (50/60Hz) |
Service Centre
Should a fault occur with your loudspeakers, please pack it correctly, using the original packing, so you can ship it safely. Product for service should be returned to the appointed dealer from whom you purchased the product. If you experience difficulties or there is no mission dealer in your area, contact the Mission distributor or the office below.UKIAG Service Dept, 13/14 Glebe Road, Huntingdon, Cambridgeshire PE 29 7DL, UKTel: +44 0 1480 452 561Email: [email protected]
 report this ad
![]() IAG House, 13/14 Glebe Road, Huntingdon, Cambridgeshire, PE29 7DL, UKTel: +44(0)1480 452561 Email: [email protected] www.mission.co.ukIAG reserves the right to alter the design and specifications without notice. All rights reserved © IAG Group Ltd.The mission is a member of the International Audio Group.
IAG House, 13/14 Glebe Road, Huntingdon, Cambridgeshire, PE29 7DL, UKTel: +44(0)1480 452561 Email: [email protected] www.mission.co.ukIAG reserves the right to alter the design and specifications without notice. All rights reserved © IAG Group Ltd.The mission is a member of the International Audio Group.
References
[xyz-ips snippet=”download-snippet”]