
![]()
MO HEALTH Low Fat Air Fryer Instruction Manual
MO HEALTH Low Fat Air Fryer Instruction Manual
A Healthy Alternative
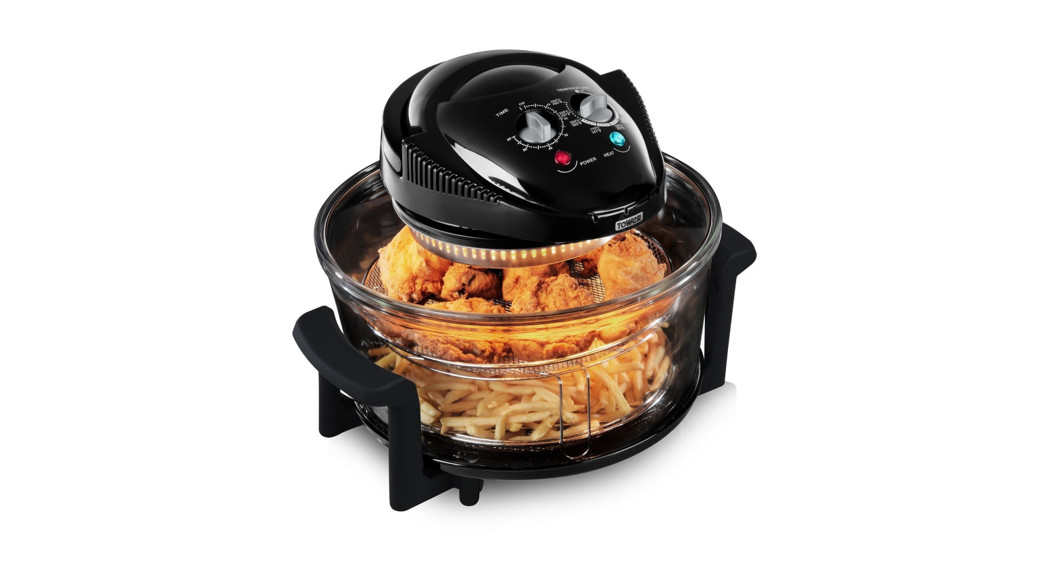
Enjoy your favourite fried foods without the fat, thanks to this Low Fat Fryer. With innovative air circulation technology, combined with the triple cooking power of halogen, convection and infrared, hot air is circulated efficiently in and around your food, cooking up to 3 times faster whilst providing an instant heat up time compared to a conventional oven.A generous 12 litre capacity, with an optional 5-litre extender ring, makes this fryer ideal for cooking larger portions, while a removable glass bowl is quick and simple to clean.Please read this manual carefully BEFORE using the appliance for your own safety. It has been designed to provide many years of trouble-free use.
There are many benefits to using a Goodmans Low Fat Air Fryer:
- Simple to use controls allow you to cook great tasting meals quickly and efficiently.
- A healthy alternative to cooking traditionally deep-fried food.
- The rapid air circulation system allows for faster cooking and saves energy.
- Revolutionary AirBlast Technology requires little or no oil.
- Great for frying, roasting, grilling and baking.
- 1300W – Uses less energy and cooks 3 times faster
- 12 litre capacity with 5-litre extender ring.
- Triple cooking power: halogen / convection / infrared.
- A removable glass bowl for easy cleaning and observation.
- Cooks from frozen: no thawing time needed.
- Halogen heating element heats directly.
- Added browning, roasting and flavour enhancement.
- Convection circulates the air for even heat distribution.
Welcome
Thank you for choosing this Goodmans product. We’ve been making electrical products for the British people for 90 years. Each of our projects has been carefully designed to be great at what it does and this one is no exception. We hope you enjoy your new Low Fat Air Fryer.
Your Low Fat Air Fryer
In The BoxCarel fully removes your low-fat air fryer from the box.
- Instruction Manual
-
Profile Recipe Book
- Tongs
- Low Rack
- High Rack
- Glass Lid Control Stand
- Oil spray
- 2 x Mesh Plates
- 1 x Extension Ring (may be packaged around the glass bowl)
- Glass bowl
- Glass bowl stand
- Glass lid with control panels
If any of these items are missing contact Customer Support at [email protected]
General Safety
- Ensure that you read all of the safety instructions before using this product.
- This product has been designed and manufactured to meet European safety standards, but like any electrical equipment, care must be taken if you are to obtain the best results and safety is to be assured.
- Do read the operating instructions before you attempt to use the product.
- To ensure that all electrical connections (including the mains plug, extension leads and interconnections between pieces of equipment) are properly made in accordance with the instructions.
- Switch off and remove the mains plug or mains adapter when making or changing any connections.
- Do consult your dealer if you are ever in doubt about the installation, operation or safety of your product.
- Don’t remove any fixed covers as this may expose you to dangerous voltages.
- Don’t continue to operate the product if you are ever in doubt about it working normally, or if it is damaged in any way. Switch it off, withdraw the plug from the mains and consult your dealer.
- There are no user-serviceable parts in the product. When servicing, refer to qualified service personnel.
- Don’t leave the product switched on when it is unattended for long periods of time unless it is specifically stated that it is designed for unattended operation or has a standby mode.
- Don’t obstruct the ventilation vents on the product, for example with curtains or soft furnishings, as this may cause overheating.
- Do not place the product in closed bookcases or racks without proper ventilation.
- Do not use the product in humid or damp conditions or allow it to be exposed to rain or moisture.
- Store the product in a clean, dry environment.
- The product shall not be exposed to dripping or splashing and no objects filled with liquids, such as vases, shall be placed on it,
- Position the power cable and other connected cables so that they are not likely to be walked on, pinched or where items can be placed on or against them.
- Never allow children to insert foreign objects into holes or slots on the product.
- No naked flame sources, such as lighted candles, should be placed on the product.
- Disconnect the product from the mains supply before cleaning.
- Do not use any liquids or aerosol cleaners, as this may damage the product. Use a soft, dust-free cloth.
- Contact local authorities for means of disposal.
- Make sure that other people in your household are conversant with the operation of the product.
Product Safety
- Check that the voltage or the main circuit corresponds with the rating of the appliance before operating.
- If the supply cord or appliance is damaged, stop using the appliance immediately and seek advice from the manufacturer, its service agent or a similarly qualified person.
- WARNING! DO NOT let the cord hang over the edge of a table or counter, serious burns may result from the appliance being pulled off the counter where it may be grabbed by children or become entangled with the
- DO NOT carry the appliance by the power cord.
- DO NOT use any extension cord with this appliance.
- DO NOT pull the plug out by the cord as this may damage the plug and/or the cable.
- Switch off at the wall socket then remove the plug from the socket when not in use or before cleaning.
- The use of accessory attachments is not recommended by the appliance manufacturer apart from those supplied with this product.
- Switch off and unplug before fitting or removing tools/attachments, after use and before cleaning.
- Close supervision is necessary when any appliance is used by or near children.
- Children should not play with the appliance.
- This appliance can be used by children aged 8 years and above and persons with reduced physical, sensory or mental capabilities or lack of experience and knowledge if they have been given supervision or instruction concerning the use of the appliance in a safe way and understand the hazards involved.
- Cleaning and user maintenance should not be undertaken by children without supervision.
- Take care when any appliance is used near pets.
- DO NOT use this product for anything other than its intended use.
- This appliance is for household use only.
- DO NOT use the appliance outdoors.
- DO NOT place the appliance on or near combustible materials such as a tablecloth or curtain.
- DO NOT place the appliance against a wall or against other appliances. Leave at least 10cm free space on the back and sides and 10cm free space above the appliance.
- Allow the appliance to cool down for approx. 30 minutes before you handle or clean it.
- Make sure the food prepared in the appliance comes out golden-yellow instead of dark or brown. Remove burnt remnants.
- During hot air frying, hot steam is released through the air outlet openings Keep your hands and face at a safe distance from the steam and from the air outlet openings.
- Hot steam and air may escape when you remove the pan from the appliance.
- Any baking trays or oven dishes used in the appliance will become hot. Always use oven gloves when handling or removing anything from the appliance.
- WARNING! DO NOT fill the appliance pan with oil as this may cause a fire hazard.
- DO NOT place anything on top of the
- Ensure that food is completely dry before adding any oil to it and/or putting it in the appliance.
 |
CAUTION HOT SURFACE! DO NOT TOUCH HOT SURFACES WHEN USING THIS APPLIANCE. |
Description Of Parts
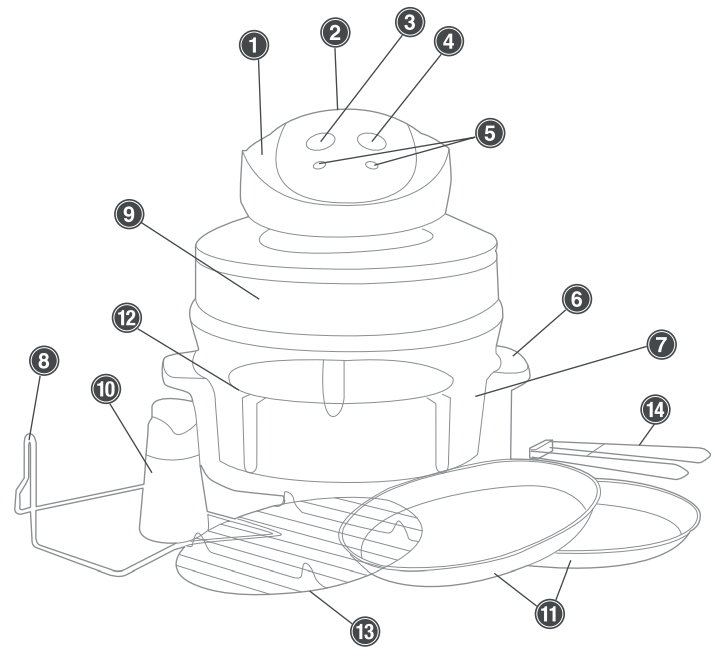
- Glass Lid With Controls
- Safety Lock
- Timer (60 minutes)
- Thermostat (125-250°C)
- Indicator Lights
- Glass Bowl Stand
- Glass Bowl
- Glass Lid Stand
- 5 Litre Extender Ring (stored underneath 7. Glass bowl)
- Oil Sprayer
- 2 x Mesh Trays
- High Rack
- Low Rack
- Tongs
Using your Air Fryer
Before first use:
- Remove the parts from the packaging and remove the extender ring from around the glass bowl.
- Place the Low Fat Air Fryer on a flat, dry surface.
- Remove any promotional labels or stickers.
- Dispose of the packaging in a responsible manner.
- When you are ready to use the appliance, be sure that the timer controls are in the “off” position and unplugged. We recommend a trial run to familiarise yourself with your appliance and to eliminate any problem substances or oil that may have been used for packaging and shipping.
- Plug the cord into a 220-240 volt AC outlet.
- Set the timer control to 10 minutes and set the temperature control to 100°C
Note: A small amount of smoke and odour may be detected. This is normal. To avoid scratching, marring, discolouration or fire hazard, do not store anything on top of the oven, especially during operation.
Convection oven cooking:Using circulating air, the convection oven cooks food quickly, efficiently and uses much less energy than conventional cooking methods. The convection oven can cook on more than one level, so dishes that normally require multiple pots and pans to wash will be simpler, and much easier to clean.The hot air method of cooking ensures an even distribution of heat around the food. One of the effects of this is that the surface of food such as meat is quickly sealed, allowing it to retain the succulence of its original flavour.
Thawing Food:The thaw/wash setting allows you to thaw out most foods. The ‘wash’ reminds you to clean any liquids from the bowl after thawing before cooking.The convection oven will thaw most foods. Simply place onto one of the wire racks, set the thermostat to thaw and allow approximately 40 minutes per kg.Large items like meat joints should be turned at least once during the thawing process.Note: Any liquids or juices from thawed food should be thoroughly cleaned from the bowl before cooking.
Cooking with the extension ring:The extension ring is perfect when you need to cook something of a larger size, such as a whole chicken. Place the extension ring on the top of the bowl, to make the bowl bigger and give it the extra volume needed for cooking. When using the extension ring, it’s possible to cook several dishes at once.
Using your appliance – Safety handle:The convection oven will not work unless the safety handle is fully clicked into the down position. To do this press the safety button on the handle to lower it into place.If you need to remove the lid during the cooking process, lifting the safety handle will stop the heater and the turbofan while you attend to the dish. Simply replace the lid and place the safety handle in the down position to resume cooking.
Thermostat:Sets the cooking temperature from 125°C to 250°C.
Timer:The timer dial is marked in minutes and has a reminder bell, which sounds when the cooking time is completed.When setting the manual timer, always turn the timer past the time you wish to set, before turning the timer back to the correct time.The timer will beep at the 5-minute point and the heating element and fan will stop. It will continue to tick down until the ‘Off’ indicator is reached.It is safe to remove the lid during the final five minutes, or you may wish to allow your food to cool. Once the ‘Off’ indicator is reached the timer sound will end. You may also turn the timer dial manually to the ‘Off’ indicator.
Operating your appliance:
- Prepare the bowl (always ensure the extender ring has been removed before operating the appliance). While cooking the surface of the bowl will be considerably hot, be sure to place the appliance on a heatproof surface.
- Place the rack in the bowl and place food in the centre of the rack to receive the best air circulation. Allow 1cm space between the food and bowl.
- Cover the bowl with the lid. Ensure it is sealed correctly.
- Plug the cord into a wall outlet.
- Turn the thermostat to the desired temperature.
- Set the timer using the reference table as a guide. Push handle back to start. The red and green indicator lights will go on to indicate that cooking has started.
- The Air Fryer will automatically shut off when cooking time has been reached. Note: The timer may continue to tick after the Air Fryer has shut off and finished
- When roasting, line the bottom of the bowl with foil to catch any drippings
Application examples:Reference table of time and temperature for cooking various foods.Note: For meats weighing from 1-1.5 Kg, set the temperature at 200°C
| Temperature (°C) | Cooking Class | Quantity | Minutes |
| 200 | Whole Chicken | 21/4kg | 70-75 |
| 200 | Sliced Pork | 500g | 7-8 |
| 200 | Drumsticks | 8 Pieces | 15 |
| 250 | Fish | 10 Pieces | 7-8 |
| 200 | Clam | 500g | 5-7 |
| 250 | Shrimps | 500g | 5 |
| 250 | Corn | 4 Pieces | 10 |
| 150 | Cake | 1 Case | 20 |
| 250 | Potato | 500g | 25 |
| 250 | Red Prawn | 4 Pieces | 15 |
| 250 | Crab Meat | 500g | 10 |
Cook for the following (approximate) times:
| Type of meat | Minutes |
| Beef, boneless, whole roast. | rare: 15-20 medium: 20-25 well done: 25-30 |
| Beef, rib roast, rump or chuck. | rare: 15-20 medium: 20-25 well done: 25-30 |
| Ham with bone & fully cooked. | medium: 12-15 |
| Pork loin (boneless). | well done: 20-25 |
| Loin with bone. | well done: 25-30 |
| Pork ribs. | well done: 25-30 |
Roasting:
- Lining the bottom of the bowl with foil will help to catch any drippings from the roast.
- Use a low rack to let hot air circulate freely.
- The propelled hot air of the convection oven cooks meat evenly and seals in any A meat thermometer is recommended.
- Without a meat thermometer, follow the time-temperature table included in the booklet, or follow a chart given for a regular oven and simply subtract 25°C.
Roast whole chicken:
- Rinse chicken thoroughly and add the desired seasoning.
- Spices such as garlic, black pepper and salt are suggested.
- Before roasting, allow the seasoning to penetrate for a few hours.
- The base of the bowl can be lined with aluminium foil to catch
- Roast for approximately 30 minutes per 1kg at 200°C.
Whole roasts:
- With the fatty portion facing upward put the meat directly on low
- Put seasoning to your tastes. Insert meat thermometer.
- Temperature for roasting is usually 25°C less than for regular or conventional
- Cooking time depends on the type and size of the roast.
Note: the process of cooking and cooking time may vary, depending on the depth and size of a mixture or preparing the dish.
Broiling, grilling and toasting:
- For broiling or grilling with a convection oven, the temperature should be set between 220-250°C.
- No pre-heating is necessary for a convection oven when Food should be placed on the rack without covering.
- To bring the food closer to the source of the heated air, the high rack should be
- Add hickory liquid smoke or mesquite to get a smoky
- Any seasoning should be applied to the surface of the meat.
- If the fish or meat is lean, spray the rack or grill with non-stick vegetable oil, or brush with cooking oil prior to arranging the fish/ meat on the
- This will minimise food sticking to the
- For browner or more seared surfaces, broil on both sides as with thick stocks or
- For thinner pieces, no turning is
Pies:
- For pre-cooked chilled pies, simple place on a high rack for 8 – 12 minutes at 220°C.
- For frozen/uncooked pies, use the same position and temperature and increase the temperature, depending on the size and content of the pie.
Bread rolls:
- To reheat fresh bread rolls, wrap each roll with foil, place on the low rack and heat at 200°C for 5-7
- If the rolls are a few days old they can be brushed with a little milk, placing them on the high rack and heat for 6-9 minutes at 180°C.
Frozen food:
- Large items like meat joints or poultry cannot be cooked from frozen and must be thawed thoroughly first, however, some foods cook best from frozen.
- Simply follow the cooking instructions on the packaging as a guideline.
- Due to the efficient nature of the convection oven, the cooking time for frozen products is often shorter than that of a conventional oven.
Grilling:
- As with toasting, items to be grilled should be placed on the high rack and should be between 220-240°C. When deciding the best temperature setting to use, consider the thickness of the food.
- A 3cm thick steak would require a lower temperature and longer cooking time than a 1cm thick steak. Also, remember that frozen food like burgers need a longer cooking time.
- You may wish to turn the food halfway through the grilling process to ensure even
Baking:
- The temperature for the cooking of uncovered dishes is usually 20 to 40°C lower than in the traditional oven.
- No pre-heating is necessary for the convection oven when Often, the centre of the cake batter will take longer to cook than the section closest to the rim.
- Therefore a bunt cake pan or tube pan is recommended for use, rather than a larger layered cake pan.
Cakes:
- Preheat the oven to 220-230°C for 3 minutes.
- When selecting an appropriate cake tin to use, be sure that it will fit comfortably in the bowl. Always place the cake tin on the low rack-never directly onto the bottom of the
- When using the recipes from elsewhere, deduct 10°C from the recommended cooking temperature.
- Cooking time depends entirely upon the size of cake you are making but it is easy to monitor its progress with the glass
Biscuits and pastries:
- Take a suitable pan and lightly grease
- Place it on the low
- The best temperature for biscuits and pastries is 220 – 230°C.
- Cooking times will vary depending on the chosen recipe, the approx. time is generally 12 -15 minutes.
Suggested baking times and temperatures:
| Food | Temperature (°C) | Minutes |
| Brownies | 150 | 18-20 |
| Buns | 200 | 10-12 |
| Cakes, layer | 150 | 18-20 |
| Cakes, loaf | 150 | 30-35 |
| Cornbread | 180 | 18-20 |
| Cookies: drop | 160 | 8-10 |
| Cookies: rolled | 160 | 10-12 |
| Muffins | 180 | 12-15 |
| Pies/pastries/pie crust | 200 | 8-10 |
| With filling (no top crust) | 160 | 25-30 |
| With filling (two crusts) | 180 | 35-40 |
| Bread, rolls | 180 | 12-15 |
| Loaf | 160 | 25-30 |
Troubleshooting
| Question | Answer |
| How long should I leave the Air Fryer to cool before storing it? | We recommend leaving the Air Fryer for 30-45 minutes to cool before storing. |
| My homemade fries are not crispy enough. | Ensure that the fries are completely dry before adding oil to them and putting them in the
Air Fryer. Try cutting the potatoes into thinner, smaller fries and adding slightly more oil for a crispier result. |
| My food has not been cooked uniformly. | The food may not be cut uniformly. Make sure everything is cut to the same shape and s ze for good, even cooking. |
| How much cooking oil do I need to use? | Frozen part fried foods require no added oils. You only need to add 1/2 – 1 tbsp. of oil for other foods |
| White smoke is coming out of the Air Fryer, | This is normal if you are preparing greasy ingredients because a large number of oil leaks into the pan. This does not affect the appliance or the end result. |
Cleaning & Care
- Remove plug from the mains socket, and allow the appliance to cool down before cleaning.
- Do not immerse the lid unit of the appliance in water and make sure no water enters the
- Clean the base unit by wiping it with a damp cloth. A little detergent can be added if the appliance is heavily soiled.
- Do not use scouring pads, steel wool or any form of strong solvents or abrasive cleaning agents to clean the appliance, as they may damage the outside surfaces of the
- Clean all accessories in warm soapy water, do not use any scouring pads, steel wool or any strong solvents or abrasive cleaning agents when cleaning accessories.
- Make sure that the appliance is cleaned after every use.
IMPORTANT:
- Allow drying fully after cleaning before using again.
- Do not use the appliance if damp. Ensure the appliance is completely clean and dry before storing.
To store your appliance:
- Unplug the power cord from the power outlet and clean as instructed.
- Store on a flat, dry level surface out of reach of children.
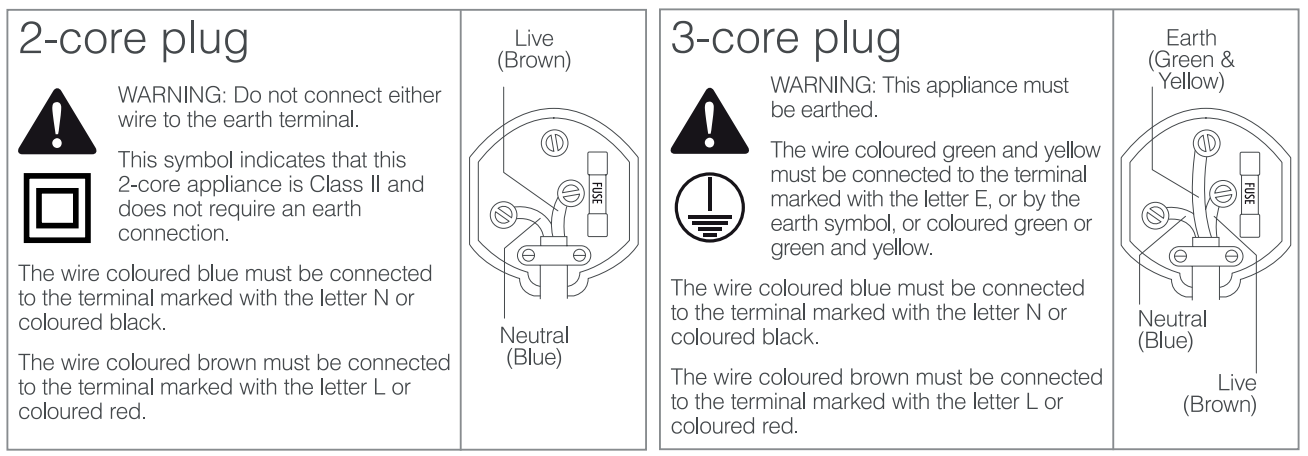
Electrical information (Fixed Mains Plug Only)The mains lead supplied with this product is fitted with a BS1363/A 13 amp plug. If it is not suitable for your supply sockets it must be replaced with an appropriate plug.If the plug becomes damaged and/or needs to be replaced please follow the wiring instructions on the next page. The plug removed must be disposed of immediately. It must not be plugged into a supply socket as this will be an electrical hazard.If the fuse needs to be replaced it must be of the same rating and ASTA approved to BS1362. If the plug is changed, a fuse of the appropriate rating must be fitted in the plug, adapter or at the distribution board. If the fuse in a moulded plug is replaced, the fuse cover must be refitted before the appliance can be used.Wiring InstructionsThe supply cable will be either 2-core or 3-core. Follow the appropriate wiring instructions shown. In both cases ensure that the outer sheath of the cable is firmly held by the cable clamp.Electrical Information (Power adapters only)Never open the power adapter, you risk getting an electric shock. Only use the power adapter that is supplied with your product. You must always connect the power adapter to the product before connecting to the mains power supply.The power adapter must be used indoors only, and must not be subjected to damp conditions.The power adapter does not have any user-serviceable parts.
Guarantee
This product is guaranteed for twelve months from the date or original purchase.If any defect should occur due to faulty materials or workmanship, contact: [email protected]You will need to have your receipt or purchase to hand. The guarantee is subject to the following provisions:
- It is only valid within the boundaries of the country of purchase.
- The product must be correctly installed and operated in accordance with the instructions contained in the User Manual.
- The product must be used solely for domestic purposes.
- The guarantee will be rendered invalid if the product is re-sold or has been damaged by inexpert repair.
- The manufacturer disclaims any liability for incidental or consequential damages.
- The guarantee is in addition to. and does not diminish your statutory or legal rights.
Technical Specification
| Model Number | 340599 |
| Power Supply | 220V-240V-50Hz |
| Power | 1300W |
Customer Support
For all product support, please email: [email protected]

FAQS
With innovative air circulation technology, combined with the triple cooking power of halogen, convection and infrared, hot air is circulated efficiently in and around your food, cooking up to 3 times faster whilst providing an instant heat up time compared to a conventional oven.
Goodmans Mo Health Compact Air Fryer 1.5L | Mo Farah | Easy Clean.
When making chunky chip shop style chips in the air fryer it is much better to parboil first, this will result in the perfect chip, soft and fluffy on the inside with a crispy chip outer.
YES
Bottom line — air fryers have been trending for years, but they are only worth the buzz if they fit your lifestyle. If you have a large family, it’ll take too long to make a meal to satisfy a crowd. But for couples or people looking for ways to cook quick meals with less oil, it could be the perfect kitchen upgrade.
They give a great “cooked” finish that will not compete with your oven, but also reheating outcomes that blow away the typical microwave. Extra, to make food crispy with a fraction of the calories and fat of conventional cooking techniques, such as deep-frying, an air fryer takes just a small amount of gasoline.
Capacity: 2.6L (approx.) Dimensions: 27.2 x 35.8 x 33.5cm (approx.)
Tip the chips into the bottom of an air fryer (the part with the paddle), add the oil, and toss the chips in the oil so they are evenly coated. Program the fryer to cook for 30 mins using the paddle. After this time, check that the chips are tender and cooked through. If they’re not, cook for a further 5 mins.
Any food with a wet batter should not be placed in the air fryer. You also want to avoid putting food that has a wet batter, like corndogs or tempura shrimp, in air fryers.
Veggies like broccoli, Brussels sprouts, potatoes, zucchini, mushrooms & onions, and cauliflower all turn out incredible in the air fryer. You can also make your main dish IN the air fryer. It works magic with proteins like tofu, chicken drumsticks, meatballs, pork chops, fried chicken… even steak.
Firstly, if your potatoes are still wet before being placed into an air fryer, this can cause your potatoes not to crispen up. You can avoid this by thoroughly patting dry your potatoes before you place them in the air fryer. Secondly, you might be putting in too many potato chips so they aren’t cooking evenly.
Yes, you can put aluminum foil in an air fryer. Tasteofhome.com explains that due to the air fryer’s cooking process consisting of rushing hot air, your aluminum foil and the meal it’s with will not be ruined by the air fryer.
Not only does air frying still run the risk of creating acrylamides, but polycyclic aromatic hydrocarbons and heterocyclic amines can result from all high-heat cooking with meat. These compounds have associations with cancer risk, according to the National Cancer Institute .
Start by preheating your air fryer for 1 minute at 400 degrees F. Now place your toast bread in the air fryer basket to be toasted. Set the time to 6 minutes, and toast your bread at 400 degrees F. halfway through cooking, you want to flip the bread to evenly cook on both sides, if you have any toppings skip this step.
Whenever we test out a new air fryer, French fries are the very first recipe we make. Homemade French fries won’t feel like so much of a chore with this machine and might actually become a regular occurance once you get the hang of it.
 report this ad
![]()
[xyz-ips snippet=”download-snippet”]