moa Fireplace Instruction Manual
BEFORE USE
Before use, please read this manual carefully.
Only connect the appliance to an earthed wall socket.
This appliance is for household use only. When using electrical appliances, basic safety precautions should always be followed toavoid fires, electric shocks, burns, or other injuries and damage. Read these operating and safety instructions carefully.
IMPORTANT SAFEGUARDS ( 1 /2)
- Read all instructions before using this heater.
- Do not use this heater outdoors.
- This heater is not intended for use in bathrooms, laundry rooms and similar indoor locations. Never place the heater in a location where it can fall into a bathtub or other water tank.
- Do not lay the power cord under the carpet. Do not cover the power cord with carpets, mats, or the like. Place the power cord away from walkways and where it cannot be tripped over.
- To disconnect the heater, turn off the controls and unplug the power cord.
- Only connect to properly grounded sockets. Always connect heaters directly to a power outlet. Never use with an extension cord or a rechargeable power source.
- Do not block the air inlets of the fire or the outlet in any way to prevent potential fire. Do not use the firebox on soft surfaces, such as a bed, where openings can get blocked.
- There is a thermostat limiter in the stove. If the inside temperature becomes too high or abnormal heating occurs, the thermostat protection switches off the power supply to prevent damage to the fire or fire hazard.
- Only use this heater as described in this manual. Any other use not recommended by the manufacturer can cause fire, electric shock or personal injury.
IMPORTANT SAFEGUARDS (2/2)
- There are no user serviceable parts in the hearth / heater. If the device appears to be defective, switch off the device and immediatelyunplug it and contact customer service.
- This heater is hot during use. Make sure your skin cannot touch hot surfaces to prevent burns. Use – if present – the handles when moving this heater. Keep combustible material such as furniture, pillows, bedding,papers, clothing and curtains at least 0. 9 meters from the front of the stove and keep them away from the sides and the back.
- Extreme caution is required when a heater is used by or near children or disabled people and when the heater remains in operation and is left unattended.
- Always pull the plug out of the socket when the heater is not in use.
- Da not use the heater if there is a damaged cord ar plug or after the heater has failed, fallen or been damaged in any way. Return the heater to an authorized service center for examination, electrical or mechanical adjustment, or repair.
- Do not insert any foreign objects into ventilation or outlet openings, as this may cause an electric shock or fire or damage the heater.
- A heater contains hot and glowing or sparking parts on the inside. Do not use the device in places where gasoline, paint or flammable liquids are used or stored.
INSTALLATION
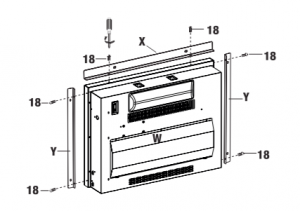
Required tools: crosshead screw driver
- Attach the metal trim.– Fasten the upper edge (X) with two screws (18) on the top of the fireplace unit (W). Make sure that the right-hand side is facing the front of the device.– Align and attach the two side edges (Y) to both sides of the hair unit (W) with the right-angled side facing the front of the appliance, using two screws (18) per side edge.
- Install the hair unit– Carefully place the fireplace unit (W) in the back of the mantle and center it in the opening. Be careful not to scratch the wood. Check the alignment and then attach the hair unit (W) to the sheath by inserting the screws (18) through the drilled holes on the edges (X and Y] and screwing it securely in place with a Phillips screwdriver.
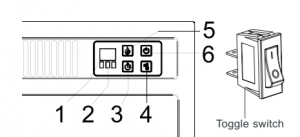
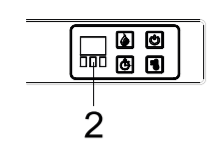
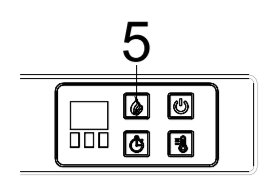
CONTROL PANEL – IDENTIFYING
- The control panel is located in the upper right corner of the fireplace.
- The control panel contains the display (1 ), the function indicator (2), the timer function (3), the heating control (4), the flames control (5) and main feed (6).
- The display unit(l) displays information about the flame level, timer, and current temperature.
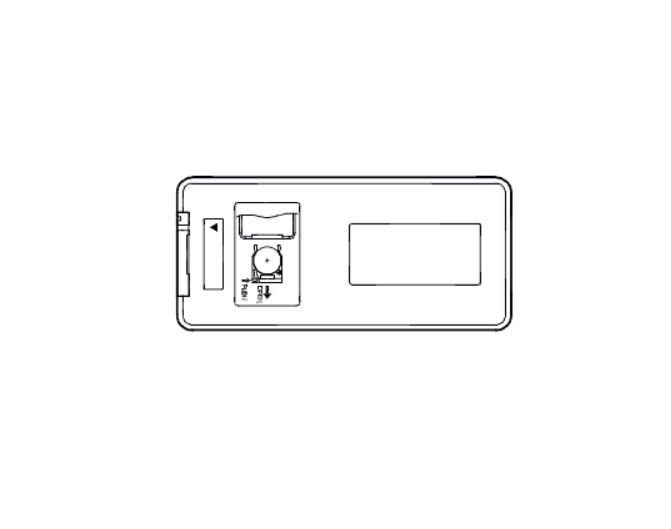
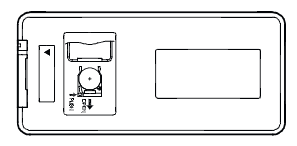
- The toggle switch is located on the back of the unit. NOTE: Before using the fireplace please make sure set the toggle switch to the positionI. Set the toggle switch to the position O if you would like to turn off the unit.
Understanding the function indicator
- The function indicator (2) has three square LEDs – red, green, and blue. The red LED indicates that the heating function is active in Fahrenheit, the green LED indicates that the heating function is active in Celsius and the blue LED indicates that the timer function is switched on.
- At the bottom of the three LEDs is the infrared receiver module that communicates with the remote control to operate the heater.
- CONTROL PANEL – TIMER FUNCTION
Number of times to press Timer interval Display1 30 min 302 60 min 1 h3 120 min 2h4 180 min 3h5 240 min 4h6 300 min 5h7 360min 6h8 OFF None
With the timer knob (3) you can set how long the fire / heating should work. The timer button (3) controls both the flames and the heating function. If the heater is running when the timer is set, the heater is on the timer. If the flames are working, the timer will control the flames. If both the heating and the flames work while the timer is set, the timer controls both the flames and the heating. If you press the button a number of times in succession, the timer is set for a specific interval. This interval period is shown in blue in the display (1 ). The preselected intervals are displayed in this t 180abel. The timer interval period starts as soon as the interval time is selected. There is no clock function to switch the heating or the flames on or off at a specific time.

CONTROL PANEL – HEATING CO
- The heating button (4) switches the heating on or off. There is no speed setting for the heating fan. If you put the heater in standby mode (you can switch it off using the ON / OFF button 6), the heater saves its settings in memory. When the power is switched on again, the heating will start again with the same settings.When the heating
- function comes on, press and hold the heating button (4) for 5 seconds to enter the temperature setting menu. The red LED indicator light is on. The display flashes (with an interval of 0.5 seconds) when you are in the settings menu. There are 22 levels to set the temperature in Fahrenheit 72 ° F-73 ° F … 82 ° F -ON-62 ° F -63 ° F … 71 ° F. Once it has been set, the display will flash five times and then exit the setting menu. If inactive, the screen turns off after 10 seconds.
- With the heater switched on, gently press and hold the ON/ OFF button for five seconds to enter the temperature adjustment menu. The LED indicator light will flash red five times and then turn green. The display (1) flashes (with an interval of 0.5 seconds) when you are in the settings menu.
- Press the heating button (4) for 5 seconds to enter the temperature setting menu. There are 12 levels to set the temperature in Celsius: 22 ° C – 23 ° C … 27 ° C -ON – 17 ° C – 1 8 … 21 ° C. Once set, the display will flash five times. If inactive, the screen turns off after 10 seconds. Repeat the same procedure for converting Celsius temperature to Fahrenheit temperature.

CONTROL PANEL – FLAME CONTROL
- Press the flame button (5) to set the flames for different levels of flame heigt. These flame levels are shown in the display (1 ). The flame settings are as following:
Button Press:Flame Level:Display Value:Fireplace Appearance: 1st pressHighL3Flames Highest, Logs Glow Highest Button Press:Flame Level:Display Value:Fireplace Appearance: 2nd pressMediumL2Flames Medium, Logs Glow Medium Button Press:Flame Level:Display Value:Fireplace Appearance 3rd pressLowL 1Flames Low, Logs Glow Low Button Press:Flame Level:Display Value:Fireplace Appearance: 4th pressAll OffNoneFlames Off, Logs Off - Regardless of the previoud flame setting, when powered off by the main power button (6), the flames will come on in L3 mode (High) whenyou turn the heater on.
- When the heater function turns on, the flame level will cycle through the 3 different level settings continuosly.
Button Press:Flame Level:Display Value:Fireplace Appearance: 1st pressHighL3Flames Highest, Logs Glow Highest Button Press:Flame Level:Display Value:Fireplace Appearance: 2nd pressMediumL2Flames Medium, Logs Glow Medium Button Press:Flame Level:Display Value:Fireplace Appearance: 3rd pressLowL 1Flames Low, Logs Glow Low
- Press the ON / OFF button (6) to switch the fire/ heating unit on and off. Press the ON / OFF button (6) once to switch on the device.Press this button again to switch the device off.

USING THE REMOTE CONTROL – INSTALLING THE BATTERY
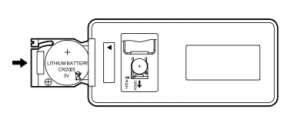
- The first thing to do with the remote control is to remove the plastic sheet that insulates the battery. The battery is supplied with the remotecontrol. Replacement batteries can be purchased at any electronics store. The part number for the battery is flR2025. Follow the procedure below to replace the battery.
– Remove the battery holder.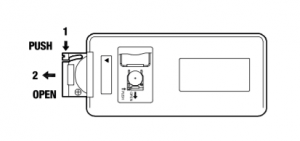
– Insert the battery with the side with the button in the battery holder, ensuring that the battery is properly secured.
– Push the battery holder back into the remote control so that it clicks.
USE OF THE REMOTE CONTROL
- Non-rechargeable batteries and may not be charged.
- Batteries must be placed with their poles in the correct place.
- Empty batteries must be removed from the product.
- Always buy the size and type of battery that is most suitable for the intended use.
- Replace all the batteries in a set at the same time.
- Clean the contacts of the batteries and also those of the device before installing the batteries.
- Remove batteries from equipment when it will not be used for a long period of time. Warning: Do not swallow batteries.
NOTE: Removal of batteries. Return your used batteries to a suitable collection point.The operation of the remote control buttons is same as the operation of the buttons on the control panel of the fireplace / stove. Read theOperation chapter for more information about the functionality of these buttons.
USE OF THE REMOTE CONTROL – THE WEEK TIMER
Note: This unit is equipped with a weekly clock function. With this you can set when the heating should switch on and off and you can set the thermostat for max. 7 days. 0 – 3 groups are available for each day.
- Use the remote control to set the weekly clock: Press the weekly timer button once to activate the function and the display will show “1 d”. Press the weekly timer button again to enter the setup menu. Then press the “+” / “-” buttons on the timer to set the the time to switch the device on and off and press the week clock button a fourth time to set the temperature Repeat the above steps to set the time and temperature for other groups and on different days.Note: If you wait longer than 5 seconds to press the keys, the weekly clock menu will close and the previous settings will be confirmed.
- The use of the control panel to set the weekly clock: Press and hold the week clock button on the control panel for 5 seconds until the digital display shows “1 d”, and press the week clock button again until the digital display shows”-” to start setting the# 1 timer. By pressing the flame button or the thermostat button, this allows you to set when the appliance will switch on, immediately after that press the button on the timer to confirm the setting for switching on and continue to set the time when the appliance will switch off by pressing the flame button or thermostat button, then press the timer button to confirm the time of switching off, then continue to set the temperature of group # 1 by pressing the flame button or press the thermostat button and then press the timer button a third time to confirm n the temperature setting ofgroup # 1. After this you can continue to set group # 2, group # 3 of the 1st day and then repeat this for the next 6 days.Note: If you wait longer than 5 seconds to press the keys, the weekly clock menu will close and the previous settings will be confirmed.
CARE AND CLEANING
The blower motor and flame motor are pre-lubricated for long-term use and do not require any further lubrication or maintenance. To remove a build-up of dust and lint, clean the fan’s outlet grille regularly using the soft brush of a vacuum cleaner.
- Use a soft, clean, lint-free cloth that will not scratch when dusting.
- Use a soft cloth dampened with warm water to clean the fireplace. DO NOT use household or corrosive or abrasive cleaners, as these can cause damage to the surface.
- When cleaning the glass screen, use a non-abrasive cloth that has been moistened with a liquid detergent or mild soap if necessary. DONOT use cleaning powders or other substances with abrasives as these substances will scratch the glass.
- Under no circumstances should this product be operated if the glass panel is broken or torn. Do not hit or hit the glass.
- If your device shows stains or is otherwise damaged during use, we advise you to contact a professional repairer.
- When the device is not in use, remove the plug from the wall socket to prevent damage.
WARNING
- Do not use this fireplace if any part of it has been flooded. Then immediately contact a qualified service technician to have the seat inspected and replace any part of the electrical system that has been submerged in water.
- Always remove the plug from the socket before cleaning the heater. First switch off the mains supply. Then remove the plug from the socket.
TROUBLE SHOOTING
- The device cannot be switched on. – Check if the device is connected to a standard 120 V wall socket. Press the ON / OFF button on the control panel.
- The device is switched on, but there is no flame effect. – Open the rear panels to check that the flame spindle has not fallen off the spindle motor.
- There is a visible flame effect, but the heater does not blow out hot air. – Switch the heater ON / OFF button on and off a number of times to ensure that it is in the “ON” position.
- The heater is not working, but the power supply is on and the – switches are in the “ON” position. Turn all switches to the “OFF” position and disconnect the device fromthe power outlet for 5 minutes. After 5 minutes, reconnect the device to the power outlet and operate it normally.
- The remote control does not work. – Replace the remote control battery. Operate remote control at a slow slow pace. Press the buttons on theremote control with an even movement and press gently. By repeatedly pressing buttons in rapid succession, it is possible that the transmitter no longer functions properly.
DISPOSAL
Do not dispose of the device in normal domestic waste. Dispose of the device over a registered waste disposal firm or through your communal waste disposal facility.Observe the currently valid regulations. In case of doubt, consult your waste disposal facility.
WARRANTY
Dear Valued Customer,Thank you very much for purchasing a MOA product. We wish you to inform you that this product is covered by a warranty which complies with all legal provisions concerning existing warranty and consumer rights in the country where the product was purchased. Should you find any defect or malfunction of your MOA product, please contact the appropriate Customer Care Center. Sincerely yours, TheMOA Team
Read More About This Manual & Download PDF:
References
[xyz-ips snippet=”download-snippet”]