
MONGOOSE MDVR-M Series 4 Channel 1080P HDD-SDD Mobile Digital Video Recording
****CRITICAL****
Attention The MDVR will provide power and image to TFT screen by Av OUT port, so don’t connect any external power for the TFT screen, or else, it will destroy the MDVR.
Installation Environment
- To extend equipment life, please install the equipment in locations with little vibration.
- To ensure normal heat dissipation, do not install the device in a poorly-ventilated area (such as trunk), and also keep about 15 cm away from other objects on the same level
- The device shall be horizontally installed and protected against water, humidity and lightning; in addition, keep the vehicle still during installation to prevent damage to the device due to falling off.
- To ensure safe operation, keep the device, camera, cables and other accessories out of reach of passengers and driver.
Avoid electric shock and fire
- The machine uses 9V-36V DC power supply, notice the polarity when wiring to avoid short circuits.
- Please power off the device when connecting accessories with device.
- Do not touch the power and the device with wet hands.
- Do not spray liquid on the device to prevent internal short circuit or fire.
- Do not put any other equipment on top of camera.
- Do not disassemble the housing without authorization to avoid damage or electric shock.
Transport and operation
- Please use the original package in transport to avoid damage in transport.
- Please keep power off in moving the device or replacing components.
Product introduction
Main Features
- Supports 1-4 Channel upto 1080P cameras
- Industry leading CPU with powerful processing ability
- Supports HDD/SSD/SD CARD for recording. Max. 2TB HDD.
- “Plug and Recording” Hard disk: innovative hard disk mounting design, no need to mount screws
- Robust design: Cast aluminum enclosure. Patented design
- Selected industrial power chip-sets, support 9-36V wide range power input, adapt to harsh environment
- Support UPS
- Support low/high temperature environment
- Support external Fireproof box, to backup data in extreme scenarios
- Support backup recording
- Dual streams for local recording and network transmission
- Support Wi-Fi, GPS modules.
- Built-in G-sensor for harsh acceleration/deceleration detection
- Data self-protection, save data when shut down abnormally
Product Specification
| Power input | DC: +9V ~ +36V | 9V~36V, Check the supply voltage of the vehicle battery before use; If it is supplied with more than 36V for a prolonged period, the device may be damaged. |
| Power output | , | |
| ACC detection | ≤4V | Power off |
| ≥5V | Power on | |
| Video input impedance | 75Ω | Each video input impedance: 75Ω |
| Video output voltage | 2Vp-p | 2VP-P CVBS output analog signal which should be adapted by 75Ω of input impedance from the display unit. |
| I/O interface | <1V | Low level alarm |
| >5V | High level alarm | |
| Operating temperature | -20℃~70℃ | In a well-ventilated place |
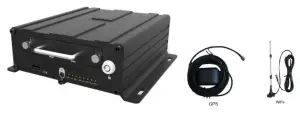
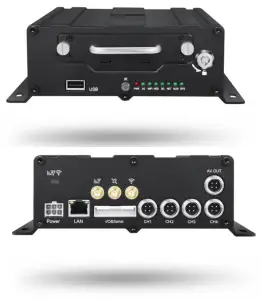
Connect WIFI/GPS antennas
Connect WIFI/GPS antennas according to labels on antennas and connectors.
Connect power with MDVR
Bench test first — Use DC12V, 3A (at least) or higher(5A is better) power adapter in office test.If bench test ensure connect Battery and Ignition to 12volt supply Ground to Ground
For the vehicle, must install like this.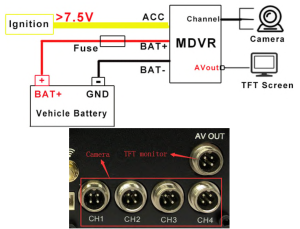
Connection to MONITOR
Connect a monitor with AVOUT port on the rear panel of MDVR.
****CRITICAL****
Attention: The MDVR will provide power and image to TFT screen by Av OUT port, so don’t connect any external power for the TFT screen, or else, it will destroy the MDVR.
System operations
User login
For all devices, the default password for DEVICE admin is 111111; Use this for initial log in
You can set up USER Password for user is 666666 User does not have same ability to change setting as admin log on
With remote:Press 【LOGIN】button to login MDVR.Press【Enter】button to call the keyboard page to input password.Once password has been inputed please pleaseIf any error while inputting ,press【Delete】Backspace button to delete.
OPTIONAL With USB mouse:Please connect a USB mouse with MDVR to setup the menu.Right click on the live video interface and you can see the login page.PRESs (EN) ENETER BUTTONClick on the password column to call the keyboard page to input password. 111111 Once password is entered please right click to proceed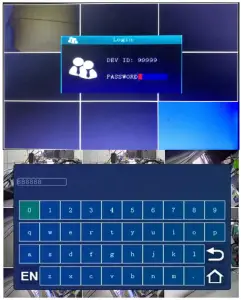
Recording and Camera type set up

n Main Menu choose RECORD. In Recording setup including: General, M stream, Time recording, Storage, OSD set.S-stream is only used for other 3G-4G Models not used for this model
General
Is used to set up for what type of camera you have. Default is 1080 type. You can choose your set up here. If you do not use 1080P camera then you must change these setting to suit your cameras.If you have mixture of 1080 (egMC10) and D1 (eg MC6) you must group the 1080P camera as Ch1 and Ch2 and use the DS1 cameras for CH3 and CH44-channel
The General info contains the basic setting for camera. When you install the MDVR, please double-check these sub-menus .
TV System: Press【Enter】to select: PAL / NTSC, default is PAL. If it’s wrong ,the image will become black-white colour only. Select PAL/NTSC according to the camera’s video type. Device will automatically restart after changing it.Camera Type: Press【Enter】 to select:4-channel :4 *1080P (default) or Choose OPTION 2 x 18080P + 2 x D1 etcResolution : D1:720*576, 720P: 1280*720 etc based on your the camera type.
Attention: the above setting must be matched with cameras specs, or else, it will not display video.For example: You have 2*1080P and 2*D1 cameras, choose item, You must put the 1080P in channel 1/2, put D1 in channel 3/4.
Record Mode: Press【Enter】 to select: Auto / time recording / alarm recording, default is Auto.Auto: it will record all the time.Time recording: Need set the time in Record settingsAlarm: Only record when alarm is triggering, should set in the Alarm menu first.Display Resolution: This is to set the TFT screen display resolution. Press【Enter】to select: 720 × 576/1024 × 768/1280 × 720/1920*1080.View mode: Press【Enter】to select: for different screen camera arrangement on monitorView Chn: Select the channels you need, to view on monitor.
Main stream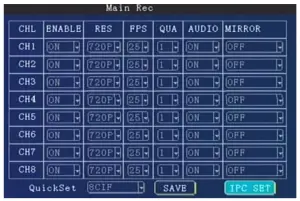
Enable: Press【Enter】to select: On / Off.Res: Resolution ,press【Enter】to select: D1 / HD1 / CIF / 720P.CIF:352*288,HD1:352*576, D1:704*576, 720P:1280*720 .FPS: Frames per second , More frames, every picture will be more clear. press【Enter】to select: 1-25 .NTSC : 30FPS , PAL: 25FPS.QUA: Quality of the video, press【Enter】to select: 1-8. 1 is best , but it will cost more storage space.AUDIO: Press【Enter】to select: On / Off. ON means the audio will be saved with video together.Mirror/Flip: Set the image to mirror or flip .Press【Enter】to select the types.QuickSet: Setup all channels resolution simultaneously, press【Enter】to select: 720P/D1 / HD1 / CIF / 720P.IPC set:MD431 supports 4 IPC by a PON switch. Optional extra
Storage CalculationMDVR support dual streams. Main stream is mainly used for local recording; Sub-stream is mainly used for network transmit or mirror recording.
Main stream:
| Resolution | Image Quality Level |
1 |
2 | 3 | 4 | 6 | 7 |
8 |
|
| Bitrate [MB/hour] | 1080P |
3600 |
3150 | 2700 | 2250 | 1350 | 900 |
675 |
|
| 720P |
1800 |
1575 | 1350 | 1125 | 900 | 675 | 450 |
351 |
|
| D1 |
900 |
675 | 540 | 450 | 395 | 351 | 316 |
281 |
|
| HD1 |
562 |
422 | 337 | 281 | 246 | 219 | 198 |
176 |
|
| CIF |
351 |
264 | 211 | 176 | 153 | 137 | 123 |
110 |
Now take the Main-stream table for example. DEFAULT IS 1080 LEVEL 5
It is an approximate data for one camera in one hour, eg. 1080P, if the Quality is 1 best), from the table, the camera uses 3600mb per hour per camera, 2TB is 2,000,000 MB
On the highest 1080P Image lever 1 quality at 3600MB per hour per cameraIf you use 1 Camera2TB HDD = 2,000,000MB / 3,600MB = 555 recording hoursIf you use 4 cameras(4 x 3,600) 14,400MB per hour = 139 hours Driving hours
If you change to 1080P image level 5 quality at 1800mb per hour per cameraIf you use 1 Camera2TB HDD = 2,000,000MB / 1,800MB = 1111 recording hoursIf you use 4 cameras(4 x 1,800) 7,200MB per hour = 278 hours Driving hours
If you change to D1 CAMERA and image level 4 quality at 450mb per hour per cameraIf you use 1 Camera2TB HDD = 2,000,000MB / 450MB = 4444 recording hoursIf you use 4 cameras(4 x 450) 1,800MB per hour = 1111 Driving hours
System setting System setup menu includes: Register info, User, Time, Startup, Config and Format.
Register info
The CMS server will monitor and manage the vehicle by Device ID.
Device ID、Plate No., Province ID, Terminal Model, Factor ID, Terminal ID, City ID:Press number keys to input.Device IDSet a number(12 digital at most) ,but must be unique, It’s very important , since we will add this device to the server by these numbers.Language: press【Enter】to select and system will reboot automatically.Position Mode: GPS, GLONASS, BeiDou, and so on.License1 &2: Custom function of RFID function for driver, should input the license number. It’s support for the third party platform with H-protocol.
User
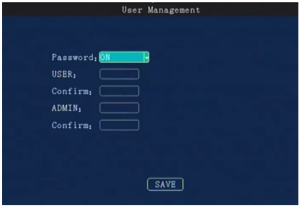
Password:press【Enter】:On/OffON: Login with Admin password can setting the User &Admin password; login by user password can only set a user password, password must be the same with [confirm] below .The administrator can set or change the parameters, so if you need to set some parameters, login with this account.The user can search and view the files only.
OFF: Without password. When entering the menu, get into the main menu directly .
Time setup
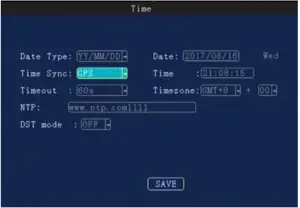
Date Type: Use for selecting the data type, year – month – day, day – month -year ,month – day – years. Press【Enter】to select.Time Sync: Press【Enter】to select: Off / GPS / NTP, default is GPS.Time out: Setup Menu Waiting Time, once overtime, it will automatically log off the current user, back to the monitoring mode. Press【Enter】 to select: 1 minute / 2 minutes / 5 minutes / 10 minutes,
Date: To modify current system date, press number keys to enter.Time: To modify current system time, press number keys to enter.Timezone: Press【Enter】to select a time zone,.
DST mode: Daylight Saving Time , set it according to your local area requirement.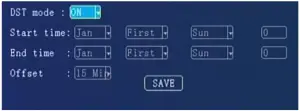 Select the start and end time, by week and the specific hour , then set the offset time (according to your local regulate on, normally it’s 60 minutes).
MDVR PLAYER
THE MD431 MDVR has software for PC to allow user to view Camera videos as well as GPS and other data.The player can be downloaded in the Product page for the MDVR in the MANUALS section on our website Mongoose.com.au and Mongoose.co.nz You can also download more detailed manual for the MDVR player and MDVR from the websiteThere HDD/SDD will need to be connected via the USB cable to your PC. Often you will need to connect Both USB to your PC to be able to power the HDD and allows transfer of files.
 report this ad
References
[xyz-ips snippet=”download-snippet”]