MONOPRICE 39263 6-Zone Home Audio RS-232 to IP Adapter User Manual
SAFETY WARNINGS AND GUIDELINES
Please read this entire manual before using this device, paying extra attention to these safety warnings and guidelines. Please keep this manual in a safe place for future reference.
- This device is intended for indoor use only.
- Do not expose this device to water or moisture of any kind. Do not place drinks or other containers with moisture on or near the device. If moisture does get in or on the device, immediately unplug it from the power outlet and allow it to fully dry before reapplying power.
- Do not touch the device, the power cord, or any other connected cables with wet hands.
- Do not expose this device to excessively high temperatures. Do not place it in, on, or near a heat source, such as a fireplace, stove, radiator, etc. Do not leave it in direct sunlight.
- Prior to operation, check the unit and power cord for physical damage. Do not use if physical damage has occurred.
- Before plugging the unit into a power outlet, ensure that the outlet provides the same type and level of power required by the device.
- Unplug this device from the power source when not in use.
- Take care to prevent damage to the power cord. Do not allow it to become crimped, pinched, walked on, or become tangled with other cords. Ensure that the power cord does not present a tripping hazard.
- Never unplug the unit by pulling on the power cord. Always grasp the connector head or adapter body.
- Clean using a soft, dry cloth only. Do not use chemical cleaners, solvents, or detergents. For stubborn deposits, moisten the cloth with warm water.
- This device has no user serviceable parts. Do not attempt to open, service, or modify this device.
INTRODUCTION
This Wi-Fi®/LAN to RS-232/RS-485 Converter allows for remote access, configuration, and the ability to control any RS-232 or RS-485 serial device over a wired Ethernet or Wi-Fi network connection. It supports the WEP, WPA-PSK, WPA2-PSK, and WAPI security protocols, as well as the WEP64, WEP128, TKIP, and AES encryption standards. It has extremely low latency and is suitable for use in a battery powered system.
FEATURES
- Can connect to an existing wired Ethernet or wireless Wi-Fi® network
- Can control any RS-232 or RS-485 device
- Supports the WEP, WPA-PSK, WPA2-PSK, and WAPI security protocols
- Supports the WEP64, WEP128, TKIP, and AES encryption standards
- Can be configured as a Wi-Fi router or access point
PACKAGE CONTENTS
Please take an inventory of the package contents to ensure you have all the items listed below. If anything is missing or damaged, please contact Monoprice Customer Service for a replacement.
- 1x Wi-Fi®/LAN to RS-232/RS-485 converter
- 1x Wi-Fi antenna
- 1x 9-pin RS-232 cable
- 1x Cat5e Ethernet cable
- 1x AC power adapter (5 VDC, 1A)
- 1x User’s manual
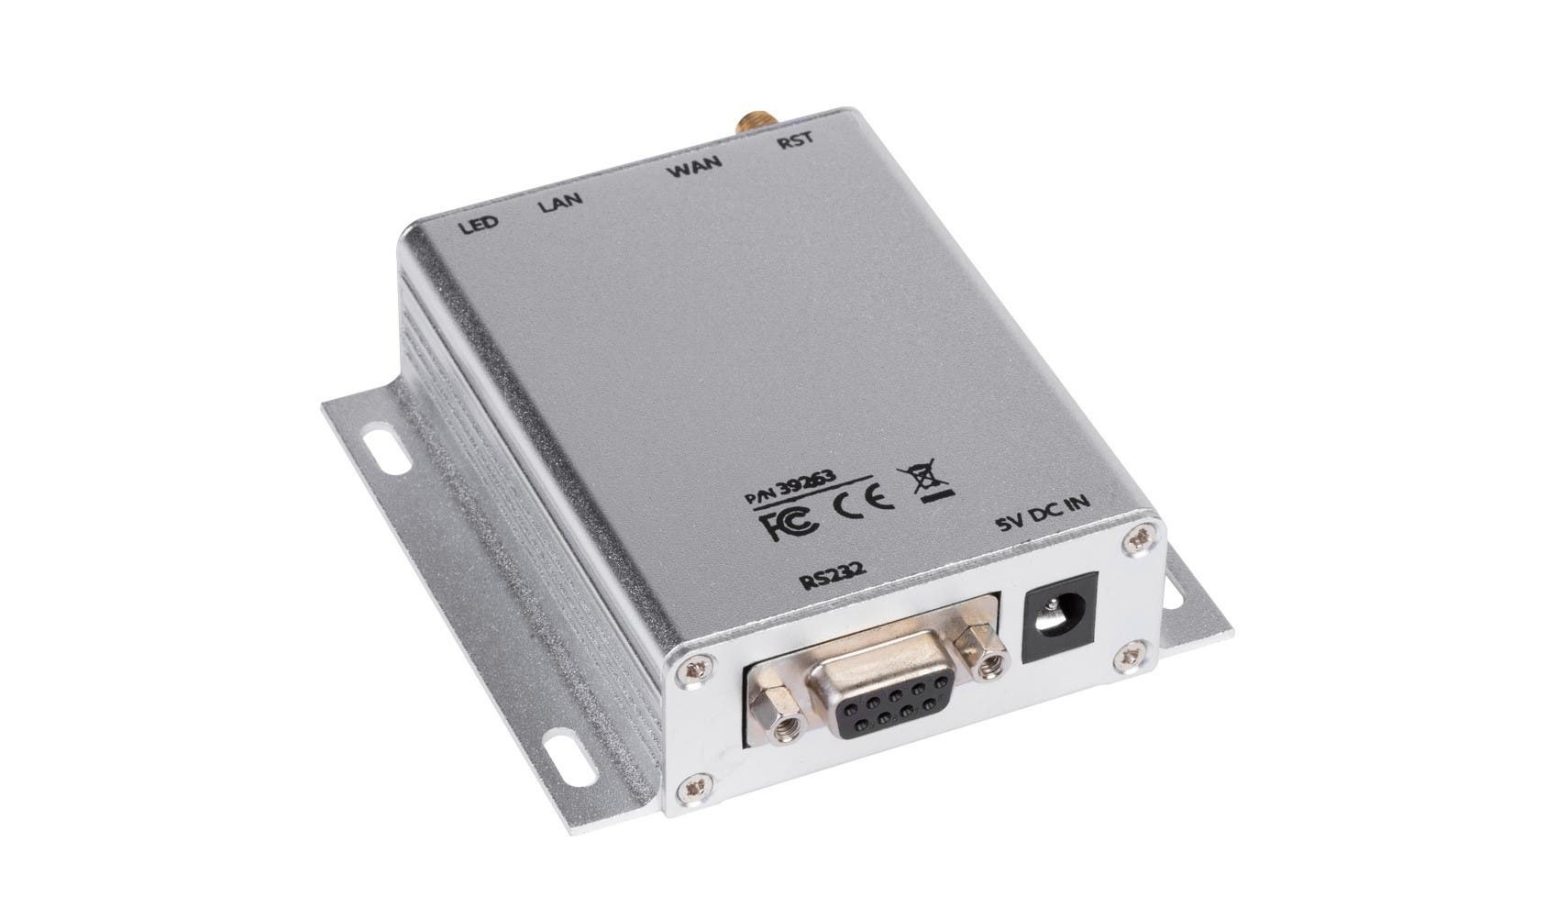
PRODUCT OVERVIEW
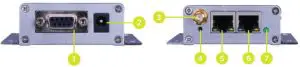
- RS-232: 9-pin DB-9 connector for connecting the included RS-232 cable to the RS-232 or RS-485 device.
- Power: DC barrel connector for connecting the included AC power adapter.
- Antenna: SMA connector for attaching the included antenna.
- Reset: Press and hold the button for about 10 seconds to reset the device to its factory default settings.
- WAN: RJ45 jack for connecting to a broadband modem.
- LAN: RJ45 jack for connecting to an Ethernet router or switch.
- Wi-Fi Status: The LED flashes green when the converter is connected to a Wi-Fi® network and is off when there is no connection.
RS-232 PINOUT
|
Pin # |
Function | Input/Output | Description |
| 1 | N/A | N/A |
N/A |
|
2 |
RxD | Input | Data receiving input |
| 3 | TxD | Output |
Data sending output |
|
4 |
N/A | N/A | N/A |
| 5 | GND | Input |
Ground |
|
6 |
N/A |
N/A | N/A |
| 7 | N/A | N/A |
N/A |
|
8 |
N/A | N/A | N/A |
| 9 | N/A | N/A |
N/A |
RJ45 PINOUT
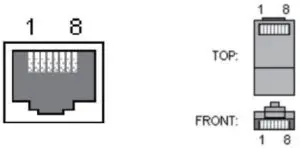
| Pin # | Function | Input/Output |
Description |
|
1 |
TX+ | Output | Transmit Data + |
| 2 | TX- | Output |
Transmit Data – |
|
3 |
RX+ | Input | Receive Data + |
| 4 | N/A | N/A |
N/A |
|
5 |
N/A | N/A | N/A |
| 6 | RX- | Input |
Receive Data – |
|
7 |
N/A | N/A | N/A |
| 8 | N/A | N/A |
N/A |
SAMPLE CONNECTION DIAGRAM
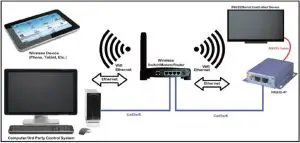
NSTALLATION
Perform the following steps to connect the converter to your network and your RS-232/RS-485 device.
- Place the Converter near the device you want to control.
- Using the included 9-pin RS-232 cable, plug one end into the RS-232 port on your device, then plug the other end into the RS-232 port on the Converter.
- If you intend to use a wired connection to the Converter, plug one end of the included Ethernet cable into the LAN port on the Converter, then plug the other end into an available LAN port on your router.Alternatively, if you intend to use a Wi-Fi® connection to the Converter, attach the included Wi-Fi antenna to the Antenna connector on the Converter.
- Plug one end of the included AC power adapter into the Power connector on the Converter, then plug the adapter into a nearby AC power outlet.
- Depending on whether you are using a wired or wireless connection, perform the steps in one of the following sections to connect to the Converter using your web browser.
Wired
- Open a web browser and connect to your router using the instructions found in your router’s user’s manual.
- In the router’s user interface, check the DHCP client to determine the IP address of the Converter.
- Enter the IP address into the address bar on your browser and hit ENTER to access the Converter’s Web GUI Login screen.
Wireless
- Create a wireless connection to the converter using the following Wi-Fi® settings:SSID: HLINKPassword: 12345678
- Once you are connected, open a web browser, type 192.168.16.254 into the address bar, and hit ENTER to access the Converter’s Web GUI Login screen.
WEB GUI
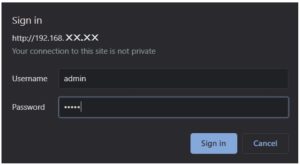
Login
Enter the Username and Password into the fields on the dialog, then click the Sign In button to continue. The default Username and Password are:
Username: adminPassword: admin
Serial2Net Settings
Click HLK-RM04 > Serial2Net Settings to get this screen, which allows you to change the Wi-Fi® connection and login parameters.
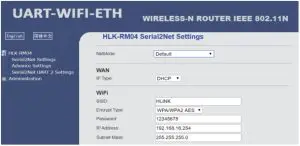
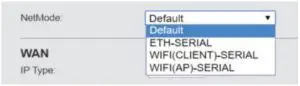
You can change the NetMode setting, but we recommend leaving it at Default.
System Settings
Click HLK-RM04 > Serial2Net UART 2 Settings to get this screen, which allows you to change many network connection settings. The parameters in the Current column reflect the current settings, while those in the Updated column are the new settings. Make changes, as desired, then click the Apply button to save your changes.
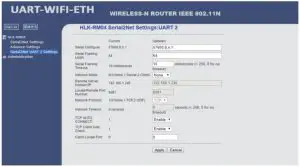
Following are details about the entries.
- Serial Configure: Sets the serial communications parameters. The values are Baud Rate, Data Bits, Parity, and Stop Bits, separated by commas.
- Serial Framing Length: Sets the Serial Framing Length, which is 64 by default and usually remains unchanged.
- Serial Framing Timeout: Sets the amount of time (in milliseconds) for the Serial Framing Timeout, which is 10 by default and usually remains unchanged.
- Network Mode: Select Client, Server, or None.
- Remote Server Domain/IP: Sets the IP address of the Remote Server Domain. This can only be changed if the Network Mode is Client.
- Locale/Remote Port Number: Sets the port number. This can only be changed if the Network Mode is Client or Server. When Network Mode is set to Client, this specifies the port number of the remote server. When Network Mode is set to Server, this specifies the local port number.
- Network Protocol: Select TCP, UDP, or None. For most configurations, set it to TCP.
- Network Timeout: Sets the amount of time (in seconds) of no data transmission before the server disconnects. Set it to 0 to never disconnect.
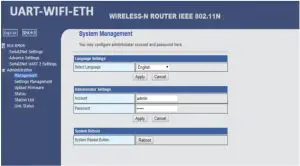
System Management
Click Administration > Management to get this screen, which allows you to set the UI Language and the login parameters (Username/Account and Password). The default Account (Username) and Password are both admin (case sensitive). Click the Reboot button to save and reload your new settings.
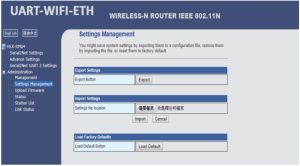
Settings Management
Once you have the Converter configured as you want, it is a good idea to save the settings to a file on your computer. This allows you to maintain several different sets of settings and to reload your settings in the event that they are changed from what you want. Click Administration > Settings Management to get the following screen, which allows you to save and load settings or to reset all settings to their factory default values.
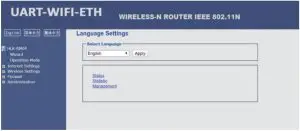
Home Page
Click the UART-WIFI-ETH label in the upper left corner of the screen to get the Home Page, as shown below
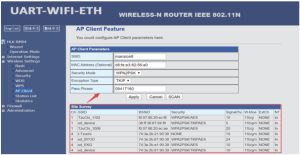
AP Configuration
Perform the following steps to configure the Converter to operate as a wireless Access Point (AP).
- From the Home Page, click HLK-RM04 > Operation Mode to get the following screen.

- Click the radio button next to the AP Client label, then click the Apply button.
- Click Wireless Settings > AP Client, enter your preferred AP Client parameters, then click the Apply button to save your changes.
SPECIFICATIONS
| Model | 39263 |
| Network Standards | IEEE 802.1b/g/n, IEEE 802.3 |
| Wireless Transmission Rate | Up to 150Mbps |
| Wireless Security Protocols | WEP, WPA-PSK, WPA2-PSK, WAPI |
| Wireless Encryption Standards | WEP64, WEP128, TKIP, AES |
| Wi-Fi® Operating Modes | Client, Router, Access Point |
| Wireless Frequency Range | 2.4 ~ 2.483 GHz |
| Emission Power | 12-15 dBm |
| Frequency Bandwidth | 20MHz, 40MHz, automatic |
| WDS Function | Supports WDS wireless bridge connection |
| Number of TCP Connections | More than 20 |
| Serial Baud Rate | 1200 ~ 500000 bps |
| Antenna Type | External 6dB |
| Operating Temperature | -4 ~ +158°F (-20 ~ +70°C) |
| Operating Humidity | 10 ~ 90% RH, noncondensing |
| Storage Temperature | -40 ~ +176°F (-40 ~ +80°C) |
| Storage Humidity | 5 ~ 90% RH, noncondensing |
| Dimensions | 1.1″ x 1.6″ x 0.4″ (29 x 40 x 9 mm) |
TECHNICAL SUPPORT
Monoprice is pleased to provide free, live, online technical support to assist you with any questions you may have about installation, setup, troubleshooting, or product recommendations. If you ever need assistance with your new product, please come online to talk to one of our friendly and knowledgeable Tech Support Associates. Technical support is available through the online chat button on our website www.monoprice.com or through email by sending a message to [email protected]. Check the website for support times and links.
REGULATORY COMPLIANCE
Notice for FCC

This device complies with Part 15 of the FCC rules. Operation is subject to the following two conditions:
- this device may not cause harmful interference, and
- this device must accept any interference received, including interference that may cause undesired operation.
Modifying the equipment without Monoprice’s authorization may result in the equipment no longer complying with FCC requirements for Class B digital devices. In that event, your right to use the equipment may be limited by FCC regulations, and you may be required to correct any interference to radio or television communications at your own expense.
This equipment has been tested and found to comply with the limits for a Class B digital device, pursuant to Part 15 of the FCC Rules. These limits are designed to provide reasonable protection against harmful interference in a residential installation. This equipment generates, uses and can radiate radio frequency energy and, if not installed and used in accordance with the instructions, may cause harmful interference to radio communications. However, there is no guarantee that interference will not occur in a particular installation. If this equipment does cause harmful interference to radio or television reception, which can be determined by turning the equipment off and on, the user is encouraged to try to correct the interference by one or more of the following measures:
- Reorient or relocate the receiving antenna.
- Increase the separation between the equipment and receiver.
- Connect the equipment into an outlet on a circuit different from that to which the receiver is connected.
- Consult the dealer or an experienced radio/TV technician for help.
RF Exposure Statement for FCC
![]() CautionThis equipment complies with radiation exposure limits set forth for an uncontrolled environment. End users must follow the specific operating instructions for satisfying RF exposure compliance. This transmitter must be at least 20 cm from the user and must not be collocated or operated in conjunction with any other antenna or transmitter.
CautionThis equipment complies with radiation exposure limits set forth for an uncontrolled environment. End users must follow the specific operating instructions for satisfying RF exposure compliance. This transmitter must be at least 20 cm from the user and must not be collocated or operated in conjunction with any other antenna or transmitter.
Notice for Industry CanadaThis Class B digital apparatus complies with Canadian ICES-003.
RF Exposure Statement for Industry Canada
![]() CautionThis equipment complies with radiation exposure limits set forth for an uncontrolled environment. End users must follow the specific operating instructions for satisfying RF exposure compliance. This transmitter must be at least 20 cm from the user and must not be collocated or operated in conjunction with any other antenna or transmitter.
CautionThis equipment complies with radiation exposure limits set forth for an uncontrolled environment. End users must follow the specific operating instructions for satisfying RF exposure compliance. This transmitter must be at least 20 cm from the user and must not be collocated or operated in conjunction with any other antenna or transmitter.
Monoprice™ and all Monoprice logos are trademarks of Monoprice Inc.Wi-Fi® and Wi-Fi Alliance® are registered trademarks of Wi-Fi Alliance.
CUSTOMER SERVICE
 report this ad
The Monoprice Customer Service department is dedicated to ensuring that your ordering, purchasing, and delivery experience is second to none. If you have any problem with your order, please give us an opportunity to make it right. You can contact a Monoprice Customer Service representative through the Live Chat link on our website www.monoprice.com or via email at [email protected]. Check the website for support times and links.
References
[xyz-ips snippet=”download-snippet”]