MONOPRICE 3G SDI 8x8 Matrix User Manual

SAFETY WARNINGS AND GUIDELINES
Please read this entire manual before using this device, paying extra attention to these safety warnings and guidelines. Please keep this manual in a safe place for future reference.
- This device is intended for indoor use only.
- Do not expose this device to water or moisture of any kind. Do not place drinks or other containers with moisture on or near the device. If moisture does get in or on the device, immediately remove it from its power source and allow it to fully dry before reapplying power.
- Do not touch the device, the power cord, or any other connected cables with wet hands.
- Do not expose this device to excessive vibration or extreme force, shock, or fluctuations in temperature or humidity.
- Do not expose this device to excessively high temperatures. Do not place it in, on, or near a heat source, such as a fireplace, stove, radiator, etc. Do not leave it in direct sunlight.
- Do not place or install this device in an area where it can be exposed to excessive amounts of dust, humidity, oil, smoke, or combustible vapors.
- Prior to operation, check the unit and power cord for physical damage. Do not use if physical damage has occurred.
- Before plugging the unit into a power outlet, ensure that the outlet provides the same type and level of power required by the device.
- Unplug this device from the power source when not in use.
- Take care to prevent damage to the power cord. Do not allow it to become crimped, pinched, walked on, or become tangled with other cords. Ensure that the power cord does not present a tripping hazard.
- Never unplug the unit by pulling on the power cord. Always grasp the connector head or adapter body.
- Remove the batteries from the controller if it will go unused for a lengthy period of time.
- Clean using a soft, dry cloth only. Do not use chemical cleaners, solvents, or detergents. For stubborn deposits, moisten the cloth with warm water.
- This device has no user serviceable parts. Do not attempt to open, service, or modify this device.
INTRODUCTION
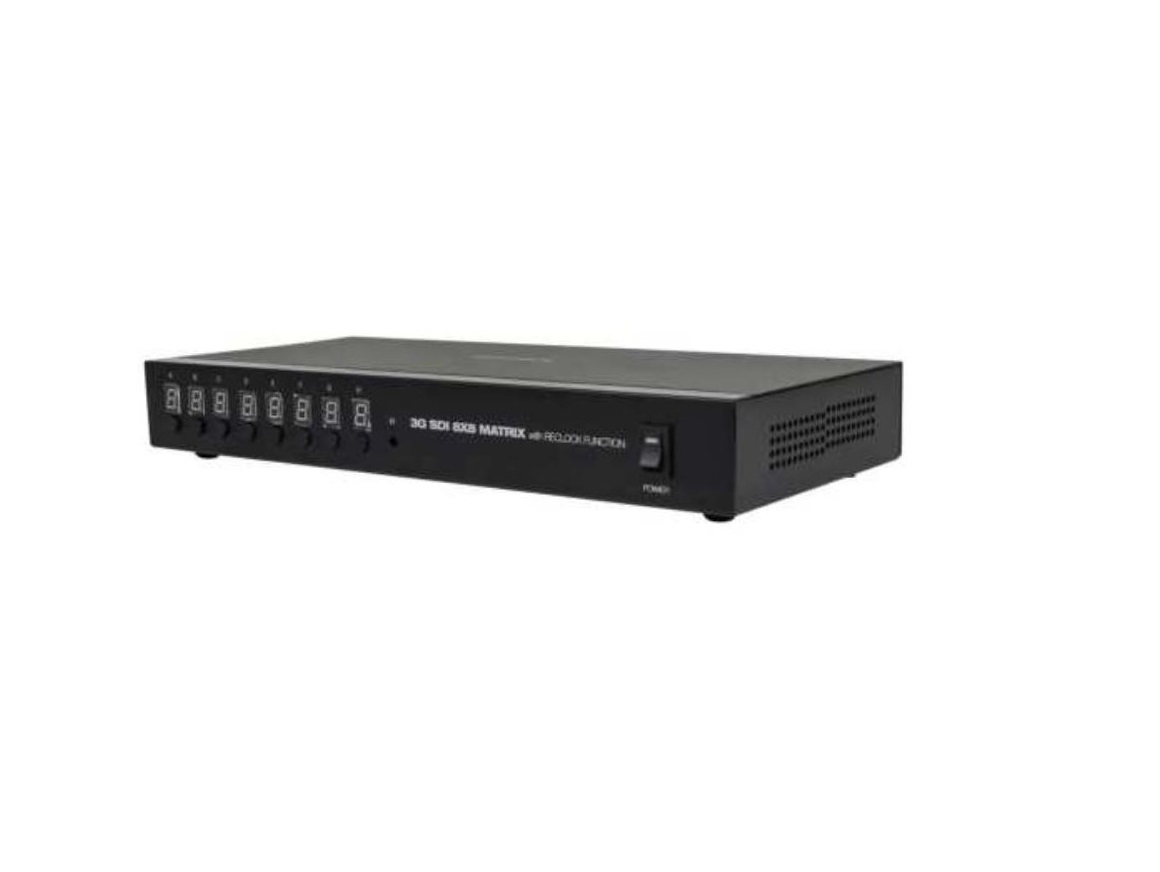
This 3G SDI 8×8 Matrix features eight SDI inputs and eight SDI outputs, with the ability to route any input to any or all outputs. It supports long SDI cable runs (up to 100m for 3G mode) and data rates from 270Mbps to 2.97Gbps. The video outputs are relocked, with support for multiple slopes. It is compatible with HD CCTV 1.0, HD-SDI (ST 292), 3G-SDI (ST 424), and SD-SDI (ST 259). It includes RS-232 serial, infrared remote, and front panel control options. It also includes an IR extender.
FEATURES
- Eight SDI video inputs and eight SDI video outputs
- Route any source to any output
- Supports multiple video resolutions (480i, 525i, 625i, 720p @24/25/30/50/60Hz, 1080i @50/60Hz, 1080p @24/25/30Hz, 1080p @50/60Hz
- Supports multiple color spaces (RGB sampled, YCbCr 4:4:4 sampled, YCbCr 4:2:2 sampled, YCbCr 4:2:0 sampled)
- Supports data rates from 270Mbps to 2.97Gbps
- Supports 8-bit, 10-bit, and 12-bit Deep Color
- Compatible with HDcctv 1.0, HD-SDI (ST 292), 3G-SDI (ST 424), and SD-SDI (ST 259)
- Supports long SDI input/output cable runs (up to 320m/300m for SD mode, 220m/200m for HD mode, and 100m/100m for 3G mode)
- SDI outputs are relocked and support multiple slopes
- Features RS-232 control input
- Includes infrared remote control
- Features an IR extender so you can use the remote control without having the matrix exposed
CUSTOMER SERVICE
The Mono price™ Customer Service department is dedicated to ensuring that your ordering, purchasing, and delivery experience is second to none. If you have any problem with your order, please give us an opportunity to make it right. You can contact a Mono price Customer Service representative through the Live Chat link on our website www.monoprice.com or via email at [email protected]. Check the website for support times and links.
PACKAGE CONTENTS
Please take an inventory of the package contents to ensure you have all the items listed below. If anything is missing or damaged, please contact Mono price™ Customer Service for a replacement.
- 1x 3G SDI 8×8 Matrix
- 1x AC Power Adapter (5 VDC, 3A)
- 1x IR Remote Control
- 1x IR Receiver
- 1x User’s Manual
PRODUCT OVERVIEW

- DC 5V 3A: DC barrel connector for connecting the included AC power adapter.
- EXT IR: 3.5mm jack for connecting the included IR receiver.
- RS232: DB9 connector for connecting a computer for RS-232 control.
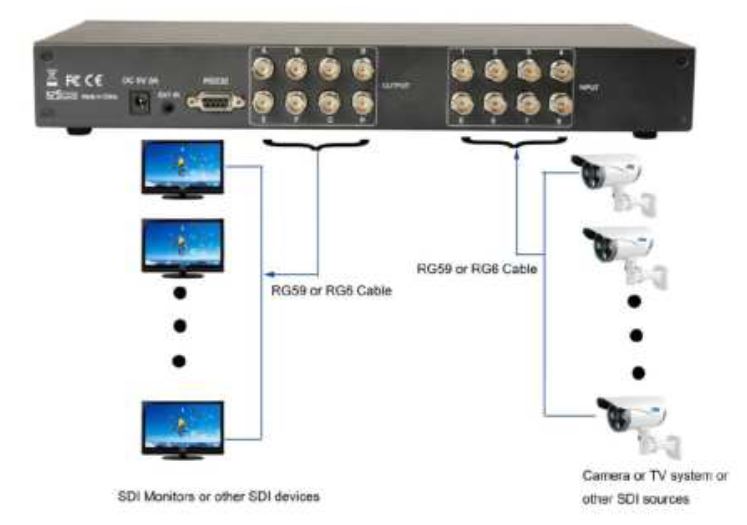
- OUTPUT: Eight BNC connectors for connecting up to eight SDI video source devices using RG-6 or RG-59 cables (available separately).
- INPUT: Eight BNC connectors for connecting up to eight SDI displays using RG-6 or RG-59 cables (available separately).
SDI CABLES
SDI cables are constructed using RG-6 or RG-59 75-ohm coaxial cable, terminated with BNC connectors on each end.
INSTALLATION
Perform the following steps to connect the switch to your SDI input and output devices, as well as a PC for automated control using the RS-232 serial interface.
- Ensure that all devices you will be connecting are powered off and unplugged from their power sources.
- Plug one end of an SDI cable (available separately) into the SDI video input jack on an SDI display or other SDI device, then plug the other end into one of the OUTPUT jacks on the rear panel of the matrix. Repeat for up to seven additional SDI displays or other output devices.
- Plug one end of an SDI cable (available separately) into one of the INPUT jacks on the rear panel of the matrix, then plug the other end into the SDI output jack on one of your SDI video source devices. Repeat for up to seven other SDI video sources.
- (Optional) Plug one end of an RS-232 serial cable (available separately) into the RS232 port on the rear panel of the matrix, then plug the other end into an RS-232 serial port on your PC.
- (Optional) Plug the included IR Receiver into the IR EXT jack on the rear panel of the matrix, then position the IR “eye” where it can receive IR signals from the included IR remote control.
- Plug one end of the included AC power adapter into the DC 5V 3A jack on the matrix, then plug the other end into a nearby AC power outlet.
- Power on your display(s) or other device(s), then power on your SDI video source device(s) and start playback of your audio/video source(s). Use the controls to verify that all inputs can be seen on all outputs.
SAMPLE CONNECTION DIAGRAM
MANUAL CONTROL
The front panel features 8 LED digital displays, labeled A-H, corresponding to the eight SDI outputs. Press the button below the LED display to increment the input source number, from 1 to 8 and then back to 1 again. Any output channel can use any of the inputs.
REMOTE CONTROL
Note: Before using the included remote control, remove the plastic insert that protects the installed battery from accidental discharge.
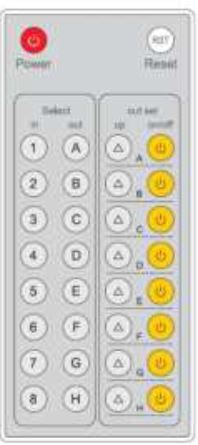
- Power: Press the Power button to turn the matrix ON or OFF. Note that the Power switch on the front panel must be set to the ON position for the remote control’s Power button to function.
- Reset: Press the Reset button to reset the matrix to its factory default settings and channel selections.
- Select: Use the in and out buttons to set the input for any given output. To make the selection, first press the letter button (A-H) corresponding to the output you wish to change, then press the number button (1-8) corresponding to the input you want to assign to the selected output. For example, to set the A output to use the 8 input, press A8 on the remote control.
- out set: Press the up▲ button for the desired OUTPUT (A-H) to increment the selected input by 1, from 1-8 and then back to 1 again. Press the button repeatedly to cycle through the available inputs. Press the on/off button for the desired OUTPUT to turn the output on or off.
RS-232 CONTROL
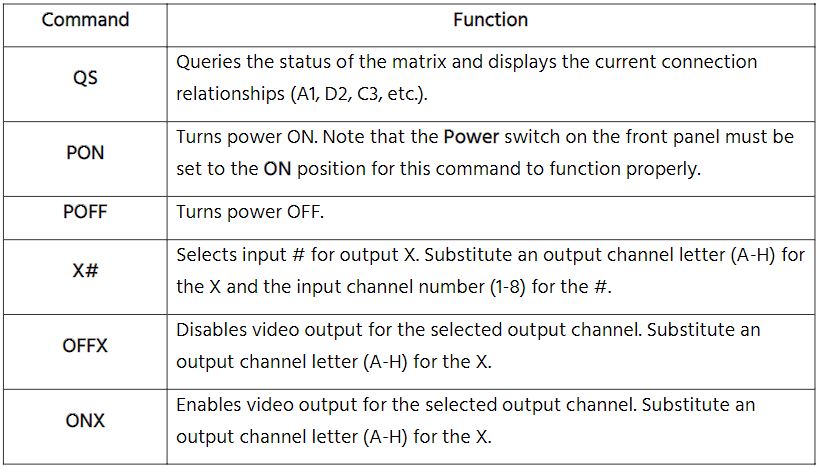
By connecting the matrix to a PC using an RS-232 cable (available separately), you can control the matrix using commands issued from a terminal program on your PC. The following table lists the various commands you can use. Note that the Power switch on the front panel must be in the ON position for these commands to function, including the power on/off commands.
TROUBLESHOOTING
Q1: The matrix is connected, but there is no video on the connected display.A1: Double check all connections. Check to ensure that the selected input has video content. Try using different SDI video cables. Ensure that the AC power adapter is plugged into the matrix and into an AC power source.Q2: The switch does not respond to RS-232 control signals from my computer.A2: Verify that you are typing in the correct RS-232 port number. Double check the connections. Try using a different RS-232 cable.
TECHNICAL SUPPORT
Mono price™ is pleased to provide free, live, online technical support to assist you with any questions you may have about installation, setup, troubleshooting, or product recommendations. If you ever need assistance with your new product, please come online to talk to one of our friendly and knowledgeable Tech Support Associates. Technical support is available through the online chat button on our website www.monoprice.com or through email by sending a message to [email protected]. Check the website for support times and links.
To download the latest drivers, firmware, manuals, etc., go to www.monoprice.com and type the P/N into the search bar. If available, support files are linked at the bottom of the product page.
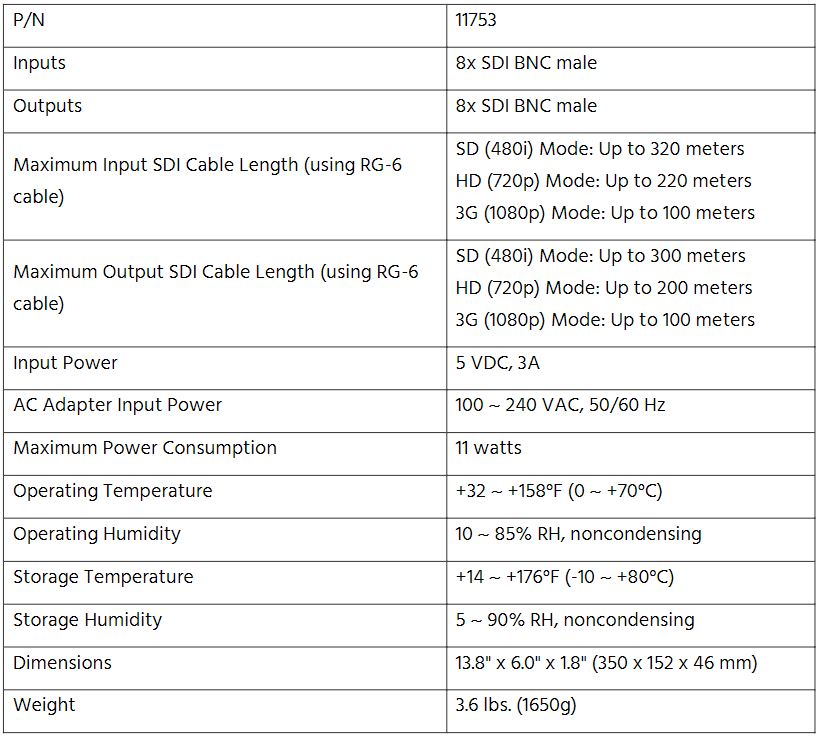
SPECIFICATIONS
REGULATORY COMPLIANCENotice for FCC
![]() This device complies with Part 15 of the FCC rules. Operation is subject to the following two conditions: (1) this device may not cause harmful interference, and (2) this device must accept any interference received, including interference that may cause undesired operation. Modifying the equipment without Mono price’s authorization may result in the equipment no longer complying with FCC requirements for Class B digital devices. In that event, your right to use the equipment may be limited by FCC regulations, and you may be required to correct any interference to radio or television communications at your own expense. This equipment has been tested and found to comply with the limits for a Class B digital device, pursuant to Part 15 of the FCC Rules. These limits are designed to provide reasonable protection against harmful interference in a residential installation. This equipment generates, uses and can radiate radio frequency energy and, if not installed and used in accordance with the instructions, may cause harmful interference to radio communications. However, there is no guarantee that interference will not occur in a particular installation. If this equipment does cause harmful interference to radio or television reception, which can be determined by turning the equipment off and on, the user is encouraged to try to correct the interference by one or more of the following measures:
This device complies with Part 15 of the FCC rules. Operation is subject to the following two conditions: (1) this device may not cause harmful interference, and (2) this device must accept any interference received, including interference that may cause undesired operation. Modifying the equipment without Mono price’s authorization may result in the equipment no longer complying with FCC requirements for Class B digital devices. In that event, your right to use the equipment may be limited by FCC regulations, and you may be required to correct any interference to radio or television communications at your own expense. This equipment has been tested and found to comply with the limits for a Class B digital device, pursuant to Part 15 of the FCC Rules. These limits are designed to provide reasonable protection against harmful interference in a residential installation. This equipment generates, uses and can radiate radio frequency energy and, if not installed and used in accordance with the instructions, may cause harmful interference to radio communications. However, there is no guarantee that interference will not occur in a particular installation. If this equipment does cause harmful interference to radio or television reception, which can be determined by turning the equipment off and on, the user is encouraged to try to correct the interference by one or more of the following measures:
- Reorient or relocate the receiving antenna.
- Increase the separation between the equipment and receiver.
- Connect the equipment into an outlet on a circuit different from that to which the receiver is connected.
- Consult the dealer or an experienced radio/TV technician for help.
Radio Notice for Industry CanadaThis Class B digital apparatus complies with Canadian ICES-003. Mono price™ and all Monoprice logos are trademarks of Monoprice Inc.
References
[xyz-ips snippet=”download-snippet”]