![]()
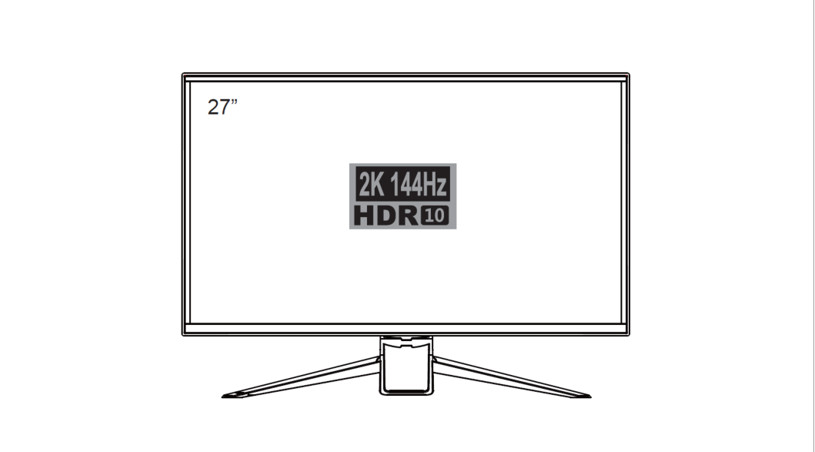
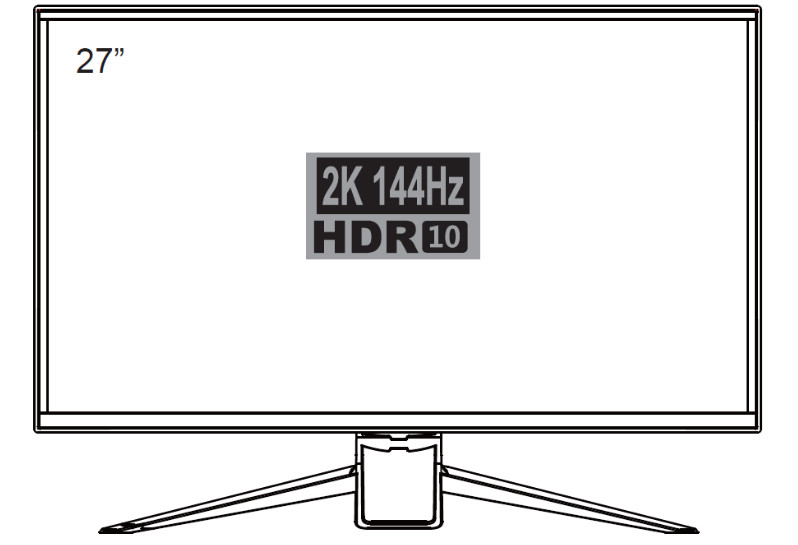
MP Zero-G 27″ WQHD 144Hz AHVA Monitorwith AMD FreeSyncTM 2.0
P/N 31004User’s Manual
SAFETY WARNINGS AND GUIDELINES
Please read this entire manual before using this device, paying extra attention to these safety warnings and guidelines. Please keep this manual in a safe place for future reference.
- This device is intended for indoor use only.
- Do not expose this device to water or moisture of any kind. Do not place drinks or other containers with moisture on or near the device. If moisture does get in or on the device, immediately unplug it from the power outlet and allow it to fully dry before reapplying power.
- Do not touch the device, the power cord, or any other connected cables with wet hands.
- Do not place the monitor on an unstable surface where it could fall and cause either personal injury or damage to the monitor and/or other equipment.
- Do not subject the product to extreme force, shock, or fluctuations in temperature or humidity.
- Do not expose this device to excessively high temperatures. Do not place it in, on, or near heat sources, such as a fireplace, stove, radiator, etc. Do not leave it in direct sunlight.
- This device ventilates excessive heat through the slots and openings in the case. Do not block or cover these openings. Ensure that the device is in an open area where it can get sufficient airflow to keep from overheating.
- Do not place or install this device in an area where it can be exposed to excessive amounts of dust, humidity, oil, smoke, or combustible vapors.
- Prior to operation, check the unit and power cord for physical damage. Do not use if physical damage has occurred.
- Before plugging the unit into a power outlet, ensure that the outlet provides the same type and level of power required by the device.
- Take care to prevent damage to the power cord. Do not allow it to become crimped, pinched, walked on, or become tangled with other cords. Ensure that the power cord does not present a tripping hazard.
- Never unplug the unit by pulling on the power cord. Always grasp the connector head or adapter body.
- Ensure that power is turned off and disconnected before making any electrical connections.
- Remove the batteries from the controller if it will go unused for a lengthy period of time.
- Clean using a soft, dry cloth only. Do not use chemical cleaners, solvents, or detergents. For stubborn deposits, moisten the cloth with warm water.
- This monitor has no user serviceable parts. Do not open the case or otherwise attempt to modify this monitor.
- Do not leave a single image on the display for a long period of time. Doing so could cause “burn-in” of the image. It is recommended to use a variable desktop background and to use a screen saver to prevent “burn-in”. Alternatively, ensure that the monitor is powered off for at least 2 hours out of every 12.
FEATURES
- Three HDMI® and one DisplayPort inputs
- 2560 x 1440p @ 144Hz maximum video resolution
- Fully compliant with the HDMI 2.0 and DisplayPort 1.2 specifications
- 1ms GTG response time 178° vertical and horizontal viewing angles
- 500,000:1 dynamic contrast ratio
- 350 cd/m² brightness
- More than 16.7 million colors
- Includes IR remote control
- Supports AMD FreeSyncTM 2.0
CUSTOMER SERVICE
The Monoprice Customer Service department is dedicated to ensuring that your ordering, purchasing, and delivery experience is second to none. If you have any problem with your order, please give us an opportunity to make it right. You can contact a Monoprice Customer Service representative through the Live Chat link on our website www.monoprice.com during normal business hours (Mon-Fri: 5am-7pm PT, Sat-Sun: 9am6pm PT) or via email at
PACKAGE CONTENTS
Please take an inventory of the package contents to ensure you have all the items listed below. If anything is missing or damaged, please contact Monoprice Customer Service for a replacement.
| 1x 27″ Monitor | 1x AC Power Adapter |
| 1x Stand Base | 1x AC Power Cord |
| 2x Stand Legs | 1x IR Remote Control |
| 6x Stand Screws | 2x AAA Batteries |
| 1x High Speed HDMI® Cable | 1x User’s Manual |
PRODUCT OVERVIEW
Input Panel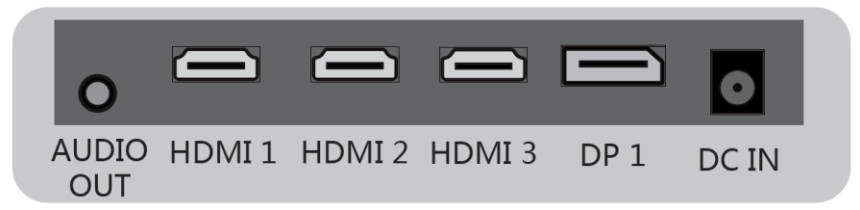 AUDIO OUT: 3.5mm stereo analog audio output.HDMI 1: HDMI® video input supporting the HDMI 1.4 specification at resolutions up to 2560 x 1440p @ 60Hz.HDMI 2: HDMI® video input supporting the HDMI 1.4 specification at resolutions up to 2560 x 1440p @ 60Hz.HDMI 3: HDMI video input supporting the HDMI 2.0 specification at resolutions up to 2560 x 1440p @ 144Hz.DP 1: DisplayPort video input supporting the DisplayPort 1.2 specification at resolutions up to 2560 x 1440p @ 144Hz.DC IN: DC barrel connector for connecting the included AC power adapter.Front
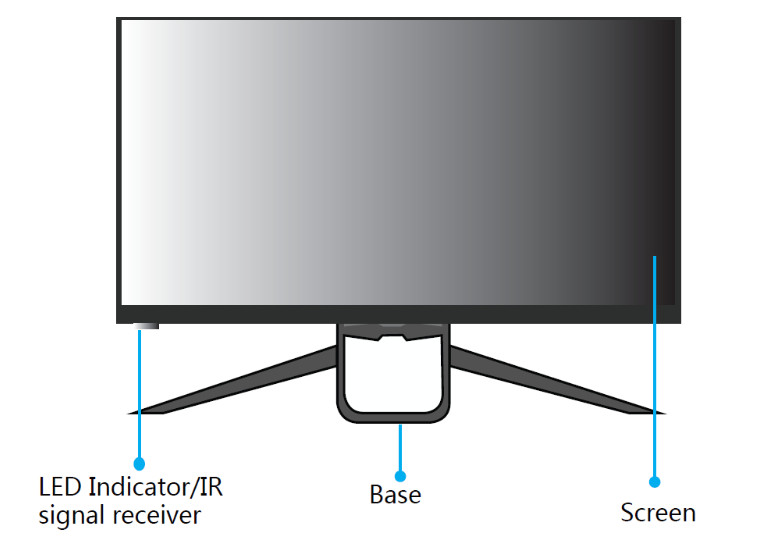 Rear
Rear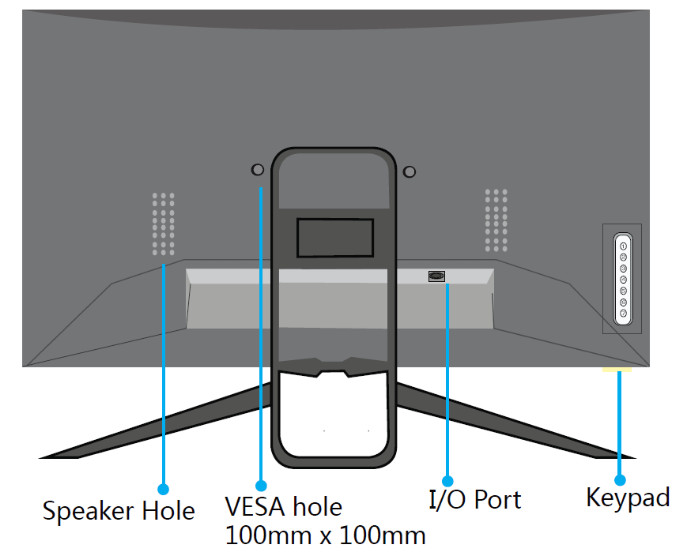 Keypad
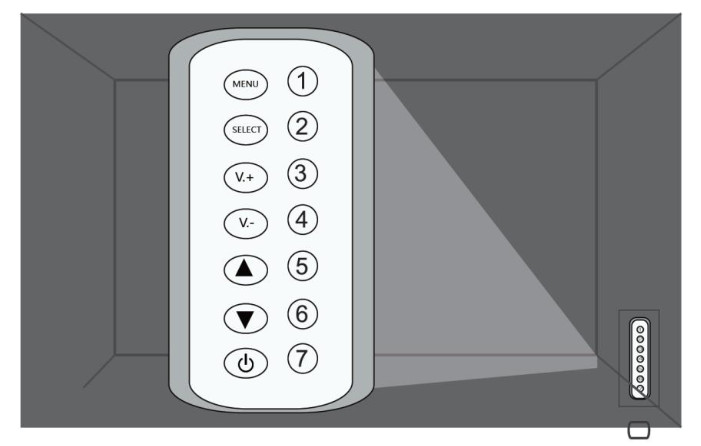
- MENU: If the OSD menu is not displayed, press the MENU button to display the OSD menu. If the OSD menu is displayed, press the MENU button to select the highlighted function.
- SELECT: Press the SELECT button to select the video input.
- V.+: If the OSD menu is not displayed, press the V.+ button to increase the volume level. If the OSD menu is being displayed, press the V.+ button to move the highlight to the right.
- V.-: If the OSD menu is not displayed, press the V.- button to decrease the volume level. If the OSD menu is being displayed, press the V.- button to move the highlight to the left.
 :If the OSD menu is not displayed, press the button to adjust the aspect ratio. If the OSD menu is displayed, press the button to move the highlight up.
- : If the OSD menu is not displayed, press the button to cycle through the crosshair modes. If the OSD menu is displayed, press the button to move the highlight down.
- : Press the button to turn the monitor on or to put it in standby mode.
Remote Control![]() Turns the monitor on or puts it into standby mode.
Turns the monitor on or puts it into standby mode.![]() Selects the video input.
Selects the video input.![]() Turns audio muting on or off.
Turns audio muting on or off.![]() Selects the image aspect ratio.
Selects the image aspect ratio.![]() Up selects the channel.
Up selects the channel.![]() Down selects the channel. Quick enter for target crosshairs.
Down selects the channel. Quick enter for target crosshairs.![]() Decreases the volume level.
Decreases the volume level.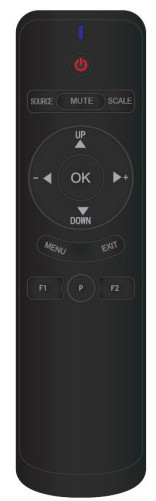
![]() Increases the volume level.
Increases the volume level.![]() Displays the source.
Displays the source.![]() Enters the OSD menu.
Enters the OSD menu.![]() Exits the OSD menu.
Exits the OSD menu.![]() Quick enter for low blue mode.
Quick enter for low blue mode.![]() Quick enter for ECO mode.
Quick enter for ECO mode.![]() Quick enter for sleep mode.
Quick enter for sleep mode.
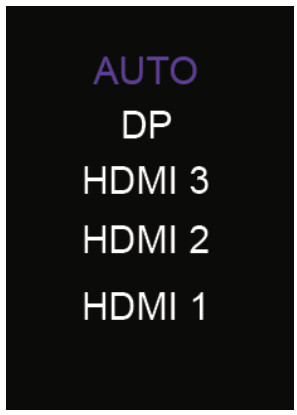
- Press the SELECT button on the Keypad to display the Input Source Menu.
- Use the and buttons to move the highlight to the desired input.
- Press the V.- button or wait 3 seconds to select the highlighted input.
- Select the AUTO option allow the monitor to automatically switch to the active input.
INSTALLING THE STAND
Unless you will be using a wall or desk mount, you will need to install the stand before you can use the monitor. Perform the following steps to install the stand.
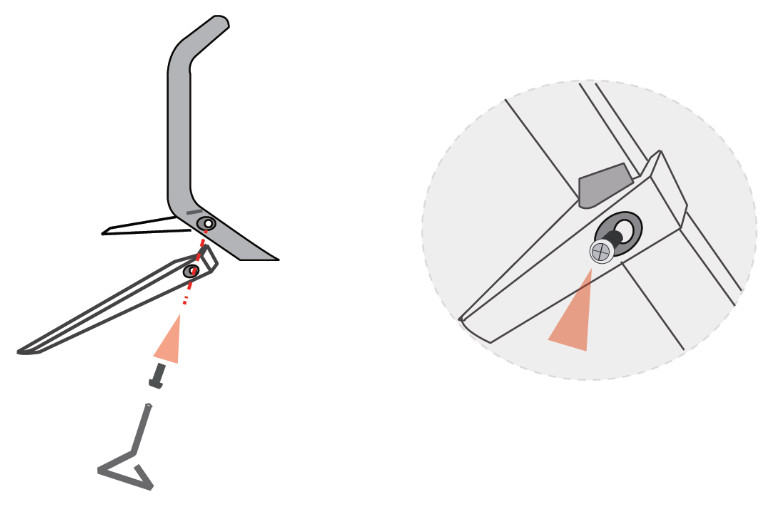
- Using two of the included Stand Screws, attach the two Stand Legs to the Stand Base, as shown in the images below.
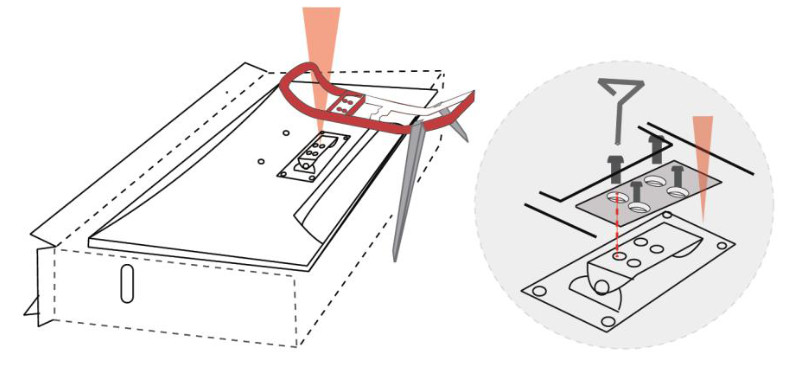
- Place the box that the monitor came in on a flat surface, then spread a towel or blanket on top of the box.
- Place the monitor face down on the covered box, then attach the Stand Base to the back of the monitor using the four remaining Stand Screws, as shown in the images below.
INSTALLATION
- Ensure that all equipment to be connected is powered off and unplugged from their power sources.
- Place the monitor it its intended location.
- Using the included High Speed HDMI® Cable, plug one end into one of the HDMI inputs on the monitor, then plug the other end into the HDMI output on your PC. Note that HDMI 3 supports the HDMI 2.0 specification at up to 144Hz refresh rate, while HDMI 1 and HDMI 2 support the HDMI 1.4 specification at up to 60Hz refresh rate.
- Plug the DC barrel connector on the included AC Power Adapter into the DC IN jack on the Input Panel.
- Plug the included AC Power Cord into the C14 connector on the AC Power Adapter, then plug the other end into a nearby AC power outlet.
| Main Menu Item | Sub Menu Item | Option | Function |
| BRIGHTNESS | BRIGHTNESS | 0~100 | Level can be adjusted from 0 to 100 |
| CONTRAST | 0~100 | Level can be adjusted from 0 to 100 | |
| BLACK LEVEL | 0~100 | Level can be adjusted from 0 to 100 | |
| ECO | STANDARD | Choose the picture mode. | |
| TEXT | |||
| GAME | |||
| MOVIE | |||
| ECO | |||
| FPS1 | |||
| BRIGHTNESS | ECO | FPS2 | Choose the picture mode |
| RTS | |||
| HDR | |||
| TV MODE | |||
| DCR | OFF | Dynamic contrast ratio on or off. | |
| ON | |||
| CROSSHAIR TARGET | TARGET 1 | Select crosshair style 1 | |
| TARGET 2 | Select crosshair style 2 | ||
| TARGET 3 | Select crosshair style 3 | ||
| LOW BLUT | OFF | Removes the blue color of the image to protect your eyes | |
| ON | |||
| UP SCALING | OFF | Disables up scaling | |
| ON | Enables up scaling | ||
| POSITION | ASPECT | WIDE | Choose the aspect ratio |
| 4:3 | |||
| 5:4 | |||
| 16:9 | |||
| 1:1 | |||
| AUTO | |||
| DP VERSION | DP 1.2 | Displays the DisplayPort version | |
| COLOR | COLOR TEMP. | WARM | Selects the basic color temperature |
| USER1 | |||
| USER2 | |||
| COLOR | COLOR TEMP | USER3 | Selects the basic color temperature |
| COOL | |||
| SRGB | Selects the basic color temperature | ||
| RED | 0~100 | Adjusts the amount of red color in the image | |
| GREEN | 0~100 | Adjusts the amount of green color in the image | |
| BLUE | 0~100 | Adjusts the amount of blue color in the image | |
| OSD SET | LANGUAGE | Engligh, etc. | Choose the OSD menu language |
| OSD H.POS | 0~100 | Adjusts the horizontal position | |
| OSD V.POS | 0~100 | Adjusts the vertical position | |
| OSD TIME | 0~60 | Adjusts the amount of time the OSD menu stays on screen without any input | |
| TRANSPARENCY | 0~100 | Adjusts the transparency/opacity of the OSD menu. | |
| OSD SIZE | NORMAL | Adjusts the size of the OSD menu | |
| LARGE | |||
| OSD ROTATION | OFF | Sets the amount of rotation of the OSD menu | |
| 90 | |||
| 180 | |||
| 270 | |||
| RESET | REST | Resets all settings to the factory default values | |
| MULTIWIN | MULTI-
WINDOW MODE |
OFF | Single picture mode |
| PIP MODE | Picture-in-picture mode | ||
| POP 2WIN | Split screen modes | ||
| POP 3WIN | Split screen modes | ||
| PEP 4WIN | |||
| WINDOW 2
INPUT |
HDMI 1 | Selects the input source for window 2 | |
| HDMI 2 | |||
| HDMI 3 | |||
| DP1 | |||
| WINDOW 3
INPUT |
HDMI 1 | Selects the input source for window 3 | |
| HDMI 2 | |||
| HDMI 3 | |||
| DP1 | |||
| WINDOW 4
INPUT |
HDMI 1 | Selects the input source for window 4 | |
| HDMI 2 | |||
| HDMI 3 | |||
| DP1 | |||
| PIP SIZE | MEDIUM | Adjusts the size of the PIP window | |
| LARGE | |||
| HUGE | |||
| SMALL | |||
| PIP POSITION | TOP LEFT | Adjusts the position of the PIP window | |
| TOP RIGHT | |||
| MULTIWIN | PIP POSITION | BOTTOMLEFT | Adjusts the position of the PIP window |
| BOTTOMRIGHT | |||
| SWAP | Swaps the main and PIP inputs | ||
| SET 2 | SIGNAL
SOURCE |
AUTO | Selects the desired input source |
| DP1 | |||
| HDMI 3 | |||
| HDMI 2 | |||
| HDMI 1 | |||
| MUTE | OFF | Switches audio muting on or off | |
| ON | |||
| AUDIO IN | AUTO | Selects the audio source | |
| DP1 | |||
| HDMI 1 | |||
| HDMI 2 | |||
| HDMI 3 | |||
| VOLUME | 0~100 | Adjusts the volume level | |
| FREE SYNC | OFF | Turns AMD FreeSyneTM on or off for use with AMD video cards and the DP input | |
| ON | |||
| HDR | AUTO | Sets the HDR function | |
| SMPTE 2084 | |||
| OFF | |||
| SET 2 | OVER DRIVER | OFF | Sets the level of overdrive |
| WEAK | |||
| MEDIUM | Sets the level of overdrive | ||
| STRONG | |||
| SLEEP MODE | OFF | Sets the amount of time before the monitor will automatically go into standby mode | |
| 10 MIN | |||
| 20 MIN | |||
| 30 MIN | |||
| 40 MIN | |||
| 50 MIN | |||
| 60 MIN | |||
| 120 MIN | |||
| 240 MIN |
TECHNICAL SUPPORT
Monoprice is pleased to provide free, live, online technical support to assist you with any questions you may have about installation, setup, troubleshooting, or product recommendations. If you ever need assistance with your new product, please come online to talk to one of our friendly and knowledgeable Tech Support Associates. Technical support is available through the online chat button on our website www.monoprice.com during regular business hours, 7 days a week. You can also get assistance through email by sending a message to [email protected]
SPECIFICATIONS
| Model | 31004 |
| Screen Size | 27″ (684.7 mm) |
| Active Area | 23.5″ x131(596.8 x 3352 mm) |
| Maximum Resolution | 2560 x 1440p @ 144Hz |
| Viewing Angles (H/V) | 170° / 160° |
| Response Time (GTG) | 1ms |
| Brightness | 350 cd/m2 |
| Contrast Ratio | 1000:1 |
| Dynamic Contrast Ratio | 500000:1 |
| Number of Colors | >163 million |
| Speakers | 2x 5 watts |
| Stand Tilt Range | +13° / -3° |
| Input Power | 12 VDC, 4A |
| AC Adapter Input Power | 100 ~ 240 VAC. 50/60 Hz |
| Maximum Power Consumption | 48 watts |
| Standby Power Consumption | ≤ 0.5 watts |
| Dimensions (without stand) | 241 x 141 x 2.0″ (614 x 360 x 52 mm) |
| Weight (without stand) | 18.6 lbs. (3.9 kg) |
AMDa’and FreeSync”fare trademarks of Advanced Micro Devices, Inc h the United States and/or other jurisdictionsHOW® the HOAR Logo, and High-Definition Multimedia Interface are trademarks or registered trademarks of Hatell Licensing LLC in the United States and other countries.
References
[xyz-ips snippet=”download-snippet”]