Monoprice Commercial Audio 60-Watt Powered Lectern User Manual

Commercial Audio 60-Watt Powered Lectern with Gooseneck Microphone and LED Light
SAFETY WARNINGS AND GUIDELINES
Please read this entire manual before using this device, paying extra attention to these safety warnings and guidelines. Please keep this manual in a safe place for future reference.
- Do not install this device on an unstable surface where it could fall and cause either personal injury or damage to the device and/or other equipment.
- Do not expose this device to excessive vibration.
- This device is intended for indoor use only.
- Do not touch the device, the power cord, or any other connected cables with wet hands.
- If operating this speaker in a humid environment, ensure that no condensation occurs. Condensation could cause damage to the speaker cones and could cause a short in the amplifier, which in turn could cause fire or severe electric shock.
- Do not expose this device to excessively high temperatures. Do not place it in, on, or near heat sources, such as a fireplace, stove, radiator, etc. Do not leave it in direct sunlight.
- Prior to operation, check the unit and power cord for physical damage. Do not use if physical damage has occurred.
- Before plugging the unit into a power outlet, ensure that the outlet provides the same type and level of power required by the device.
- This device uses a grounded power cord and requires a ground connection for safe operation. Ensure that the power source has a proper ground connection.
- Do not modify the plug or use a “cheater” plug to bypass the ground connection.
- Unplug this device from the power source when not in use.
- Take care to prevent damage to the power cord. Do not allow it to become crimped, pinched, walked on, or become tangled with other cords. Ensure that the power cord does not present a tripping hazard.
- Never unplug the unit by pulling on the power cord. Always grasp the connector head or adapter body.
- Ensure that power is turned off and disconnected before making any electrical connections.
- Clean using a soft, dry cloth only. Do not use chemical cleaners, solvents, or detergents. For stubborn deposits, moisten the cloth with warm water.
- This device has no user serviceable parts. Do not attempt to open, service, or modify this device.
INTRODUCTION
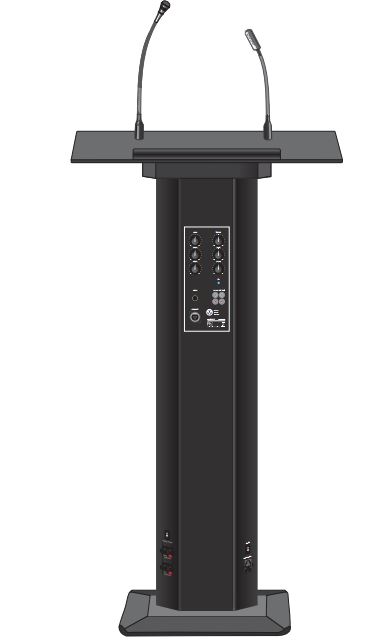
Thank you for purchasing this Powered Lectern! This lectern features a built-in 60-watt amplifier and speakers, so it can serve as a stand-alone audio system for presentations. It includes a gooseneck microphone and LED lamp, which attach to the top. A balanced pre-amp output allows you to connect it to an external audio system to replace or augment the lectern’s built-in sound system. An additional 3-pin Male 91 MC3M connector with phantom power inside the apron allows you to connect an additional condenser microphone, while a 1/4″ jack on the lectern column allows you to connect an additional dynamic microphone. Line level RCA inputs allow you to add an external audio source to provide music or other audio material, while line-level RCA outputs allow you to record your presentation.
FEATURES
- Includes gooseneck dynamic microphone and gooseneck LED lamp
- Built-in 60-watt amplifier and speakers
- Balanced pre-amp output
- Line level RCA input
- Balanced 1/4″ dynamic microphone input
- Line level RCA outputs for recording presentations
CUSTOMER SERVICE
The Monoprice Customer Service department is dedicated to ensuring that your ordering, purchasing, and delivery experience is second to none. If you have any problem with your order, please give us an opportunity to make it right. You can contact a Monoprice Customer Service representative through the Live Chat link on our website www.monoprice.com during normal business hours (Mon-Fri: 5am-7pm PT, Sat- Sun: 9am-6pm PT) or via email at
PACKAGE CONTENTS
Please take an inventory of the package contents to ensure you have all the items listed below. If anything is missing or damaged, please contact Monoprice Customer Service for a replacement.
- 1x Lectern Base
- 1x Lectern Column with Speakers and Amplifier
- 1x Lectern Apron
- 1x Lectern Top
- 1x Gooseneck Microphone
- 1x Gooseneck LED Lamp
- 1x AC Power Cord
- 1x User’s Manual
PRODUCT OVERVIEW
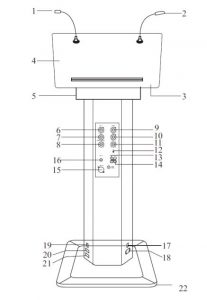
- Gooseneck microphone
- Gooseneck LED lamp
- Light switch
- Lectern top
- Lectern apron
- MIC 1 volume control
- MIC 2 volume control
- MIC 3 volume control
- Treble control
- Bass control
- AUX 1 volume control
- Power indicator
- AUX 1 input
- Line output
- Pre-amp output
- MIC 2 input
- Power switch
- AC power connector
- Internal speaker switch
- Channel 1 (left) output
- Channel 2 (right) output
- Lectern base
ASSEMBLY
Perform the following steps to assemble the lectern.
- Place the Lectern Column upside down on the floor.
- Using a #2 Phillips screwdriver, remove the 6 screws from the bottom of the Lectern Column.
- Place the Lectern Base on the bottom of the Lectern Column with the screw holes aligned.
- Using the screws removed in step 2 and a #2 Phillips screwdriver, attach the Lectern Base to the Lectern Column.
- Carefully turn the Column and Base assembly over so that it is resting on the Base.
- Using a #2 Phillips screwdriver, remove the 6 screws from the top of the Lectern Column.
- Place the Lectern Apron on the top of the Lectern Column with the screw holes aligned.
- Using the screws removed in step 6 and a #2 Phillips screwdriver, attach the Lectern Apron to the Lectern Column.
- Place the Lectern Top upside down.
- Using a #2 Phillips screwdriver, remove the 4 screws from the bottom of the Lectern Top.
- (Optional) If you wish to add an additional condenser microphone to the system, plug a condenser microphone into the 3-pin Male 91 MC3M Amphenol connector on the top of the Lectern Column, then feed the cable through one of the vertical slots in the Lectern Apron.
- (Optional) If you wish to add another lamp or other device that requires power, plug the device’s AC plug into the NEMA 1-15 power outlet on the top of the Lectern Column, then feed the cable through one of the vertical slots in the Lectern Apron.
- While holding the Lectern Top on the Lectern Apron, attach the 9-pin connector from the top to the 9-pin connector on the top of the Lectern Column.
- Position the Lectern Top on the Lectern Apron with the screw holes aligned.
- Using the screws removed in step 10 and a #2 Phillips screwdriver, attach the Lectern Top to the Lectern Apron.
- Ensure that the Lamp Switch on the underside of the Lectern Top is in the off position.
- Plug the Gooseneck Microphone into the MIC XLR connector on the upper side of the Lectern Top.
- Plug the Gooseneck LED Lamp into the LAMP XLR connector on the upper side of the Lectern Top. Note that this connector is for the lamp only. Plugging a microphone into the connector will cause permanent damage to the microphone and this XLR connector).
- (Optional) If you wish to use external speakers rather than the speakers in the Lectern Column, attach the negative lead from the left channel speaker to the black Channel 1 (Left) Speaker connector, then attach the positive lead to the red connector.
- (Optional) If you wish to use external speakers rather than the speakers in the Lectern Column, attach the negative lead from the right channel speaker to the black Channel 2 (Right) Speaker connector, then attach the positive lead to the red connector.
- (Optional) If you wish to use an auxiliary audio source (such as music before the presentation), insert the left channel RCA plug from your external audio source into the white AUX 1 RCA jack, then insert the right channel RCA plug into the red AUX 1 RCA jack.
- (Optional) If you wish to record the presentation using an external audiorecorder, insert the left channel RCA plug from your recording into the white REC OUT RCA connector, then insert the right channel RCA plug into the red REC OUT RCA jack.
- (Optional) If you wish to use an external amplifier or sound system to replace or augment the audio from this Lectern, plug the system input connector into the PRE-OUT XLR jack.
- (Optional) If you wish to use an additional dynamic microphone, insert the 1/4″ plug from your dynamic microphone into the MIC 2 jack on the Lectern Column.
- Ensure that the Power Switch is in the off position.
- Turn the four volume knobs (MIC 1, MIC 2, MIC 3, and AUX 1) fully counterclockwise to the 0 position.
- Place the TREBLE and BASS tone knobs in the middle/0 position.
- Insert the included AC power cord into the AC Power Connector on the Lectern Column, then plug the other end into a nearby AC power outlet.
OPERATION
- Use the MIC 1 volume knob to control the volume level of audio from the Gooseneck Microphone.
- Use the MIC 2 volume knob to control the volume of a dynamic microphone plugged into the 1/4″ MIC 2 jack on the Lectern Column.
- Use the MIC 3 volume knob to control the volume level of a condenser microphone plugged into the Male 91 MC3M Amphenol connector on top of the Lectern Column.
- Use the AUX 1 volume knob to control the volume level of a line level audio source connected to the AUX 1 RCA jacks.
- Use the TREBLE and BASS tone controls to boost or cut the high and low frequency volume levels.
- Use the Lamp Switch on the underside of the Lectern Top to turn the Gooseneck LED Lamp on or off.
TECHNICAL SUPPORT
Monoprice is pleased to provide free, live, online technical support to assist you with any questions you may have about installation, setup, troubleshooting, or product recommendations. If you ever need assistance with your new product, please come online to talk to one of our friendly and knowledgeable Tech Support Associates. Technical support is available through the online chat button on our website www.monoprice.com during regular business hours, 7 days a week. You can also get assistance through email by sending a message to
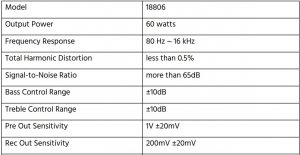
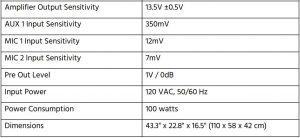
SPECIFICATIONS
REGULATORY COMPLIANCE
Notice for FCC
![]()
This device complies with Part 15 of the FCC rules. Operation is subject to the following two conditions: (1) this device may not cause harmful interference, and (2) this device must accept any interference received, including interference that may cause undesired operation.
Modifying the equipment without Monoprice’s authorization may result in the equipment no longer complying with FCC requirements for Class B digital devices. In that event, your right to use the equipment may be limited by FCC regulations, and you may be required to correct any interference to radio or television communications at your own expense.
This equipment has been tested and found to comply with the limits for a Class B digital device, pursuant to Part 15 of the FCC Rules. These limits are designed to provide reasonable protection against harmful interference in a residential installation. This equipment generates, uses and can radiate radio frequency energy and, if not installed and used in accordance with the instructions, may cause harmful interference to radio communications. However, there is no guarantee that interference will not occur in a particular installation. If this equipment does cause harmful interference to radio or television reception, which can be determined by turning the equipment off and on, the user is encouraged to try to correct the interference by one or more of the following measures:
- Reorient or relocate the receiving antenna.
- Increase the separation between the equipment and receiver.
- Connect the equipment into an outlet on a circuit different from that to which the receiver is connected.
- Consult the dealer or an experienced radio/TV technician for help.
Notice for Industry CanadaThis Class B digital apparatus complies with Canadian ICES-003.
References
[xyz-ips snippet=”download-snippet”]