![]()
SB-500 Dolby DigitalTM 5.1 Soundbarwith Wireless Surround Speakers and Wireless SubwooferP/N 42011User’s Manual
SAFETY WARNINGS AND GUIDELINES
Please read this entire manual before using this device, paying extra attention to these safety warnings and guidelines. Please keep this manual in a safe place for future reference.
- This device is intended for indoor use only.
- Do not expose this device to water or moisture of any kind. Do not place drinks or other containers with moisture on or near the device. If moisture does get in or on the device, immediately remove it from its power source and allow it to fully dry before reapplying power.
- Do not touch the device, the power cord, or any other connected cables with wet hands.
- If operating this speaker in a humid environment, ensure that no condensation occurs. Condensation could cause damage to the speaker cone and could cause a short in the amplifier, which in turn could cause fire or severe electric shock.
- Do not expose this device to excessive vibration.
- Do not subject the product to extreme force, shock, or fluctuations in temperature or humidity.
- Avoid prolonged exposure to excessive volume levels, which could cause hearing damage. Reduce the volume to a minimum before using these speakers, then increase the volume to a comfortable listening level.
- Do not expose this device to excessively high temperatures. Do not place it in, on, or near a heat source, such as a fireplace, stove, radiator, etc. Do not leave it in direct sunlight.
- This device ventilates excessive heat through the slots and openings in the case. Do not block or cover these openings. Ensure that the device is in an open area where it can get sufficient airflow to keep from overheating.
- Do not place or install this device in an area where it can be exposed to excessive amounts of dust, humidity, oil, smoke, or combustible vapors.
- Unplug this device from the power source when not in use.
- Take care to prevent damage to the power cord. Do not allow it to become crimped, pinched, walked on, or become tangled with other cords. Ensure that the power cord does not present a tripping hazard.
- Never unplug the unit by pulling on the power cord. Always grasp the connector head or adapter body.
- Ensure that power is turned off and disconnected before making any electrical connections.
- Unplug this device from the power source when not in use.
- Remove the batteries from the controller if it will go unused for a lengthy period of time.
- Do not mix new and old batteries or batteries of different types in the remote control.
- Install the subwoofer in a place where the power plug can be readily accessible so that you can quickly unplug the unit in the event that a safety incident occurs.
- Clean using a soft, dry cloth only. Do not use chemical cleaners, solvents, or detergents. For stubborn deposits, moisten the cloth with warm water. · This device has no user-serviceable parts. Do not attempt to open, service, or modify this device.
- This device contains small parts that could pose a choking hazard to small children. Keep this device and its parts out of reach of small children.
CUSTOMER SERVICE
The Monoprice Customer Service department is dedicated to ensuring that your ordering, purchasing, and delivery experience is second to none. If you have any problem with your order, please give us an opportunity to make it right. You can contact a Monoprice Customer Service representative through the Live Chat link on our website www.monoprice.com or via email at [email protected]. Check the website for support times and links.
PACKAGE CONTENTS
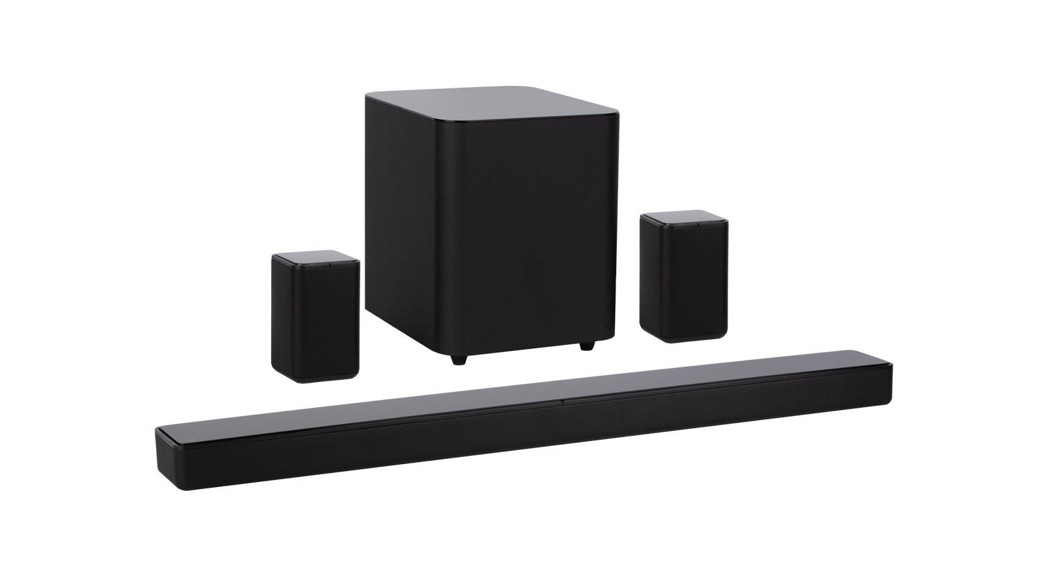
Please take an inventory of the package contents to ensure you have all the items listed below. If anything is missing or damaged, please contact Monoprice Customer Service for a replacement.1x SB-500 Soundbar1x Wireless Subwoofer2x Wireless Satellite Speakers1x IR Remote Control (batteries not included)1x S/PDIF Digital Optical Cable1x Satellite Interconnect Cable2x AC Power Adapters1x AC Power Cord (NEMA® 1-15 to IEC 60320 C7)2x Wall Mount Brackets4x Wall Mount Bracket Screws2x Wall Anchors2x Wall Mount Screws 1x User’s Manual
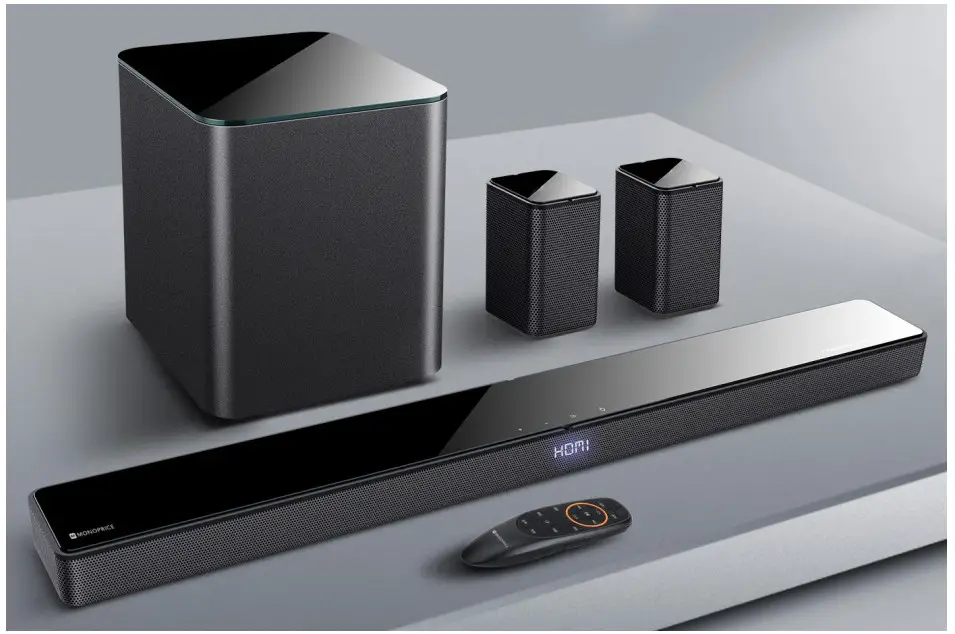
PRODUCT OVERVIEW
Soundbar
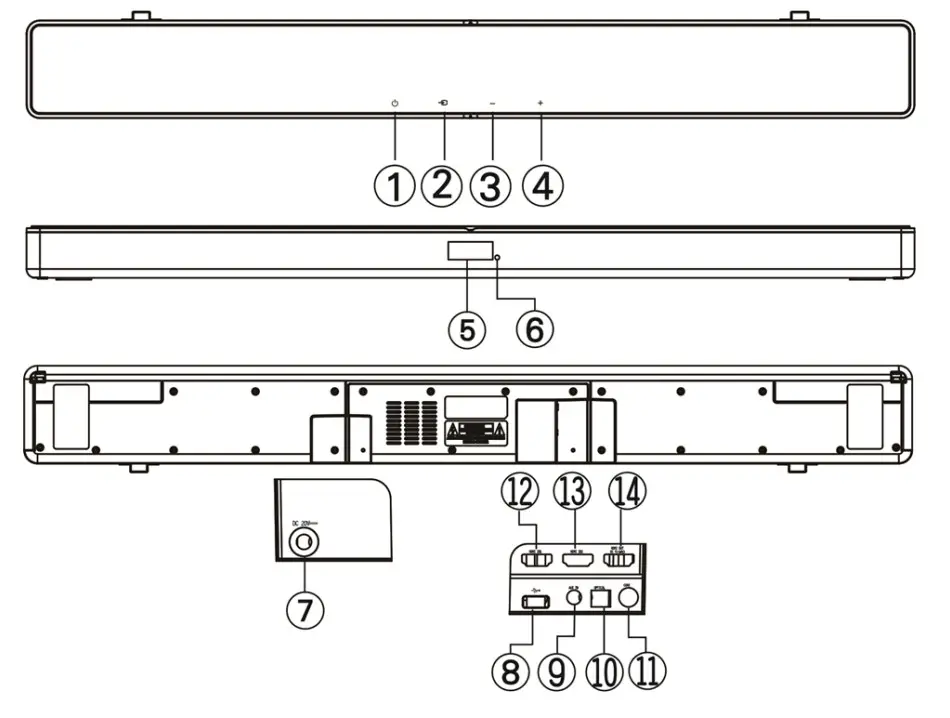
 Press the button to turn the soundbar on or to put it into standby mode.
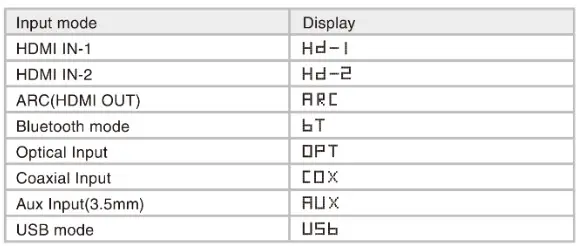
- → Press the button to cycle through the available inputs. The input selection order and the identifier that will show on the LED DISPLAY for each is shown in the following table.
- -: Press the button to decrease the volume level.
- +: Press the button to increase the volume level.
- LED DISPLAY: The LED DISPLAY shows the selected input or PAIRING when pairing with the subwoofer or satellite speakers. 5
- IR: IR receiver/sensor receives infrared signals from the included remote control.
- DC 20V: DC barrel connector for connecting the included AC power adapter.
- USB: USB port for streaming audio from a connected PC.
- AUX IN: 3.5mm analog stereo audio input.
- OPTICAL: S/PDIF digital optical input.
- COAX: S/PDIF digital coaxial input.
- HDMI IN-1: HDMI® input 1.
- HDMI IN-2: HDMI input 2.
- HDMI OUT TO TV (ARC): HDMI output for connecting an HDMI display. This output supports the Audio Return Channel (ARC) feature, allowing you to play audio originating from the connected display. This is useful when using an over-the-air antenna or built-in apps on your Smart TV.
Subwoofer
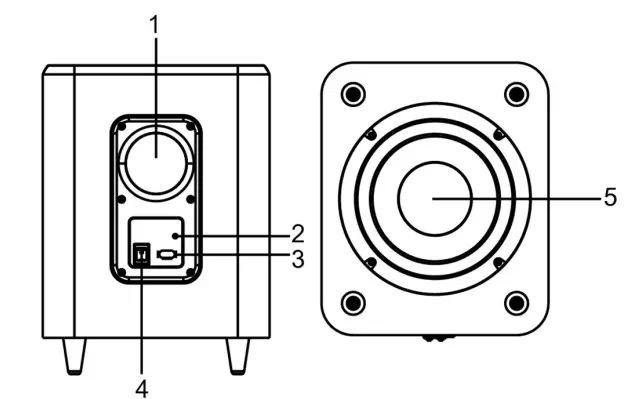
- POWER: Use the POWER switch to turn the subwoofer on or off.
- PAIR: Press and hold the PAIR button for about 5 seconds to pair the subwoofer with the soundbar.
- LED: The LED indicates the pairing status with the soundbar. It will illuminate solid blue when paired and will flash blue when not paired.
- AC: IEC 60320 C8 panel connector for connecting the included AC power cord.
- DRIVER: 8″ down-firing subwoofer driver.
Satellite Speakers
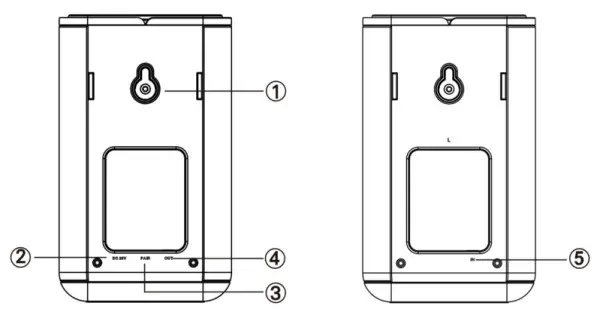
- MOUNT: Mounting keyhole for attaching the speaker to the wall.
- DC 20V: DC barrel connector for connecting the included AC power adapter.
- PAIR: Press and hold the PAIR button for about 5 seconds to pair the satellite speakers with the soundbar.
- OUT: Audio output jack for connecting the left side speaker. 5. IN: Audio input jack for connecting the right-side speaker.
Remote Control
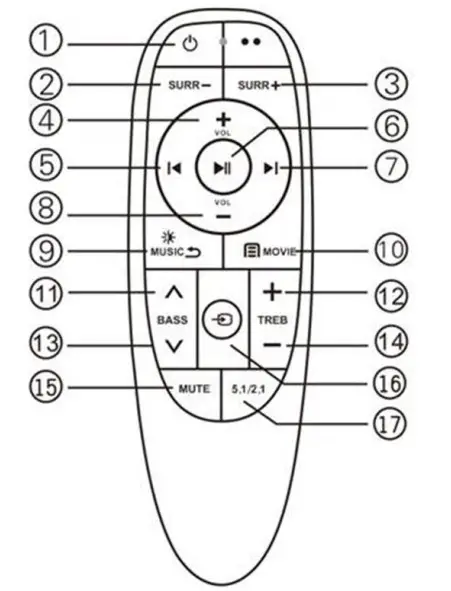
- : Press the button to turn the soundbar on or to put it into standby mode.
- SURR-: Press the button to decrease the volume level of the surround speakers.
- SURR+: Press the button to increase the volume level of the surround speakers.
- VOL+: Press the button to increase the volume level of the main speakers.
- : When Bluetooth® or USB is selected as the input, press the button to skip back to the previous track.
- : When Bluetooth or USB is selected as the input, momentarily press the button to start or pause playback. Press and hold the button for about 3 seconds to delete the current Bluetooth® pairing and then put the soundbar in Bluetooth pairing mode.
- : When Bluetooth or USB is selected as the input, press the button to skip forward to the next track.
- VOL-: Press the button to decrease the volume level of the main speakers.
- MUSIC: Momentarily press the button to select the MUSIC sound effect. Press and hold the button for about 3 seconds to turn the LED DISPLAY backlighting on or off.
- MOVIE: Press the button to select the MOVIE sound effect.
- BASS∧: Press the button to increase the low-frequency response.
- TREB +: Press the button to increase the high-frequency response.
- BASS∨: Press the button to decrease the low-frequency response.
- TREB -: Press the button to decrease the high frequency response.
- MUTE: Press the button to turn the audio muting on or off.
- →: Press the button to cycle through the available inputs.
- 5.1/2.1: Press the button to switch between 2.1 channel and 5.1 channel playback modes.
INSTALLATION
Subwoofer PlacementFirst, find a location to place the subwoofer. The subwoofer must be within a few feet of an easily accessible AC power outlet. In general, the subwoofer will give the best bass response when placed within a few feet of one of the front wall corners. Place the subwoofer in the intended location.
Mounting the Satellite Speakers
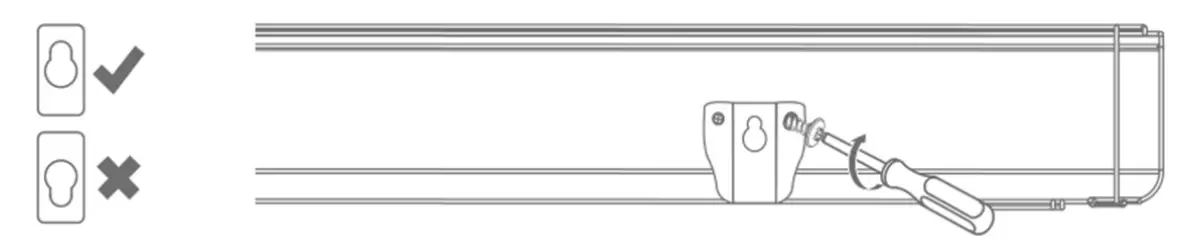
The satellite speakers feature built-in keyhole mounts, which resemble a traditional inverted keyhole with the hole below the slot. When a screw is installed in the wall with about a 1/8″ gap between the wall and the screw head, you can place the speaker over the screw head, then slide it down so that the screw head engages with the slot and holds the speaker securely in place. To install the satellite speakers, you will need two screws and two wall anchors. This kit includes two screws and two wall anchors, which can be used for either the satellite speakers or the soundbar. If you want to mount both the satellites and the soundbar to the wall, you will need to obtain two additional screws and wall anchors. Find a location along the rear wall to install the satellite speakers. In general, you will want the speakers to be at or slightly above your ear level when seated in the preferred listening spot and about 6-8 feet apart on the wall. Mark the intended locations with a pencil, then use a carpenter’s level to ensure that the marks are level. Once you have the proper screw locations, drill the pilot holes and screw the screws into the wall until there is about 1/8″ clearance between the screw head and the wall.
Soundbar Placement or Mounting
If you are using a TV wall mount, the ideal mounting option is to mount the soundbar on the wall beneath the display. If your TV is placed on a table, you can simply place the soundbar on its feet on the table in front of the display. It should be placed close to the front of the table so that the table surface doesn’t create sound reflections. If your table isn’t wide enough to fit the soundbar, you can mount the soundbar on the wall above the display. If mounting to the wall, first use a Phillips screwdriver to attach the two included Wall Mount Brackets to the back of the soundbar using the four included Wall Mount Bracket Screws. Ensure that the hole on the bracket is beneath the slot.
Next, using a tape measure and a pencil, mark potential drill locations on the wall exactly 740mm (29.13″) apart. Use a carpenter’s level to ensure that the locations are level. This kit includes two screws and two wall anchors, which can be used for either the satellite speakers or the soundbar. If you want to mount both the satellites and the soundbar to the wall, you will need to obtain two additional screws and wall anchors.
Soundbar Physical Connections
This section outlines the steps necessary to physically connect the soundbar to various audio sources. Only a single audio source is necessary for the soundbar to function, so all other connections are optional. Note that a Bluetooth® connection is not physical, so will be covered in a later section. Note also that only a S/PDIF digital optical cable is included, so all other cables must be obtained separately.
- Ensure that all equipment to be connected is powered off and unplugged from its power source.
- Using High-Speed HDMI® Cable, plug one end into the HDMI input on your TV, then plug the other end into the HDMI OUT TO TV (ARC) port on the soundbar. Note that you should use the input that supports the ARC feature if your display has one.
- Using the High-Speed HDMI Cable, plug one end into the HDMI IN-1 port on the soundbar, then plug the other end into the output of an HDMI source device.
- Using the High-Speed HDMI Cable, plug one end into the HDMI IN-2 port on the soundbar, then plug the other end into the output of an HDMI source device.
- Using the included S/PDIF digital optical cable, plug one end into the OPTICAL port on the soundbar, then plug the other end into the digital optical output of an audio source device.
- Using a S/PDIF digital coaxial cable, plug one end into the COAX port on the soundbar, then plug the other end into the digital coaxial output of an audio source device.
- Using a 3.5mm stereo audio cable, plug one end into the AUX IN jack on the soundbar, then plug the other end into the headphone output of a mobile device or into the audio output of an audio source device. Note: Use a 3.5mm to RCA stereo audio cable if you want to connect to a device with RCA outputs.
- Using a USB cable, plug one end into the USB port on the soundbar, then plug the other end into an available USB port on your PC.
- Using the included Satellite Interconnect Cable, plug one end into the IN jack of the Left satellite speaker, then plug the other end into the OUT jack on the Right satellite speaker.
Powering On and Pairing
Perform the following steps to power on and pair the speakers.
- Plug one end of one of the included AC Power Adapters into the DC 20V jack on the soundbar, then plug the adapter into a nearby AC power outlet.
- Press on the soundbar to turn it on. The LED DISPLAY will illuminate and show the last user input.
- Plug one end of the included AC Power Cord into the AC jack on the subwoofer, then plug the other end into a nearby AC power outlet.
- Place the POWER switch on the subwoofer in the ON position. The LED on the subwoofer will begin blinking blue.
- Press and hold the→ button on the soundbar for about 5 seconds. The LED DISPLAY will show PAIRING.
- Within 15 seconds, press and hold the PAIR button on the subwoofer for about 5 seconds. The subwoofer will pair with the soundbar and the LED on the subwoofer will illuminate solid blue. The LED DISPLAY on the soundbar will return to showing the currently selected input.
- Plug one end of the→ second AC Power Adapter into the DC 20V jack on the Right satellite speaker. The LED will begin blinking blue.
- Press and hold the button on the soundbar for about 5 seconds. The LED DISPLAY will show PAIRING.
- Within 15 seconds, press and hold the PAIR button on the Right satellite speaker for about 5 seconds. The speaker will pair with the soundbar and the LED will illuminate solid blue. The LED DISPLAY on the soundbar will return to showing the currently selected input.
Final Steps
- If the soundbar is to be mounted on the wall, attach it to the two screws you installed in the front wall earlier, otherwise position it on the table.
- Attach the two satellite speakers to the two screws you installed in the rear wall earlier.
- Remove the battery compartment lid on the included IR Remote Control, then install two AAA batteries (not included), paying attention to the polarity markings in the battery compartment. Reinstall the battery compartment lid.
- Plugin and power on all connected equipment. Ensure that audio is playing on each audio source device.
- Momentarily press the→ button on either the soundbar or the remote control to cycle through the available inputs. Verify that audio is playing for each device. Congratulations! Your new soundbar is installed and ready for use!
BLUETOOTH PAIRING
- Press the button on the soundbar to power it on.
- Momentarily press the→ button on the soundbar or remote control until the LED DISPLAY on the soundbar shows bT. If the bT is blinking, the soundbar is in Bluetooth® pairing mode. If the bT is not blinking, the soundbar is paired with another device. If you want to change the pairing, press and hold the button on the remote control for about 3 seconds to delete the pairing. The bT will begin blinking to show that the soundbar is in Bluetooth pairing mode.
- Open the Bluetooth® settings on your mobile device and set it to scan for nearby Bluetooth connections.
- Locate and select the MP42011 entry. If prompted for a passcode, enter 0000 (four zeros). Once the connection is established, a prompt sound will be heard and the bT will on the LED DISPLAY stops blinking.
Notes:a. If you receive a call while audio is playing, audio playback will pause while the call is in progress. You will not hear the call through the soundbar. When the call is terminated, audio playback will resume.b. If there is an existing Bluetooth connection, press and hold the ![]() button on the remote control for about 3 seconds to delete the pairing and put the soundbar into Bluetooth pairing mode.c. Bluetooth has an operating range of about 32 feet (10 meters) in clear air. Any obstructions between the device and the soundbar can reduce the range. If you move out of range, the connection will be broken. Simply move back within range to reestablish the connection.d. If the connection is not restored, pair your device with the soundbar again.
button on the remote control for about 3 seconds to delete the pairing and put the soundbar into Bluetooth pairing mode.c. Bluetooth has an operating range of about 32 feet (10 meters) in clear air. Any obstructions between the device and the soundbar can reduce the range. If you move out of range, the connection will be broken. Simply move back within range to reestablish the connection.d. If the connection is not restored, pair your device with the soundbar again.
TROUBLESHOOTING
Q1: The soundbar will not power on.A1: Ensure that the AC Power Adapter is securely plugged into both the soundbar and the wall outlet. Verify that the AC outlet is live by plugging in another device, such as a lamp.Q2: The IR remote control does not work.A2: Verify that the batteries are properly installed with the proper polarity, as indicated in the bottom of the battery compartment. Replace the batteries with new ones.Q3: There is no sound.A3: Verify that you have the correct input selected. Ensure that audio is playing on the selected input device. Ensure that the cable connecting the audio source device is securely plugged in at each end.Q4: The sound is distorted.A4: Reduce the volume level until the distortion is no longer heard. If using a device with a variable output level, such as a Bluetooth® connection or the headphones output of a mobile device, reduce the volume on the source device.Q5: The unit gets warm after prolonged playback at high volume levels.A5: This is normal. Either turn the unit off or reduce the volume level.Q6: Bluetooth® will not connect.A6: Ensure that Bluetooth is enabled on the mobile device. Press and hold the ![]() button on the remote control to delete any existing pairings, then pair your device with the soundbar again.Q7: There is poor sound quality when streaming audio over the Bluetooth connection.A7: Move the Bluetooth device closer to the soundbar to eliminate issues caused byexcessive range.
button on the remote control to delete any existing pairings, then pair your device with the soundbar again.Q7: There is poor sound quality when streaming audio over the Bluetooth connection.A7: Move the Bluetooth device closer to the soundbar to eliminate issues caused byexcessive range.
TECHNICAL SUPPORT
Monoprice is pleased to provide free, live, online technical support to assist you with any questions you may have about installation, setup, troubleshooting, or product recommendations. If you ever need assistance with your new product, please come online to talk to one of our friendly and knowledgeable Tech Support Associates. Technical support is available through the online chat button on our website www.monoprice.com or through email by sending a message to [email protected]. Check the website for support times and links.
SPECIFICATIONS
| Model | 42011 |
| Soundbar Midrange Drivers | 4x 45mm x 100mm panels |
| Soundbar Tweeter Drivers | 4x 1.75″ domes |
| Satellite Drivers | 2x 2.5″ cones |
| Subwoofer Driver | lx 8″ down-firing cone |
| Soundbar Output Power (all channels) | 60 watts @4 ohms |
| Satellite Output Power | 2x 20 watts @8 ohms |
| Subwoofer Output Power | 100 watts @4 ohms |
| Frequency Response (overall) | 30Hz — 18kHz |
| Sensitivity | 95dB |
| Total Harmonic Distortion | 4.% |
| Signal-to-Noise Ratio | 58dB |
| Bluetooth® Version | 5 |
| Supported Bluetooth Profiles | A2DP v1.3, AVRCP v1.6, HFP v1.7, HID v1.1, AVCTP v1.4, AVDTP v1.3, and SPP v 1.2 |
| Bluetooth Range | up to 32 feet (10 meters) |
| Protection Class | II |
| Transmission Frequency | 5.8 GHz |
| S/PDIF Input Frequency Support | 96kHz, 16/20/24 bit |
| Soundbar Input Power | 20 VDC, 1.8A |
| Satellite Input Power | 20 VDC, 1.8A |
| Subwoofer Input Power | 100 — 240 VAC, 50/60 Hz |
| AC Adapter Input Power | 100 — 240 VAC, 50/60 Hz |
| Soundbar Power Consumption | 36 watts |
| Subwoofer Standby Power Consumption | < 2 watts |
| Remote Control Power Source | 2x AAA batteries (not included) |
| Remote Control Range | up to 19.6 feet (6 meters), 5 30° angle |
| Operating Temperature | +32 — +95°F (0 —+35°C) |
| Operating Humidity | 20 — 80% RH, noncondensing |
| Soundbar Dimensions | 39.3″ x 4.5″ x 2.2″ (998 x 115 x 56 mm) |
| Satellite Dimensions (each) | 3.5″ x 3.5″ x 5.9″ (90 x 90 x 150 mm) |
| Subwoofer Dimensions | 9.8″ x 11.8″ x 13.0″ (250 x 300 x 330 mm) |
| Soundbar Weight | 7.1 lbs. (3.2 kg) |
| Satellite Weight (each) | 2.9 lbs. (1.3 kg) |
| Subwoofer Weight | 14.1 lbs. (6.4 kg) |
REGULATORY COMPLIANCE
 report this ad
Notice for FCCThis device complies with Part 15 of the FCC rules. Operation is subject to the following two conditions: (1) this device may not cause harmful interference, and (2) this device must accept any interference received, including interference that may cause undesired operation. Modifying the equipment without Monoprice’s authorization may result in the equipment no longer complying with FCC requirements for Class B digital devices. In that event, your right to use the equipment may be limited by FCC regulations, and you may be required to correct any interference to radio or television communications at your own expense. This equipment has been tested and found to comply with the limits for a Class B digital device, pursuant to Part 15 of the FCC Rules. These limits are designed to provide reasonable protection against harmful interference in a residential installation. This equipment generates, uses, and can radiate radio frequency energy and, if not installed and used in accordance with the instructions, may cause harmful interference to radio communications. However, there is no guarantee that interference will not occur in a particular installation. If this equipment does cause harmful interference to radio or television reception, which can be determined by turning the equipment off and on, the user is encouraged to try to correct the interference by one or more of the following measures:
- Reorient or relocate the receiving antenna.
- Increase the separation between the equipment and receiver.
- Connect the equipment into an outlet on a circuit different from that to which the receiver is connected.
- Consult the dealer or an experienced radio/TV technician for help.
Radio Notice for FCCCaution This FCC Part 15 radio device operates on a non-interference basis with other devices operating at this frequency. Any changes or modifications to said product not expressly approved by Monoprice, including the use of non-approved antennas, could void the user’s authority to operate this device. This device complies with Part 15 of the FCC Rules. Operation is subject to the following two conditions: (1) this device may not cause harmful interference, and (2) this device must accept any interference received, including interference that may cause undesired operation.Notice for Industry CanadaThis Class B digital apparatus complies with Canadian ICES-003. Cet appareil numérique de la classe B est conforme à la norme NMB-003 du Canada.Radio Notice for Industry CanadaCaution This IC RSS-210 radio device operates on a non-interference basis with other devices operating at this frequency. Any changes or modifications to said product not expressly approved by Monoprice, including the use of non-approved antennas, could void the user’s authority to operate this device. This device complies with IC RSS-210. Operation is subject to the following two conditions: (1) this device may not cause harmful interference, and (2) this device must accept any interference received, including interference that may cause undesired operation.MonopriceTM and all Monoprice logos are trademarks of Monoprice Inc.Dolby®, Dolby digital, Dolby AudioTM, and the double-D symbol are trademarks of Dolby Laboratories.NEMA® is a registered trademark of the National Electrical Manufacturers Association.HDMI®, the HDMI Logo, and High-Definition Multimedia Interface are trademarks or registered trademarks of HDMI Licensing LLC in the United States and other countries.The Bluetooth® word mark and logos are registered trademarks of Bluetooth SIG, Inc.
References
[xyz-ips snippet=”download-snippet”]