Monoprice Wi-Fi Mesh Router AC1200 Dual Band
Whole Home System User Manual
SAFETY WARNINGS AND GUIDELINES
Please read this entire manual before using this device, paying extra attention to these safety warnings and guidelines. Please keep this manual in a safe place for future reference.
- This device is intended for indoor use only.
- Do not expose this device to water or moisture of any kind. Do not place drinks or other containers with moisture on or near the device. If moisture does get in or on the device, immediately unplug it from the power outlet and allow it to fully dry before reapplying power.
- Do not touch the device, the power cord, or any other connected cables with wet hands.
- Do not expose this device to excessive vibration.
- Do not subject the product to extreme force, shock, or fluctuations in temperature or humidity.
- Do not expose this device to excessively high temperatures.
- Do not place it in, on, or near a heat source, such as a fireplace, stove, radiator, etc. Do not leave it in direct sunlight.
- Prior to operation, check the unit and power cord for physical damage. Do not use if physical damage has occurred.
- Before plugging the unit into a power outlet, ensure that the outlet provides the same type and level of power required by the device.
- Unplug this device from the power source when not in use.
- Take care to prevent damage to the power cord. Do not allow it to become crimped, pinched, walked on, or become tangled with other cords. Ensure that the power cord does not present a tripping hazard.
- Never unplug the unit by pulling on the power cord. Always grasp the connector head or adapter body.
- Ensure that power is turned off and disconnected before making any electrical connections.
- Clean using a soft, dry cloth only. Do not use chemical cleaners, solvents, or detergents. For stubborn deposits, moisten the cloth with warm water.
- This device has no user serviceable parts. Do not attempt to open, service, or modify this device.
INTRODUCTION
The Monoprice Mesh Router provides whole home coverage for up to 4500 square feet. The patented TouchLink technology offers one-touch easy and fast connections. With the free Mesh Go app for Android™ and iOS® mobile devices, the connection is seamless and hassle-free. The Monoprice Mesh Router is user friendly with additional options to configure your wireless settings and server to your own preferences.
CUSTOMER SERVICE
The Monoprice Customer Service department is dedicated to ensuring that your ordering, purchasing, and delivery experience is second to none. If you have any problem with your order, please give us an opportunity to make it right. You can contact a Monoprice Customer Service representative through the Live Chat link on our website www.monoprice.com or via email at [email protected]. Check the website for support times and links.
PACKAGE CONTENTS
Please take an inventory of the package contents to ensure you have all the items listed below. If anything is missing or damaged, please contact Monoprice Customer Service for a replacement.
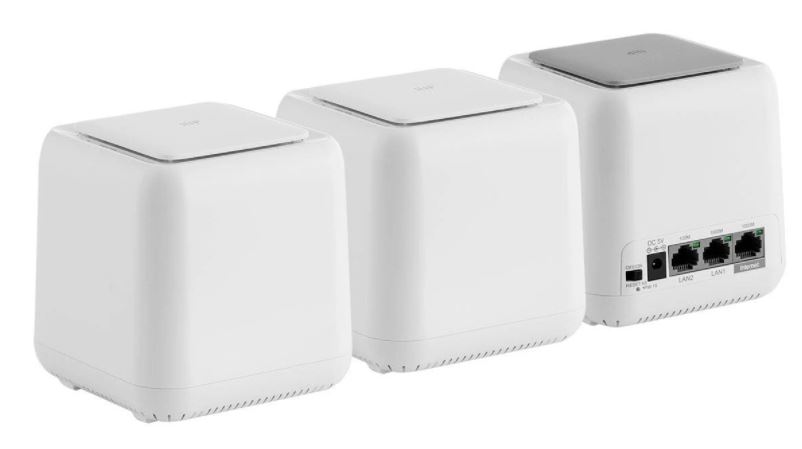
1x Mesh Router3x AC Power Adapters2x Mesh Extenders1x User’s Manual1x Ethernet Cable
PRODUCT OVERVIEW

LED INDICATIONS
Router
Solid Purple: The router is starting up. Solid Blue: The Internet is connected.Flashing Blue: The router is in TouchLink mode, allowing you to connect directly without a password. It also indicates that the newly added extender is being paired with the router.Flashing Red: The router is disconnected.
Extenders
Solid Purple: The extender is starting up.Solid Blue: The connection between the extender and the router is good.Solid Red: The connection between the extender and the router is weak. Place the router in a more open area or shorten the distance between the router and extender.Flashing Blue: The extender is in TouchLink mode, allowing you to connect directly without a password. It also indicates that the extender is pairing with the router.Flashing Red: The extender is disconnected. Note: When adding extenders, the furthest extender may display solid purple and red flashing before turning solid blue.
ROUTER INSTALLATION
- Ensure that the router is powered off.
- Place the router near your modem. For best results, place the router in an elevated, open position.
- Using the included Ethernet Cable, plug one end into the Internet port on the router, then plug the other end into the LAN port on your modem.
- Plug one of the included AC Power Adapters into the DC 5V connector on the router, then plug the adapter into a nearby AC power outlet.
- Slide the On/Off Switch to the ON position. Note: If you want to use more than two wired connections, use an Ethernet switch.
CONNECTING TO THE ROUTER
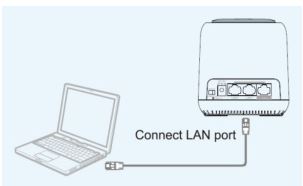
WiredTo make a wired connection, plug one end of an Ethernet cable into the Ethernet port on your computer, then plug the other end into either the LAN1 (Gigabit) or LAN2 (10/100Mbps) port on the router.
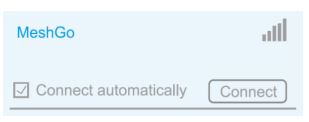
Wi-Fi for Windows UsersPerform the following steps on your Windows® PC to make a Wi-Fi® connection with the router.
- Ensure that your computer’s Wi-Fi is turned on.
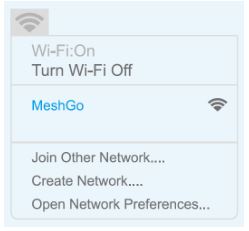
- Click the Wi-Fi icon on the taskbar.

- Locate and select the MeshGo entry.
Wi-Fi for Mac UsersPerform the following steps on your Mac® to make a Wi-Fi® connection with the router.
- Ensure that your computer’s Wi-Fi is turned on.
- Click the Wi-Fi icon in the upper right corner of the screen, then locate and select the MeshGo entry.
SETTING UP THE ROUTER
Perform the following steps to configure your router.
- Open a web browser, then type either http://ap.setup or 192.168.10.1 and press the Enter key.
- Type admin into the name field, then click the Login button.
- Select Router.
- Use the drop-down list next to the WAN Type entry to select the type of WAN you have. You can select DHCP (Dynamic IP), PPPoE, or Static IP.Note: If you have a DSL line and your ISP only gave you an Account Name and Password, choose PPPoE. If you have a cable or fiber connection, choose DHCP (Dynamic IP). If your ISP gave you an IP Address, Subnet Mask, and Default Gateway, choose Static IP.
- The default Mesh SSID is MeshGo. You can use the default or change the name, as desired.
- Use the drop-down list next to the Security Type entry to select the type of security you want to use. We recommend WPA/WPA2 Mix, as shown in the image below.
- Create a password in the Mesh Password field. Note that passwords are case sensitive.
- Click the Apply button to save your settings. Installation and basic setup takes a few minutes to complete.
EXTENDER PLACEMENT
The extenders that come with this kit have been paired with the router at the factory, so all you need to do is position them in your home, plug them in, and turn them on to extend the Wi-Fi® signal throughout your home. Proper positioning is an important part of extending the Wi-Fi signal. The Wi-Fi signal radiates outward from the router and from each extender. The distance it can cover is largely dependent on the size of your home and the materials it is made from. Brick and concrete will attenuate the signal more than wooden construction. Additionally, the presence of electronics, metal materials, and water can reduce the signal strength. The following guidelines can help in determining where to place the router and extenders.
- The extenders work best when their square LED lights are solid blue.
- Generally, your mesh Wi-Fi® devices work best when they are no more than two rooms from each other.
- Ensure the router and extenders are evenly spread out, but not too far from each other.
- If you live in a multi-story home, put your mesh Wi-Fi® device in an open area and try to keep it clear of clutter.
- Position the Wi-Fi devices to avoid obstructions, such as wall, doors, and aquariums to improve performance.
- Place the devices in a central location, away from anything that might block the signal, such as metal objects, bodies of water, reinforced concrete walls, foil-insulated walls, or another other similar construction materials.
- Elevating the devices can greatly improve coverage.
 The extenders work best when their square LED lights are solid blue.
After positioning the extenders, perform the following steps to check that each extender has a good connection.
- Open a web browser on your computer, then type http://ap.setup or 192.168.10.1 in the address bar.
- Log in to the router. The default user name is admin and there is no password.
- Click Status > Device List to see a list of connected devices and their connection status.
ADDING EXTENDERS
You can purchase additional extenders to increase the Wi-Fi® signal coverage in your home. There are two ways to include the additional extenders in the Mesh network.
Using a Web Browser
Perform the following steps to add the extender using a web browser.
- Open a web browser on your computer, then type http://ap.setup or 192.168.10.1 in the address bar.
- Log in to the router. The default user name is admin and there is no password.
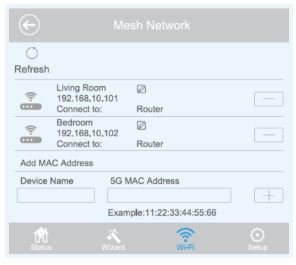
- Go to Wi-Fi > Mesh Network.
- Type the extender’s 5G MAC address into the MAC Address field, then click the + button. The 5G MAC address can be found on the label on the bottom of the extender.
 Open a web browser on your computer, then type
 Using the Pair Button
- Place the new extender near the router, then plug it into a nearby AC power outlet.
- Press and hold the Reset/Pair Button on the router for 1 second. The LED flashes blue.
- Within two minutes, press and hold the Reset/Pair Button on the extender for 1 second. After the LED indicators on both the router and extender turn solid blue, pairing is complete.
- Place the extender in the desired location.
Verifying the Installation
After positioning the new extender, perform the following steps to check that each extender has a good connection.
- Open a web browser on your computer, then type http://ap.setup or 192.168.10.1 in the address bar.
- Log in to the router. The default user name is admin and there is no password.
- Click Status > Device List to see a list of connected devices and their connection status.
TOUCHLINK
TouchLink is a system that allows you to connect to Wi-Fi® without inputting a password. TouchLink is activated by touching the Gray Cap on the router or the White Cap on one of the extenders.
Configuring TouchLink
Perform the following steps to configure the amount of time that TouchLink will remain active after touching the Gray Cap on the router or White Cap on an extender.
- Open a web browser on your computer, then type http://ap.setup or 192.168.10.1 in the address bar.
- Log in to the router. The default user name is admin and there is no password.
- Click Wi-Fi > TouchLink > Timer, then set the time to any value between 30 and 200.
Using TouchLink
- Touch the Gray Cap on the router or the White Cap on an extender.
- Open the Wi-Fi® settings on your mobile device.
- Locate and select the entry that ends with _Touch. By default, it is MeshGo_Touch.
THE MESHGO APP
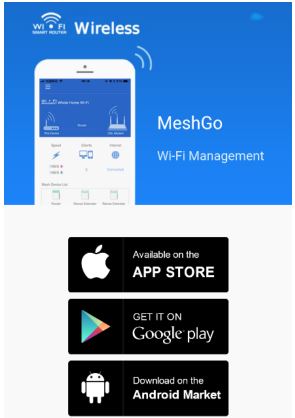
![]() The MeshGo app allows you to easily control the router and extenders using your smartphone or tablet.
The MeshGo app allows you to easily control the router and extenders using your smartphone or tablet.
- Search for MeshGo (see the icon to the right) in the App Store on iTunes®, the Android™ Market app, or the Google Play™ store. Scan the QR code below to go directly to the download page.http://apps.iqs.link/app/mesh.html
- Download and launch the MeshGo app.

TROUBLESHOOTING
- The login page does not appear after entering http://ap.setup in the web browser.
- Ensure your computer is set to obtain an IP address automatically.
- Verify that you entered the address correctly. Alternatively, try typing http://192.168.10.1 in the web browser.
- Use a different web browser and try again.
- Reboot the router and try again.
- I cannot access the Internet.
- Connect a computer directly to the modem using an Ethernet cable to verify that you can access the Internet. If you cannot, contact your service provider.
- Open a web browser and enter http://ap.setup or http://192.168.10.1 and run the quick setup again.
- Reboot the router and try again.
- How can I restore the router to the factory default settings?
- While the router is powered on, press and hold the Reset/Pair Button on the router for 6 seconds.
- I cannot remember my Administration Management password.
- Refer to 3 above to reset the router to the factory default settings, then login using the default admin user name with no password.
- I forgot my wireless network password.
- Open a web browser and enter http://ap.setup in the address bar. Go to Wi-Fi > Wi-Fi Configuration to see the password.
TECHNICAL SUPPORT
Monoprice is pleased to provide free, live, online technical support to assist you with any questions you may have about installation, setup, troubleshooting, or product recommendations. If you ever need assistance with your new product, please come online to talk to one of our friendly and knowledgeable Tech Support Associates. Technical support is available through the online chat button on our website www.monoprice.com or through email by sending a message to [email protected]. Check the website for support times and links.
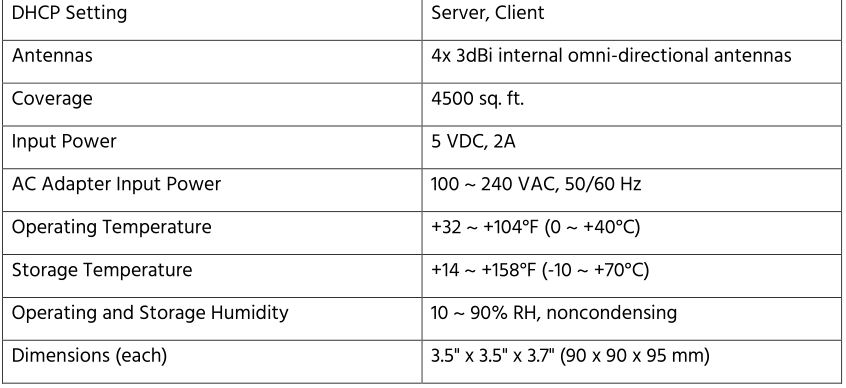
SPECIFICATIONS

REGULATORY COMPLIANCE
Notice for FCC
![]()
This device complies with Part 15 of the FCC rules. Operation is subject to the following two conditions: (1) this device may not cause harmful interference, and (2) this device must accept any interference received, including interference that may cause undesired operation.
Modifying the equipment without Monoprice’s authorization may result in the equipment no longer complying with FCC requirements for Class B digital devices. In that event, your right to use the equipment may be limited by FCC regulations, and you may be required to correct any interference to radio or television communications at your own expense.
This equipment has been tested and found to comply with the limits for a Class B digital device, pursuant to Part 15 of the FCC Rules. These limits are designed to provide reasonable protection against harmful interference in a residential installation. This equipment generates, uses and can radiate radio frequency energy and, if not installed and used in accordance with the instructions, may cause harmful interference to radio communications. However, there is no guarantee that interference will not occur in a particular installation. If this equipment does cause harmful interference to radio or television reception, which can be determined by turning the equipment off and on, the user is encouraged to try to correct the interference by one or more of the following measures:
- Reorient or relocate the receiving antenna.
- Increase the separation between the equipment and receiver.
- Connect the equipment into an outlet on a circuit different from that to which the receiver is connected.
- Consult the dealer or an experienced radio/TV technician for help.
Notice for Industry CanadaThis Class B digital apparatus complies with Canadian ICES-003.
EU Declaration of Conformity

Monoprice, Inc. declares the product described within this user guide or manual is in compliance with below applicable directives. The full text of the EU Declaration of Conformity is available at the following internet address: https://www.monoprice.com/product?p_id=38623 or the CE DoC can be found within this user manual
- EMC Directive 2004/108/EC
- Low Voltage Directive 2014/35/EU
- RoHS2 Directive 2011/65/EU
- WEEE Directive 2012/19/EC
- REACH Directive 1907/2006/EC
WEEE Information
User information for consumer products covered by EU Directive 2012/19/EU on Waste Electric and Electronic Equipment (WEEE)
This document contains important information for users with regards to the proper disposal and recycling of Monoprice products. Consumers are required to comply with this notice for all electronic products bearing the following symbol:
![]()
For Consumers in the European Union: This EU Directive requires that the product bearing this symbol and or its packaging must not be disposed of with unsorted municipal waste. The symbol indicates that this product should be disposed of separately from regular household waste streams. It is your responsibility to dispose of this and other electrical and electronics products via designated collection facilities appointed by the government or local authorities. Correct disposal and recycling will help prevent potential negative consequences to the environment and human health. For more detailed information about the disposal of your unwanted product, please contacts your local authorities, waste disposal service, or the shop where you purchased the product.
Safety Notice
![]()
WARNING: Do not use this product near water, for example, in a wet basement or near swimming pool or in an area where accidental contact with water or liquid might occurs
WARNING: Avoid using this product during an electrical storm. There may be a remote risk of electric shock from the surge caused by lightning
WARNING: The external power adapter or AC power cord is the equipment’s disconnection device. The power outlet must be located nearby the equipment and its access must be easy
WARNING: Use this product in a well-ventilated area
Google™, Android™, and Google Play™ are trademarks of Google LLC.Cisco® and IOS® are registered trademarks or trademarks of Cisco Systems, Inc. and/or its affiliates in the United States and certain other countries.Wi-Fi® and Wi-Fi Alliance® are registered trademarks of Wi-Fi Alliance.Microsoft® and Windows® are either registered trademarks or trademarks of Microsoft Corporation in the United States and/or other countries.Mac® and iTunes® are trademarks of Apple Inc., registered in the U.S. and other countries.
References
HDMI Cable, Home Theater Accessories, HDMI Products, Cables, Adapters, Video/Audio Switch, Networking, USB, Firewire, Printer Toner, and more! – Monoprice.com
Monoprice Whole Home Mesh Wi-Fi System, Wi-Fi Router and 2 Satellite Extenders, Quick Setup by Touch Link Technology Covers Entire Home up to 4500 sq. ft. – Monoprice.com
[xyz-ips snippet=”download-snippet”]