MONSTER PRISM 3D LED Art Panels MLB7-1034-RGB User Guide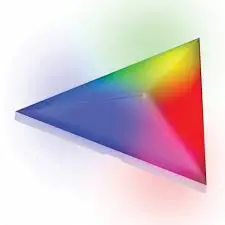
GETTING STARTED
Thank you for choosing the Prism 3D LED Art Panels by Monster Smart Illuminessence. This Quick Start Guide will help you with setup and installation of your device.
WHAT’S IN THE BOX
- 4 x Prism LED panels
- 4 x Prism mounting brackets with 3M Command damage-free adhesive (preinstalled on each panel)
- 4 x Prism connectors
- 1 x Prism controller
- 1 x Power adapter (12V 3A, 6ft/1.8m cord)
- 1 x Quick Start Guide
- 1 x Design Guide
WHAT DO YOU NEED?
- Cellphone or tablet with Android 6.0 or higher / iOS 10 or higher
- Wi-Fi router with an internet connection
- Wi-Fi 2.4GHz 802.11n
Before setup, make sure your phone or tablet is connected to the 2.4GHz Wi-Fi network that your Prism will be placed on.You may also need to turn on location to find nearby devices.TIP: Do you know your Wi-Fi network name and password? Write it down now if it’s hard to remember.
ANYTHING ELSE?
If you really want to be precise during installation, you can use a level, but it’s not required.
TIP: Save these instructions for future reference.
SETUP
COMPLETE SETUP BEFORE INSTALLATION
STEP 1Remove your Prism panels and all components from the box. Note that the mounting bracket and adhesive tape will be preinstalled on each panel.
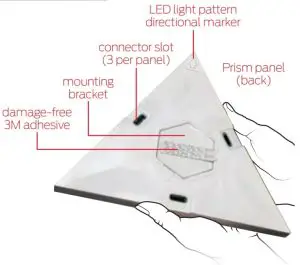
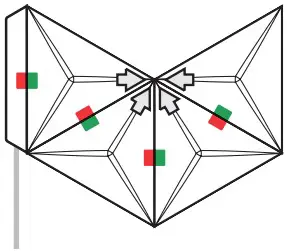
DESIGN TIP: Pointing the LED pattern directional markers on the back of each panel towards or away from each other will create different lighting effects when panels are combined, but you can easily change this after installation!
STEP 2Download the app from the ![]() App Store (for iPhone) or Google Play Store (for Android phones). free download
App Store (for iPhone) or Google Play Store (for Android phones). free download
STEP 3Make sure your phone or tablet is successfully connected to the2.4GHz Wi-Fi network that your Prism will be placed on.Open the ![]() app and create an account by following the on-screen instructions.
app and create an account by following the on-screen instructions.
STEP 4
It is recommended to pair Prism in a location close to your router BEFORE installation. Panels do not need to be connected to the controller to pair.
Plug the power adapter into the bottom of the controller and connect the other end to a powered wall outlet. The LED indicator will begin blinking rapidly when it has entered pairing mode and is ready to pair. (Any connected panels will blink as well.)
Pairing Modes
EZ MODE – RAPIDLY BLINKING LED (default) EZ Mode is the default mode for quick and easy pairing setup
AP MODE – SLOWLY BLINKING LEDAccess Point Mode is a secondary setup that can help connect to mixed networks. Follow the on-screen step by step instructions.
Press and hold the power button for 5-6 seconds to enter pairing mode or change between pairing modes.
Monster Smart devices only work on a 2.4GHz Wi-Fi network. Many newer home Wi-Fi networks are mixed networks that are set to 5GHz by default (ex: AT&T, Verizon) and you may need to use AP pairing mode to connect. If you still have difficulty, contact your Internet Service Provider for assistance with 2.4GHz network setup
NOTE: At any point during pairing mode you can unplug and reconnect the power to cancel pairing and operate the product without Wi-Fi. Advanced features will not be available.
STEP 5
In the app, select the “+” in the upper right corner of the home screen to add a new device and then select “Lighting (Wi-Fi)” to add your device.
If needed, click “Net Pairing Mode” in the upper right to switch the default EZ pairing mode for 2.4GHz Wi-Fi networks to AP mode for mixed Wi-Fi networks.
STEP 6
EZ mode (default)
Confirm that the LED indicator is RAPIDLY blinking. Confirm that the network displayed is your 2.4GHz Wi-Fi network, then enter your Wi-Fi password and click “Confirm”.
AP mode
Confirm that the LED indicator is SLOWLY blinking. Confirm the network is your mixed Wi-Fi network, enter your Wi-Fi password and click “Confirm”. Follow the on-screen instructions to set up your device via wireless access point.

Once complete, your device will be connected to the network. Confirm or change the settings for your device and then click “Done”. Your Prism is now setup and you can proceed to installation.
You can now use the app to add voice control (see pg 12), adjust settings, create custom lighting effects, set schedules, and more!
INSTALLATION
STEP 1Before installing anything, try out different shapes and patterns with your panels on the floor or a large table to decide what you would like to create! Consult the Design Guide for ideas.examples: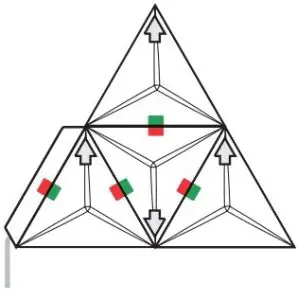
IMPORTANT:
- Plan to install your Prism near enough to a power outlet.
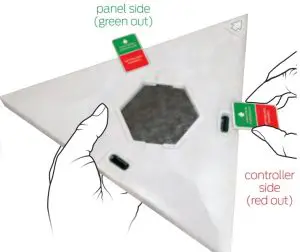
- Place the controller on the left side of your pattern on the RED end of one connector.
- To ensure all panels light up, make sure all the connectors always point GREEN side AWAY from the controller.
DESIGN TIP: Pointing the directional markers on the back of each panel towards or away from each other will create different lighting effects when panels are combined, but you can easily change this after installation!
STEP 2First, clean the mounting surface with rubbing alcohol and let dry. When you’re ready to start, peel of the adhesive backing from one Prism panel, position the panel on the wall where you would like to begin your pattern, and press gently on the center.
NOTE: Do not attach this product to wallpaper, brick, the ceiling, or the floor. If desired, you can use a level to help align and place this first panel.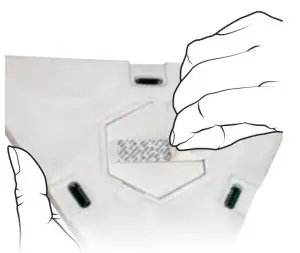

STEP 3Remove the panel, leaving the bracket in place on the wall.Press firmly on the bracket for 10 seconds to ensure a strong hold.
NOTE: If you ever want to uninstall your Prism panel in the future, simply hold the bracket and SLOWLY stretch the damage-free removal tab down along the wall to remove. They can be reinstalled with new 3M strips (rated at least 3lbs).
STEP 4Attach connectors to your first panel: attach one connector for the controller unit with the RED side out, and any additional connectors as desired to build your pattern with the GREEN sides out. Make sure to insert each connector fully into the slot.
TIP: Only one green side should ever be connected to any one panel at a time.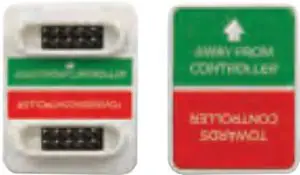

STEP 5With connectors installed, return your first panel to the wall by centering it over the mounting bracket so it snaps into place.
NOTE: Ensure the directional marker is pointing in the desired direction for your pattern.
NOTE: Ensure the RED connector is at the left side of the panel and that any other connectors are GREEN.
STEP 6Build out your Prism pattern by repeating these steps with more panels and connectors, moving away from the controller.
STEPS:
- A. Peel of the adhesive backing on a new panel.
- B. Place the new panel on the wall over an open GREEN connector.
- C. Remove the panel and press on the bracket for 10 seconds.NOTE: Once additional panels have been installed, take extra care to hold down neighboring panels when removing one
- D. Attach more connectors with the GREEN side out and replace the panel.
- E. Make sure all connections are secure.

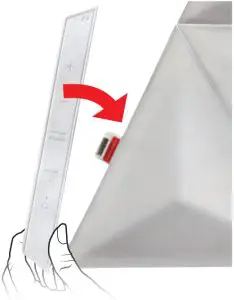
STEP 7Once your pattern is complete, plug the power adapter into the controller and attach the controller to the open RED connector on the panel in the bottom left corner of your pattern.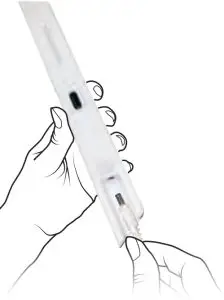
STEP 8Plug it in and you’re done! Your Prism is now setup, installed, and ready to use. Remember, you can always easily remove a panel to rotate the directional marker or add more connectors and panels from add-on kits to change or expand your design.
TROUBLESHOOTING
HAVING TROUBLE WITH SETUP?Don’t return this product to the retailer, we’re here to help. Please call for customer support: 866-246-2008
Q: Why is my device failing to connect to my Wi-Fi network?A1: Make sure your phone or tablet is successfully connected tothe 2.4GHz Wi-Fi network that your device will be placed on.A2: You may first need to enable and allow location services onyour phone or tablet to find nearby devices.A3: If your Wi-Fi network is a mixed 2.4GHz/5GHz network, try usingAP pairing mode for better results.A4: If you still have issues with your mixed network, you may needto access your router settings and/or call your Internet ServiceProvider to create a separate 2.4GHz network.
Q: None of my panels are lighting up, what should I do?A1: Check that the power adapter is connected securely both tothe controller and to a powered outlet. The LED indicatorshould illuminate if it is powered and paired to Wi-Fi.A2: On the first panel, ensure that the controller is on the RED sideof the connector and any panels are on the GREEN sides.
Q: Why are only some of my panels not lighting up?A1: To ensure all panels light up, make sure all the connectors always point the GREEN side AWAY from the controller.
A2:If you’ve just added a panel, try turning Prism of and on again.
Q: What if the LED colors don’t line up between panels?A1: Pointing the directional arrows on the back of each panel towards or away from each other will create different lighting effects when panels are combined. Try rotating some panels.NOTE: Take care to hold down neighboring panels when removing one. Always ensure all connections are secure.
Q: I’ve added add-on kits, why are the LEDs flickering?A1: Prism power kit can run up to 8 x Prism panels (1 x Starter Kit+ 2 x Add-on Packs). Adding more than 8 x panels will requiregrouping in an additional power kit to maintain normal operation.
For other frequently asked questions please visit ourwebsite at www.monsterilluminessence.com
HOW TO USE
CONTROLS
Your Prism 3D LED Art Panels can be easily controlled by thecontroller, using the ![]() app to access advanced and customizable lighting effects, or by using a compatible voice assistant product for hands-free operation.
app to access advanced and customizable lighting effects, or by using a compatible voice assistant product for hands-free operation.
CONTROLLER FEATURES
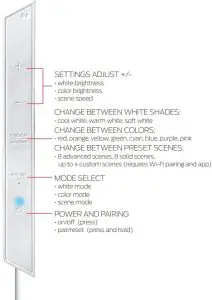
NOTE: One controller can run up to 8 x Prism panels. Adding more than 8 x panels will require an additional controller and power kit to maintain normal operation.
APP CONTROL: CUSTOM SCENES
The app ![]() gives you full control over all the functions of the Prism, as well as the ability to edit preset scenes and create your own custom scenes. Below are some of the custom scene features for Prism:
gives you full control over all the functions of the Prism, as well as the ability to edit preset scenes and create your own custom scenes. Below are some of the custom scene features for Prism: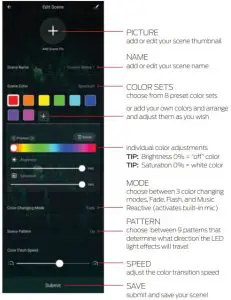
VOICE CONTROL OPTIONAL
AMAZON VOICE CONTROL SETUP
Make sure your Amazon Alexa device is installed and setup
STEP 1: Open the Alexa app and go to Skills in the menuSTEP2: Search for and choose ![]() STEP 3: Enable the Skill and authorize your account using your login informationNOTE: Use the same login information that you used to create your Monster Smart account
STEP 3: Enable the Skill and authorize your account using your login informationNOTE: Use the same login information that you used to create your Monster Smart account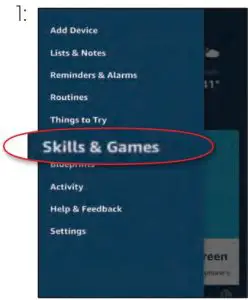

At any time, go to the Alexa app to set nicknames and rooms for your devices. You can also rename devices in the Monster Smart app
Using the name Prism, or the name you assigned your Prism, you can ask Alexa to control your device, just say “Alexa,” and ask: “Turn on my Prism”, “Set my Prism to blue”, “Set my Prism to 50% brightness”, and more!
GOOGLE VOICE CONTROL SETUP
Make sure your Google Assistant device is installed and setup.
STEP 1: Open the Google Home app, go to the Homemenu, and tap the “+” buttonSTEP 2: Click “Set up device”STEP 3: Click “Have something already set up?”STEP 4: Search for and choose and authorize your account using your login informationNOTE: Use the same login information that you used to create your Monster Smart account
At any time, go to the Google Home app to set nicknames and rooms for your devices. You can also rename devices in the Monster Smart app.Using the name Prism, or the name you assigned your Prism, you can ask your Google Assistant to control your device, just say “Hey Google” and say: “Turn on my Prism”, “Set my Prism to blue”, “Set my Prism to 50% brightness”, and more!
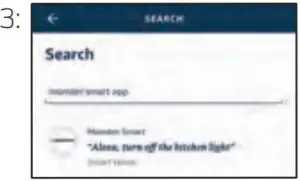
![]() SIRI VOICE CONTROL SETUP
SIRI VOICE CONTROL SETUP
Requires iPhone running iOS 12 or later.
STEP 1: Open the ![]() app and go to the “Smart” menu, tap the “+” button to create a new Tap To Run Smart SceneSTEP 2: Tap “launch Tap To Run” and fill out the informationSTEP 3: Once your Smart Scene is created and saved, click the button that appears at the bottom of the screen that says “Add to Siri” to open the list of optionsSTEP 4: Select your new Tap To Run Smart Scene from the list and click “Add to Siri”STEP 5: Create a custom phrase to say to Siri to run your Smart Scene (this can be any verbal command)
app and go to the “Smart” menu, tap the “+” button to create a new Tap To Run Smart SceneSTEP 2: Tap “launch Tap To Run” and fill out the informationSTEP 3: Once your Smart Scene is created and saved, click the button that appears at the bottom of the screen that says “Add to Siri” to open the list of optionsSTEP 4: Select your new Tap To Run Smart Scene from the list and click “Add to Siri”STEP 5: Create a custom phrase to say to Siri to run your Smart Scene (this can be any verbal command)
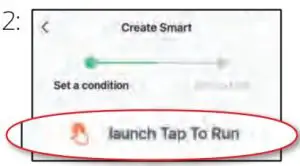
Now Siri can use your voice and custom verbal command to turn your device on or of, activate your favorite lighting pattern, adjust Prism at the same time as your other smart devices, or whatever you’ve set up as your Tap To Run Smart Scene.
WARRANTY
1 Year Limited Warranty – Please read and understand all instructions before using this product. If damage is caused by failure to follow the instructions, this warranty is null and void.
SAFETY
- Keep these instructions
- Do not drop, puncture, or disassemble this product
- Do not install this product in any way other than what is outlined in this guide
- Do not attach this product to the ceiling or to the floor
- Do not install this product on unpainted brick, uneven/ bumpy surfaces, or wallpaper
- Do not use this product in wet or very humid environments or expose to dripping or splashing liquids of any kind
- Do not immerse in water
- Avoid long exposure to direct sunlight, which may cause damage
- Do not use this product in small, enclosed locations that could limit the flow of air or trap excess heat
- Do not expose this product to open flames
- Do not use the product in a strong magnetic field
- Do not use this product for emergency lighting/exits
- Do not allow small children to operate, modify, or install this device unsupervised
- Use a clean, soft cloth to clean – do not use any corrosive cleaners/oils to clean
- For indoor use only
Powered by![]()
PRISM | Model: MLB7-1034-RGB | Input: 12VDC 3A FCC ID: 2AHAS-MLB71034 | IC: 26069-MLB71034 | HVIN: MLB7-1034 RGB![]()
![]()
The illustrated products and specifications may differ slightly from those supplied. The M Monster logo and IlluminEssence are trademarks or registered trademarks of Monster, Inc. or its subsidiaries in the U.S. and other countries and are used under license. Apple and the Apple logo are trademarks of Apple Inc., registered in the U.S. and other countries. App store is a service mark of Apple Inc. Google and Google Play are trademarks of Google LLC.Pre-set-up required. Amazon, Alexa, and all related logos are trademarks of Amazon.com, Inc. or its affliates. All other brand names are trademarks of their respective owners. Neither Jem Accessories, Inc. nor Monster, Inc. is affiliated with the respective owners of their trademarks. Licensed and Manufactured by Jem Accessories, Inc. Edison, NJ 08817. Made in China.
FCC Compliance
This device complies with Part 15 of the FCC. Operation is subject to the following two conditions: (1) this device may not cause harmful interference, and (2) this device must accept any interference received, including interference that may cause undesired operation. Changes or modifications not expressly approved by the party responsible for compliance could void the user’s authority to operate the equipment.This equipment has been tested and found to comply with the limits for a Class B digital device, pursuant to part 15 of the FCC Rules. These limits are designed to provide reasonable protection against harmful interference in a residential installation. This equipment generates uses and can radiate radio frequency energy and, if not installed and used in accordance with the instructions, may cause harmful interference to radio communications. However, there is no guarantee that interference will not occur in a particular installation. If this equipment does cause harmful interference to radio or television reception, which can be determined by turning the equipment of and on, the user is encouraged to try to correct the interference by one or more of the following measures:
- Reorient or relocate the receiving antenna.
- Increase the separation between the equipment and receiver.
- Connect the equipment into an outlet on a circuit different from that to which the receiver is connected.
- Consult the dealer or an experienced radio/TV technician for help.
RF Exposure StatementTo satisfy FCC’s RF exposure requirements, a separation distance of 20 cm or more should be maintained between the antenna of this device and persons during device operation. To ensure compliance, operations at closer than this distance is not recommended.
ISEDC Warning
This device complies with Innovation, Science, and Economic Development Canada license-exempt RSS standard(s).Operation is subject to the following two conditions:
- this device may not cause interference, and
- this device must accept any interference, including interference that may cause undesired operation of the device
The device is compliance with RF exposure guidelines, users can obtain Canadian information on RF exposure and compliance. The minimum distance from body to use the device is 20cm.
1 YEAR LIMITED WARRANTY
 report this ad
Jem Accessories, Inc. Limited Warranty Policy for Monster Smart Products Last Updated: March 27, 2020This limited warranty contains important information about your rights and obligations, as well as limitations and exclusions that may apply to you.
- WHAT THIS LIMITED WARRANTY COVERS; PERIOD OF COVERAGEJem Accessories, Inc. (“Jem Accessories”), 32Brunswick Ave, Edison, New Jersey, USA, warrants to the owner of the enclosed Monster Smart-branded product contained in this box (“Product”) will be free from defects in materials and workmanship for a period of one year.Notwithstanding the foregoing, the Warranty Period for a factory refurbished Product is one (1) year, even if installed by a professional. If the Product fails to conform to this Limited Warranty during the Warranty Period, Jem Accessories will, at its sole discretion, either (a) repair or replace any defective Product or component; with proof of purchase using original documentation. Repair or replacement may be made with a new or refurbished product or components, at Jem Accessories’s sole discretion. If the Product or a component incorporated within it is no longer available, Jem Accessories may, at Jem Accessories’s sole discretion, replace the Product with a similar product of similar function.This is your sole and exclusive remedy for breach of this Limited Warranty. Any Product that has either been repaired or replaced under this Limited Warranty will be covered by the terms of this Limited Warranty for the longer of (a) ninety (90) days from the date of delivery of the repaired Product or replacement Product, or (b) the remaining Warranty Period. This Limited Warranty is not transferable from the original purchaser to subsequent owners.
- TOTAL SATISFACTION RETURN POLICY If you are the original purchaser of the Product and you are not satisfied with this Product for any reason, you may return it in its original condition to the retailer in compliance with the retailer’s return policy.
- WARRANTY CONDITIONS; HOW TO GET SERVICE IF YOU WANT TO CLAIM UNDER THIS LIMITED WARRANTYBeforemaking a claim under this Limited Warranty, the owner of the Product must (a) visit monsterilluminessence.com/support during the Warranty Period to provide notice of your warranty claim and describe the alleged failure, and (b) comply with Jem Accessories (or its authorized distributor’s) return shipping instructions.Jem Accessories will have no warranty obligations with respect to a returned Product if it determines, at its reasonable discretion after examination of the returned Product, that the Product is an Ineligible Product (defened below). JemAccessories will bear all costs of return shipping to owner and will reimburse any shipping costs incurred by the owner, except with respect to any Ineligible Product or products shipped internationally, for which the owner will bear all shipping costs.
- WHAT THIS LIMITED WARRANTY DOES NOT COVERThis Limited Warranty does not cover the following (collectively “Ineligible Products”): (i) Products marked as “sample” or “Not for Sale”, or sold “AS IS”; (ii) Products that have been subject to: (a) modifications, alterations, tampering, or improper maintenance or repairs; (b) handling, storage, installation, testing, or use not in accordance with any quick start guide, manual or other instructions provided by Jem Accessories; (c) abuse or misuse of the Product; (d) breakdowns,fluctuations, or interruptions in electric power or the telecommunications network; or (e) Acts of God, including but not limited to lightning, food, tornado, earthquake, or hurricane; or (iii) any non-Jem Accessories branded hardware products, even if packaged or sold with Jem Accessories hardware. This Limited Warranty does not cover consumable parts, including batteries, unless damage is due to defects in materials or workmanship of the Product, or software (even if packaged or sold with the product). Jem Accessories recommends that you use only authorized service providers for maintenance or repair. Unauthorized use of the Product or software can impair the Product’s performance and may invalidate this Limited Warranty.
- DISCLAIMER OF WARRANTIES Except as stated above in this limited warranty, and to the maximum extent permittedby applicable law, Jem Accessories disclaims all express, implied, and statutory warranties and conditions with respectto the product, including the implied warranties of merchantability and fitness for a particular purpose. To themaximum extent permitted by applicable law, Jem Accessories also limits the duration of any applicable impliedwarranties or conditions to the duration of this limited warranty.
- LIMITATION OF DAMAGES In addition to the above warranty disclaimers, in no event will Jem Accessories be liable for any consequential, incidental, exemplary, or special damages, including any damages for lost data or lost profuctts, arising from or relating to this limited warranty or the product, and Jem Accessories’s total cumulative liability arising from or related to this limited warranty or the product will not exceed the amount actually paid for the product by theoriginal purchaser
- LIMITATION OF LIABILITYThe Jem Accessories online services at monsterilluminessence.com (“services”) provide you information (“product information”) regarding your Jem Accessories products or other peripherals connected to your products (“product peripherals”). The type of product peripherals that may be connected to your product may change from time to time. Without limiting the generality of the disclaimers above, all product information is provided for your convenience, “as is”, and “as available”. Jem Accessories does not represent, warrant, or guarantee that product information will be available, accurate, or reliable or that product information or use of the services or product will provide safety in your home. You use all product information, the services, and the product at your own discretion and risk. You will be solely responsible for (and Jem Accessories disclaims) any and all loss, liability, or damages, including to your wiring, fixtures, electricity, home, product, product peripherals, computer, mobile device, and all other items and pets in your home, resulting from your use of the product information, services, or product. Product information provided by the services is not intended as a substitute for direct means of obtaining the information. For example, a notification provided through the service is not intended as a substitute for audible and visible indications in the home and on the product, nor for a third party monitoring service that monitors alarm state.
- YOUR RIGHTS AND THIS LIMITED WARRANTYThis Limited Warranty gives you specific legal rights. You may also have other legal rights that vary by state, province, or jurisdiction. Likewise, some of the limitations in this Limited Warranty may not apply in certain states, provinces or jurisdictions. The terms of this Limited Warranty will apply to the extent permitted by applicable law. For a full description of your legal rights you should refer to the laws applicable in your jurisdiction and you may wish to contact a relevant consumer advisory service.If you need to start a warranty claim for your Monster Smart device, please reach out to Customer Support by emailing[email protected] or calling our support number 866-246-2008.Please allow 7-10 business days to process warranty claims. Customers located outside of U.S. will be responsible for all shipping costs.
References
[xyz-ips snippet=”download-snippet”]