
![]()
M1 / M1 DHC Electric TrolleyInstruction Manual
REGISTERONLINEwww.motocaddy.com/warranty
Visit www.motocaddy.com/instructions for other Motocaddy instructions including translations
Locating your Serial Number / Information about DHC
Locating your Serial Number
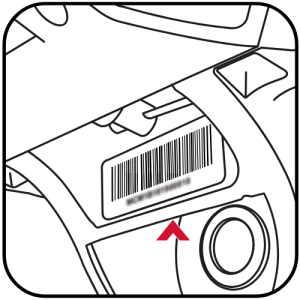
The serial number for this M-Series trolley is located on the trolley underside next to the motor (fig. 1). This number is required when registering your warranty online and should be kept handy for future use.
The same number should also be on the box received with your trolley. Please ensure you keep hold of the packaging in case you need to return your trolley for any reason. A proof of purchase must also be kept in case your trolley requires servicing during its warranty period.
Please keep a record of your trolley serial number here for future reference:
Information about DHC (Downhill Control) models
The information in this instruction manual applies to both standard and DHC electric trolley models. For DHC specific functionality, please turn to page 18.
Safe use of your Trolley / Trolley Care
Safety cut-out
This Motocaddy trolley is fitted with a timed safety cut-out feature. Once started the trolley will automatically cut power to the motor after ten minutes to prevent any possible damage to the trolley. Pressing the on/off button will restart the trolley.
Safe use of your Trolley
Motocaddy trolleys are designed for the transportation of golf bags and clubs contained within. Using the trolley for any other purpose may cause damage to the trolley and cause harm to the user.
- Do not attempt to transport any other equipment
- The trolley is not designed for the transportation of people
- Do not use the trolley to assist you when going up hills
- Submerging the trolley in water (e.g. a lake) is likely to cause damage to the trolley
- Do not operate the trolley whilst under the influence of drugs or excessive amounts of alcohol
- All batteries must be disconnected from the trolley before folding, storage and transportation
Caring for your Trolley
Although your Motocaddy trolley has been weatherproofed, please follow these simple guidelines to help protect your trolley:
- Do not store your trolley outside
- Try to minimise exposure to rain as much as possible with an umbrella during heavy rainfall
- Wipe excess water from the trolley prior to storage
- Never use a pressure washer to clean your trolley. To prevent water damage, wipe down with a damp cloth
- Avoid using high pressure air hoses near moving components
Trolley Care / Battery Care & Advice
This Motocaddy trolley is designed to require very little maintenance. We do however recommend giving your trolley regular checks to ensure:
- There is no build up of excess mud and dirt
- The front wheel nut is on tightly and quick release lever is clamped down
- The front wheel is not clogged up and turns freely
Only original Motocaddy parts should be used when repairing your trolley.
Battery Care & Advice
All batteries must be charged as soon as possible after each use. Leaving batteries discharged for long periods of time will affect the battery life.
Please ensure that only batteries supplied by Motocaddy are charged with Motocaddy chargers. Cyclic battery chargers are designed specifically in accordance with the battery manufacturer’s requirements. The Lithium battery charger MUST NOT be used to charge any other battery and is designed for use with Motocaddy Lithium batteries only.
The charger should only be connected to an earthed socket outlet; the battery charger should only be opened and maintained by authorised personnel. Unauthorised opening will invalidate your warranty.
The battery must be stored and charged on a dry non-carpeted surface and charged at temperatures ranging between 10°C and 30°C. Charging above or below these temperatures is not recommended as it can reduce the battery capacity.
When connecting your battery to the trolley, please ensure that the connections match up black to black and grey to grey.
Charging your Lithium Battery / Lithium Battery Care
Charging your Lithium Battery
- Unplug the Lithium battery from the trolley. This should always be performed before folding the trolley to avoid damage to the battery and/or trolley
- Plug the charger into your mains supply
- Attach the battery cable to the charger matching black to black and grey to grey
- When the charging LED indicator has turned green, the battery is fully charged and ready to be used
 RED – Battery charging GREEN – Battery fully charged and ready to be disconnected
 - The charging process will take between 3 to 5 hours depending on the depth of discharge (please be aware that this may take longer for the first few charges)
- Once charging is complete please disconnect the charger from the mains power supply
- Finally disconnect the charger from the battery
If you connect the battery to the charger and the LED goes out, this is likely to indicate that the battery is fully charged. Please double check the battery on the trolley to ensure that it is fully working.
Caring for your Lithium Battery
- Try to avoid getting the battery too wet (i.e. do not submerge the battery, avoid deep puddles and do not clean your trolley whilst the battery is still in the battery tray)
- Dropping the battery may cause damage to the internal cells
- Do not lift or carry the battery by the cable
- Use a damp cloth to clean off any dirt
Lithium Battery Care
Recommendations for hibernation of Lithium Batteries during winter months
If for any reason your Lithium battery is not going to be used for lengthy periods, e.g. 3 months over the winter, it is advised to store the battery half charged. To do this simply use the battery for a round of golf as usual and charge it for 1.5 hours at the end of the round. Before the battery is used again, recharge it (top it up) prior to use.
We recognise that extended absences are not always planned in advance, however when it is likely that you will not be using your battery for a period of time it is good practice to follow these steps to extend the life of your Lithium battery. Please ensure that the charger is ALWAYS disconnected from the battery after charging.
Battery Management System (BMS)
Motocaddy Lithium batteries are fitted with a comprehensive battery management system (BMS) to protect the battery from excessive abuse, high currents, deep discharge and overcharge. When the battery is delivered there may be no output as the BMS is designed to maximize safety whilst shipping. Please ensure that the battery is fully charged prior to connecting it to your trolley as this will activate the BMS and effectively ‘switch-on’ the battery. From time to time, at deep discharge or long term storage the BMS may switch-off the battery. A full battery charge will rectify this problem.
Motocaddy golf trolleys are designed to work with the BMS system installed in the Lithium batteries and the voltage meter is also synchronised to work in conjunction with the battery. If for any reason the voltage on the battery falls below the low battery warning on the trolley, then the BMS may disable the battery to protect it. Again if this occurs please recharge fully. Please be aware that Lithium batteries tend to ‘drop off’ quickly at the end of the cycle so it is not advisable to attempt to play excessive holes as the BMS will activate for protection purposes.
Attaching the Wheels / Inverting the Wheels
Attaching the Wheels
The M1 trolley does not have a specific left and right wheel.
To attach the rear wheels, follow these simple steps:
- Push the quick release button in towards the centre of the wheel
- Slide the wheel onto the trolley axle as far as it will go (onto the inner groove)
- Once in position, release the button and pull the wheel outwards slightly to lock
- An audible ‘click’ will confirm the wheel is in the correct position
The outer groove can be used as a “free-wheel” option if you run out of battery power.
Once correctly attached onto the inner groove, non-DHC wheels will rotate freely forwards, but not backwards. DHC wheels will not rotate freely in either direction.
Inverting the Wheels
The wheels can be inverted to reduce the trolley width for transportation and storage.
- Push and hold the quick release button while sliding the wheel off the axle
- Flip the wheel over, push and hold the button, then slide onto the axle
- Release the button and pull the wheel out slightly until it engages with the free wheel groove
Front Wheel Alignment
Adjusting the Front Wheel Alignment
In the unlikely event that your trolley is not tracking in a straight line, the alignment of the front wheel can be adjusted to rectify the fault. This problem can be caused by a number of factors including a slightly loose bag support or an unevenly packed golf bag.
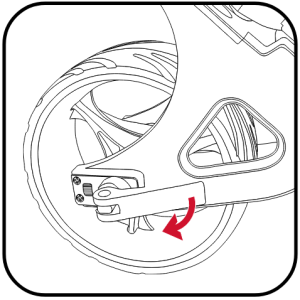
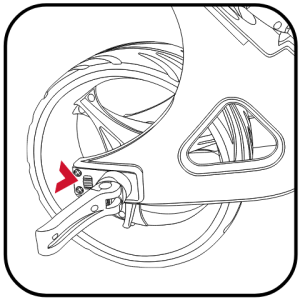
Fig 1 Fig 2
To alter the alignment of the front wheel, follow these simple steps:
- Lift the quick release lever positioned on the front wheel housing and loosen the wheel nut (fig. 1)
- There are two small metal dials on either side of the housing that are used to realign the wheel (fig. 2)
- If your trolley is veering to the right, you will need to turn the left hand dial clockwise and the right hand dial anti-clockwise
- If your trolley is veering to the left, you will need to turn the right hand dial clockwise and the left hand dial anti-clockwise
- Tighten the wheel nut and push down the lever to lock the wheel back into place (fig. 3)
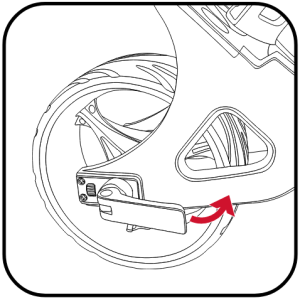
Fig 3
This procedure can be carried out until you are happy the trolley is moving in a straight line (please note you may only need to adjust one dial at a time).
These instructions are based on positioning yourself in front of the trolley looking at the wheel.
Unfolding your Trolley
Unfolding your Trolley
We recommend unfolding your trolley once the wheels have been un-inverted and reattached (see page 8).
- Lift the upper bag support slightly and release the upper latch (fig. 1)
- Unfold the handle and re-secure the latch (fig. 2)
- Release the lower latch (fig. 3)
- Lift the trolley handle up into position (fig. 4). The front wheel will automatically unfold
- Re-secure the lower latch and ensure the auto-open stand is folded away (fig. 5)
The model shown below is a standard M-Series trolley. The folding mechanism is the same despite the design differences.
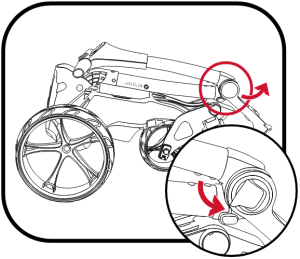
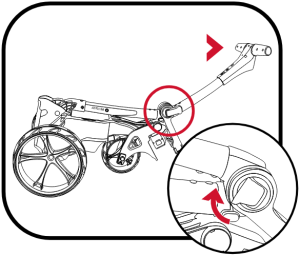


Fig 1 Fig 2 Fig 3 Fig 4 Fig 5
Folding your Trolley
Folding your Trolley
- Release the lower latch (fig. 1). The auto-open stand will also be activated
- Fold the frame forward until fully extended (fig. 2). The front wheel will automatically fold underneath
- Release the upper latch and fold the handle back until the trolley is fully folded (fig. 3)
- Re-secure both latches. If you wish to stand the trolley upright, leave auto-open stand out. Remember to ensure the auto-open stand is pushed down if not being used (fig. 4)
- The wheels can be inverted to reduce the trolley width for transportation and storage (fig. 5). See page 8 for details
Please ensure the auto-open stand is folded away when not in use to prevent damage.
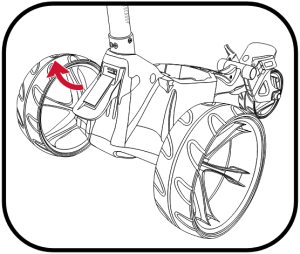

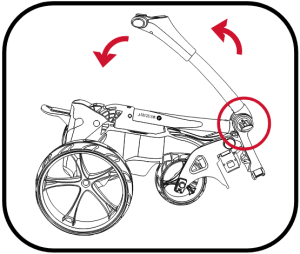

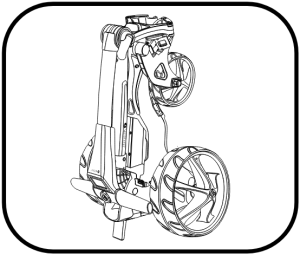
Fig 1 Fig 2 Fig 3 Fig 4 Fig 5
Upper & Lower Bag Supports
Upper Bag Supports
The upper bag support straps are secured using the following steps:
- Stretch the elasticated strap around the bag & loop the rounded bar underneath the hook (fig. 1)
- Position the two placement straps centrally on your golf bag (fig. 2)


Fig 1 Fig 2
Lower Bag Supports
This Motocaddy trolley is fitted with the EASILOCK™ bag attachment system.If you are using an EASILOCK™ compatible golf bag please follow these simple instructions:
- Remove the two pre-fitted lower bag straps by depressing the rear button and sliding (fig. 3)
- Match up the indicating line on the golf bag with the line on the lower bag support
- Lower the bag until the pins lock in position. You should hear an audible ‘click’

If you are using a non-EASILOCK™ golf bag, please use the following instructions:
- Stretch the lower bag strap around the bag base & loop the rounded bar underneath the hook
- Position the two placement straps centrally on the base of your golf bag
Please ensure all straps are hooked securely before releasing. Failure to do so could result in injury.
Adjusting the Bag Supports
Adjusting the Bag Supports
The bag support straps are manufactured from elasticated material to allow your golf bag to be held tightly in position.
The strap should be adjusted to be reasonably tight around the golf bag:
- Unclip the elasticated straps from the housing by pulling outwards in the direction shown (fig. 1)
- Move the bar as required to tighten or loosen the strap fitting. Pulling the bar downwards will tighten, pushing it upwards will loosen (fig. 2)
- Ensure that the straps are clipped back into the housing before use (fig. 3)
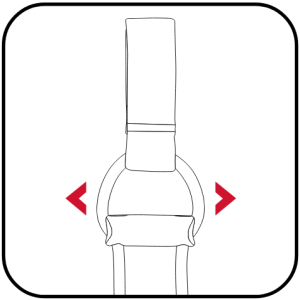
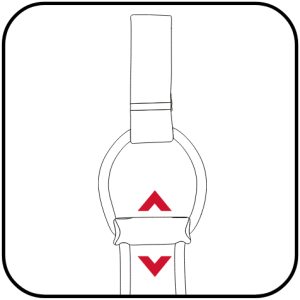
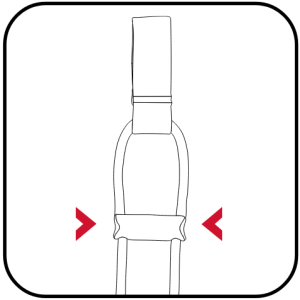
Fig 1 Fig 2 Fig 3
Equipment Overview
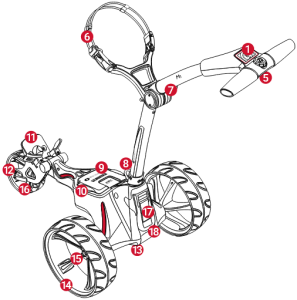
- Anti-glare LCD widescreen display
- Speed Setting (see page 15)
- Battery Meter (see page 15)
- Speed Controller & On/Off Button (see page 15)
- USB Charging Port (under handle)
- Upper Bag Support
- Upper Release Latch
- Battery Connector
- Battery
- Battery Tray
- EASILOCK™ Lower Bag Support
- Front Wheel
- Motor (under Battery Tray)
- Rear Wheels
- Rear Wheel Release Button
- Front Wheel Alignment Adjusters
- Auto-Open Stand
- Lower Release Latch
Starting, Stopping & Changing Speed
Starting, Stopping & Changing Speed

The M1 is very simple to control. There is one main button that is used to start and stop the trolley, whilst also controlling the speed, which can be adjusted while the trolley is stationary or in motion.
The trolley has 9 speed settings (1 to 9) with 1 being the slowest and 9 the fastest. To increase the speed, rotate the speed dial clockwise, or anti-clockwise to decrease the speed.
To start the trolley, simply select your required speed setting and press the button. The trolley will smoothly accelerate until it reaches the selected speed. To stop the trolley, simply press the button again – there is no need to reduce the speed setting.
The speed number will start flashing when you press the button. This indicates that the trolley has been started.
Battery Meter / USB Charging Port
Battery Meter
The M1 includes an on-screen battery meter which provides an indication of remaining battery capacity. The number of illuminated bars will decrease as the battery capacity reduces.
A fully charged battery will show from left to right – two short red bars, two medium orange bars and two larger green bars (fig. 1).
The trolley is designed to protect your battery from being fully discharged, should your battery capacity drop too low the trolley will cut the power to the motor. If this should happen, please charge your Lithium battery before further use.
Please be aware that certain moisture, temperature and humidity conditions can result in localised misting within the display screen. This will not affect the trolley functionality, nor cause any damage and will return to normal when adverse conditions subside.

USB Charging Port
This trolley features a USB charging port designed to charge USB powered devices during your round.
Simply remove the covering cap and plug a USB cable into the charging port located on the underside of the handle. The device will continue charging while the cable is attached and the battery is connected.
The rate of charge will be slower than a mains AC charger and similar to plugging the device into a PC. The USB charger takes power from the main trolley battery and continuous charging will reduce the battery capacity between charges. The trolley is designed to disable the USB port when the battery capacity reaches a preset level.
Adjustable Distance Control
Adjustable Distance Control
This trolley features a basic, easy to use adjustable distance control which will allow you to send your trolley ahead of you from 15 – 45 yards.
- While stationary select the speed that you wish your trolley to set off at
- Hold down the on/off button for 3 seconds, the number “1” will flash on the display (fig. 1). There are three settings for the distance, 1 = 15 yards, 2 = 30 yards and 3 = 45 yards
- Turn the button clockwise to increase and anti-clockwise to decrease to your preferred distance
- Press the on/off button to set the trolley in motion. While the trolley is powered using ADC, the speed number and white dashes will flash
- The trolley can be stopped manually by pressing the button again

In the unlikely event that your trolley fails to register distance whilst in ADC mode, the trolley will cut power to the motor to prevent the trolley from travelling too far. The trolley screen will flash “E” to indicate that this safety feature has been activated (fig. 2).

The trolley can be reset by pressing the on/off button once, thereby allowing you to continue to use the trolley with ADC disabled until you are able to contact our technical support team.
Introduction to DHC / Using the DHC Parking Brake (DHC models only)
The below information is applicable to DHC models ONLY.
Introduction to DHC
The letters DHC stand for ‘Downhill Control’ and mean that your trolley will automatically maintain a controlled speed whilst travelling down hills.
Whenever you are looking to move the trolley, even if just to reposition it ready to use, always put it on a low speed setting to make it easier to steer.

Using the DHC Parking Brake
DHC models are fitted with an electronic parking brake. To use this feature, the trolley must be in a stationary position. The parking brake is initiated by rotating the speed dial down to 1 and then rotating one click further.
Once activated, the screen will toggle between ‘P’ and number ‘1’ (fig. 1 & 2).The speed setting can be adjusted whilst the parking brake is activated by turning the speed dial.
To release the parking brake, press the on/off button to start the trolley.

Declaration of Conformity
![]() DECLARATION OF CONFORMITY
DECLARATION OF CONFORMITY
![]()
![]()
![]() Motocaddy Ltd,Units 15 – 18 Stansted Distribution Centre,Start Hill, Great Hallingbury, Hertfordshire, CM22 7DG,United Kingdom
Motocaddy Ltd,Units 15 – 18 Stansted Distribution Centre,Start Hill, Great Hallingbury, Hertfordshire, CM22 7DG,United Kingdom
![]() +44 (0)1279 712 370
+44 (0)1279 712 370
MC.21.60.002 | EASILOCK™ Patent (GB) – GB2519073 | USB Charging Port Patent (GB) – GB2473845 | USB Charging Port Patent (AUSTRALIA) – 2010224448
References
[xyz-ips snippet=”download-snippet”]