
Motorola Solutions PMMN4128 RM780 IMPRES Windporting Remote Speaker Microphone User Guide
Foreword RF Energy Exposure and Product Safety Guide for Portable Two-way Radios
Attention!
Before using this accessory, read this guide which contains important operating instructions for safe usage and RF energy awareness and control for compliance with applicable standards and regulationsThe Remote Speaker Microphone (RSM), when attached to the radio, is restricted to occupationaluse only to satisfy FCC/ICNIRP RF energy exposure requirements. Before using this product, read the RF energy awareness information and operating instructions in the Product Safety and RF Exposure booklet enclosed with your radio to ensure compliance with RF energy exposure limits.
Acoustic Safety
Exposure to loud noises from any source for extended periods of time may temporarily or permanently affect your hearing. The louder the volume of the radio, the less time is required before your hearing can be affected.
Hearing damage from loud noise is sometimes undetectable at first and can have a cumulative effect.
To protect your hearing:
- Use the lowest volume necessary to do your job.
- Turn up the volume only if you are in noisy surroundings.
- Turn down the volume before attaching headset or earpiece.
- Limit the amount of time you use headsets or earpieces at high volume.
- When using the radio without a headset or earpiece, do not place the speaker of the radio directly against your ear.
- If you experience hearing discomfort, ringing in your ears, or muffled speech, you should stop listening to your radio through your headset or earpiece, and have your hearing checked by your doctor. To change the volume level, refer to Radio Product Safety Leaflet or CPS for Surveillance extra loud (xL) Kit Configurations.
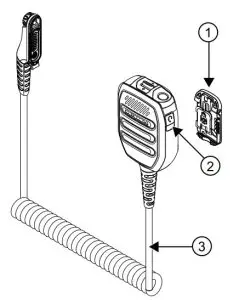
RSM Features
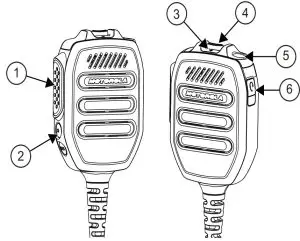
Table 1: RSM Features
| No. | Description |
| 1 | Push-to-Talk Button |
|
2 |
1-Dot Button* 2-Dot Button* |
| 3 | + Volume Up |
| 4 | – Volume Down |
Table 1: RSM Features
| No. | Description |
| 5 | Accessory Orange/Emergency Button* |
|
6 |
Receive-only 3.5 mm Audio Jack (Non-threaded) covered by Dust Cover |
| * Check with your dealer for available programmable functions. |
Recommended Practice

- Cover the audio jack with dust cover when it is not plugged with earpiece.
- Do not fill water into the audio jack.
- If water enters the audio jack, remove water by shaking the RSM
Transmitting and Receiving
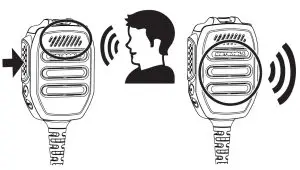
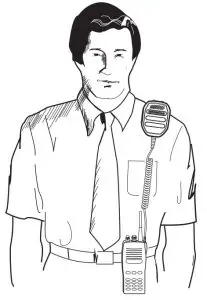
Recommended RSM Wearing Position
Attaching the RSM to the RadioAttach the RSM connector to the side connector of the radio. Then secure the connection screw in a clockwise direction until tightened.Note: To ensure proper operation, turn off the radio before connecting the RSM to the radio.Connecting the RSM to the radio disables the speaker of the radio, but does not disable the microphone and PTT of the radio.
Detaching the RSM from the Radio
- Unscrew and detach the RSM connector from the radio side connector.
- Keep the dust cover inserted in the audio jack of the RSM when a secondary accessory is not being used.
Optional Accessories
| Part Number | Description |
| PMLN8120 | Rx only xL Clear Tube Earpiece, 3.5mm Jack |
Replacement Parts
Table 3: Replacement Parts
| No | Description |
| 1 | Low Profile Swivel Clip (PMLN8121) |
|
2 |
Dust Cover 10pcs/pack (PMLN8122) |
| 3 | Coil Cord (PMKN4232) |
Service and Warranty
Other than the replaceable cable assembly, dust cover, and clip, the PMMN4128 Remote Speaker Microphone is not repairable. The RSM is covered under the standard Motorola Solutions one-year limited warranty
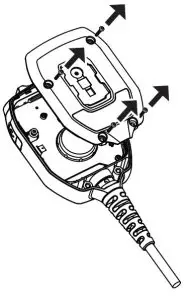
Coil Cord Replacement Procedure
- Remove the screws to disassemble the RSM.

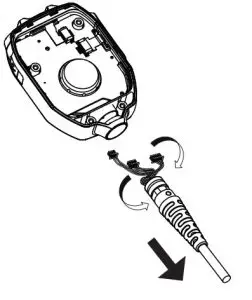
- Remove the cable.
- Reassemble the RSM.

Replacing the Dust Cover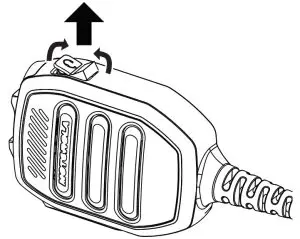
- Lift both sides of the dust cover.
- Pull out the dust cover to dismantle it.
- Bend the dust cover.
- Insert to the dust cover slot

Attaching Swivel Clip
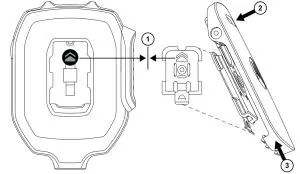
- Match and align the arrowhead icons and side wings.
- Push down the top of the clip.
- Simultaneously, push slide clip upward
Detaching Swivel Clip
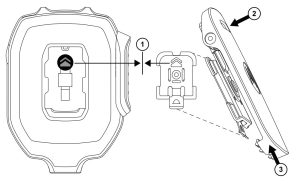
- Push top of the clip to raise the clip to the highest position.
- Lift up the bottom release latch.
- Slide the clip to remove the clip
Refer to manual MN006622A01for other languages: https://learning.motorolasolutions.com/ https://learning.motorolasolutions.com/
References
[xyz-ips snippet=”download-snippet”]