
Motorola Solutions VCM-5 Vehicle Charger Mounting Adapter Instruction Manual
Important Safety Instructions
This document contains important safety and operating instructions and should be read in conjunction with the product safety information supplied with the mobile or portable radios, used with the accessories. Read these instructions carefully and save them for future reference. Installation of communications equipment should be performed by qualified personnel only.
Before using the accessory, read all the instructions and cautionary markings on all other items. Seek guidance from vehicle manufacturer on mounting equipment in vehicles.
Operational Caution
 To reduce risk of injury, use only Motorola Solutions approved items with the Vehicle Charger Mounting Adapter.
- It is essential to mount the equipment in locations where it will not cause any injury in the event of a collision.
- A vehicle air bag inflates with great force. Do not place objects, including communications equipment, in the area over the vehicle air bag or in the air bag deployment area. If the communication equipment is improperly installed and the vehicle air bag inflates, this could cause serious injury. If necessary, contact the vehicle manufacturer for air bag information specific to the vehicle.
- Verify that none of the vehicle systems are affected by use of the portable radio such as cruise control, Anti-lock Braking System (ABS) braking, traction control, engine management, direction indicators, lights, and others.
- Use existing openings through the bulkhead to avoid drilling.If drilling is necessary, ensure that no damage is incurred to the vehicle Electronic Control Modules (ECM), fuel pipes, brake pipes, and/or cable looms.
- Do not transport or store flammable gas, flammable liquids or explosives in the compartment of your vehicle that contains your equipment.
- To avoid possible interference with blasting operations, turn your radio OFF before entering an area where you may be close to electrical blasting caps, in a “blasting area” or in areas posted as “Turn OFF two-way radios”. Obey all signs and instructions.
Safety and General Information
A properly installed Vehicle Charger Mounting Adapter minimizes service calls. When mounting the components of the Vehicle Charger Mounting Adapter, consider the following factors:
- The mounting surface must have sufficient strength to support the item being mounted to prevent it from becoming loose over time.
- Do not attach components to any part of the vehicle that is subject to excessive vibration.
- The proposed location of the item being mounted, wires, or cables attached, must not interfere with driver or passenger seating or leg space.
- Use the supplied mounting hardware.
- Ensure that the cables are not stretched, and not subject to heat from the engine, transmission housing, or heating ducts.
- Crimp or tie together all the wires using a cable tie to keep tidy.
- Ensure that screws are securely fastened on all connectors.
- Do not run cables over sharp edges that may cause excessive wear or chaffing of the cable insulation.
- Do not install components in locations where they may cause interference to the operation of the vehicle’s controls.
- Always remove the antenna before charging the radio. The radio may not charge properly if the antenna is attached to the radio.
- The E-DC-32 Cigarette Lighter Adapter is designed for charging only when the radio is not in operation. Always turn the radio off when charging the battery
On some vehicles, it is necessary to penetrate the bulkhead to reach the battery. Ensure that there is cable clearance on the opposite side of the bulkhead and that the vehicle ECM are not installed on the opposite side of the bulkhead before drilling commences. Protect the cable where it passes through the bulkhead by using a grommet or similar protective measures.
Introduction
The VCM-5 Vehicle Charger Mounting Adapter is a Mobile Mounting Bracket designed to match the CD-58 Desktop Charger. The VCM-5 includes the E-DC-32 Cigarette Lighter Adapter.
Supplied Items
Before installing the Mounting Adapter, confirm all parts are present
- VCM-5 bracket to install CD-58 Desktop Charger: 1 piece
- Bracket “A” for mounting in the vehicle: 1 piece
- Cloth Band Assembly to fix the radio (including Adjusters): 1 piece
- Screw Kit to mount VCM-5 bracket to Bracket “A” (screws, toothed washers, and plain washers): 2 pieces for each
- Hexagon Wrench: 1 piece
- Cigarette Lighter Adapter E-DC-32: 1 piece
Installation
- Place Bracket “A” at a suitable position for mounting. Ensure that there is sufficient clearance for the VCM-5 bracket. Drill holes compatible with the mounting hardware you have selected. For best results, Motorola Solutions recommend hardware of #8 (M4) screw.Note: As each mounting situation is different, mounting hardware is not supplied with this kit.
- Secure Bracket “A” with your selected screws and washers.Figure 1: Installing Bracket “A”
- Install the Cloth Band and flat-shaped Adjuster to the VCM-5 bracketFigure 2: Installing Cloth Band and Flat-Shaped Adjuster
- Insert the front section of the CD-58 Desktop Charger into the VCM-5 bracket until it locks in place with a click. Ensure that the small protrusions of the VCM-5 bracket is fixed correctly into the holes which are located at the bottom of the CD-58 Desktop Charger.Figure 3: Inserting CD-58 Desktop Charger into VCM-5 BracketNote: The CD-58 Desktop Charger must not be inclined and/or rotated.Figure 4: CD-58 Inclined and Rotated
- Use the Hexagon Wrench to mount the VCM-5 bracket to Bracket “A” with the screws and washers.Figure 5: Mounting VCM-5 Bracket to Bracket “A”Note: Adjust the angle of the Charger Stand to a convenient and accessible position.You can also secure the Charger Stand with Bracket “A” directly to the vehicle.Figure 6: Securing Charger Stand with Bracket “A” to Vehicle
- Insert the DC plug from the E-DC-32 Cigarette Lighter Adapter into the DC jack at the rear panel of the CD-58 Desktop Charger. Route and secure the E-DC-32 Cigarette Lighter Adapter cable in the vehicle, then plug the E-DC-32 Cigarette Lighter Adapter into the cigarette lighter jack of the vehicle. Insert the radio into the CD-58 Desktop Charger.Figure 7: Connecting E-DC-32 Cigarette Lighter Adapter to CD58 Desktop Charger
- Install the Adjuster to the Cloth Band.Figure 8: Installing Adjuster to Cloth Band
- Hook the Adjuster to the hook of the VCM-5 bracket. Ensure that the ring section of the Cloth Band goes over the Channel knob of the radio.Figure 9: Hooking Adjuster to VCM-5 Bracket
- Adjust the Cloth Band so that the ring section is on top and at the center of the radio. Secure the radio by tightening the end of the Cloth Band with the Adjuster while pulling the Cloth Band downward, so that the radio does not become loose from vibrationNote: Do not secure the Cloth Band too tightly, as it can damage the radio.Figure 10: Securing Cloth Band Over the Radio
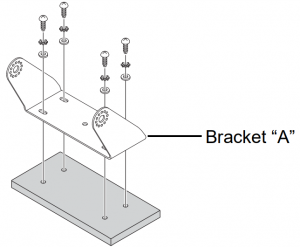 Figure 1: Installing Bracket “A”
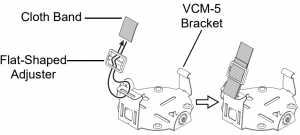 Figure 2: Installing Cloth Band and Flat-Shaped Adjuster
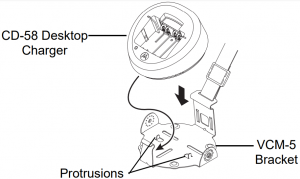 Figure 3: Inserting CD-58 Desktop Charger into VCM-5 Bracket
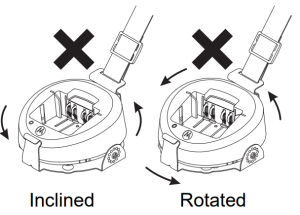 Figure 4: CD-58 Inclined and Rotated
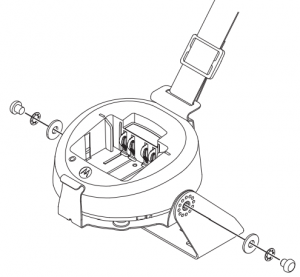 Figure 5: Mounting VCM-5 Bracket to Bracket “A”
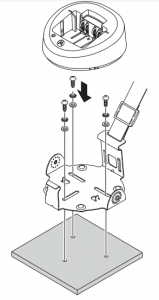 Figure 6: Securing Charger Stand with Bracket “A” to Vehicle
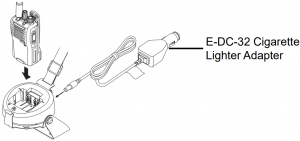 Figure 7: Connecting E-DC-32 Cigarette Lighter Adapter to CD58 Desktop Charger
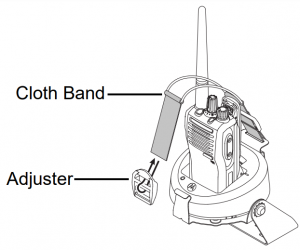 Figure 8: Installing Adjuster to Cloth Band
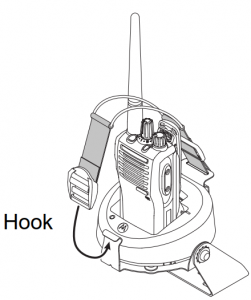 Figure 9: Hooking Adjuster to VCM-5 Bracket
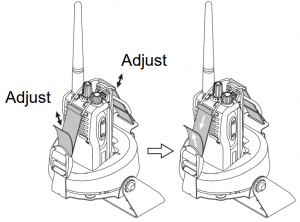 Figure 10: Securing Cloth Band Over the Radio
© 2017 and 2021 Motorola Solutions, Inc. All rights reserved.MOTOROLA, MOTO, MOTOROLA SOLUTIONS and the Stylized M logo are trademarks or registered trademarks of Motorola Trademark Holdings, LLC and are used under license. All other trademarks are the property of their respective owners.

[xyz-ips snippet=”download-snippet”]