
![]() IMPRES Adaptive Single Unit Charger PMPN4527 User Guide
IMPRES Adaptive Single Unit Charger PMPN4527 User Guide

EU Contact: Motorola Solutions, Czerwone Maki 82, 30-392 Krakow, Poland
 JULY 2021© 2021 Motorola Solutions, Inc. All rights reserved
Intellectual Property and Regulatory Notices
CopyrightsThe Motorola Solutions products described in this document may include copyrighted Motorola Solutions computer programs. Laws in the United States and other countries preserve for Motorola Solutions certain exclusive rights for copyrighted computer programs. Accordingly, any copyrighted Motorola Solutions computer programs contained in the Motorola Solutions products described in this document may not be copied or reproduced in any manner without the express written permission of Motorola Solutions. No part of this document may be reproduced, transmitted, stored in a retrieval system, or translated into any language or computer language, in any form or by any means, without the prior written permission of Motorola Solutions, Inc.TrademarksMOTOROLA, MOTO, MOTOROLA SOLUTIONS, and the Stylized M Logo are trademarks or registered trademarks of Motorola Trademark Holdings, LLC and are used under license. All other trademarks are the property of their respective owners.License RightsThe purchase of Motorola Solutions products shall not be deemed to grant either directly or by implication, estoppel or otherwise, any license under the copyrights, patents or patent applications of Motorola Solutions, except for the normal non-exclusive, royalty-free license to use that arises by operation of law in the sale of a product.Open Source ContentThis product may contain Open Source software used under license. Refer to the product installation media for full Open Source Legal Notices and Attribution content.European Union (EU) Waste of Electrical and Electronic Equipment (WEEE) Directive![]() The European Union’s WEEE directive requires that products sold into EU countries must have the crossed-out trash bin label on the product (or the package in some cases). As defined by the WEEE directive, this cross-out trash bin label means that customers and end-users in EU countries should not dispose of electronic and electrical equipment or accessories in household waste. Customers or end-users in EU countries should contact their local equipment supplier representative or service center for information about the waste collection system in their country.DisclaimerPlease note that certain features, facilities, and capabilities described in this document may not be applicable to or licensed for use on a specific system, or may be dependent upon the characteristics of a specific mobile subscriber unit or configuration of certain parameters. Please refer to your Motorola Solutions contact for further information. © 2021 Motorola Solutions, Inc. All Rights Reserved
The European Union’s WEEE directive requires that products sold into EU countries must have the crossed-out trash bin label on the product (or the package in some cases). As defined by the WEEE directive, this cross-out trash bin label means that customers and end-users in EU countries should not dispose of electronic and electrical equipment or accessories in household waste. Customers or end-users in EU countries should contact their local equipment supplier representative or service center for information about the waste collection system in their country.DisclaimerPlease note that certain features, facilities, and capabilities described in this document may not be applicable to or licensed for use on a specific system, or may be dependent upon the characteristics of a specific mobile subscriber unit or configuration of certain parameters. Please refer to your Motorola Solutions contact for further information. © 2021 Motorola Solutions, Inc. All Rights Reserved
Contact Us
The Solutions Support Center (SSC) is the primary contact for technical support included in your organization’s service agreement with Motorola Solutions. Service agreement customers should be sure to call the SSC in all situations listed under Customer Responsibilities in their agreement, such as: · Before reloading software · To confirm troubleshooting results and analysis before taking action Your organization received support phone numbers and other contact information appropriate for your geographic region and service agreement. Use that contact information for the most efficient response. However, if needed, you can also find general support contact information on the Motorola Solutions website, by following these steps: 1 Enter motorolasolutions.com in your browser. 2 Ensure that your organization’s country or region is displayed on the page. Clicking or tapping thename of the region provides a way to change it. 3 Select “Support” on the motorolasolutions.com page.CommentsSend questions and comments regarding user documentation to Provide the following information when reporting a documentation error: · The document title and part number · The page number or title of the section with the error · A description of the error Motorola Solutions offers various courses designed to assist in learning about the system. For information, go to https://learning.motorolasolutions.com to view the current course offerings and technology paths.
Icon ConventionsThe documentation set is designed to give the reader more visual clues. The following graphic icons are used throughout the documentation set.![]() DANGER: The signal word DANGER with the associated safety icon implies information that, if disregarded, will result in death or serious injury.
DANGER: The signal word DANGER with the associated safety icon implies information that, if disregarded, will result in death or serious injury.![]() WARNING: The signal word WARNING with the associated safety icon implies information that, if disregarded, could result in death or serious injury, or serious product damage.
WARNING: The signal word WARNING with the associated safety icon implies information that, if disregarded, could result in death or serious injury, or serious product damage.![]() CAUTION: The signal word CAUTION with the associated safety icon implies information that, if disregarded, may result in minor or moderate injury, or serious product damage.CAUTION: The signal word CAUTION may be used without the safety icon to state potential damage or injury that is not related to the product.
CAUTION: The signal word CAUTION with the associated safety icon implies information that, if disregarded, may result in minor or moderate injury, or serious product damage.CAUTION: The signal word CAUTION may be used without the safety icon to state potential damage or injury that is not related to the product.![]() IMPORTANT: IMPORTANT statements contain information that is crucial to the discussion at hand, but is not CAUTION or WARNING. There is no warning level associated with the IMPORTANT statement.
IMPORTANT: IMPORTANT statements contain information that is crucial to the discussion at hand, but is not CAUTION or WARNING. There is no warning level associated with the IMPORTANT statement. NOTE: NOTICE contains information more important than the surrounding text, such as exceptions or preconditions. They also refer the reader elsewhere for additional information, remind the reader how to complete an action (when it is not part of the current procedure, for instance), or tell the reader where something is on the screen. There is no warning level associated with a notice.Important Safety InstructionsThis document contains important safety and operating instructions. Please read these instructions carefully and save them for future reference. Before using the battery charger, read all the instructions and cautionary markings on the charger, the battery, and the radio using the battery.
![]() WARNING:
WARNING:
- To reduce the risk of damage to the power cord, pull the plug rather than the cord when disconnecting power cord from the AC outlet or the charger.
- To reduce the risk of fire or electric shock, avoid using an extension cord. If an extension cord must be used, ensure that the cord size is 18 AWG for lengths of up to 6.5 feet (2 m), and 16 AWG for lengths up to 9.8 feet (3 m).
- To reduce the risk of fire, electric shock, or injury, do not operate the charger if it is broken or damaged in any way. Take it to a qualified Motorola Solutions service representative.
- To reduce the risk of fire or electric shock, do not disassemble the charger. It is not repairable and replacement parts are not available.
- To reduce the risk of electric shock, unplug the charger power adapter from the AC outlet before attempting any maintenance or cleaning.
- To reduce the risk of injury, charge only the rechargeable authorized batteries. Other batteries may explode, causing personal injury and damage.
- To reduce the risk of fire, electric shock, or injury, only use the accessories recommended by Motorola Solutions.
- Changes or modifications made to this device, not expressly approved by Motorola Solutions, could void the authority of the user to operate this equipment.
Class B Digital DeviceNOTE: This equipment has been tested and found to comply with the limits for a Class B digital device, pursuant to part 15 of the FCC Rules. These limits are designed to provide reasonable protection against harmful interference in a residential installation. This equipment generates, uses and can radiate radio frequency energy and, if not installed and used in accordance with the instructions, may cause harmful interference to radio communications. However, there is no guarantee that interference will not occur in a particular installation. If this equipment does cause harmful interference to radio or television reception, which can be determined by turning the equipment off and on, the user is encouraged to try to correct the interference by one or more of the following measures:
- Reorient or relocate the receiving antenna.
- Increase the separation between the equipment and receiver.
- Connect the equipment into an outlet on a circuit different from that to which the receiver is connected.
- Consult the dealer or an experienced radio/TV technician for help.
IMPRES Batteries and ChargersThe IMPRESTM energy solution is an advanced energy system developed by Motorola Solutions. The system includes:
- IMPRES battery
- IMPRES adaptive charger
- IMPRES radioCharger Specification
- Input: 14 V 1 A · Output: 8.8 V 1.5 A
Features and BenefitsCharging IMPRES batteries using an IMPRES Adaptive Charger, which periodically calibrates and reconditions the battery, yields the following benefits:
- Maximize battery life by significantly reducing heat during the trickle and post-charge cycles.
- Determines the current battery status, giving the radio user an indication of effective use time.
- Provide higher-rate IMPRES Lithium-Ion battery charging.
- Automatically performs calibration and reconditioning when needed.
- Minimizes IMPRES battery heating, regardless of how long the battery is left in the charger pocket.
- Periodically charges a battery stored in the charger, maintaining a high state of readiness for the user.
- Eliminates Nickel battery memory effect, eliminating the need to purchase special equipment or train personnel in tasks to maintain battery life cycle. Using this unique patented system, there is no requirement to track and record IMPRES battery, conduct manual calibration and reconditioning, or remove batteries from chargers after charging completion.
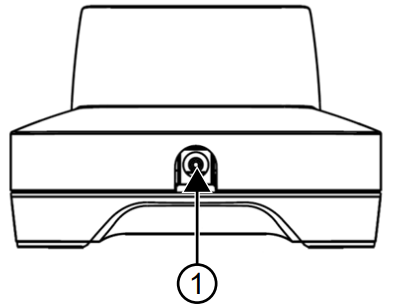
Charging Radios and BatteriesThe IMPRES Adaptive Charger System is a fully automated system. The charger pockets accommodate either radio with an attached Motorola Solutions-approved battery or a Motorola Solutions-approved battery alone. Batteries charge best at room temperature. Prerequisites: Note that the radio can only be turned on when the radio is transmitting data wirelessly. Otherwise, turn off the radio.Procedure:
- Plug the charger end of the power supply cord into the DC inlet (1) at the back of the charger.

- Plug the wall power adapter into the appropriate Alternating Current (AC) outlet.A successful power-up sequence is indicated by a single green blink on the charger indicator.Refer to the IMPRES Battery Charging Indicators on page 9.
- Insert a Motorola Solutions-approved battery or a radio with a Motorola Solutions-approved battery into the charger pocket.Align the battery contacts with the charger contacts.b Press the battery into the pocket, ensuring complete contact.Once the Motorola Solutions-approved battery is properly seated into the pocket, the charger indicator illuminates, indicating the charger has recognized the presence of the battery.
- To remove a radio or Motorola Solutions-approved battery from the charger, pull straight up until the battery completely clears the charger housing.
IMPRES Battery Charging Indicators
Table 1: IMPRES Battery Charging Indicators
|
Status |
LED Status |
Comments |
|
| Charger Power On | Green for approx. 1
sec |
Successful charger power-up. | |
| Rapid Charging |  |
Steady red | Battery in rapid charge mode. |
| Charged to 90 % or
more |
 |
Flashing green | Battery is charged to
90 % or greater capacity. |
| Charged to 95 % or
more |
Steady green | Battery is charged to
95 % or greater capacity. |
|
| Calibration | Steady amber | Battery is in recondition or
calibration mode. |
|
| Fault |  |
Flashing red | Not chargeable; remove and re-insert radio or battery. |
|
Status |
LED Status |
Comments |
|
| Standby | |
Flashing amber | • Battery is waiting to rapid charge.
• Battery may be too hot, too cold, or low voltage. • Charger may be too hot. |
| End of Service Life |  |
Alternating red and green | Battery remains usable but may be nearing the end of its rated service life. |
| Recalibration |  |
Alternating amber and green | Battery requires calibration or battery is due for callibration. |
IMPRES Battery InitializationFor a full IMPRES functionality, a new IMPRES battery must be initialized by the charger.The charger automatically detects the new IMPRES battery, and automatically starts initialization.Initialization is the first calibration and reconditioning of an IMPRES battery.Phases of Battery InitializationThe first phase is a battery discharge, indicated by a steady amber LED. The second phase is a full charge, indicated by a steady green LED. Refer to IMPRES Battery Charging Indicators on page 9.NOTE: This process may take up to 12 hours or more to complete, depending on the state of charge and capacity of the battery. Interruption of either phase delays initialization until the next charging opportunity.
Automatic IMPRES Calibration and ReconditionThe IMPRES charger automatically assesses the condition of an IMPRES battery.Based on the condition, the charger automatically calibrates and reconditions the battery. This process starts with battery discharge, indicated by a steady amber LED status. Calibration and reconditionare complete only after a full charge, indicated by a steady green LED status. See IMPRES BatteryCharging Indicators on page 9.This process can take up to 12 hours or more to complete, depending on the charging status and battery capacity. Interruption of either the discharge phase or the full charge phase delays calibration until the next charging opportunity.
Figure 1: Self-Calibration and Recondition Icon
![]()
NOTE: IMPRES batteries with the Self-Calibration and Recondition icon on the battery label, do not require periodic calibration and recondition, when docked into this IMPRES charger.
Terminating Calibration and Recondition ManuallyYou can manually terminate calibration and recondition during the process.
Procedure:
- Remove the battery from the charger pocket.
- Reinsert the battery into the charger pocket within 5 seconds.Battery calibration and recondition immediately terminate. Normal battery charging starts. The LED indicates charge status.Initiating Calibration and Recondition ManuallyAlthough calibration or recondition is automatic, you may be required to manually initiate calibration or recondition in certain situations.
Procedure:
- Insert the battery into the charger pocket.
- Remove the battery from the charger pocket.
- Reinsert the battery into the charger pocket within 5 seconds.Calibration and recondition start immediately, beginning with battery discharge indicated by a steady amber LED status. Calibration and recondition are complete only after a full charge indicated by a steady green LED status. See IMPRES Battery Charging Indicators on page 9.NOTE: This process can take up to 12 hours or more to complete, depending on the charging status and battery capacity. Interruption of either the discharge phase or the full charge phase delays calibration until the next charging opportunity.
IMPRES End of Service Life LED IndicationThe IMPRES charger may indicate IMPRES battery end of service. Alternating red and green LED status can appear to show End of Service Life.Normal usage of the batteries reduces the available capacity. After successful completion of calibration and recondition, the IMPRES charger compares IMPRES battery capacity to the battery rated capacity. When the capacity is at a low value, the IMPRES battery may be nearing its end of service.
Troubleshooting
Table 2: Troubleshooting
|
Problem |
What it means… |
What to do… |
| No charger indication | • No charger contact.
• No power to the charger. |
Check that the radio with battery, or the battery, is inserted correctly.
• Make sure that the power cord is securely plugged into the charger and an appropriate AC outlet, and that there is power to the outlet. |
| Blinking red indication | • No charger contact.
• Battery is not chargeable. |
Remove the battery from the charger and replace it back into the charger.
• Verify that the battery is a Motorola authorized battery listed in Motorola Solutions Authorized Batteries. Other batteries may not charge.• Remove power from the battery charger and, using lean the gold metal charging contacts of both the battery and the charger. • Replace the battery. |
| Blinking amber indication | Battery is waiting to charge.
The battery temperature may be below 5 °C (41 °F) or above 40 °C (104 °F) or the battery voltage may be lower than the predetermined threshold level for rapid charging. |
When this condition is corrected, the battery charges automatically. |
ServiceThe IMPRES Adaptive Chargers are not repairable. Order replacement chargers as necessary from your local Motorola Solutions Sales Representative.
This section list out authorized accessories to be used with your charger.Compatible Power SuppliesTable 3: Compatible Power Supplies
|
Power Supply |
Power Supply Description |
Country Plug |
| 25009297001 | 14 W, 120 VAC | US/Taiwan |
| 2571886T01 | 21 W, 90 V–264 V | JPN/BZL/India |
| PS000037A01 | 14 W, 207 V–253 V | EU |
| PS000037A02 | 14 W, 207 V–253 V | UK/HK |
| PS000037A03 | 14 W, 207 V–253 V | AU/NZ |
| PS000037A04 | 14 W, 207 V–253 V | ARG |
| PS000037A05 | 14 W, 207 V–253 V | CHINA |
| PS000037A06 | 14 W, 207 V–253 V | KOR |
Table 4: Motorola Solutions Authorized Batteries
|
Battery |
Chemistry |
Battery Description |
| NNTN4321_ | Li-Ion | IMPRES Li-Ion IECEX IP67 2000T |
| NNTN7789_ | Li-Ion | IMPRES Li-Ion IECEX IP67 1900T |
| NNTN8128_ | Li-Ion | IMPRES Li-Ion IP67 2000T |
| NNTN8129_R | Li-Ion | IMPRESS FM Li-Ion 2300M 2350T |
| NNTN8287_ | Li-Ion | IMPRES Li-Ion CSA157 IP67 2300T |
| NNTN8305_R | Li-Ion | IMPRES Li-Ion 1300T |
| NNTN8359_ | Li-Ion | IMPRESS IECEX/ATEX IP67 Li-Ion1800M |
| NNTN8386_ | Li-Ion | 2075T |
| NNTN8560_ | Li-Ion | IMPRES Li-Ion CSA157 IP68 2300T |
| NNTN8570_ | Li-Ion | IMPRES Li-Ion TIA4950 IP67 2500T |
| NNTN8750_ | Li-Ion | IMPRES Li-Ion IECEX/ATEX IP67 1250T |
| NNTN8840_ | Li-Ion | IMPRES Li-Ion CSA157 IP67 2050T |
| PMNN4065_ | Ni MH | IMPRES Li-Ion IECEX IP67 2000T |
| PMNN4066_ | Li-Ion | BATT NIMH 1480T |
| PMNN4069_ | Li-Ion | IMPRES Li-Ion IP57 1700T |
| PMNN4077_ | Li-Ion | IMPRESS Li-Ion 1400MAH FM |
| PMNN4101_ | Li-Ion | IMPRES Li-Ion 2240T |
| PMNN4102_ | Li-Ion | IMPRES Li-Ion IP57 1550T |
| PMNN4103_ | Li-Ion | IMPRES FM IP57 Li-Ion1400M 1500T |
| PMNN4104_ | Ni MH | IMPRES Li-Ion IP57 2200T |
| PMNN4262_R | Li-Ion | BATT NIMH IP57 1430T |
| PMNN4406_R | Li-Ion | IMPRES Li-Ion IP57 2850T |
| PMNN4407_R | Li-Ion | BATT Li-Ion IP68 1650T |
| PMNN4409_R | Li-Ion | IMPRES Li-Ion IP68 1650T |
| PMNN4412_R | Ni MH | IMPRES Li-Ion IP68 2250T |
| PMNN4415_R | Ni MH | BATT NIMH IP68 1400T |
| PMNN4416_R | Li-Ion | BATT NIMH IP56 1400T |
| PMNN4417_R | Li-Ion | BATT Li-Ion IP56 1650T |
| PMNN4418_R | Li-Ion | IMPRES Li-Ion IP56 1650T |
Table 5: Batteries Available in Taiwan
| Battery | Chemistry |
Battery Description |
| PMNN4488AC | Li-Ion | IMPRES Li-Ion HE DENS IP68 3000T (VIB |
| PMNN4493AC | Li-Ion | BELT CLIP) |
| PMNN4490BC | Li-Ion | IMPRES Li-Ion HE DENS IP68 3000T |
| PMNN4489BC | Li-Ion | IMPRES Li-Ion TIA4950 HE DENS IP68 2900T |
| PMNN4448B | Li-Ion | IMPRES Li-Ion TIA4950 HE DENS IP68 2900T |
| NNTN8560BC | Li-Ion | IMPRES Li-Ion IP68 2800T |
| PMNN4544AW | Li-Ion | IMPRES Li-Ion TIA4950 IP67 2500T |
| PMNN4543AW | Li-Ion | IMPRES Li-Ion IP68 2450T |
| PMNN4077E | Li-Ion | BATT Li-Ion IP68 2450T |
| PMNN4424BC | Li-Ion | IMPRES Li-Ion 2240T |
| PMNN4491CC | Li-Ion | IMPRES Li-Ion IP68 2350T |
| NNTN8359CR | Li-Ion | IMPRES Li-Ion IP68 2100T |
| NNTN8128CC | Li-Ion | IMPRESS IECEX/ATEX IP67 Li-Ion1800M |
| NNTN8128BR | Li-Ion | 2075T |
| NNTN8129ARW | Li-Ion | IMPRES Li-Ion IP67 2000T |
| PMNN4525BC | Li-Ion | IMPRES Li-Ion 2000T |
| PMNN4066B | Li-Ion | IMPRESS FM Li-Ion 2300M 2350T |
| PMNN4406BR | Li-Ion | IMPRES Li-Ion IP68 1950T |
References
[xyz-ips snippet=”download-snippet”]