
![]()
MODELS:LUX85CONNECT, LUX85CONNECT-2,LUX85CONNECT-3, LUX85CONNECT-4
QUICK START GUIDEFor a full explanation of all features and instructions, please refer to the User’s Guide.(available for download from www.motorolastore.com).
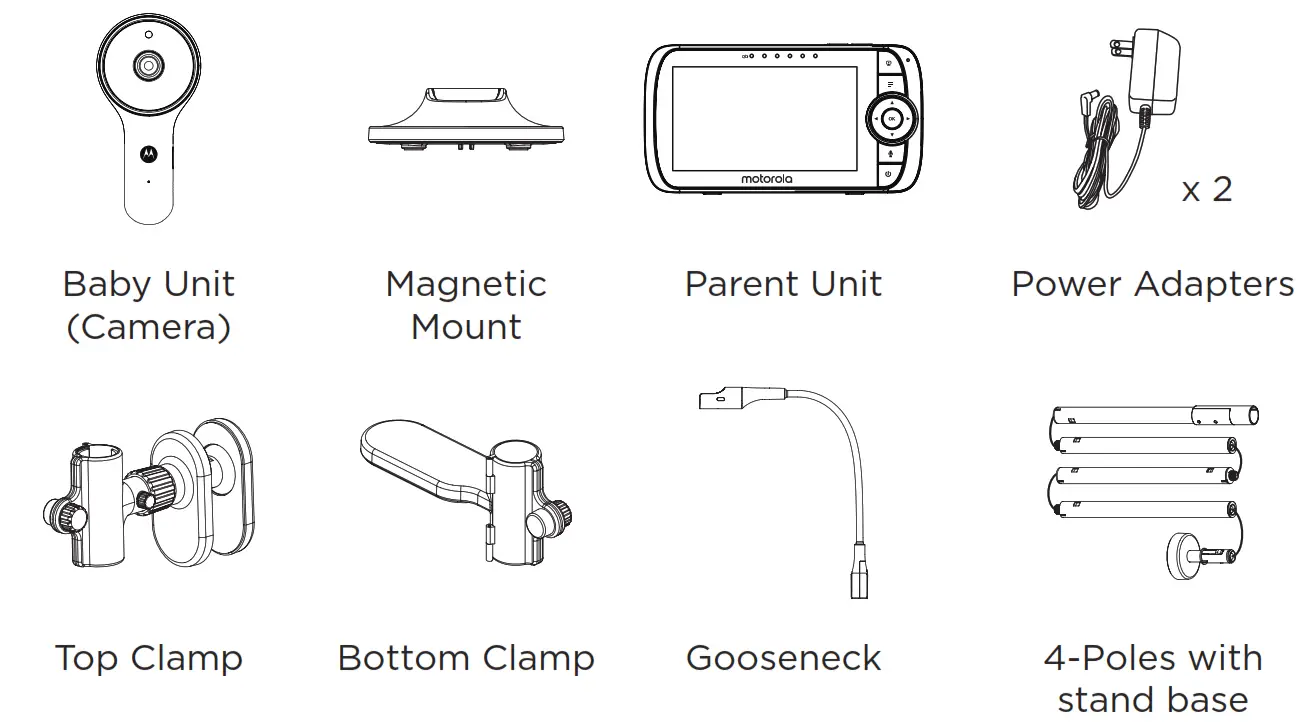
Contents Inside Box
 WARNING:Strangulation hazard. Children have STRANGLED in cords. Keep this cord out of the reach of children (more than 1 metre away). Do not remove the tags from the AC Adapters. Only use the AC Adapters provided.
Setting up your Digital Video Baby Monitor
A. Connecting the Power Supply for the Baby Unit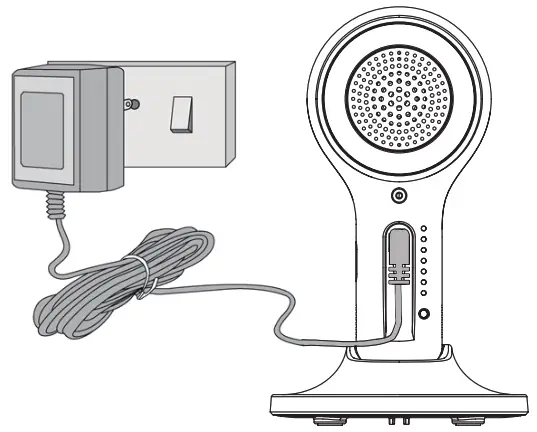
- Insert the DC plug of the power adapter into the DC socket on the back of the Baby Unit.
- Connect the other end of the power adapter to a suitable power socket.
- The baby unit turns on and the power indicator lights in Blue colour.NoteOnly use the supplied power adapter (DC5V/1000mA).
B. Fixing magnetic mount on the wall
- Mark the position of the screw holes on the wall.
- Install wall anchors (Not provided) suitable for the wall type and mounting screws if needed.
- Fasten the mounting screws (Not provided) on the wall.
- Position the cable behind the base as the picture shown before attaching the base on the wall.
 Mark the position of the screw holes on the wall.
C. Connecting the Power Supply of the Parent Unit.
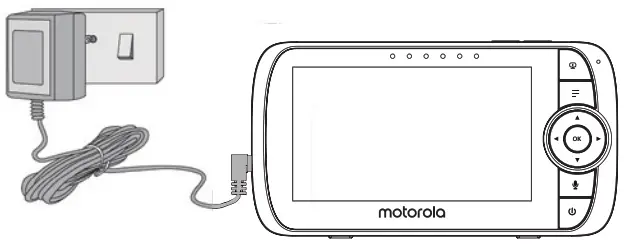
- Connect the small plug of the power adapter to the parent unit and the other end to the power socket. Only use the enclosed adapter (5VDC/1000mA).
- A rechargeable battery (Lithium ion battery 2000mAh) allows the parent unit to be used when not plugged into an power socket. The battery provides up to 5 hours operation of the Parent Unit. We recommend charging the for at least 16 hours before first use, and when the Parent Unit indicates the battery is low.
- Press and hold the POWER button on the top of the Parent Unit to turn it ON.
D. Desktop Stand of the Parent Unit
- Move the stand ring on the back of the parent unit downward.
- Recommend to rotate it by 90 degree to set up the desktop stand.
Basic operation of the keys
| Parent unit | ||
| ON/OFF button | Press and hold to switch the Parent Unit ON/OFF. | |
| UP/DOWN buttons | Press to tilt the camera image upward or downward.Press to adjust menu setting when menu is active. | |
| LEFT/RIGHTbuttons | Press to pan the camera image left or right.Press to access menu options when menu is active. | |
| MENU button | Press to open menu options or exit the menu. | |
| OK button | Press to confirm a selection. | |
| VIDEO button | Press to turn the LCD screen ON/OFF. | |
| TALK button | Press and hold to talk to your baby. | |
| Volume button | Press -/+ to select volume level of the Parent Unit. | |
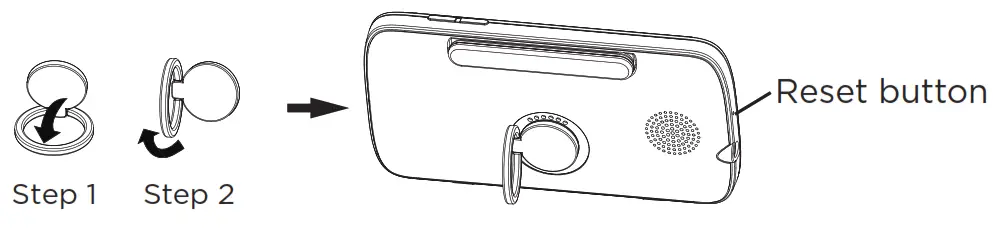
| RESET button | Press and hold with a small pin to reset the unit. | |
| Baby Unit |
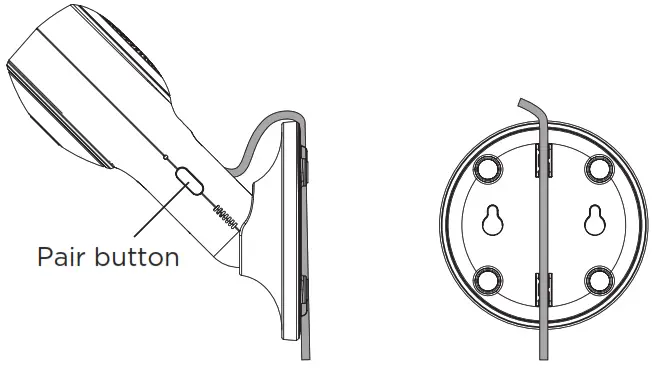
| PAIR button |
Press and hold to pair with the parent unit or Hubble Wi-Fi® Setup. |
Setting up the Baby Unit for Wi-Fi® internet viewing
A. Install Hubble Connected App.
- Scan the QR code with your smart device and download Hubble Connected App from the App Store for iOS devices or from the Google Play™ Store for Android™ devices.
- Install Hubble Connected App on your device.
B. View on Compatible Smartphones, Tablets and Computers.
- Open the Hubble Connected App on your compatible smartphone or tablet.
- Follow the in-app instructions to create your Hubble account and connect to your device.
- Log in to your account on your compatible smartphone, tablet or via https://app.hubbleconnected.com/#login on your PC to access your live camera stream.
Please take note of the following minimum system requirements:Smartphones/Tablets: iOS 9.0, Android™ 5.0Wi-Fi® requirements:At least 0.6 Mbps upload bandwidth per Smart Monitoring Companion, test your Internet speed at: http://www.speedtest.net/
Installation of Cot mount
A cot mount with cable management is included which mounts directly to most cots to allow better viewing. Assemble and install the cot mount using the following steps.
- Join the 4 poles and the support base together as the diagram shown. (Fig. 1a , 1b)Note:Each pole is connected with power cord inside, manage with care the power cords when removing the poles from the box and during installation.
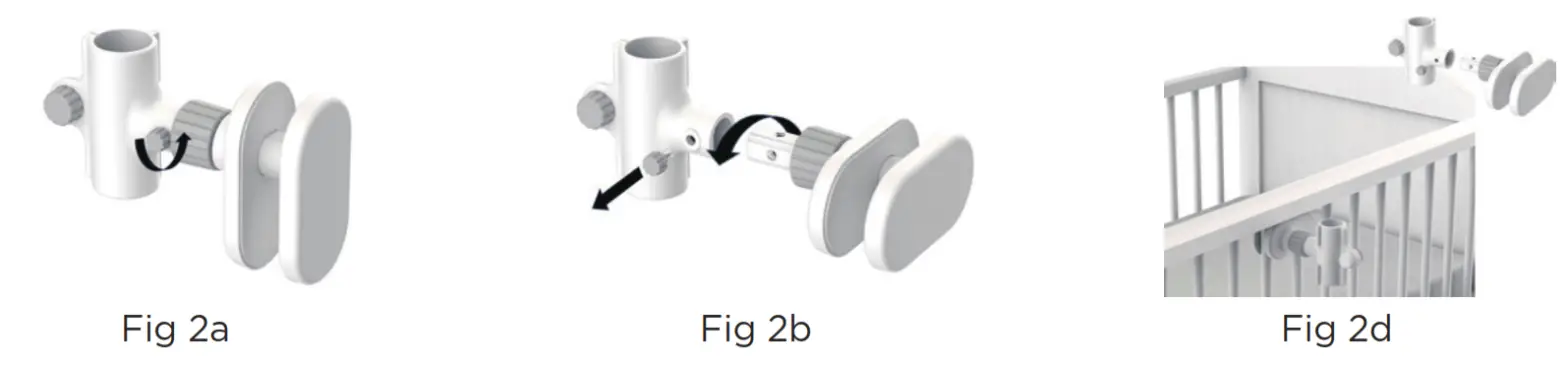
- The Top clamp is delivered by default for vertical clamping on the top rail of the cot, to clamp horizontally on the slates of the crib, please unfasten and remove the tiny knob completely from the Top Clamp assembly (Fig.2a), remove the Top Clamp from the assembly and re-orient the Top Clamp with the long open end pointing at left hand side (Fig. 2b), then reinsert into the assembly, fasten the tiny knob back to the assembly until the Top Clamp is securely locked.
- Fasten the top clamp either vertically on the upper rail or the slats horizontally. (Fig 2c, 2d)
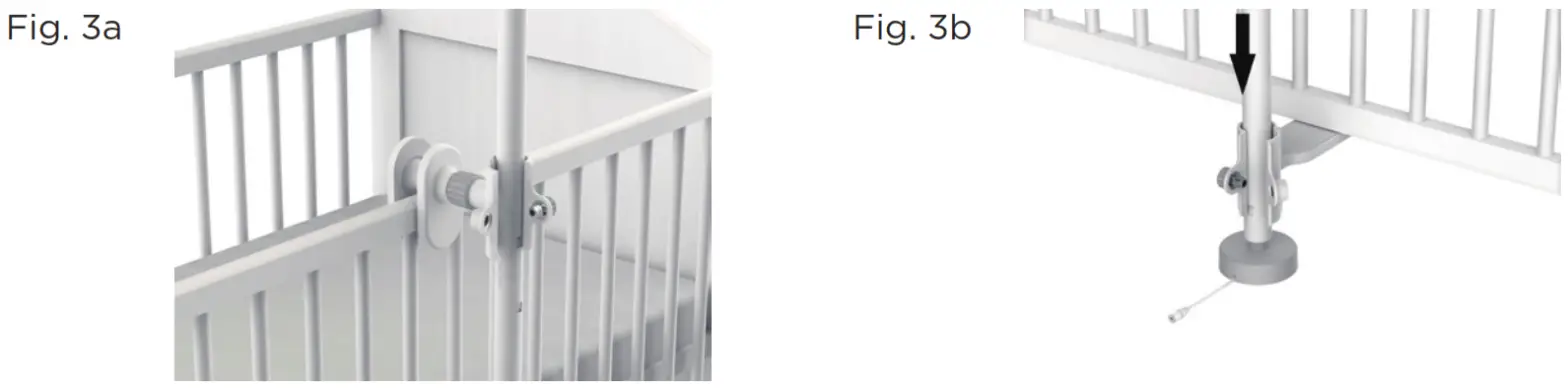
- Unlock the knob then open the top clamp and bottom clamp, move the supporting pole into the clamps. (Fig. 3a)
- Place then press the bottom clamp below against the lower rail, the stand base is spring loaded. Push the lower pole downward before closing the bottom clamp with knob. This is to allow the lower clamp to exerting clamping force on the lower rail (Fig. 3b).
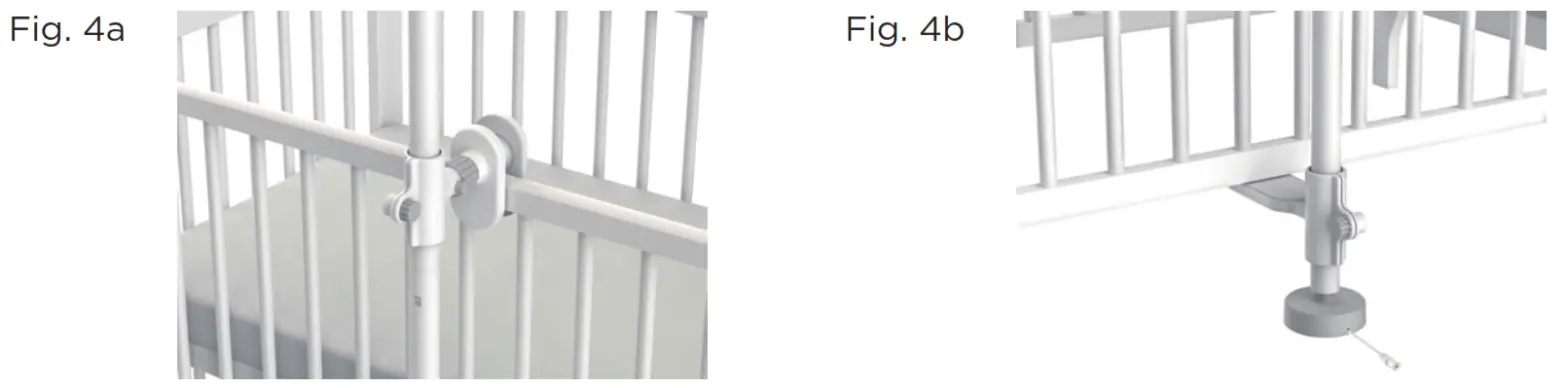
- Fasten the knobs to close the holders of the top and bottom clamps so that the support poles stand firm and straight, ensure that the supporting poles are positioned stable on the top rail or slates. (Fig. 4a,4b).
 Note:Each pole is connected with power cord inside, manage with care the power cords when removing the poles from the box and during installation.
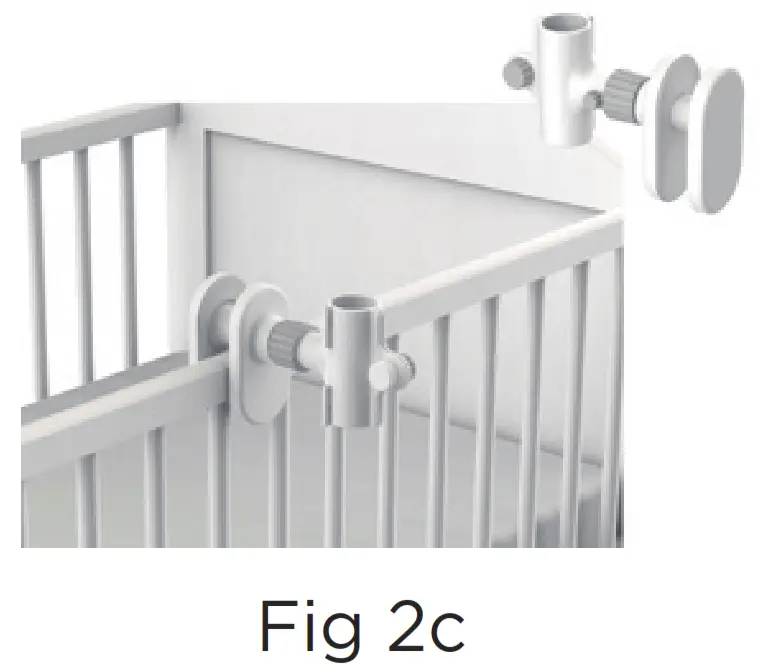
Choking Hazard:May contain Small Parts. Parents exercise caution and keep children under 5 from the installation.
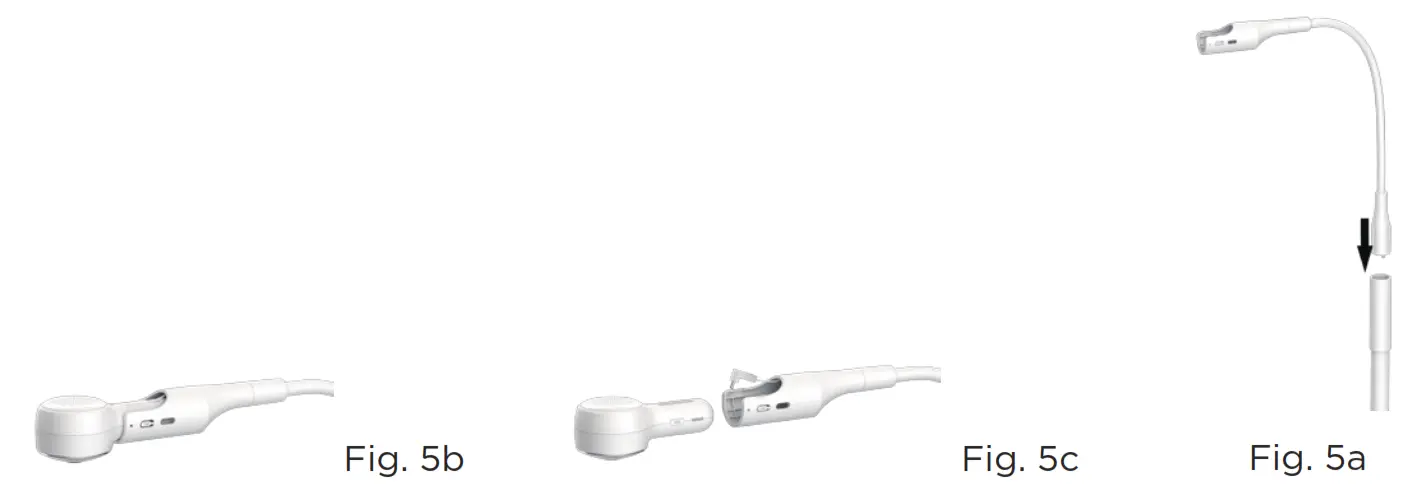
- Install the flexible gooseneck extension into the top post. You will hear the click noise when all the sections are properly connected (Fig. 5a).
- Insert the camera unit into the housing at the end of the flexible gooseneck extension, make sure the camera is magnetic mounted. Connect the power adapter plug to the camera unit power socket then close the cover (Fig. 5b, 5c)
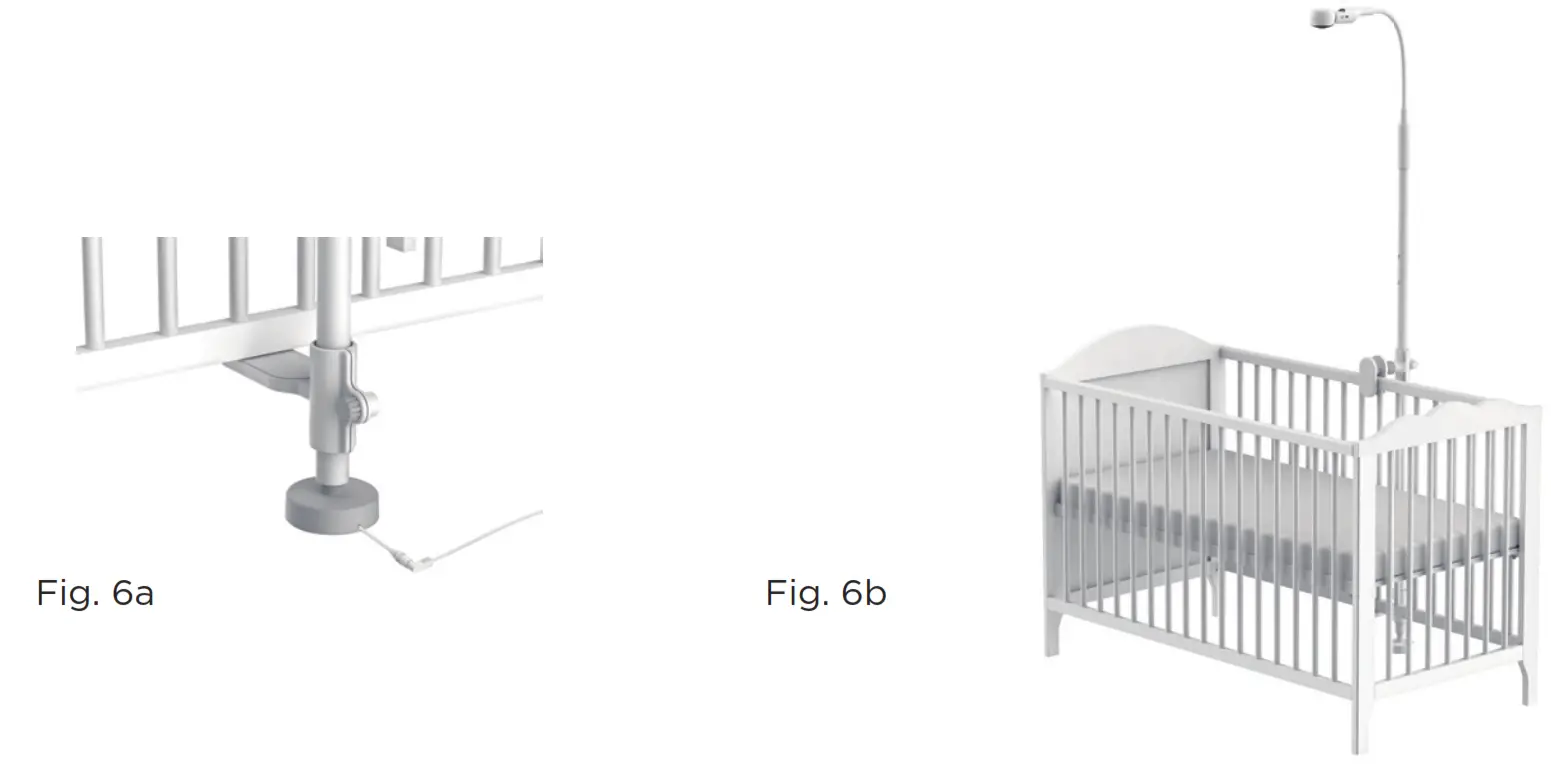
- Insert the DC plug into the power socket of the Cot mount, and connect the power adapter to a suitable power socket. (Fig. 6a).
- Power on the camera unit then view the image through the parent unit. Adjust the flexible gooseneck and select from the parent unit different zoom factor (1x, 1.5x or 2x) for optimal view over the cot (Fig. 6b).
General Information
If your product is not working properly, read this Quick Start Guide or the User’s Guide of one of the models listed on page 1.Contact Customer Service:+44 (0) 844 557 0890 (UK only)* +44 (0) 8187 62092 (ROI)(*Calls cost 7p per minute plus your telephone company’s access charge)
Consumer Products and Accessories Limited Warranty (“Warranty”)Thank you for purchasing this Motorola branded product manufactured under license by Binatone Electronics International LTD (“BINATONE”).What Does this Warranty Cover?Subject to the exclusions contained below, BINATONE warrants that this Motorola branded product (“Product”) or certified accessory (“Accessory”) sold for use with this product that it manufactured to be free from defects in materials and workmanship under normal consumer usage for the period outlined below. This Warranty is your exclusive warranty and is not transferable.THIS WARRANTY GIVES YOU SPECIFIC LEGAL RIGHTS, AND YOU MAY HAVE OTHER RIGHTS THAT VARY BY STATE, PROVINCE OR COUNTRY. FOR CONSUMERS WHO ARE COVERED BY CONSUMER PROTECTION LAWS OR REGULATIONS IN THEIR COUNTRY OF PURCHASE OR, IF DIFFERENT, THEIR COUNTRY OF RESIDENCE, THE BENEFITS CONFERRED BY THIS LIMITED WARRANTY ARE IN ADDITION TO ALL RIGHTS AND REMEDIES CONVEYED BY SUCH CONSUMER PROTECTION LAWS AND REGULATIONS. FOR A FULL UNDERSTANDING OF YOUR RIGHTS YOU SHOULD CONSULT THE LAWS OF YOUR COUNTRY, PROVINCE OR STATE.Who is covered?This Warranty extends only to the first consumer purchaser, and is not transferable.What will BINATONE do?BINATONE or its authorized distributor at its option and within a commercially reasonable time, will at no charge repair or replace any Products or Accessories that do not conform to this Warranty. We may use functionally equivalent reconditioned/ refurbished/ pre-owned or new Products, Accessories or parts.What Other Limitations Are There?ANY IMPLIED WARRANTIES, INCLUDING WITHOUT LIMITATION THE IMPLIED WARRANTIES OF MERCHANTABILITY AND FITNESS FOR A PARTICULAR PURPOSE, SHALL BE LIMITED TO THE DURATION OF THIS LIMITED WARRANTY, OTHERWISE THE REPAIR OR REPLACEMENT PROVIDED UNDER THIS EXPRESS LIMITED WARRANTY IS THE EXCLUSIVE REMEDY OF THE CONSUMER, AND IS PROVIDED IN LIEU OF ALL OTHER WARRANTIES, EXPRESS OR IMPLIED. IN NO EVENT SHALL MOTOROLA OR BINATONE BE LIABLE, WHETHER IN CONTRACT OR TORT (INCLUDING NEGLIGENCE) FOR DAMAGES IN EXCESS OF THE PURCHASE PRICE OF THE PRODUCT OR ACCESSORY, OR FOR ANY INDIRECT, INCIDENTAL, SPECIAL OR CONSEQUENTIAL DAMAGES OF ANY KIND, OR LOSS OF REVENUE OR PROFITS, LOSS OF BUSINESS, LOSS OF INFORMATION OR OTHER FINANCIAL LOSS ARISING OUT OF OR IN CONNECTION WITH THE ABILITY OR INABILITY TO USE THE PRODUCTS OR ACCESSORIES TO THE FULL EXTENT THESE DAMAGES MAY BE DISCLAIMED BY LAW.
Some jurisdictions do not allow the limitation or exclusion of incidental or consequential damages, or limitation on the length of an implied warranty, so the above limitations or exclusions may not apply to you. This Warranty gives you specific legal rights, and you may also have other rights that vary from one jurisdiction to another.
| Products Covered | Length of Coverage |
| Consumer Products | One (1) year from the date of the products original purchase by the first consumer purchaser of the product. |
| Consumer Accessories | Ninety (90) days from the date of the accessories original purchase by the first consumer purchaser of the product. |
| Consumer Products and Accessories that are Repaired or Replaced | The balance of the original warranty or for Ninety (90) days from the date returned to the consumer, whichever is longer. |
Exclusions
Normal Wear and Tear. Periodic maintenance, repair and replacement of parts due to normal wear and tear are excluded from coverage.
Abuse & Misuse. Defects or damage that result from: (a) improper operation, storage, misuse or abuse, accident or neglect, such as physical damage (cracks, scratches, etc.) to the surface of the product resulting from misuse; (b) contact with liquid, water, rain, extreme humidity or heavy perspiration, sand, dirt or the like, extreme heat, or food; (c) use of the Products or Accessories for commercial purposes or subjecting the Product or Accessory to abnormal usage or conditions; or (d) other acts which are not the fault of MOTOROLA or BINATONE, are excluded from coverage. Use of Non-Motorola branded Products and Accessories. Defects or damage that result from the use of Non-Motorola branded or certified Products or Accessories or other peripheral equipment are excluded from coverage.
Unauthorized Service or Modification. Defects or damages resulting from service, testing, adjustment, installation, maintenance, alteration, or modification in any way by someone other than MOTOROLA, BINATONE or its authorized service centers, are excluded from coverage. Altered Products. Products or Accessories with (a) serial numbers or date tags that have been removed, altered or obliterated; (b) broken seals or that show evidence of tampering; (c) mismatched board serial numbers; or (d) nonconforming or non-Motorola branded housings, or parts, are excluded from coverage.Communication Services. Defects, damages, or the failure of Products or Accessories due to any communication service or signal you may subscribe to or use with the Products or Accessories is excluded from coverage.
How to Obtain Warranty Service or Other Information?To obtain service or information, please call:+44 (0) 844 557 0890 (UK only)* +44 (0) 8187 62092 (ROI)
(*Calls cost 7p per minute plus your telephone company’s access charge)You will receive instructions on how to ship the Products or Accessories at your expense and risk, to a BINATONE Authorized Repair Center.
To obtain service, you must include: (a) the Product or Accessory; (b) the original proof of purchase (receipt) which includes the date, place and seller of the Product; (c) if a warranty card was included in your box, a completed warranty card showing the serial number of the Product; (d) a written description of the problem; and, most importantly; (e) your address and telephone number.These terms and conditions constitute the complete warranty agreement between you and BINATONE regarding the Products or Accessories purchased by you, and supersede any prior agreement or representations, including representations made in any literature publications or promotional materials issued by BINATONE or representations made by any agent, employee or staff of BINATONE, that may have been made in connection with the said purchase.
Disposal of the Device (environment) At the end of the product life cycle, you should not dispose of this product with normal household waste. Take this product to a collection point for the recycling of electrical and electronic equipment. The symbol on the product, user’s guide and/or box indicates this. Some of the product materials can be re-used if you take them to a recycling point. By reusing some parts or raw materials from used products you make an important contribution to the protection of the environment. Please contact your local authorities in case you need more information on the collection points in your area.
CE DECLARATIONThis product is in compliance with the essential requirements and other relevant provisions of the RED Directive 2014/53/EU.Download User Guide from website: www.motorolastore.com/support
 report this ad
Manufactured, distributed or sold by Binatone Electronics International LTD., official licensee for this product. MOTOROLA and the Stylised M logo are trademarks or registered trademarks of Motorola Trademark Holdings, LLC. and are used under license. Apple logo is trademark of Apple Inc., registered in the U.S. and other countries. App Store is a service mark of Apple Inc. Google Play and Android are trademarks of Google Inc. Wi-Fi is a trademark of the Wi-Fi Alliance. All other trademarks are the property of their respective owners. © 2020 Motorola Mobility LLC. All rights reserved.
Printed in ChinaUK_EN Version 3.0
References
[xyz-ips snippet=”download-snippet”]