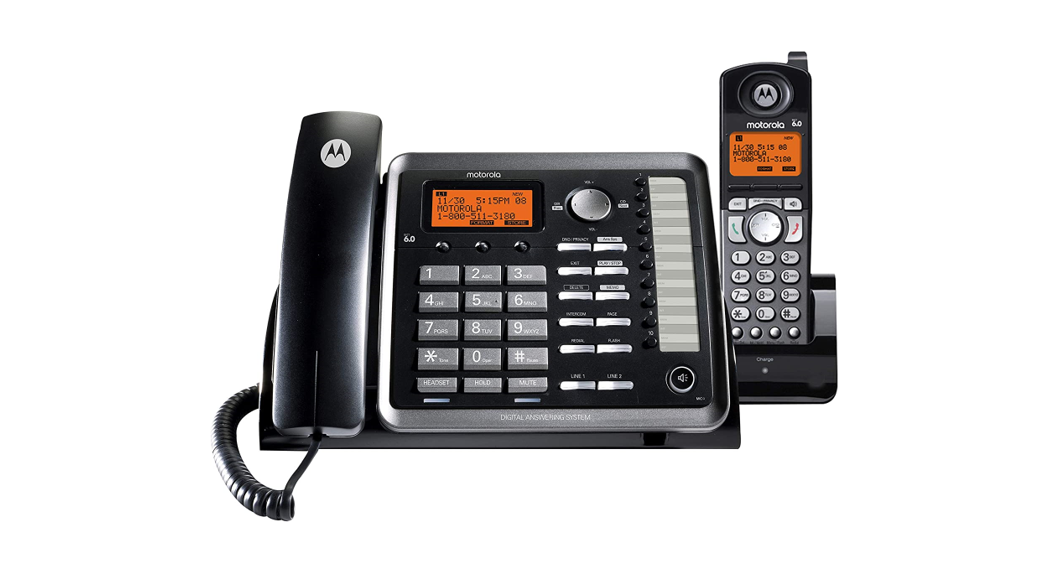
Motorola ML252542-Line Corded Base Station withDigital Answering SystemQuick Start Guide
Digital Answering System cont.
Record your greeting after the beep. Press FINISH softkey to end the recording. The greeting will playback for you and automatically save. If you are not satisfied, simply select the OGA RECORD option again and re-record.
Setting Outgoing Message (OGA)From the ANSWERING SYS. menu:
- Using VOL + and VOL – of the navigation button to scroll to SET OGA. Press SELECT softkey.
- Using VOL + and VOL – of the navigation button to scroll to LINE 1 or LINE 2 and press the SELECT softkey.
- Using VOL + and VOL – of the navigation button to scroll to your selection.
- Press SELECT soft key to save your selection. If there is no recording for the selected OGM, the screen will display EMPTY.
NOTEDEFAULT is the original pre-recorded OGA.ANNOUNCE ONLY will play the greeting message to the caller but will not be allocable to leave a message.TIMED will allow you to set two different greetings, one for office hours and one after your business has closed.
Manufactured, distributed, or sold by Meizhou Guo Wei Electronics Co. LTD., the official licensee for this product. MOTOROLA and the Stylized M Logo are trademarks or registered trademarks of Motorola Trademark Holdings, LLC. and are used under license. All other trademarks are the property of their respective owners. © 2020 Motorola Mobility LLC. All rights reserved.Issue 1.3 (EN-US)
Digital Answering System
Turning Answering System On/OffYou can set the Answering System On or Off for each telephone line individually.To set your Answering System:1. Press and hold Ans Sys for 2 seconds, the screen will display the ON/OFF STATUS setting menu.The option is also available in the ANSWERING SYS. menu.
- In idle mode, press MENU softkey to go to the main menu.
- Using VOL + and VOL – of the navigation button to scroll to ANSWERING SYS. Press SELECT softkey.
- Using VOL + and VOL – of the navigation button to scroll to ON/OFF STATUS. Press SELECT softkey.2. Using VOL + and VOL – of the navigation button to scroll to LINE 1 or LINE 2 and press the SELECT softkey.3. Using VOL + and VOL – of the navigation button to scroll to ON or OFF.4. Press SELECT softkey to save your selection.
Recording a Greeting
From the ANSWERING SYS. or ANSWERING SYSTEM menu:
- Using VOL + and VOL – of the navigation button to scroll to OGA RECORD. Press SELECT softkey.
- Using VOL + and VOL – of the navigation button to scroll to LINE 1 or LINE 2 and press SELECT softkey.
- Using VOL + and VOL – of the navigation button to scroll to the OGA type you want to record over and press SELECT softkey.
- There are 4 types of OGA to select from PERSONAL, ANNOUNCE ONLY, WORK HOURS, and AFTER HOURS.
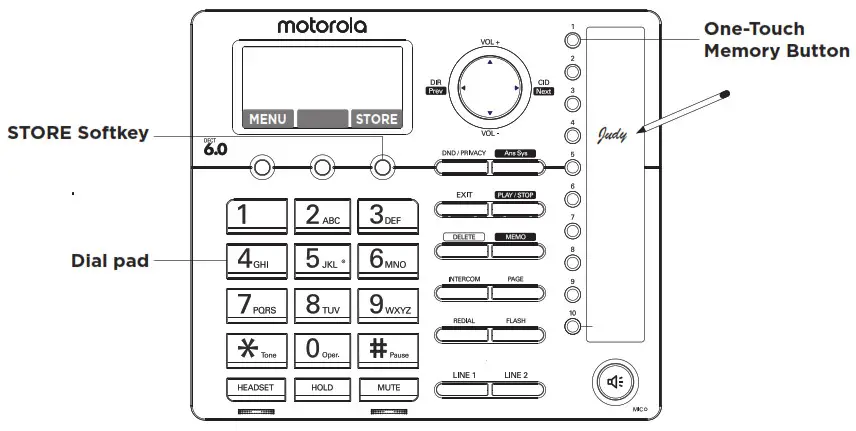
Adding a Directory Entry / One-Touch MemoryTo program a One-Touch Memory button:
- Press STORE soft key to access the feature.
- Press the One-Touch Memory button to be programmed.
- The screen will display ENTER NAME:
- Using the dial pad to enter the name and press SAVE softkey.
- The screen will display ENTER NUMBER:
- Using the dial pad to enter the number and press SAVE softkey to complete.
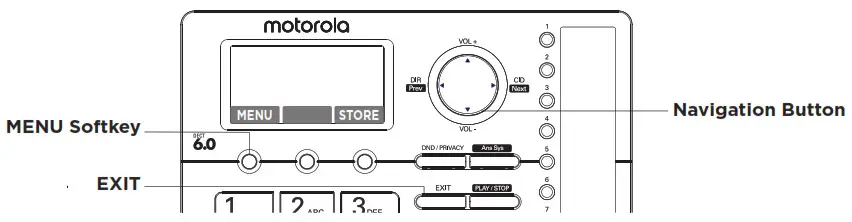
- Press MENU soft key to access the feature and setup menus.
- Using VOL + and VOL – of the navigation button to change your selection onthe menu.
- Press SELECT soft key to enter menus or make selections.
- Press BACK softkey to return to a previous menu or EXIT button to return tothe idle screen.
NOTEThe base displays the current date, time, and softkey labels. The softkey labels will change according to the status of the unit. The base display has a dedicated SET CLOCK icon flashing when the clock is not set. Go to PHONE SETTINGS – DATE/TIME to set the clock.
Base Layout
report this ad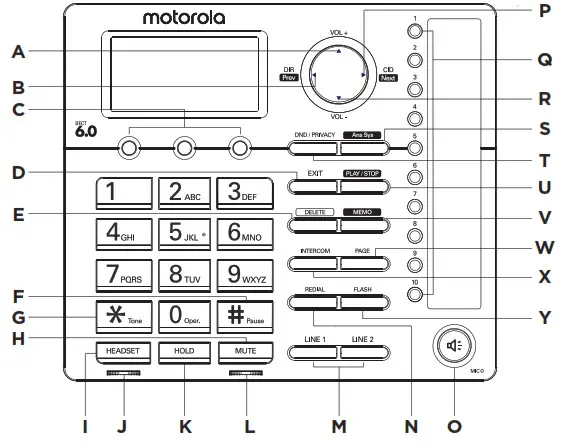
| A Volume + | N Redial Record |
| B Directory | O Speakerphone |
| C 3 Softkeys | P Caller ID Record |
| D Exit | Q One-Touch Memory (1-10) Buttons |
| E Delete | R Volume – |
| F # Pause | S Answering System Button / Indicator |
| G * Tone | T DND / Privacy Button / Indicator |
| H Mute | U Play / Stop |
| I Headset | V Memo |
| J Headset LED Indicator | W Page |
| K Hold | X Intercom |
| L Mute LED Indicator | Y Flash |
| M Line 1, Line 2 Buttons / Indicators |
[xyz-ips snippet=”download-snippet”]