motorola NNTN6899 Multi-Unit Charger User Guide
IMPORTANT SAFETY INSTRUCTIONS SAVE THESE INSTRUCTIONS
This document contains important safety and operating instructions. Please read these instructions carefully and save them for future reference.
Before using the battery charger, read all the instructions and cautionary markings on (1) the charger, (2) the battery, and (3) on the radio using the battery.
![]() WARNINGS
WARNINGS
- To reduce risk of injury, charge only the rechargeable Motorola Solutions authorized batteries listed in Table 1. Other batteries may explode, causing personal injury and damage.
- Use of accessories not recommended by Motorola Solutions may result in risk of fire, electric shock, or injury.
- To reduce risk of damage to the electric plug and cord, pull by the plug rather than the cord when disconnecting the charger.
- An extension cord should not be used unless absolute necessary. Use of an improper extension cord could result in risk of fire and electric shock. If an extension cord must be used, make sure that the cord size is 18 AWG for lengths up to 100 feet (30.48 m), and 16 AWG for lengths up to 150 feet (45.72 m).
- To reduce risk of fire, electric shock, or injury, do not operate the charger if it has been broken or damaged in any way. Take it to a qualified Motorola Solutions service representative.
- Do not disassemble the charger. It is not repairable and replacement parts are not available. Disassembly of the charger may result in risk of electrical shock or fire.
- To reduce risk of electric shock, unplug the charger from the AC outlet before attempting any maintenance or cleaning
OPERATION SAFETY GUIDELINES
- Turn radio off when charging battery.
- This equipment is not suitable for outdoor use. Use only in dry locations/conditions.
- Connect equipment only to an appropriately fused and wired supply of the correct voltage (as specified on the product).
- Disconnect from line voltage by removing mains plug.
- The socket outlet to which this equipment is connected should be close by and easily accessible.
- In equipment using fuses, replacements must comply with the type and rating of the original equipment.
- Maximum ambient temperature around the power supply equipment must not exceed 40 °C (104 °F).
- Make sure the cord is located where it will not be stepped on, tripped over, or subjected to water, damage, or stress.
The Multi-Unit Charger is compatible with both the standard and high capacity battery. The radios and batteries listed in Table 1 are approved for use with the Multi-Unit Charger.
Table 1. Authorized Radios and Batteries
| Part Number | Description | Charging Pocket |
| MTP850–All
Models |
TETRA Hand Portable Terminal | NNTN6845* NNTN6848* |
| MTH800–All
Models |
TETRA Hand Portable Terminal | NNTN7006* NNTN7010* |
| FTN6573 | Lithium Ion Battery for MTP850
– Standard (950 mAh) |
NNTN6846* |
| FTN6574 | Lithium Ion Battery for MTP850
– High Capacity (1850 mAh) |
NNTN6846* |
| SNN5705 NNTN6922 | Lithium Ion Battery for MTH800
– Standard (800 mAh) |
NNTN7007* |
| PMNN4351 | Lithium Ion Battery for MTP850
–Standard CE (1840 mAh) |
NNTN6846* |
| NNTN4655 NNTN6923 | Lithium Ion Battery for MTH800
– High Capacity (1500 mAh) |
NNTN7007* |
| PMNN4084 | Lithium Ion Battery for TCR1000 Extended Battery – Standard (1800 mAh) | NNTN7648* |
| SNN5784 | Lithium Ion Battery for TCR1000 – Standard (880 mAh) | NNTN7648* |
| MTP3100 MTP3200 MTP3250 MTP6550 MTP8750 MTP8850 | TETRA Hand Portable Terminal | NNTN8144 NNTN8145 NNTN8146 NNTN8147 NNTN8148 NNTN8149 NNTN8150 |
| MXP600 | PMNN4801 Lithium Ion Battery IMPRES 2 IP68 1900T
PMNN4802 Lithium Ion Battery IMPRES 2 IP68 3400T PMNN4582 Lithium Ion Battery IMPRES 2 IP68 2900T |
NNTN8144 NNTN8145 NNTN8146 NNTN8147 NNTN8148 NNTN8149 NNTN8150 |
| NNTN8020 | Lithium Ion Battery For – Standard (1650 mAh) | NNTN8151 NNTN8152 NNTN8153 NNTN8155 NNTN8156 NNTN8157 |
| NNTN8023 | Lithium Ion Battery For – High Capacity (2150 mAh) | NNTN8151 NNTN8152
NNTN8153 NNTN8155 NNTN8156 NNTN8157 |
| PMNN4522 | IMPRES 2 Lithium Ion Battery For – High Capacity (3400 mAh) | NNTN8151
NNTN8152 NNTN8153 NNTN8155 NNTN8157 |
This is a class A equipment. In a domestic environment this product may cause radio interference in which case the user may be required to take adequate measures.
Power Sources
Only Motorola Solutions authorized line cords listed in Table 2 should be used with the Multi-Unit Charger.
Table 2. Authorized Line Cords
| Line Cord Part Number | Description |
| 3087791G16 | Korean Line Cord |
| 3087791G07 | UK Line Cord |
| 3087791G04 | Euro Line Cord |
| 3087791G10 | Australia Line Cord |
| 3087791G13 | Argentina Line Cord |
| 3087791G01 | US Line Cord |
| 3087791G20 | AC Power Cord, JP, 125VAC 7A |
| CB000460A01 | Power Cord, China |
DESCRIPTION
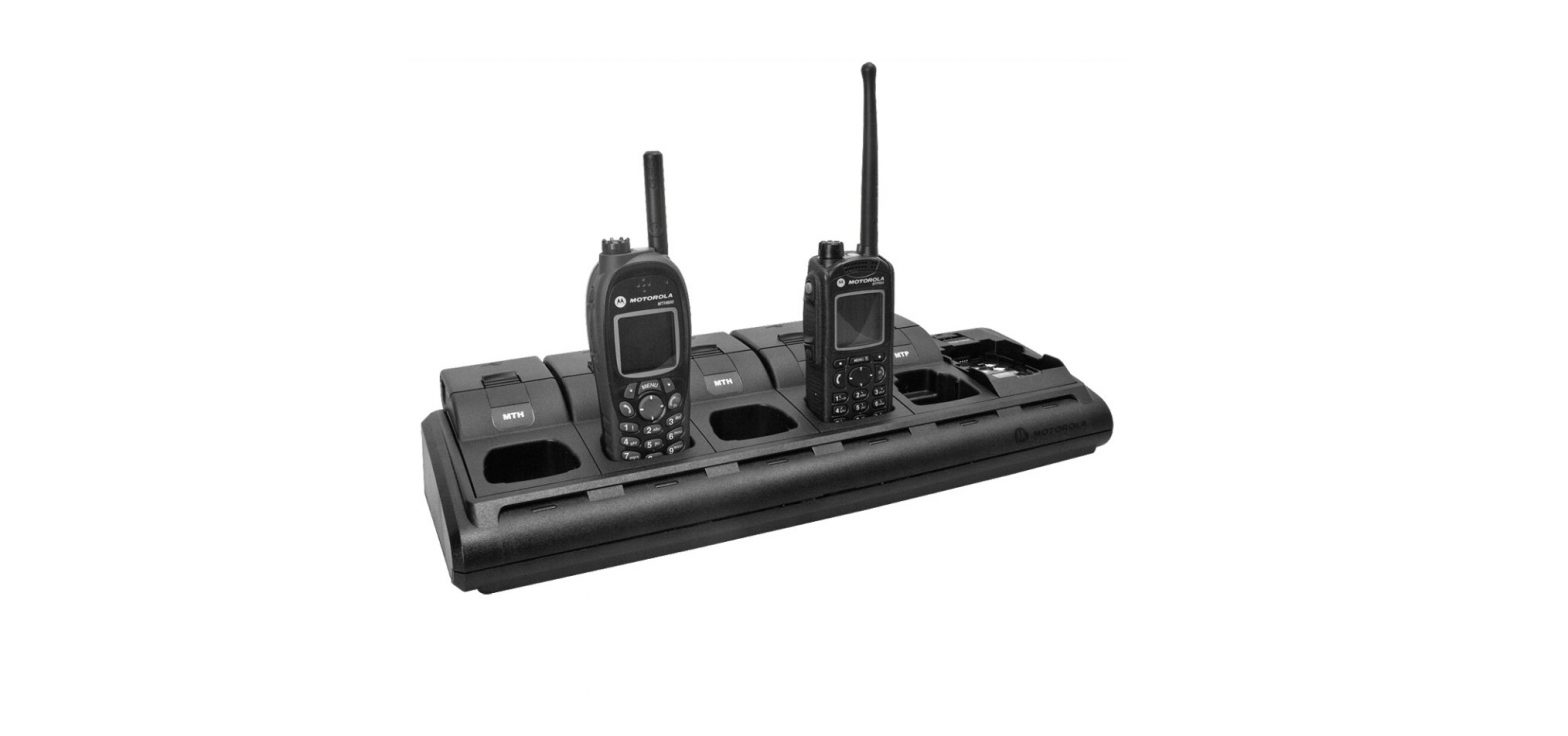
The Multi-Unit Charger comprises of a base unit which accommodates six charging locations. Each charging location is fitted with a charging pocket. The kit contains:
- 1 Multi-Unit Charger Base unit
- 6 Radio pockets or 6 Battery pockets *
- 1 Regional line cord
- 1 User Guide
To mix and match battery and radio charging, individual charging pockets have to be ordered separately from your local Motorola Solutions dealer to retrofit the Multi-Unit Charger. See Table 1 for approved charging pocket part numbers.
OPERATING INSTRUCTIONS
The Multi-Unit Charger will charge only Motorola Solutions authorized radios and batteries listed in Table 1. Prior to operating the charger, check that all radio and battery inserts are in place and properly latched.The Multi-Unit Charger can charge up to six radios or batteries (in any combination) listed in Table 1.Note: Prior to charging a battery with radio, turn the radio off.
Setting Up the Charger:
- Install the desired combination of radio or battery pockets securely into the six available locations on the charger. To install, place the tabs on the bottom of the pocket into the slots on the charger base and press the top of the pocket into the latch until a positive click is heard and felt. Any combination of six pockets may be selected and installed.Note: To ensure proper installation, press the latch down into position to seat the insert into the MUC base, make sure all six locations have pockets installed. Attempting to use the charger with missing pockets will allow foreign objects to cause the charger to malfunction.
- Plug the line cord into the rear of the Multi-Unit Charger and the plug into an appropriate AC outlet. The charger performs a quick power-up routine during which the LED indicators of each of the six charger pockets will flash once to indicate a successful power-up of that pocket.Note: The cooling fan begins running when the unit is plugged in and will remain running while the unit is powered. For Radio Charging:
- Insert a radio with battery (radio turned off) into the charger pocket and press down firmly until the connector on the bottom of the radio is mated to the connector on the charger. You will feel a slight snap when connection is made. Once the radio is properly engaged, the pocket LED illuminates. After 15 seconds, the LED will indicate that charging has started. To remove the radio after charging, hold down on the charger base and lift the radio straight up out of the pocket. The connector will automatically release.Note: To ensure the radio is properly charged, make sure the radio is inserted into the plug by firmly pushing down the radio into the base.General Limitations:
- Radio will not start in Charge Mode (no charging) if the radio is OFF and battery voltage is above 4.1 V
- Radio will not start in Charge Mode (but trickle charging will run in the background) if the radio is OFF and battery voltage is below 3.4 V
For Battery Only Charging:
- Insert a battery into the battery pocket by placing the top of the battery into the pocket and engage the holding features in the pocket. Press down on the bottom of the battery to engage the latch. After 15 seconds, the LED will indicate that charging has started. To remove the battery after charging, hold down on the charger base and lift the battery up via its top latch.
LED Indicator Status
When the radios and batteries are properly seated in the pockets, the charger LED will light to indicate the charging status as shown below:
| Charger Status | |
| (Radio and/or Battery) | Indicator |
| Power On | Single Blink Green |
| Rapid Charging | Steady Red |
| Top-off Charging | Blinking Green |
| Charge Complete | Steady Green |
| Battery Not Chargeable | Blinking Red |
| Waiting to Charge (Either the battery temperature is too hot or too cold, or battery voltage is too low or too high to allow Rapid Charging) | Blinking Orange |
Optional Equipment
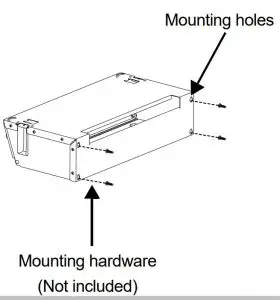
A wall mount bracket (part number: NNTN6844) or charger base tray (part number: NNTN7560) is available for the Multi-Unit Charger. Contact your local dealer to order this item. Installation is shown in the following image.
Mounting Multi-Unit Charger to Wall Bracket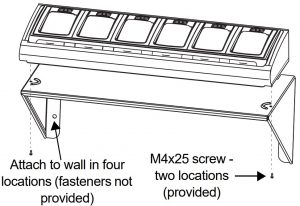
- Mount bracket to wall using appropriate fasteners in four locations (fasteners not included in kit).
- Install two M4x25 screws (included in kit) through bracket into charger base as shown. Do not over tighten the screws.
Mounting Multi-Unit Charger to Charger Base Tray
- Mounting holes are available at the back of Charger Base Tray for direct mounting to wall surfaces.
- Position the base tray in the desired position and mount the base tray to wall using appropriate fasteners in four locations (fasteners not included in kit).

 Note: The Charger Base Tray can also be mounted with the Wall Mount Bracket (NNTN6844).
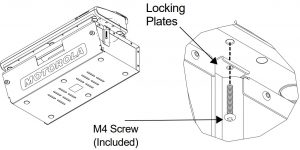
 - Pull out the locking plates at the two sides to align with the charger’s base screw holes.
- Assemble two pieces of M4 screws (included in the package through the locking plates into the charger base as shown in the picture below. Do not overtighten the screws.

TROUBLESHOOTING
| Problem | Solution |
| Charger LED status does not turn on when radio or battery is inserted |
|
| LED status changes unexpectedly or is inconsistent |
|
| Charge time appears longer than usual |
|
| Radio or battery is not charged |
|
SERVICE
The Multi-Unit Charger is not user repairable. Chargers that are not operable should be sent to an authorized Motorola Solutions Repair Center. Contact your local dealer for locations. Replacements for damaged chargers should be ordered from your local dealer as necessary.
The following user replacement items are available for order from your local dealer
Table 3. User Replacement Items
| Part Number | Description |
| NNTN6845 | Charger Radio Pocket for MTP850 |
| NNTN6846 | Charger Battery Pocket for MTP850 |
| NNTN6848 | Charger Radio Pocket With Remote Programming USB Port for MTP850 |
| NNTN7006 | Charger Radio Pocket for MTH800 |
| NNTN7007 | Charger Battery Pocket for MTH800 |
| NNTN7010 | Charger Radio Pocket With Remote Programming USB Port for MTH800 |
| NNTN7648 | Charger Battery Pocket for TCR1000 |
| NNTN8036 | Charger Radio Pocket with Remote Programming USB Port for MTP3100, MTP3200, MTP3250, MTP6550, MTP8750, and MTP8850 |
| NNTN8037 | Charger Battery Pocket for NNTN8020 and NNTN8023 |
MOTOROLA, MOTO, MOTOROLA SOLUTIONS and the Stylized M logo are trademarks or registered trademarks of Motorola Trademark Holdings, LLC and are used under license. All other trademarks are the property of their respective owners.© 2006 and 2021 Motorola Solutions, Inc.All rights reserved.
[xyz-ips snippet=”download-snippet”]

