![]() Bluetooth® Accessory Pod PMLN6396/HKLN4512
Bluetooth® Accessory Pod PMLN6396/HKLN4512
![]()
![]()
 MOTOROLA, MOTO, MOTOROLA SOLUTIONS and the Stylized M Logo are trademarks or registered trademarks of Motorola Trademark Holdings, LLC and are used under license. All other trademarks are the property of their respective owners.© 2012 and 2020 Motorola Solutions, Inc.All rights reserved. Printed inEU Contact: Motorola Solutions, Czerwone Maki 82,30-392 Krakow, Poland
BLUETOOTH ACCESSORY POD PMLN6396/ HKLN4512
Congratulations on your new Motorola Solutions Bluetooth Accessory Pod! This Pod device is designed to allow you the convenience of Bluetooth technology by simply connecting it to a Motorola Solutions swivel earpiece, enabling you to comfortably wear it in many convenient ways for long periods of time. Furthermore, the Bluetooth Pod is exclusively designed for business radio applications and optimized to work with Motorola Solutions two-way radios.This user guide contains the operation and pairing instructions of Bluetooth Pod. Before getting started, please make sure you read and understand the RF and Acoustic Safety sections, which contain very important information about this product.
FOREWORDRF Energy Exposure and Product Safety Guide for Portable Two-Way RadiosATTENTION!The radio is restricted to occupational use only to satisfy ICNIRP/FCC RF energy exposure requirements. Before using this product, read the RF Energy Exposure and Product Safety Guide that ships with the radio which contains instructions for safe usage and RF energy awareness and control for compliance with applicable standards and regulations. This device complies with part 15 of the FCC Rules and Industry Canada license-exempt RSS standard(s). Operation is subject to the following two conditions: (1) This device may not cause harmful interference, and (2) this device must accept any interference received, including interference that may cause undesired operation. Any changes or modifications not expressly approved by Motorola Solutions may void the user’s authority to operate this device. Battery Information: Battery is shipped with a nominal charge between 30% and 50%. Battery should be stored between -10 °C (14 °F) and 30 °C (86 °F) to minimize permanent capacity loss. Caution: Storing your fully charged accessory in high-temperature conditions may permanently reduce the life of the internal battery.Note: The battery is not a user-replaceable part.
Important Information:
- Do not charge your accessory in temperatures below 0 °C (32 °F) or above 45 °C (113 °F). Do not store your accessory in direct sunlight or where expected temperatures can exceed this range such as inside a parked car.
- Storing your fully charged accessory in high-temperature conditions may permanently reduce the life of the internal battery.
- Battery life may temporarily shorten in low-temperature conditions.
ACOUSTIC SAFETY
Exposure to loud noises from any source for extended periods of time may temporarily or permanently affect your hearing. The louder the radio’s volume, the less time is required before your hearing could be affected. Hearing damage from loud noise is sometimes undetectable at first and can have a cumulative effect.To protect your hearing:
- Use the lowest volume necessary to do your job.
- Turn up the volume only if you are in noisy surroundings.
- Turn down the volume before adding a headset or earpiece.
- Limit the amount of time you use headsets or earpieces at high volume.
- When using the radio without a headset or earpiece, do not place the radio’s speaker directly against your ear.
GETTING STARTED
Before you start, make sure the Pod is fully charged. Recommended charging time is three (3) hours. For detailed instructions on Pod charging, please refer to the Charging Cradle Instructions Leaflet (P/N: 68012008029).
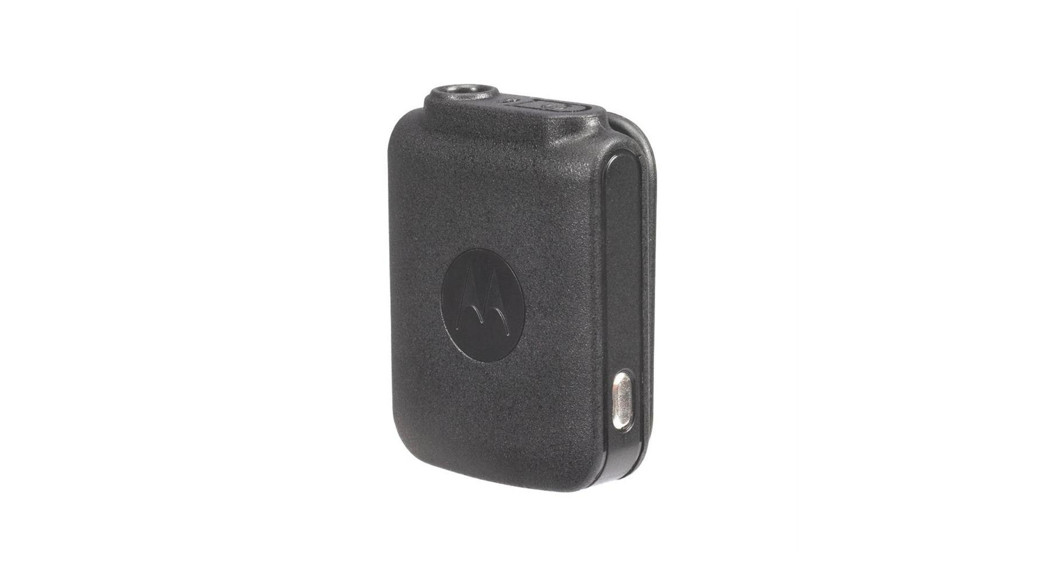
BLUETOOTH ACCESSORY POD OVERVIEW
This Bluetooth Accessory Pod is designed to be used in conjunction with the Motorola Solutions Swivel Earpiece HKLN4513 (Figure 1-A) or the Motorola Solutions Boom Microphone Earpiece HKLN4514 (Figure 1-B). The wearing positions for the Pod as shown in the drawings are for illustration purposes only and can be located at the user’s discretion. An optional In-Ear- Adapter (Figure 2) can be used with the Boom Microphone Earpiece for high noise environments.
| Number | Indication |
| 1 | 3.5 mm Audio Jack |
| 2 | Bluetooth Status Indicator |
| 3 | Power / Volume Button |
| 4 | Clip |
| 5 | Recess for Label |
| 6 | Charger Contact |
In order to connect the Swivel Earpiece, insert the earpiece audio connector into the Pod audio jack connector, making sure it is firmly attached..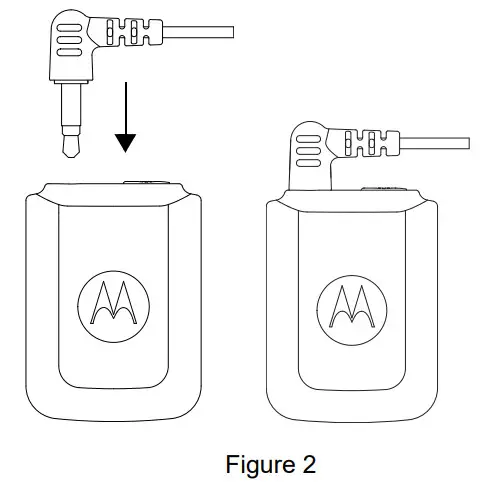 Note: Power ON the Pod only after the earpiece is inserted.
PAIRING THE POD WITH YOUR TWO-WAY RADIO
Pairing your Pod for the first time
- Before starting, make sure your two-way radio is in pairing mode.
- With the Pod off, press and hold the Pod power button until the LED is solid Blue.
- Position the Pod next to the two-way radio that you want to pair.
- Pod will provide a voice prompt to indicate a successful connection.
- Refer to the table below for additional LED status indications.
Clearing/Erasing Pairing Information
- Ensure the previous connected two-way radio is turned off.
- Turn off the Pod.
- Long press the power button until you hear a voice prompt “Pairing Cleared”.
- LED will show solid Blue, indicating the Pod is in pairing mode.
BLUETOOTH POD STATUS LED INDICATORS
| State | LED Indication | |
| Power | Power ON (LED ON) (press and hold for 1 second) | Solid Green LED for 3 seconds then OFF |
| Power OFF (Press and hold for 3 seconds) | Flashing Red LED 3 times then OFF | |
| BT Status | Pairing Mode | Solid Blue LED |
| BT Connecting | Flashing Green LED | |
| Pairing Fail/Timeout | Flashing Purple LED for 2 z seconds | |
| Wireless LinkConnected With Host | Flashing Blue LED every 5 seconds | |
| Wireless Link Disconnected From Host | Fast Flashing Blue LED | |
| Battery | Low | Flashing Red LED every 2 minutes |
| Charging | Charging | Solid Red LED |
| Fully Charged | Solid Green LED |
CHARGING YOUR DEVICE
The Pod can be charged with Motorola Solutions Bluetooth Pod Charging Cradle (PMLN6428/ HKLN4509).Note: For assuring proper operation, DO NOT power on the Pod while charging.
CHANGING YOUR POD VOLUME
 report this ad
To change Pod volume:
- After the Pod is connected to the radio, select the Pod volume range (high, medium, and low).
- Cycle through to the desired volume range with sequential short presses (less than 1 second) of the power button.
- If the Pod is used with a CLP radio, the CLP radio up/down volume controls a finer resolution volume adjustment within each Pod volume range. Consult CLP user manual for accessing radio volume up/down control.
- If the Pod is used with any other Motorola Solutions radio, volume is adjusted only on the Pod as described in Step 2.
WARRANTY
Motorola Solutions offers a standard one (1) year warranty. Contact your Motorola Solutions dealer for detailed information on the standard warranty.Note: Warranty is void after customer replacement of any parts other than replacement parts listed. For more information about this product, please contact your Motorola Authorized Dealer or visit us at: www.motorolasolutions.com/bluetoothaccessories
[xyz-ips snippet=”download-snippet”]