
MULTI-UNIT CHARGER KITSPMPN4095A
IMPORTANT SAFETY INSTRUCTIONS
This document contains important safety and operating instructions. Please read these instructions carefully and save them for future reference.Before using the battery charger, read all the instructions and cautionary markings on (1) the charger, (2) the battery, and (3) the radio using the battery.
- To reduce the risk of damage to the power cords, pull the plug rather than the cord when disconnecting from the AC outlet or the charger.
- An extension cord should not be used unless absolutely necessary. Use of an improper extension cord could result in a risk of fire and electric shock. If an the extension cord must be used, make sure that the cord size is 18 AWG for lengths of up to 6.5 feet (2.0 m), and 16 AWG for lengths up to 9.8 feet (3.0 m).
- To reduce the risk of fire, electric shock, or injury, do not operate the charger if it has been broken or damaged in any way. Take it to a qualified Motorola Solutions service representative.
- Do not disassemble the charger. It is not repairable and replacement parts are not available. Disassembly of the charger may result in risk of electric shock or fire.
- To reduce the risk of electric shock, unplug the charger power cord from the AC outlet before attempting any maintenance or cleaning.
- To reduce the risk of injury, charge only the rechargeable Motorola authorized batteries listed in Table 3. Other batteries may explode, causing personal injury and damage.
- Use of accessories not recommended by Motorola Solutions may result in a risk of fire, electric shock, or injury.
OPERATIONAL SAFETY GUIDELINES
- This equipment is not suitable for outdoor use. Use only in dry locations and conditions.
- Maximum ambient temperature around the charger must not exceed 40 °C (104 °F).
- The radio can be turned ON only when it is transmitting data wirelessly, such as using Wi-Fi. Otherwise, turn OFF the radio.
- Connect the charger to the power supply listed in Table 4 with an appropriate power cord listed in Table 5.
- The AC outlet to which the power cord is connected should be close and easily accessible.
- Make sure the power cord is located where it will not be stepped on, tripped over, or subjected to water, damage, or stress.
- Connect the power cord only to an appropriately fused and wired AC outlet with the correct voltage, as specified on the product.
- Disconnect from line voltage by removing the power cord from the AC outlet.
- Multi-Unit Charger will charge the batteries listed in Table 3, when used in conjunction with Pockets in Table 2. The batteries are charged only when attached to a radio.
CHARGER SPECIFICATION
Input: 15 V ![]() 13.4 AOutput: 5 V
13.4 AOutput: 5 V![]() 1.5 A x 12 Pockets
1.5 A x 12 Pockets
Table 1: Multi-Unit Charger
| Kit Number | Description | Communication Module |
| PMPN4095_ | ST7000 Multi-Unit Charger | Not supported |
Table 2: Multi-Unit Charger Pockets(compatible with Charger(s) in Table 1)
| Part Number | Description |
| AS000030A01 | CHARGER POCKET TRI UNIT DEVICE PROGRAM iTM |
Table 3: Motorola Solutions Authorized Batteries
| Part Number | Description |
| PMNN4510A | EXTERNAL 201W POWER SUPPLY |
Table 5: Motorola Solutions Authorized Power Cords
| Part Number | Description |
| 3087791G01 | Power Cord, the UNITED STATES / NORTH AMERICA |
| 3087791G04 | Power Cord, EUROPE |
| 3087791G07 | Power Cord, the UNITED KINGDOM / HONG KONG |
| 3087791G10 | Power Cord, AUSTRALIA/ NEW ZEALAND |
| 3087791G13 | Power Cord, ARGENTINA |
| 3087791G16 | Power Cord, KOREA |
| 3087791G20 | Power Cord, JAPAN |
| 3087791G22 | Power Cord, BRAZIL |
| CB000199A01 | Power Cord, CHINA |
| CB000805A01 | Power Cord, TAIWAN |
CHARGER OVERVIEW
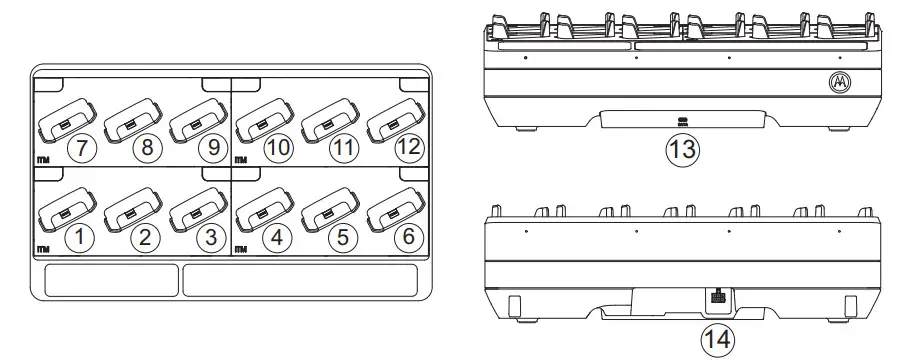
| 1-6 | Pocket #1 through Pocket #6 |
| 7-12 | Pocket #7 through Pocket #12 |
| 13 | Communications Module |
| 14 | DC Inlet Socket |
OPERATING INSTRUCTIONS
- Batteries charge best at room temperature.
- Batteries to be attached to a radio.
CHARGING PROCEDURE
- Place the Multi-Unit charger on a flat surface.
- Firmly insert the power supply into the charger DC Inlet Socket at the back of the charger.
- Plug the power supply power cord into a matching power outlet.
- Insert the radio with the attached battery into an available pocket.
- When the radio with the attached battery is properly seated in the pocket, the charging status will be indicated by the radio display indicator and the LED charging indicator on the radio.
- The radio with attached battery is ready for use when the radio display indicates
Fully Charged and the LED charging indicator shows Green.Note: Grip the radio body when inserting or removing the radio from the charger.Avoid pulling the radio antenna when removing the radio.The complete online user guide is available at https://businessonline.motorolasolutions.com.
OPTIONAL EQUIPMENT
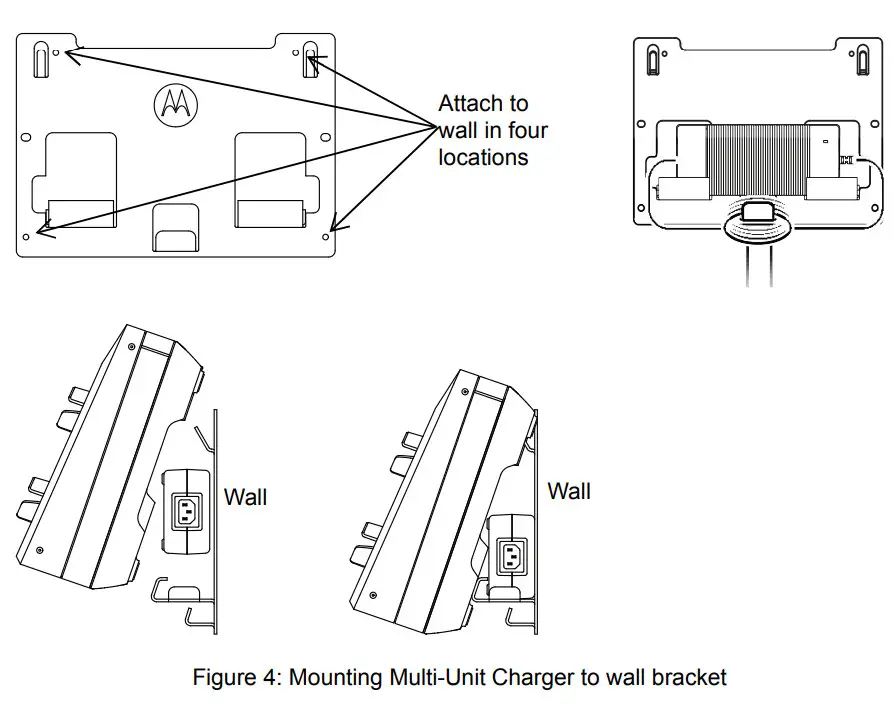
A wall mount bracket (Part Number: BR000270A01) is available for the Multi-Unit Charger.Contact your local dealer to order this item. Installation is shown below.
- This wall mount bracket should be installed by a trained and experienced technician. Having the product installed by a nonspecialized technician is very dangerous, and can cause damage or injury.
- Do not install the product where the weight cannot be supported. If the strength of the location where the wall mount is installed is not strong enough, it can fall off and cause an injury.
- Do not install on a structure that is prone to vibration, movement, or chance of impact.

Mounting Multi-Unit Charger to Wall Bracket
- Position the wall mount bracket in the desired position, and mark the location of the mounting holes on the wall surface.Ensure the area behind the mounting surface is always free of electrical wires, cables, and pipes before cutting, drilling, or installing the mounting screws.
- Mount bracket to the wall using the appropriate mounting hardware required for the type of wall material fixture it is being mounted to. Drill based on the marked mounting holes on the wall surfaces.
- Secure the wall bracket in position by installing mounting hardware over the mounting holes on the wall bracket tightly.Note: It is recommended to use 10-16×1-1/2” tapping screw and washer (not included) on wood stud and solid-flat concrete/brick wall.
- Hang the Multi-Unit Charger on the wall bracket as shown in Figure 4.
MOTOROLA, MOTO, MOTOROLA SOLUTIONS, and the Stylized M Logo are trademarks or registered trademarks of Motorola Trademark Holdings, LLC and are used under license. All other trademarks are the property of their respective owners.© 2016 and 2020 Motorola Solutions, Inc. All rights reserved.
Notes
Motorola Solutions Malaysia Sdn. Bhd. (Co. No. 455657-H)Plot 2A, Medan Bayan LepasMukim 12, S.W.D.11900 Bayan Lepas, Penang.Malaysia.
EU Contact:Motorola Solutions,Czerwone Maki 82,30-392 Krakow,Polandhttps://www.businessonline.motorolasolutions.com
 report this ad
Printed in
References
[xyz-ips snippet=”download-snippet”]