 ST7000QUICK START GUIDE


Controls and Indicators
- Battery Cover

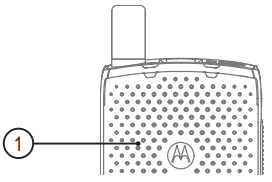
- Top Microphone
- Power Button
- LED Power Indicator
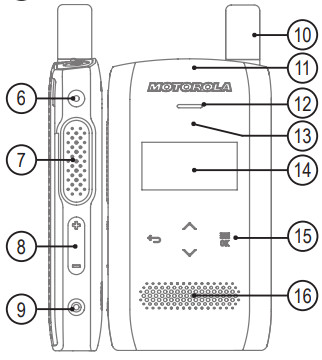
- Talkgroup Selector

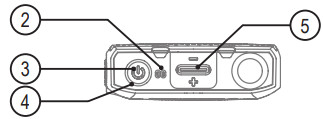
- P1 Programmable Button/Emergency Button
- Push-to-Talk Button (PTT)
- Volume Button
- P2 Programmable Button
- Hybrid Antenna
- LED Coverage Indicator
- Earpiece
- Proximity Sensor
- PMOLED Display
- Touch User Interface
- Speaker

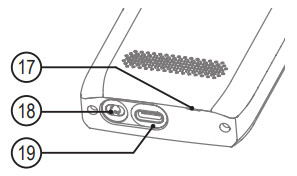
- Bottom Microphone
- 3.5mm Audio Connector
- USB Type-C Connector

LED Power and Coverage Indicators
| Indication | Coverage LEDStatus | Power LEDCharging Status |
| Solid green | In use | Fully Charged |
| Blinking green | In service | 90% Charged |
| Solid red | Out of service | Rapid Charge |
| Blinking red | Connecting to a networkEntering DMO | Faulty or Invalid Battery;If the charger is not attached: Low Battery |
| Blinking orange | Radio is powering on | The battery is waiting to charge |
| Solid orange | Incoming private orphone call | Not applicable |
| No indication | Radio powered off | Not applicable |
Battery Capacity Information
| Information | Description |
| Full (80% – 100% capacity) | |
| Middle (60% – 80% capacity) | |
| Low (25% – 60% capacity) | |
| Very low (5% – 25% capacity) | |
  |
Less than 5% capacity |
Removing and Attaching the Battery Cover
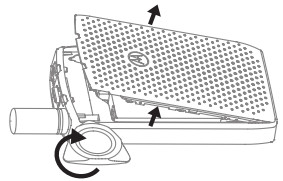

To Remove: Place and twist the battery cover opener at both top corner slots, one after the other. Lift up the battery cover along the side surface.


To Attach: Insert the bottom part of the battery cover into the slot. Press down the middle part followed by the top part of the battery cover until it clicks.
Installing the Battery


Insert the bottom part of the battery into the compartment.Press down the top part of the battery into the compartment until it clicks.
Holding Your RadioThe radio has two microphones:
- A top microphone for the simplex group, dispatcher, or private calls
- A bottom microphone for duplex, telephone-like callsWhen making duplex calls (low audio), hold your radio as you would a telephone. Speak into the bottom microphone. Listen via the earpiece. Keep the antenna at least 2.5 centimeters from your head and body.



Looking After Your RadioNever leave your radio or battery in extreme temperatures (over +85 °C), for example, behind a windscreen in direct sunlight.The radio is not submersible (compliant with the IP54 standard, only when the battery cover and antenna are attached).To clean your radio, use a moistened or antistatic cloth.
Attaching the Antenna
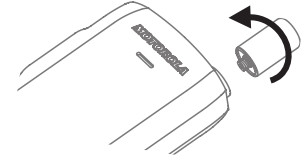

Turn the radio off before attaching the antenna.Align the bottom part of the antenna to the threaded base on top of the radio.Turn clockwise until snug. Do not force.
Icons
| Icon | Description |
| In-Service (TMO) | |
| No Service (TMO) | |
| Signal Strength | |
  |
Direct Mode (DMO) |
| Emergency Call | |
| Scan (TMO) | |
| Battery Level | |
  |
Battery Charging |
  |
Bluetooth No/Active Connection |
| Migration | |
| High Audio | |
| Low Audio | |
| Earpiece Connected |
Using the Terminal
Turning the Radio On/OffTo Turn On: Press and hold the Power button until the LED Coverage Indicator lights up.To Turn Off: Press and hold the Power button until the screen displays Powering Off.Turning the Display On/OffTurn the display on/off when the radio is turned on only.To turn the display on/off, press the Power button.Using the Radio MenuTo enter the menu, press the Menu/OK key.To scroll through the menu, press the Up or Down Navigation key.To scroll quickly through the menu, press and hold the Up or Down Navigation keyTo select a menu item, press the Menu/OK key.To return to the previous level, press the Back key.Selecting Trunked/Direct Mode OperationEnable Trunked Mode or Direct Mode through the Customer Programming Software (CPS). From the Home Screen, enter the Menu. Scroll to and selectNetworks → Trunked Mode or Direct Mode.Making TMO/DMO Group CallsEnter TMO or DMO. From the Home Screen, toggle the Talkgroup Selector button, or enter the Menu and select Favorite TGs or TG Folders (if configured).Select the talk group (if configured). Press and hold PTT. Wait for the talk permit tone (if configured) and talk. Release PTT to listen.
Making TMO/DMO Emergency Group CallsEnter TMO or DMO. Press and hold the Emergency button. The emergency alarm is sent automatically (if configured). Press and hold PTT. Wait for the talk permit tone (if configured) and talk. Release PTT to listen. To exit the emergency mode, press and hold the Back key.Making Simplex Private CallsIN DMO: From the Home Screen, enter the Menu. Select My Contacts or Contacts (if configured). Select the targeted contact and contact number (if configured). Press and hold PTT to make the call. Wait for the talk permit tone (if configured) and talk. Release PTT to listen. Press the Back key to terminate the call.IN TMO: From the Home Screen, enter the Menu. Select My Contacts or Contacts (if configured). Select the targeted contact and contact number (if configured). Press and release PTT to make the call. Once the call is connected, press and hold PTT. Wait for the talk permit tone (if configured) and talk. Release PTT to listen. Press the Back key to terminate the call.Making Duplex Private/Phone/PABX CallsFrom the Home Screen, enter the Menu. Select My Contacts or Contacts (if configured). Select the targeted contact and contact number (if configured). Press and release the Menu/OK key to make the call. Wait for the called party to pick up and talk.Press the Back key to terminate the call.Pairing Your Radio with Bluetooth DevicesFrom the home screen, enter the Menu. Scroll to and select BT Settings → Add Device → List of BT devices. Scroll to the required device and select.
More Information on the RadioVisit the Motorola Solutions Web site at:http://www.motorolasolutions.com/Learning Experience PortalUser documentation available at:https://learning.motorolasolutions.com/Open Source Software Legal NoticesAvailable in Customer Programming Software Plus (CPS Plus) DVD


This document is copyright protected. Duplications for the purpose of the use of Motorola Solutions products are permitted to an appropriate extent. Duplications for other purposes, changes, additions, or other processing of this document are not permitted. Only this electronically-saved document is considered to be the original. Duplications are considered merely copies. Motorola Solutions, Inc., and its subsidiaries and affiliates do not vouch for the correctness of such kinds of copies.MOTOROLA, MOTO, MOTOROLA SOLUTIONS, and the Stylized M Logo are trademarks or registered trademarks of Motorola Trademark Holdings, LLC and are used under license. All other trademarks are the property of their respective owners.© 2016 and 2021 Motorola Solutions, Inc. All rights reserved.\


References
[xyz-ips snippet=”download-snippet”]
