![]()
Talkabout T82OWNER’S MANUAL
RF ENERGY EXPOSURE AND PRODUCT SAFETY GUIDE FOR PORTABLE TWO-WAY RADIOS
ATTENTION!Before using this product, read the RF Energy Exposure and Product Safety Guide that ships with the radio which contains instructions for safe usage and RF energy awareness and control for compliance with applicable standards and regulations.
Package Contents
| Package Content | T82C |
| Radio | 1 |
| Belt clip | 1 |
| Battery | 1 |
| Power Supply | 1 |
| Charger Tray | 1 |
| Owner’s manual | 1 |
Frequency Chart
| Channel | Frequency |
| (MHz) | |
| 1 | 409.75000 |
| 2 | 409.76250 |
| 3 | 409.77500 |
| 4 | 409.78750 |
| 5 | 409.80000 |
| 6 | 409.81250 |
| 7 | 409.82500 |
| 8 | 409.83750 |
| 9 | 409.85000 |
| 10 | 409.86250 |
| 11 | 409.87500 |
| 12 | 409.88750 |
| 13 | 409.90000 |
| 14 | 409.91250 |
| 15 | 409.92500 |
| 16 | 409.93750 |
| 17 | 409.95000 |
| 18 | 409.96250 |
| 19 | 409.97500 |
| 20 | 409.98750 |
Features and Specifications
- 20 analog channels
- 121 Sub-Codes (38 CTCSS Codes and 83 DCS codes)
- iVOX/VOX
- Easy Pairing
- LED Flashlight
- 20 Selectable Call Tone Alerts
- Segmented LED Display
- Roger Tone
- Micro USB Connector for charging
- Battery Indicator Bar
- Channel Monitor
- Channel Scan
- Dual-Channel Monitor
- Keypad Lock
- Auto Squelch Control
- Auto Repeat (Scrolling)
- Battery Low Alert
- Keypad Tone (On/Off)
- Silent Mode (Vibrate Alert)
- Emergency Features
- IP Rating: IPx2
- Power Source: NiMH battery Pack/3 x AA Alkaline batteries
- Battery Life: Up to 18 hours (Typical battery life, 5/5/90profile. Actually observed runtimes may vary).
Note: Range may vary depending on environmental and/or topographical conditions.
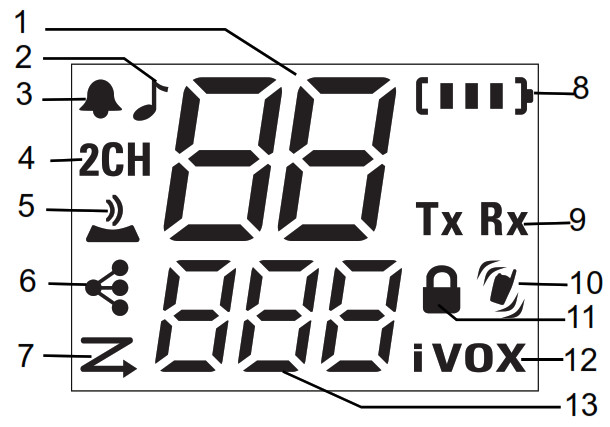
- Channel [1–20]
- Call Tone [Off, 1–20]
- Roger Tone [On/Off]
- Dual-Channel Monitor
- Keypad Tone [On/Off]
- Easy Pairing
- Scan Indicator
- Battery Indicator [3 Battery Levels]
- Status [Transmit/ Receive]
- Vibrate Alert [On/Off]
- Keypad Lock
- iVOX [Off, L1, L2, L3] VOX [Off, L1, L2, L3]
- Sub-Code [0–121]
Note: The radio screen dims 5 seconds after the last button is pressed. LED blinks and the radio screen turns off after another 5 seconds for battery saving purposes. Press any button (except the Flashlight button) to resume the display.
Installing the Batteries
Each radio can either use a NiMH rechargeable battery pack or three units of AA Alkaline Battery and beeps when the batteries are low.
- Make sure your radio is turned OFF.
- With the back of the radio facing you, push the latch to the left to unlock the battery door.
- Insert the battery pack with the
 and signs facing you for the NiMH battery pack. Observe polarity.For AA Alkaline batteries, insert the batteries. Observe polarity.
 - Close the battery door and push the latch to the right to lock the battery door.
Radio Battery MeterThe number of bars (0–3) on the Radio Battery icon shown indicates the charge remaining in the battery. When the radio battery meter shows one segment left, the radio chirps periodically or after releasing the PTT button (Low Battery Alert).Battery Capacity Maintenance
- Charge the NiMH batteries once every 3 months when not in use.
- Remove the battery from the radio for storage purposes.
- Store the NiMH batteries at a temperature between -20 °C to 35 °C and in low humidity. Avoid damp conditions and corrosive materials.
Using the Micro-USB ChargerThe micro-USB charger allows you to charge your NiMH battery pack.
- Power off your radio before start charging.
- Plug the micro-USB cable into the micro-USB charging port on your radio.
- Connect the USB charger to a nearby and easily accessible wall power outlet.
- An empty battery will be fully charged in 8 hours.
- The battery indicator bar moves up and down while charging.
Using the Charging Cradle
- Make sure your radio is turned OFF.
- Connect the AC adapter to the micro-USB port of the charging cradle.
- Place the charging cable on a stable surface.
- Place the radio in the charging cradle with the keypad facing forward.
- The radio battery indicator bar moves up and down while charging.
Note: Motorola Solutions recommends powering your radio while charging. However, if power is ON while charging, you may not beable to transmit a message if the battery is completely empty.Allow time for the battery to charge to one bar before attempting to transmit a message.When moving between hot and cold temperatures, do not charge the NiMH battery pack until the temperature acclimates (usually about 20 minutes).For optimal battery life, remove the radio from the charger within 16 hours. Do not store the radio while connected to the charger.
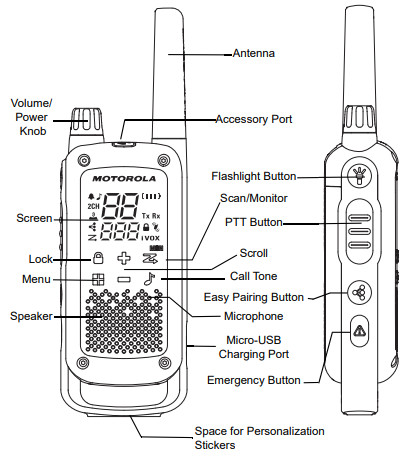
Turning your Radio On and OffTo turn your radio ON, turn the rotary knob clockwise.To turn your radio OFF, turn the rotary knob counterclockwise.
Setting the Volume
To increase the volume, turn the rotary knob clockwise.To decrease volume, turn the rotary knob counterclockwise.Do not hold the radio close to your ear. If the volume is set to an uncomfortable level, it could hurt your ear.
Talking and ListeningAll radios in your group must be set to the same channel and Sub-Code in order to communicate.
- Hold your radio 2–3 cm from your mouth.
- Press and hold the PTT button while speaking. The Tx Transmit icon appears on the display.
- Release the PTT button to receive incoming calls. The radio displays receive Rx icon.
For maximum clarity, hold the radio 2 to 3 cm away and avoid covering the microphone while talking.
Talk RangeYour radio is designed to maximize performance and improve transmission range. Ensure the radios are at least 5 feet apart when in use.Monitor-ButtonPress and hold ![]() Scan/Monitor for 3 seconds to enter Monitor mode and listen for weak signals on the current channel. You can also listen to the volume level of the radio when you are not receiving it. This allows you to adjust the volume, if necessary.Push-to-Talk Time-out TimerTo prevent accidental transmissions and save battery life, the radio emits a continuous warning tone and stops transmitting if you press the PTT button for 60 seconds
Scan/Monitor for 3 seconds to enter Monitor mode and listen for weak signals on the current channel. You can also listen to the volume level of the radio when you are not receiving it. This allows you to adjust the volume, if necessary.Push-to-Talk Time-out TimerTo prevent accidental transmissions and save battery life, the radio emits a continuous warning tone and stops transmitting if you press the PTT button for 60 seconds
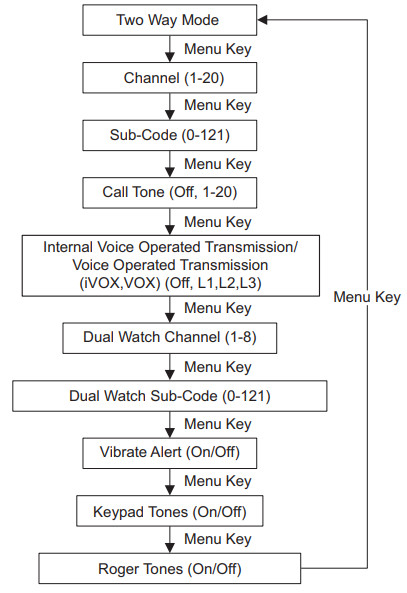
Selecting the ChannelThe channel is the frequency of the radio uses to transmit.
- Press Menu until the channel number starts to flash.
- Press or change the channel. Long press on these keys allows you to scroll through the channels rapidly to browse the codes.
- Press the PTT button to exit the menu or Menu to continue set up.
Selecting the Sub-CodeSub-Codes help minimize interference by blocking transmissions from unknown sources. Your radio has 121 Sub-Codes.To set the code for a channel:
- Press Menu until the code starts to flash.
- Press or select the code. You can hold down the button to speed up scrolling through the codes.
- Press the PTT button to exit the menu or Menu to continue set up.
Setting and Transmitting Call TonesYour radio can transmit different call tones to other radios in your group. Your radio has 20 call tones for you to choose from.To set a call tone:
- Press Menu until the Call Tone icon appears. The current call tone-setting flashes.
- Press or to change and listen to the call tone.
- Press the PTT button to exit the menu or Menu to continue set up.
In order to transmit your call tone to other radios, set up the same channel and Sub-Code on your radio and press ![]() Call Tone.
Call Tone.
Easy PairingThe Easy Pairing feature allows a group of radio users to program all their radios to the same Channel and Sub-Code settings quickly and simultaneously. Any one radio within the group can be designated as the “Leader’s radio” and have it’s Channel and Sub-Code settings transmitted to and copied by all the other radios in the group (Members’ radios).
- Pick any one of the radios as the “Leader’s radio”. On this radio, program the Channel and Sub-Code to the desired settings. See “Selecting the Channel” and “Selecting the Sub-Code” sections in this user manual.
- To copy the channel and Sub-Code combination to all the other “Members’ radios”, press and hold the button on the Members’ radios until you hear a beep. Release the button after the beep, and wait for the transmission from the Leader’s radio.Note:•You will see the icon blinking on the display. This confirms that the radio is in Easy Pairing mode waiting to receive the Channeland Sub-Code settings from the Leader’s radio. All Members’ radios remain in this mode for 3 minutes.• A group with many radios should have all users take this step at the same time, so all radios can be programmed in one go.
- On the Leader’s radio, press and hold down the button until you hear a double beep.
Note:
- At the double beep, this radio’s Channel and Sub-Code settings will be transmitted, which will be received and copied by all theother (Members’) radios.
- The Leader’s radio must make this transmission when all the Members’ radios are still in the Easy Pairing mode, otherwise, the transmission will not be picked up.
- On the Leader’s radio, the user must remember not to release the button on the first (single) beep, otherwise, this radio will become another Member’s radio. If that happens, you can press PTT to escape, and retry the steps described in #3 again.
Internal Voice Operated Transmission/ Voice Operated Transmission (I VOX/VOX)Transmission is initiated by speaking into the microphone of the radio/audio accessory instead of pushing the PTT button.
| L3 = High Sensitivity for quiet environments |
| L2 = Medium Sensitivity for most environments |
| L1 = Low Sensitivity for noisy environments |
- Press Menu until the I VOX icon appears on the display. When the audio accessory is connected, the VOX icon will be shown. The current setting (Off, L1–L3) flashes.
- Press or select the sensitivity level.
- Press the PTT button to exit the menu or Menu to continue set up.
Note: When using iVOX/VOX, there will be a short delay.
Dual-Channel MonitorEnables you to scan the current channel and another channel alternately.To set another channel and start Dual Channel Monitor:
- Press Menu until the Dual Channel Monitor 2CH icon appears. The Dual Channel Monitor icon flashes.
- Press or select the channel then press Menu.
- Press or select the Sub-Code.
- Press the PTT button or wait until time out to activateDual-Channel Monitor. The screen will alternate between home the channel and the Dual Channel Monitor channel.
- To end Dual Channel Monitor, press Menu.Note: If you set the same channel and Sub-Code as the current channel, Dual Channel Monitor does not work.
Silent ModeSilent Mode (Vibrate Alert) notifies you that your radio is receiving a message. This is useful in noisy environments.The Vibrate Alert is triggered when you received a call. The Vibrate Alert is triggered again if there is no activity within 30 seconds after the previous call.
- Press Menu until the Vibrate Alert icon is displayed.The current setting will flash.
- Press or change the setting to On/Off.
- Press the PbTT button to exit the menu or Menu to continue set up.
Keypad TonesYou may enable or disable the keypad tones. You will hear the key tone each time a button is pushed.
- Press Menu until the Keypad Tone icon appears.The current setting On/Off will flash.
- Press either or to turn On/Off.
- Press the PTT button to confirm or Menu to continue set up.
Roger ToneYou can set your radio to transmit a unique tone when you finish transmitting. It is like saying “Roger” or “Over” to let others know you have finished talking.
- Press Menu until the Roger Tone icon appears. The current setting On/Off flashes.
- Press or turn On or Off.
- Press the PTT button to set or Menu to continue set up.
Emergency Alert ModeThe Emergency Alert feature can be used to signal members in your group for help. T82C radios operate in an automatic “hands-free” emergency control mode for a total of 30 seconds after activating the Emergency Alert. T82C radios in your group will automatically advance the speaker volume to the maximum setting and sound a warbling alert tone for 8 seconds. The alert tone is emitted from your own radio speaker and the receiving radios in your group. After the 8 second alert, any spoken words or incidental sounds at you end is transmitted to the group for 22 seconds. For the 30 second duration of Emergency Alert mode, T82C radio controls and buttons are locked to maximize reception of the emergency message.
- Press and hold the Emergency Alert button for 3 seconds.
- Release the button and the alert tone begin to sound.There is no need to continue to hold the Emergency Aler button or use PTT for your message to be transmitted.
WARNING: The Emergency Alert feature should only be used in the ven of an actual emergency. Motorola Solutions is not responsible there is no response to the emergency alert from the receiving group.
LED FlashlightYour radio has a built-in-LED Flashlight.The LED Flashlight remains on until the button is released.
Keypad LockTo avoid accidentally changing your radio settings:
- Press and hold Key Lock until the Key Lock Indicator icon displays.
- You can turn the radio ON and OFF, adjust the volume, receive, transmit, send a call tone, send Emergency Alert, and monitor channels when in the lock mode. All other functions remain locked.
- Press Key Lock and hold until the Key Lock Indicator is no longer displayed to unlock the radio.
ScanningUse the scan function to do the following:
- Search all channels for transmissions from unknown parties.
- Find someone in your group who has accidentally changed channels or
- Find unused channels quickly for your own usage.
The priority feature, basic and advanced to make your search more effective.
- The “Basic Scan” mode uses the channel and code combinations for each of the channels as you have set them (or with the default code value of 1).
- The “Advance Scan” mode scans all channels for any and all codes; detect any code in use and use that code value temporarily for that channel.
- Priority is given to the “Home Channel” (For example, the channel and Sub-Code your radio is set to when you start the scan). This means the initial channel (and code settings) is scanned more often than the other seven channels and your radio will respond quickly to any activity occurring on the home channel as a priority.
To start Basic Scanning:
- Press the Scan/Monitor button briefly. The Scan Z icon appears in the display and the radio begins to scroll through the channel and code combinations.
- When the radio detects channel activities matching the channel and Sub-Code combination, the radio stops scrolling and you can hear the transmission.
- Press the PTT button within 5 seconds after the end of the transmission to respond and talk to the person transmitting.
- The radio resumes scrolling through the channels 5 seconds after the end of any received activity.
- Press the Scan/Monitor button briefly to stop scanning.
To start Advanced Scanning:
- Set home channel’s Sub-Code to “zero” or OFF.
- Press the Scan/Monitor button briefly. The Scan Z icon appears in the display and the radio begins to scroll through the channels. No Sub-Codes filters what is heard.
- When the radio detects channel activities with any code (or NO code), it stops scrolling and you can hear the transmission. Any Sub-Code that may be used by another party will be detected and displayed.
- Press the PTT button within 5 seconds after the end of the transmission to talk.
- The radio resumes scrolling through channels 5 seconds after the end of any received activity.
- Press the Scan/Monitor button briefly to stop scanning.
Note:
- The transmission will be on the “Home Channel” if you press the PTT button while the radio is scrolling through inactive channels. You may press the Scan/Monitor button to stop scanning at any time.
- You may immediately resume the scan by briefly pressing or if the radio stops on an undesired transmission.
- You may temporarily remove that channel from the scan list by pressing and holding or for 3 seconds if the radio stops repeatedly on an undesired transmission. You may remove more than one channel this way.
- Turn the radio OFF and then ON, or EXIT and re-enter the scanning mode by pressing Scan/Monitor to restore the removedchannel(s) to the scan list.
- You cannot remove the “Home Channel” from the scan list.
- In the Advanced Scan, the detected code is used for one transmission. You must take note of that code, exit scan, and set the detected code on that channel to permanently use.
Warranty Information
The authorized Motorola Solutions dealer or retailer where you purchased your Motorola Solutions two-way radio and/or original accessories will honor a warranty claim and/or provide warranty service.Please return your radio to your dealer or retailer to claim your warranty service. Do not return your radio to Motorola Solutions.In order to be eligible to receive warranty service, you must present your receipt of purchase or a comparable substitute proof of purchase bearing the date of purchase. The two-way radio should also clearly display the serial number.The warranty will not apply if the type or serial numbers on the product have been altered, deleted, removed, or made illegible.
What Is Not Covered By The Warranty
- Defects or damage resulting from the use of the Product in other than its normal and customary manner or by not following the instructions in this user manual.
- Defects or damage from misuse, accident, or neglect.
- Defects of damage from improper testing, operation, maintenance, adjustment, or any alteration or modification of any kind.
- Breakage or damage to aerials unless caused directly by defects in material or workmanship.
- Products disassembled or repaired in such a manner as to adversely affect performance or prevent adequate inspection and testing to verify any warranty claim.
- Defects or damage due to range.
- Defects or damage due to moisture, liquid, or spills.
- All plastic surfaces and all other externally exposed parts are scratched or damaged due to normal use.
- Products rented on a temporary basis.
- Periodic maintenance and repair or replacement of parts due to normal usage, wear and tear.
Copyright Information
The Motorola Solutions products described in this manual may include copyrighted Motorola Solutions programs, stored semiconductor memories, or other media. Laws in the United States and other countries preserve for Motorola Solutions, certain exclusive rights for copyrighted computer programs, including the exclusive right to copy or reproduce in any form, the copyrighted Motorola Solutions programs.Accordingly, any copyrighted Motorola Solutions computer programs contained in the Motorola Solutions products described in this manual may not be copied or reproduced in any manner without express written permission of Motorola Solutions. Furthermore, the purchase of Motorola Solutions products shall not be deemed to grant either directly or by implication, estoppel, or otherwise, any license under the copyrights, patents, or patent applications of Motorola Solutions, except for the normal non-exclusive royalty-free license to use that arises by operation of law in the sale of products.
| PartName | Hazardous Substances | |||||
| (Pb) | (Hg) | (Cd) | (Cr + 6) | (PBB) | (PBDE) | |
| Housing | 0 | 0 | 0 | 0 | 0 | 0 |
| DisplayPCB | 0 | 0 | 0 | 0 | 0 | 0 |
| PCB | X | 0 | 0 | 0 | 0 | 0 |
| Cable | 0 | 0 | 0 | 0 | 0 | 0 |
| Battery | X | 0 | 0 | 0 | 0 | 0 |
| PSU | X | 0 | 0 | 0 | 0 | 0 |
| ChargerTray | X | 0 | 0 | 0 | 0 | 0 |
| This table is prepared according to SET 11364. | ||||||
| 0: Indicates that the content of such hazardous substance in all homogeneous materials of such component is within the limits specified In GBFT 26572. | ||||||
| X: Indicates that the content of such hazardous substance in at least one homogeneous material of such component exceeds the limits specified in GB/T 26572. |
![]()
MOTOROLA, MOTO, MOTOROLA SOLUTIONS, and the Stylized M Logo are trademarks or registered trademarks of Motorola Trademark Holdings, LLC and are used under license. All other trademarks are the property of their respective owners. © 2018 and 2020 Motorola Solutions, Inc. All rights reserved.

 Printed in
[xyz-ips snippet=”download-snippet”]