
MOTOROLA TWO-WAY RADIO VLR150 User Guide
![]()
QUICK REFERENCE GUIDEVLR150 TWO-WAY RADIO
Congratulations on your new Radio!
Thank you for purchasing a Motorola Solutions VLR150 Radio.Your VLR150 radio is ready for use after a fully-charged battery has been installed. Please refer to www.motorolasolutions.com/VLR150 for information on product details, brochures, CPS software and approved accessories.The VLR150 two-way business radios operate on radio frequencies that are regulated by the Federal Communications Commission (FCC). In order to transmit on these frequencies, you are required to have a license issued by the FCC. Refer to http://www.fcc.gov for more information.This device complies with Part 15 of the FCC rules. Operation is subjected to the condition that this device does not cause harmful interference.
GETTING STARTED
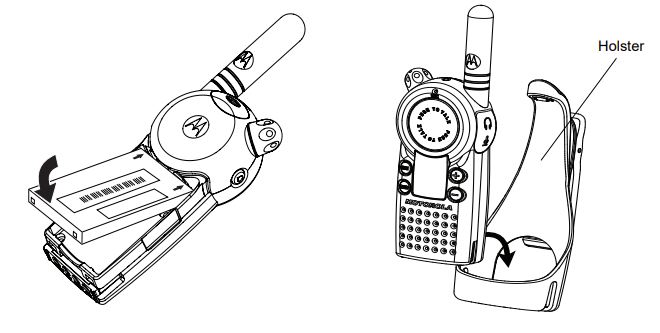
- INSTALL THE BATTERY
- Insert the battery, printed arrows first, into the battery compartment and press down to secure firmly in place.
- Slide and snap the battery door into place.
- INSTALL THE HOLSTER
- Slide the bottom of the radio into the holster until it snaps into place.
- To remove, push the tab on the holster and pull the radio away from the holster.
- CHARGE THE BATTERY
Use only the charger supplied with the radio
a. Using the Drop-in Charger
- Insert the plug of the power cord into the jack on the charger, and plug the cord into an AC outlet.
- Turn the radio off.
- Insert the radio (with battery installed) into the front charging pocket. The drop-in charger will also sequentially charge a spare battery. The spare battery will not charge until the radio battery is fully charged.
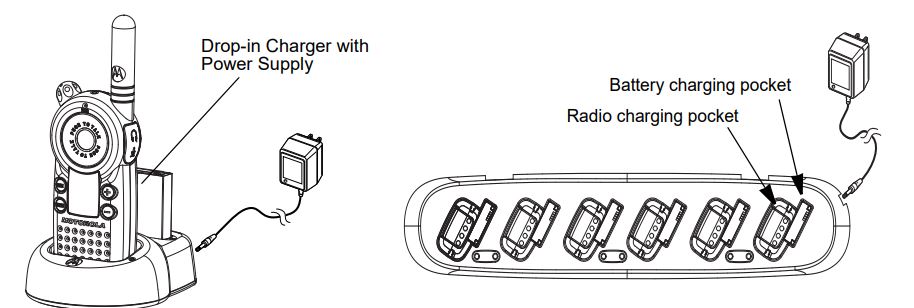
b. Using the Multi-Unit Charger (Accessory sold separately)
The Multi-Unit Charger (MUC) allows drop-in charging of up to 6 radios or batteries. Batteries can be charged inside the radios or removed and placed in the MUC separately. Each of the 6 charging pockets can hold a radio or battery, but not both. (Follow steps 1 – 3 above).
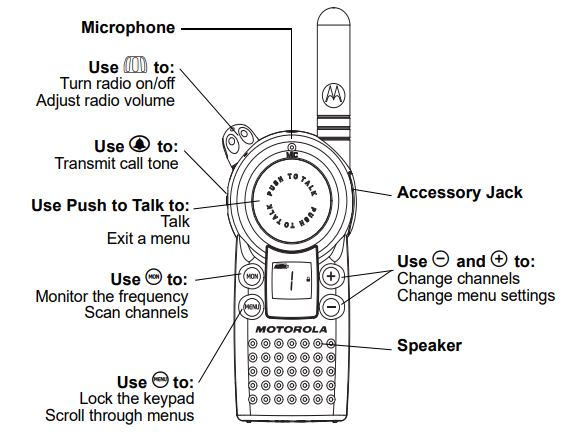
TURNING THE RADIO ON/OFF AND ADJUSTING THE VOLUME
To turn ON the radio, rotate the On/Off/Volume Knob clockwise. The radio will provide an audible indication and the LED indicator will blink briefly. To turn the radio OFF, rotate the On/Off/Volume Knob counterclockwise and the radio LED Indicator turns OFF. Rotate the volume knob clockwise to increase volume, and counter-clockwise to decrease the volume.
CHECK THE BATTERY STATUS
On the drop-in charger, the radio and battery charging pockets have their own LEDs. On the MUC, each of the 6 charging pockets has an LED. The LED is solid red when the battery is charging and solid green when charging is complete.
TRANSMITTING AND RECEIVING
- Press and hold
 to check for channel activity. If you hear static, the channel is clear to use. Do not transmit if someone is speaking on the channel. Press again to stop monitoring.
 - To talk, press and hold Push to Talk and speak into the microphone. Hold the radio 2 to 3 inches away from your mouth.
- To listen, release Push to Talk.
Note: The transmit LED on the top of the radio is red when transmitting.
GENERAL OPERATION – HOW TO

For product-related questions, please visit: www.motorolasolutions.com/VLR150. For further information, refer to your specific product User Guide
ATTENTION
Before using this product, read the RF energy awareness information and operating instructions contained in the Safety and RF Energy Exposure Booklet enclosed with your radio package.
MOTOROLA, MOTO, MOTOROLA SOLUTIONS and the Stylized M logo are trademarks or registered trademarks of Motorola Trademark Holdings, LLC and are used under license. All other trademarks are the property of their respective owners.
© 2015 and 2020 Motorola Solutions, Inc. All rights reserved. Printed in. ![]()

References
[xyz-ips snippet=”download-snippet”]