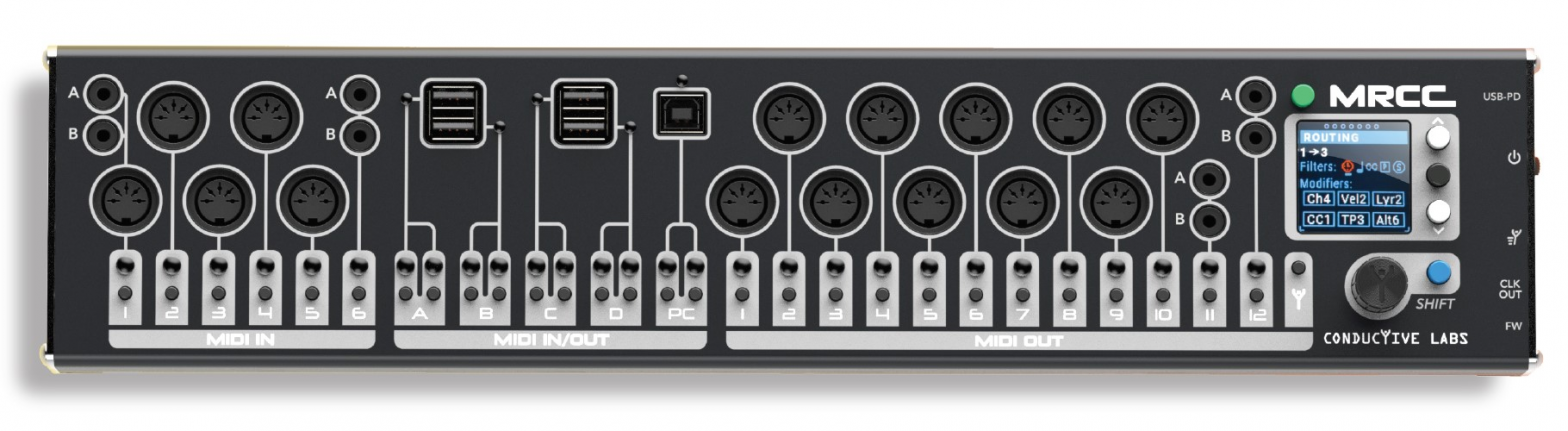
MRCC MIDI Router Control Center

Thank you for choosing MRCC for your MIDI studio! We really appreciate it! If you would be so kind, tag your social media posts with #MRCC so we can find them. We would love to see how MRCC improves your studio and makes it a better place to create. Share your stories on our forums in the “Show me what you got!” section.
Download the complete MRCC User Manual at https://conductivelabs.com/download
What’s in the box:
- MRCC – MIDI Router Control Center
- International AC Power Supply
- AC Outlet Adapters
- USB Type B Cable
- This Quick Start Guide
- Optional accessories (if ordered)
Power Supply Specifications:Input: 100 to 240V AC, 50/60HzOutput: 5.25V DC, 3A, USB Type C connector
MRCC Power Consumption:MRCC alone uses a minimum of 26mA, and up to 990mA primarily depending on how many LEDs are lit and their brightness. Each USB A Host port supports up to 500mA as per USB 2.0 specification.The MRCC is compatible with most USB-PD (Power Delivery) specification power supplies with a 5V DC, 15W (minimum) rating. MRCC will operate correctly down to 4.5V DC, but USB 2.0 devices are only required to operate down to 4.75V. MRCC absolute maximum input is 5.5V DC. Higher voltages will cause damage that is not covered by warranty. When using a 3rd party power supply, use the shortest USB cable possible to prevent voltage drop.
EU Declaration of Conformity available at https://conductivelabs.com/download
Precautions, not limited to:
- Read and follow all instructions.
- Unplug before cleaning and only use only a soft dry cloth. Do not use any cleaners.
- Do not use the instrument near water or moisture, such as a bathtub, sink, swimming pool or similar place.
- Do not expose the instrument to hot sunlight.
- Do not spill any kind of liquid onto the instrument.
- Do not place the instrument in an unstable position where it might accidentally fall. Do not place heavy objects on the instrument.
- Do not open or insert anything into the instrument that may cause a fire or electrical shock.
- Always contact Conductive Labs LLC if you have an issue. You will invalidate your warranty if you open and remove the cover.
- Do not use the instrument when there is a gas leak nearby.
- Conductive Labs LLC is not responsible for any damage or data loss caused by improper operation of the instrument.
- The MRCC RJ45 port is not Ethernet. Do not attach any Ethernet devices to MRCC, it may damage MRCC or the Ethernet device.
Not following the above Precautions will void the manufacturer’s warranty.
This device complies with part 15 of the FCC Rules. Operation is subject to the following two conditions: (1) This device may not cause harmful interference, and (2) this device must accept any interference received, including interference that may cause undesired operation. Note: This equipment has been tested and found to comply with the limits for a Class B digital device, pursuant to part 15 of the FCC Rules. These limits are designed to provide reasonable protection against harmful interference in a residential installation. This equipment generates, uses and can radiate radio frequency energy and, if not installed and used in accordance with the instructions, may cause harmful interference to radio communications. However, there is no guarantee that interference will not occur in a particular installation. If this equipment does cause harmful interference to radio or television reception, which can be determined by turning the equipment off and on, the user is encouraged to try to correct the interference by one or more of the following measures:
- Reorient or relocate the receiving antenna.
- Increase the separation between the equipment and receiver.
- Connect the equipment into an outlet on a circuit different from that to which the receiver is connected.
- Consult the dealer or an experienced radio/TV technician for help.
This Quick Start Guide is a supplement to the MRCC User Manual, available on the Conductive Labs website at: https://conductivelabs.com/download. For complete information on using MRCC, please refer to the User Manual.
Support for MRCC is provided by Conductive Labs and our experienced users on the Conductive Labs forums.Please register on the forums for questions not answered in this guide or the User Manual. As part of forum registration, you will receive a verification email. If you do not receive it check your spam/junk folder, the verification emails often end up there. If you experience any problem with registering on the forums, let us know using the contact page on our website and we’ll get you set up. You can register on the forums here: https://conductivelabs.com/forum
Getting Started
- Plug in your MIDI controllers (keyboards, sequencer, The NDLR) into MRCC’s MIDI Inputs and/or USB host or PC port.Note: MRCC USB Host ports only work with USB MIDI Class compliant devices. Those are devices that do not require a special driver when used with a computer. Consult the manufacturer of the device if you aren’t sure.Note: 3.5MM jacks labeled A and B are MIDI TRS standard inputs and outputs. You can choose 1 of the inputs (A or B), the other will be disabled. You can use the A and B outputs simultaneously.
- Connect sound modules to the MRCC MIDI outputs, or use virtual synths or a DAW on your PC using MRCC’s USB type B PC connection port and the provided cable.Hint: For hardware MIDI controllers and sound modules, it helps a lot to label them with their MIDI channels.Note: For a computer DAW (Digital Audio Workstation), each one is different. Check the DAW documentation for setting up MIDI tracks and virtual instruments, such as VSTs.
- Power MRCC using the supplied power supply and outlet/mains adapter for your region:
- Attach the appropriate mains adapter, then plug it into a power outlet.
- Plug the power supply cable with USB C connector into the MRCC on the right-side panel where it is labeled USB-PD, then switch it on. The MRCC LEDs flash and the screen will come on.
- Basic MIDI Routing
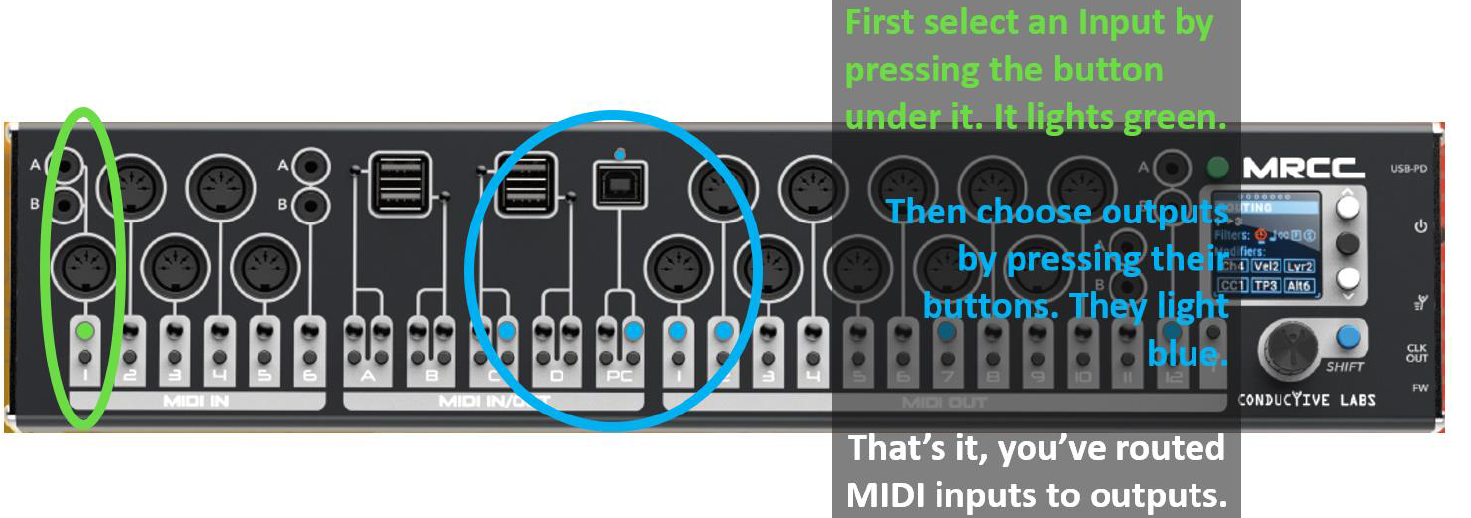
Routing MIDI Inputs 1 thru 6
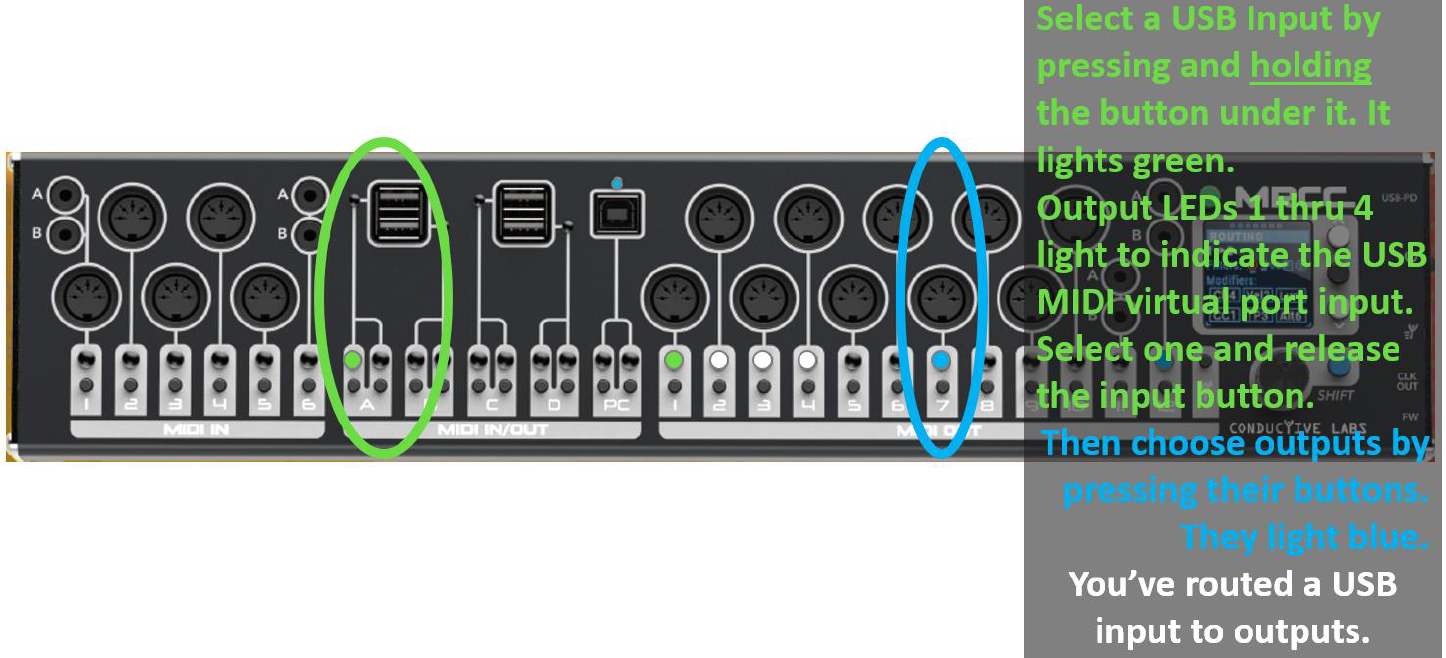
Routing USB Host Ports A thru DThe USB Host ports light green when a USB device is attached. They do not light when a device is only taking power and not data. If a port lights Amber, it means the device is drawing more power than allowed for USB 2.0. If a USB Host port lights Amber, disconnect the device and power cycle MRCC to reset the port.
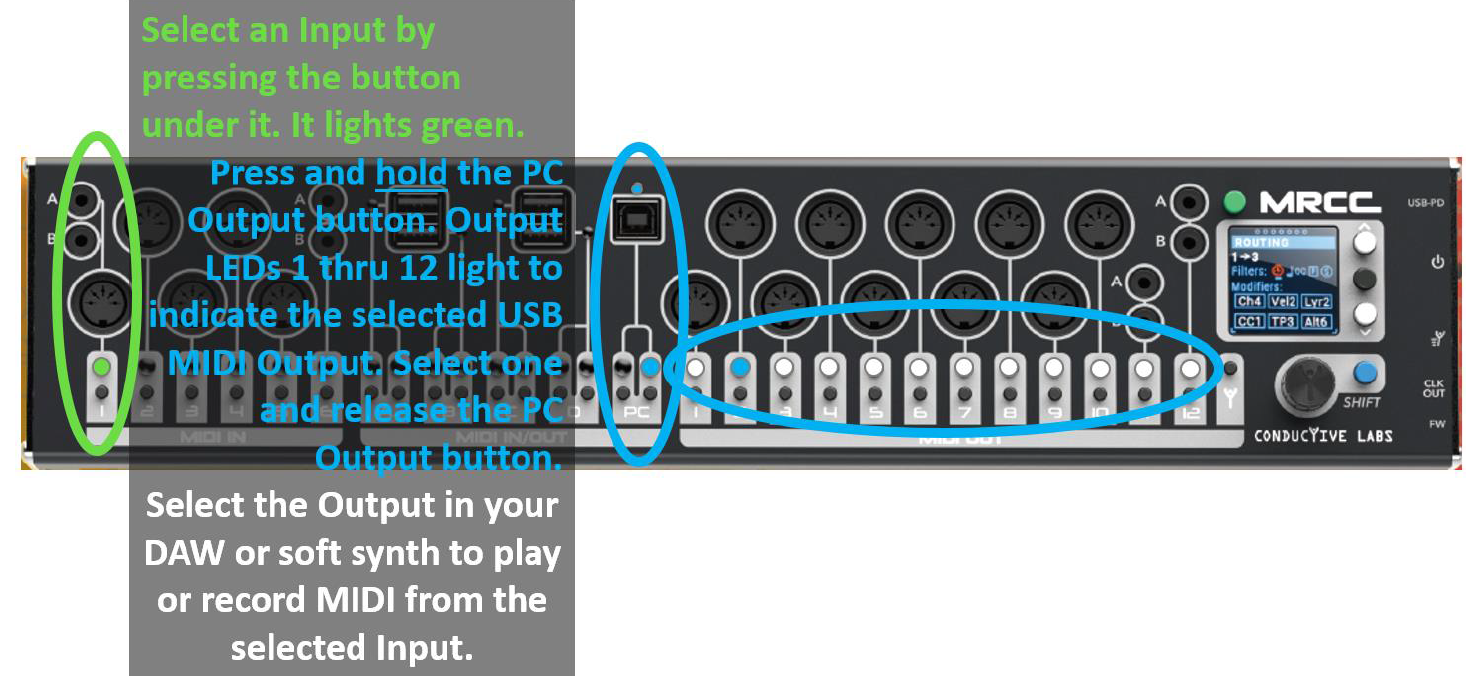
Routing a PC USB Virtual MIDI Input to Outputs
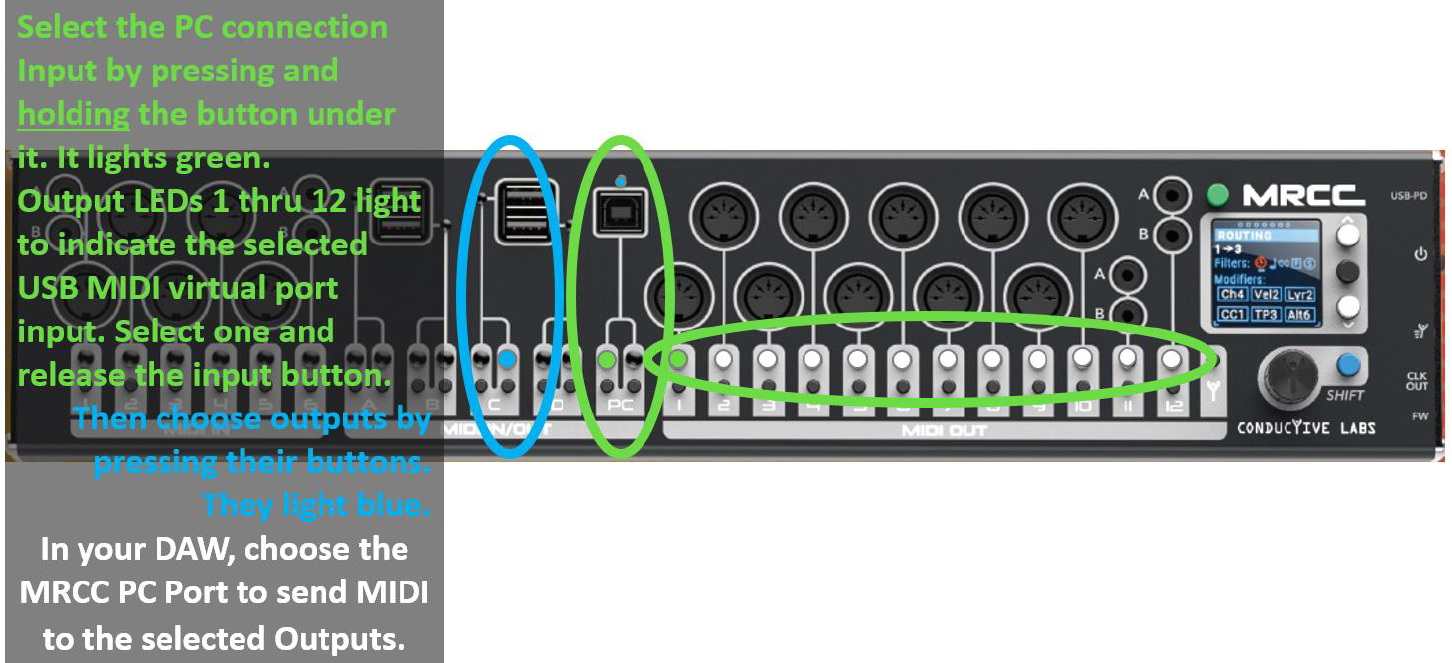
Choosing USB PC Port Virtual Outputs
Saving your settings Systemsettings in the SETTINGS menu are automatically saved when you change them. Routing, filtering, label assignments and other settings may be saved from the TOOLS LOAD/SAVE menu:
- Turn the encoder to the TOOLS page.
- Press the white ‘down’ button until the cursor reaches the Preset line.
- Turn the encoder clockwise to select a preset number to save to.
- Press the ‘down’ button until SAVE is highlighted.
- Press the Blue Shift button + the Black Enter button to save.
Firmware UpdatesConductive Labs provides periodic firmware updates to enhance features or fix reported issues. You can find the latest released firmware update on the Download section of the Conductive Labs website. Before updating your firmware, check the version you are currently using by rotating the encoder until you see the SETTINGS screen.Hint: Press the Green button briefly to move the selection to the top of the menu if its not already there.
- On the SETTINGS screen, press the white ‘down’ button once, then rotate the encoder clockwise to the last page. The FW version and Serial Number are shown there.
- Typically, firmware updates will not overwrite your settings or patches.
- Registered users of the Forum can download pre-release (beta) versions of firmware when available. We appreciate our users help in testing changes and enhancements. Please report your success or issues with pre-release firmware on the forums.
- Instructions for updating firmware are on the Download page at conductivelabs.com.
Other Cool Stuff
Check the User Manual for a complete description of current functionality.Press and hold the Green button to put MRCC into Standby mode. Press it again to resume.Press and hold the Blue Shift button + the Y button (next to port 12) to start a light show. You can select various lightshow motifs from the SETTINGS menu.You can adjust the port LED brightness from the SETTINGS menu. Speaking of LEDs, you might notice the flickering amber light below the USB B port. It’s just an internal LED we sometimes use for diagnostics.
AccessoriesThere are currently 2 accessories available for MRCC:
MRCC 2U Rack Mount BracketsThe MRCC Rack Mount Brackets enables MRCC to be mounted in a standard 19 inch rack. The MRCC is 2U.
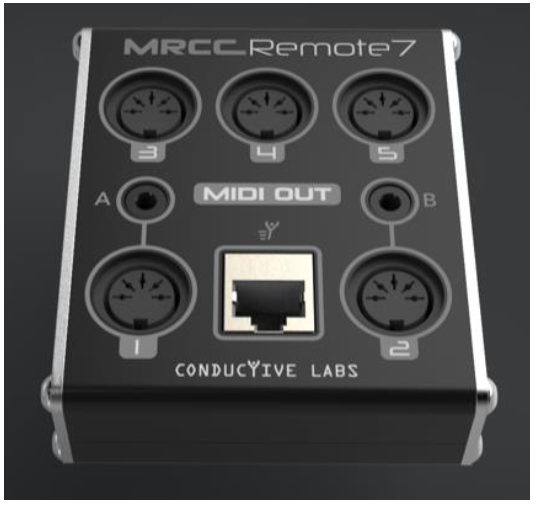
MRCC Remote 7 Port ExtenderThe MRCC Remote 7 Port extender provides a slick way to get ports to where you need them in your studio or performance space. Five – 5 pin DIN outputs are added, plus two 3.5MM TRS jacks which are shared with two of the 5 outputs. One 3.5MM TRS is MIDI type A and the other is MIDI type B.The Remote 7 attaches to MRCC via a “shielded connector” Ethernet cable (included). That is, an Ethernet cable with a metal shield over the RJ45 jacks that is connected on each end via a drain wire in the cable.Note that, the MRCC RJ45 port is not Ethernet. Do not attach any Ethernet devices to MRCC, it may damage MRCC or the Ethernet device.
Conductive Labs LLC, a Corporation registered in the State of Oregon USA.Owners: Darryl McGee and Steve BarileAddress: Conductive Labs LLC 11340 NW Anderson St. Portland, OR 97229 USAEmail: [email protected]
COPYRIGHT @ CONDUCTIVE LABS LLC 2021. ALL RIGHTS RESERVED.
All documentation, images, software, firmware, user interface, industrial design and hardware design is protected by copyright law and international treaties. The firmware is licensed (not sold), and its use is subject to a License Agreement. Unauthorized use, copying or distribution of any of the above material or any of its components may result in severe criminal or civil penalties, and will be prosecuted to the maximum extent under the law.All trademarks and registered trademarks used in this documentation are the property of their owners.
![]()
References
[xyz-ips snippet=”download-snippet”]