
![]()
MultiConnect ® rCellMTR6 Quick Start

Welcome
The Multiconnect rCell is an affordable Intelligent Wireless Router used to enable devices with Internet service. It is a simple alternative to complex and expensive cellular routers in applications where advanced networking capabilities are already in place or are not required, but there is a need for remote access without using local wired networks
Package Contents
| Description | Quantity |
| MultiConnect rCell modem | 1 |
| Antennas (Cellular) | 2 |
| Antennas (WiFi) | 2 |
| Power Adapter | 1 |
| 8-pin Terminal Block (Power and IO) | 1 |
| 4-pin Terminal Block Power Adapter (RS232 /RS485) | 1 |
| Ethernet Cable | 1 |
| Din Rail Bracket | 1 |
| Desktop Mounting Bracket Set | 1 |
| Quick Start | 1 |
Front Panel
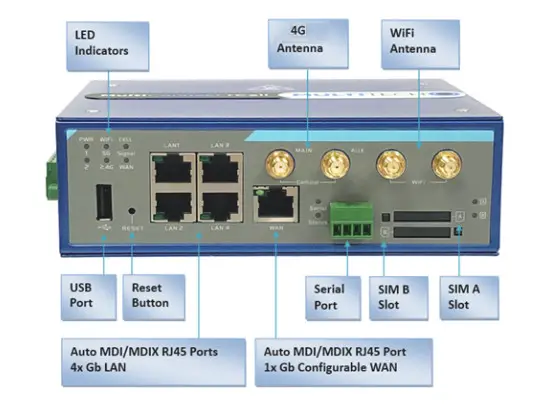
Connectors
| Item | Description |
| Reset | Push and hold for 30 seconds to reset the device back to factory default settings. |
| Ethernet | Connect an Ethernet cable. 4 LAN and 1 WAN RJ45 ports. |
| 8-pin Block | Connect to the power adapter. Red wire to POWER1/2 and black wire to GND. |
| SIM NB | Insert mini-SIM (2FF) cards provided by your service provider. |
| CELL SMA | Connect cellular antennas. |
| Item | Description |
| WIFI RSMA | Connect the WIFI antennas. |
| 4-pin Block | Two wires RS232 / RS485 |
| USB Host | USB host port for external USB drive/storage |
LED Indicators
| Item | Description |
| Power 1/Power 2 | On: Solid depending on DC power input applied. (12V to 48VDC) |
| WIFI 5G/WIFI 2.4G | On: Solid when Wi-Fi is enabled and active. |
| Off: Wi-Fi is disabled. | |
| Status | Off: Solid when the device is power on and booting. |
| On: When the device is ready and running normally. | |
| Cell Signal | On: Solid when there is a strong cellular signal. |
| Off: No cellular signal. | |
| Flashing fast: Medium cellular signal. | |
| Flashing slow: Weak cellular signal. | |
| Cell WAN | On: Solid when there is an active WAN connection. |
| Off: No active WAN connection. | |
| Serial | On: Serial WAN is established and active. |
| Off: No active WAN connection. | |
| Flashing: While data packet transferred via Serial port. | |
| Ethernet (On the Ethernet port) | On: Solid when there is an Ethernet connection. |
| Off: No Ethernet connection. | |
| Flashing: Data actively on Ethernet port. |
| Item | Description |
| SIM A/ SIM B | On: SIM card detected and ready. |
| Off: SIM card not present or not detected. | |
| Flashing: Detecting and querying SIM card information. |
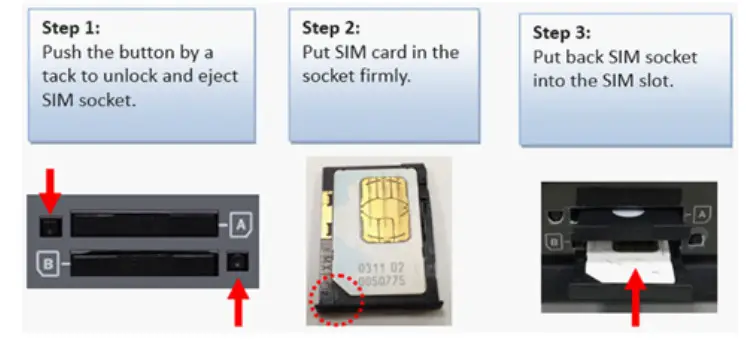
Installing the SIM Card
This device requires a 2FF mini-SIM card, which is supplied by your service provider. Install the SIM card before connecting antennas and cabling the device.To install the SIM card:
- Locate the SIM A or B card slot on the front of the device.The slots are labeled A and B. Use a tack, paper clip, or pen to push the button to unlock and eject the SIM holder.
- Put the SIM card in the socket.
- Insert the socket back into the SIM card as shown.
Note: When setting up the software, make sure you select the slot in which you installed the SIM card.
Attaching Antennas and Cables
Note: Before powering up the device, enable DHCP on your computer’s Ethernet port.
- Connect the provided antennas to the connectors labeled Cellular and WiFi. Finger tighten. For best cellular performance, position the top of the antennas as far apart as possible.
- Connect the Ethernet cable between the Ethernet ports on your computer and the device’s Ethernet LAN port.
- Connect the 12V power adapter and power connector to the device. The red wire is 12V POWER and the black wire is GND.
- To power up the device, plug the power adapter into an electrical outlet.
RS-232/485
To use the 4-pin terminal block serial port for connecting to your serial device use the RS-232/485 pin assignments as shown.
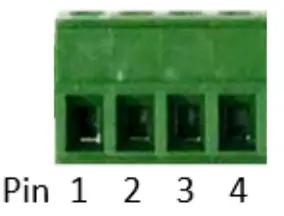
| Pin 1 | Pin 2 | Pin 3 | Pin 4 | |
| RS-232 | GND | RDX | TXD | GND |
| RS-485 | GND | DATA- | DATA+ | GND |
Basic WAN Connection Setup with Internet Access
After installing the SIM card and connecting cables and antennas, set up the device to connect to the Internet:
- Wait for 120 seconds after connecting power. The computer gets IP address 192.168.2.100 via DHCP.
- In a web browser, enter IP address 192.168.2.1.
- Log in using admin as both the Username and Password.If you are using the default password, you will be prompted to change it for future logins.
- Click Basic Network > WAN > Connection Setup.
- Click Edit on the WAN-1 Cellular connection
- If a custom APN setting is required, select Dial-up profile to Manual Configuration and then enter the APN. Click Save.
- Wait a few minutes and check the LED status. When there is a live connection, the CELL Signal and Cell WAN LEDs are ON. For more information on the LEDs, refer to LED Indicators.
After the device has a valid Internet connection, your computer automatically has full access to the Internet.
Upgrading Firmware
Once your device is installed, ensure the firmware is up to date.
- Download firmware updates through the MTR6 product page on www.multitech.com.
- Unzip the firmware BIN file and save it on your computer.
- Verify that the computer has DHCP enabled.
- In a browser, go to 192.168.2.1 and log in to the MTR6. The default Username and Password are both admins. If you are using the default password, you will be prompted to change it for future logins.
- Click Administration > System Operation > Backup & Restore > FW Upgrade.
- Click Choose File and select the BIN file you unzipped and saved to the computer.
- Click Upgrade. Wait a few minutes for the upgrade to complete
- Log in again to verify the firmware version is updated.
- Run through Setup Internet Connection. Refer to Basic WAN Connection Setup with Internet Access.
47 CFR Part 15 Regulation Class B Devices
This equipment has been tested and found to comply with the limits for a Class B digital device, pursuant to part 15 of the FCC Rules. These limits are designed to provide reasonable protection against harmful interference in a residential installation. This equipment generates, uses, and can radiate radio frequency energy and, if not installed and used in accordance with the instructions, may cause harmful interference to radio communications. However, there is no guarantee that interference will not occur in a particular installation. If this equipment does cause harmful interference to radio or television reception, which can be determined by turning the equipment off and on, the user is encouraged to try to correct the interference by one or more of the following measures:
- Reorient or relocate the receiving antenna.
- Increase the separation between the equipment and receiver.
- Connect the equipment into an outlet on a circuit different from that to which the receiver is connected.
- Consult the dealer or an experienced radio/TV technician for help.
Warning: Changes or modifications to this unit not expressly approved by the party responsible for compliance could void the user’s authority to operate the equipment.Additional User, Safety and Regulatory Content For additional safety and regulatory content refer to the MultiConnect rCell MTR6 User Guide (S000700), which is available atwww.multitech.com.
MultiConnect® rCell MTR6 Quick Start Document Number: 82130700LCopyright and TrademarkThis publication may not be reproduced, in whole or in part, without the specific and express prior written permission signed by an executive officer of Multi-Tech Systems, Inc. All rights reserved. Copyright © 2020 by Multi-Tech Systems, Inc.Multi-Tech Systems, Inc. makes no representations or warranties, whether express, implied or by estoppels, with respect to the content, information, material, and recommendations herein and specifically disclaims any implied warranties of merchantability, fitness for any particular purpose, and non-infringement. Multi-Tech Systems, Inc.reserves the right to revise this publication without obligation to notify any person or organization of such revisions or changes. MultiTech, MultiConnect, and the MultiTech logo are registered trademarks of Multi-Tech Systems, Inc. All other brand and product names are trademarks or registered trademarks of their respective companies.
Multi-Tech Systems, Inc2205 Woodale Drive, Mounds View, Minnesota 55112 U.S.A.Phone: 763-785-3500 or 800-328-9717Fax: 763-785-9874Support Portal https://support.multitech.comEurope, Middle East, Africa: [email protected]+(44) 118 959 7774 MULTITECH
 report this ad
Knowledge Base http://www.multitech.com/kb.goU.S., Canada, all others: [email protected] (800) 972-2439 or (763) 717-5863Business Hours: M-F, 8 am to 5 pm CT
References
[xyz-ips snippet=”download-snippet”]