
MuxLab 4K HDMI KVM Over IP Extender User Manual
FEATURES OF THE INTERFACE:
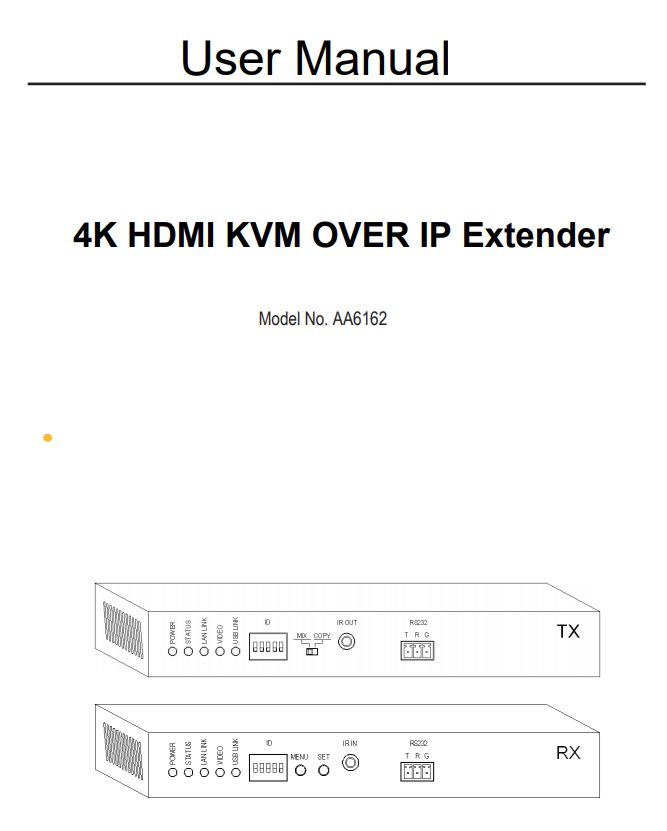
Picture 1.0 Front panel of Transmitter (TX)
![]()
Picture 1.1 Back panel of Transmitter (TX)
![]()
Picture 1.2 Front panel of Receiver (RX)
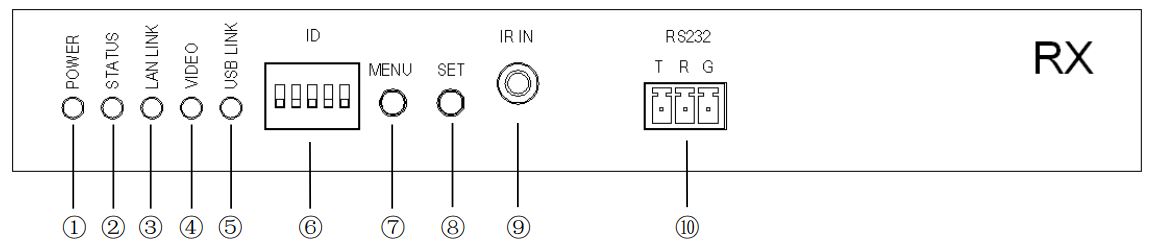
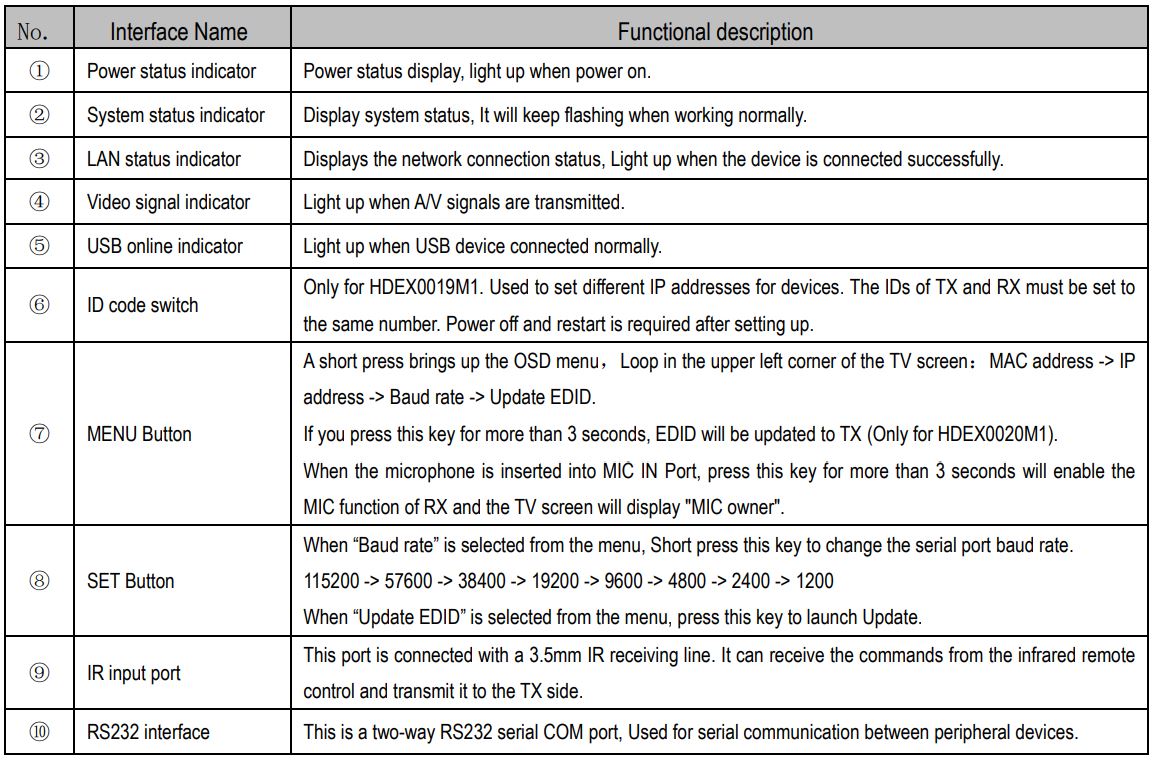
Picture 1.3 Back panel of Receiver (RX)


Connection and operation:
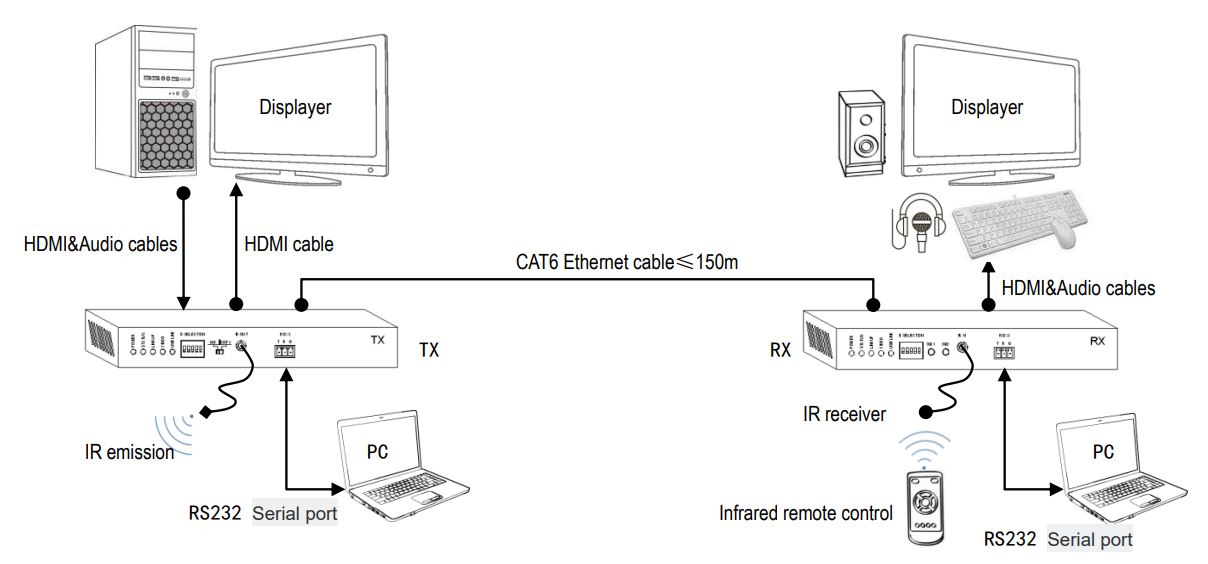
- One-to-One Connection Diagram
 Multiple One-to-One Connection Diagram
- One-to-Many Connection Diagram
- Connection instructions4.1 Connect the HDMI IN Port of the TX to the HDMI output port of signal source/PC over a HDMI cable.4.2 Connect the HDMI OUT Port of the RX to the HDMI input port of display device over a HDMI cable.4.3 Connect the 1G LAN Port of the TX to the 1G LAN Port of the RX over a network cable. Gigabit switches need to be inserted between TX and RX when multiplexing4.4 TX and RX need to be set to the same ID number before use. (Only for HDEX0019M1)4.5 Supply TX and RX with AC power adapter.4.6 RS232, IR and other interfaces can be selected as required.
- RS232 Communication5.1 To use RS232 to do communication, the TX RS232 Port Baud rate can be set to 115200. RX RS232 Baud rate can be adjusted between 1200-115200(refer to button function instruction),which need to be matched with the output connected serial port baud rate.5.2 To use cross-link way for serial port connection, TXD to connect with RXD of the output connected device, the RXD to connect with the TXD of the output connected device, and GND to connect with GND.5.3 At One to Many Connection mode, TX RS232 can send serial port data to many RX simultaneously and also can monitor many RX RS232.The TX only can receive data of one RX at the same time. When one of the RX send data, the TX will keep communicate with the RX, the other RX have to wait extra 0.2 seconds to get the chance of communicating with the TX after the current RX stopped communication.
- IR Extend6.1 IR Extend is used for using IR remote to do distance control to the peripheral device.6.2 To check if the working frequency of the IR remote is under the range of the 30-50HZ.6.3 To point the IR Transmitter head at the peripheral device location.6.4 At one to many connection mode, TX will monitor many RX IR interface. The TX only can receive one of the RX IR data. When one of the RX send data, the TX will keep communicating with the RX, the other RX have to wait the extra 2seconds to have the chance of communicating after the current RX stopped communicating.
- Analog Audio Input and Output7.1 If the TX Line In or Line Out have cable connection, it will transmit the Line IN input audio to the RX automatically.7.2 If the RX MIC IN or LINE Out have cable connection, the HDMI Output audio will be mute and the audio will be priority output from the LINE OUT Port.7.3 TX Line Out audio signal is from RX MIC IN Port.7.4 At One to Many Connection mode, it needs to keep pressing the RX MENU button for lasting three seconds to get the chance of using the TX LINE OUT Channel. After done successfully, the RX will show “USB owner”.
- USB Expand8.1 To use the USB cable to connect the TX DEVICE Port to the PC. Normally no need to install driver, if meet the remind of driver installation, please download the driver by linking the Ethernet.8.2 It can insert the Mouse, Keyboard and U-stick and other peripheral device to the RX USB Port. And the peripheral device driver still need to be installed at the PC.8.3 The device can be used normally after the RX and RX USB LINK LED both go bright.8.4 At One To Many connection mode, there are many RX, it need to short press the RX SET button to get the chance of using the RX USB Channel.
- EDID Mode and Update:9.1 There is one EDID Mode Switch, when choose MIX Mode, it will do mixed process to the EDID from both TX and RX HDMI Port Connected Device; when choose Copy Mode, it will only read the RX HDMI Port connected device.9.2 AA6160 will update the new TV EDID to the TX automatically after detecting the RX HDMI port have connected the new TV.9.3 AA6162 can update the new TV to the TX by keeping press the MENU button for three seconds after HDEX0020M1 have detected the RX HDMI port have connect the new TV.
- Other matters needing attention:10.1 After change the ID set-up, it needs to be active by power off and on again.11.2 If meet exception, the user can try to update the EDID.
 Multiple One-to-One Connection Diagram
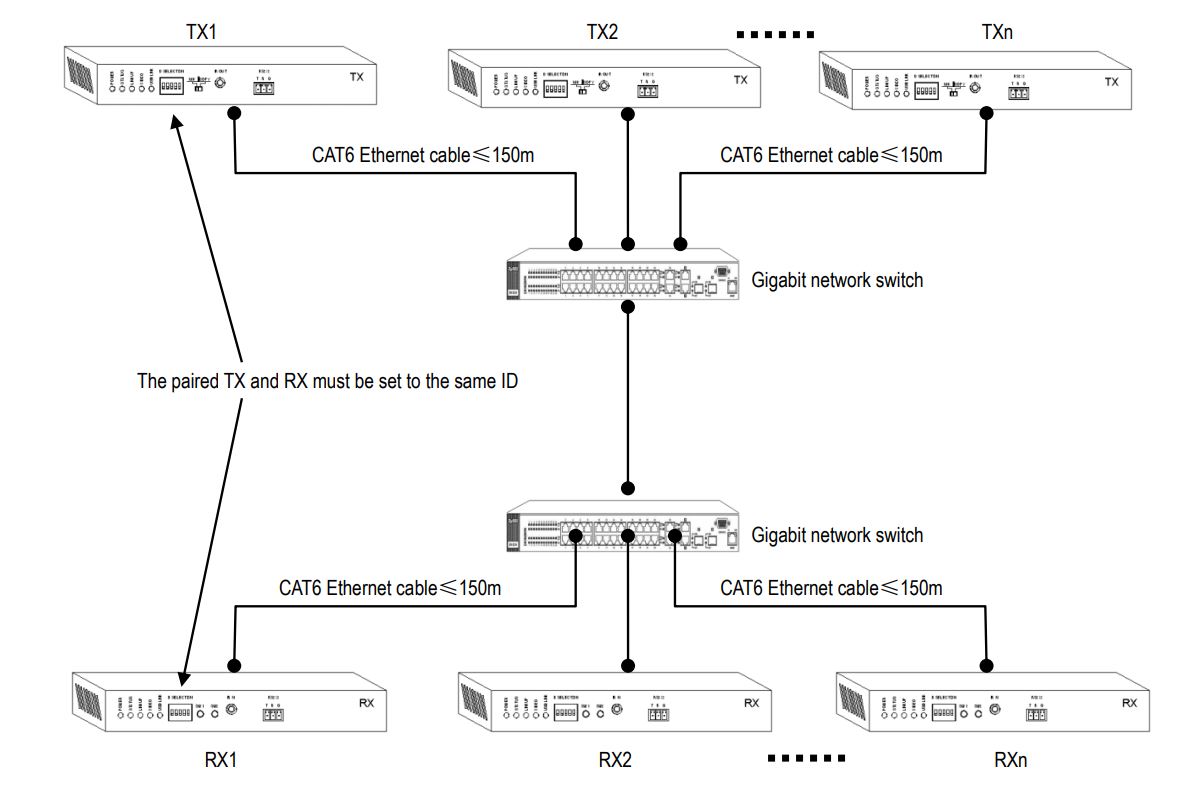 One-to-Many Connection Diagram
 Connection instructions4.1 Connect the HDMI IN Port of the TX to the HDMI output port of signal source/PC over a HDMI cable.4.2 Connect the HDMI OUT Port of the RX to the HDMI input port of display device over a HDMI cable.4.3 Connect the 1G LAN Port of the TX to the 1G LAN Port of the RX over a network cable. Gigabit switches need to be inserted between TX and RX when multiplexing4.4 TX and RX need to be set to the same ID number before use. (Only for HDEX0019M1)4.5 Supply TX and RX with AC power adapter.4.6 RS232, IR and other interfaces can be selected as required.
SPECIFICATIONS:


[xyz-ips snippet=”download-snippet”]