Metal and Water FinderGOLD LINEUser’s Manual
Safety information
| The operating in high voltage areas would limit the results and performance |
It’s better to turn off mobile while using the device. |
| Don’t operate two devices with same method of search at the same place |
Don’t store in high temperature or high humidity |
| Disconnect the batteries before long time storage |
The operator Must remove any metals that might affect the operating eg: Rings, watch, belt… |
Any attempt to tamper with the device or unapproved maintenance would void the warranty |
For devices that work on eplaceable batteries, use good quality batteries to work longer hours. |
![]() The user must practice before starting the detecting operations and discoveries
The user must practice before starting the detecting operations and discoveries![]() Store in Cool and dry place 15-40 C 5%-75% humidity
Store in Cool and dry place 15-40 C 5%-75% humidity

Read & Understand The User’s manual before using this device
Technical specification
| Search system : | Built-in ionic and radar search system |
| Search principle: | Processing the Signal Received level of ionic radiation |
| Operating processor: | MICROCONTROLLER PIC18 |
| Operating frequency: | 20 MHz |
| Power: | two celles lithium 3.7v – 3600 mAh / output 12v |
| Power consumption: | Maximum of consumption 50 mA |
| Battery life: | 10 work hours |
| Charger: | 5.1 volt 3A / Charging Time 4 hours |
| Display Type: | NO |
| Specialized to detects: | Gold |
| Targets Discrimination: | NO |
| Target Selection System: | NO |
| Depth Search: | 12 M |
| Distance Search: | 50 M |
| Results feedback: | Light, sound, and vibration alerts |
| Bluetooth | NO |
| Wireless: | NO |
| Automatic smart | No |
| guidance system: | Yes |
| Voice alerts: | Yes |
| Vibrating alert: | From -15° C to 60° C |
| Operating temperature: | From -15° C to 40° C |
| Storage temperature: | It can be stored and work in the degree rate of air humidity of |
| Humidity: | level 90%. |
| Weight: | Compound: 700 g – disjointed in the bag: 1200 g |
| Dimensions: | 35X80X150 mm |
| Bag dimensions: | 130X290X340 mm |
Device parts
Main Control UnitThe unit is responsible to control of the settings and search options. The batteries were built inside it. Also, it’s responsible for issuing the search acoustic, optical, and vibrations results.
Ion and Radar sensor.This sensor needs to connect into its own entrance at the front of the device by using a connectivity socket.
HandheldIt uses for hold and control the device. The hand held has a laser button on the front section. and the charging socket at the bottom
ChargerAn electric charger to recharge the device’s battery Values: Input: 240-100VAC / 60-50Hz / 0.4 amps Output: 5 volts AC / 3 amp / 15 Watt.

HeadphonesNeeds to contact through the headphones jack, who is to the right side of the device.

Interfaces
- Ionic sensor input
- Night light
- Visual signal indicator
- ON/OFF key
- Battery indicator
- Ground calibration button
- Volume button
- LED button
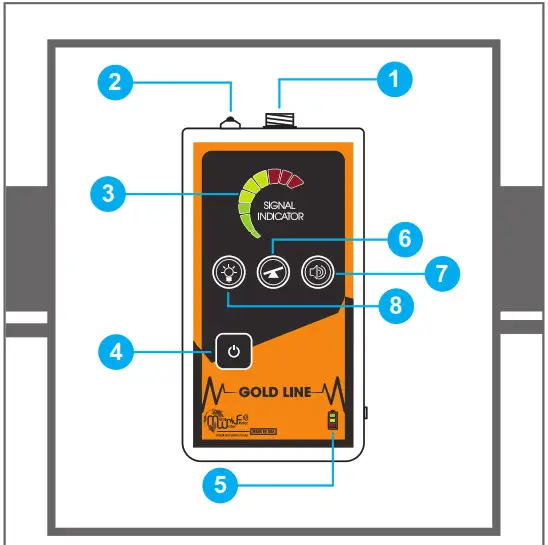
- laser button
- Charge socket
Device Aggregation

Power button: Press and hold to turn on the unit after switching the power switch ON.
LED flashlight button: press the button to turn the flashlight in the front of the unit for ease of use in night. Keep in mind that working with a flashlight increases the power consumption and therefore less working hours.

Volume button: press the button to select the sound level

Ground calibration key: With this key, the user can adjust the unit to adapt to the terrain and environment in which the device operates. The device gives the normal and stable adjustment of the search tool for better results. Note: We may start searching in an area where the device is issuing a signal, in general, We press the calibrate key once and wait for the signal to stabilize If this continues to sound in any direction we press the key again until we get a stable result and then go to the search area to determine the targets. There are three levels to adjust the calibration if the device is not calibrated. You are located in areas where there ishigh noise from high voltage, etc.
Starting
To use the Verification Unit, First, move away from the suspected target location and calibrate the device by pressing the balance button, then start moving around the target location. The unit will react according to the target ionic field indicating sound and visual signals. The signal will increase when the unit is near the target.
Note:The ionic field intensity depends on the metal type and the period that has been underground. The approximate depth of the target can be determined by using this unit. After the target point is determined, direct the target to the target and walk in any direction until the acoustic indicator is disconnected. We measure the distance from this point to the target point, which is the approximate distance to the depth of the target.
Charging
Caution -Charge the battery immediately after use.-When the battery is full disconnect the charger.-Only use the charging adapter that is attached with the product.-Charge and store the unit away from flammable objects.-Turn the unit off after use and don’t leave it idle.
| Battery Status while charging | Battery Status while working | ||
| Description | LED Indicator | Description | LED Indicator |
| Flashing Red: The battery is starting to charge in ‑rst stage |  |
Battery at 100% | |
| The red indicator stops ashing and the yellow start to ash indicating the start of the second stage of the charging process |  |
Battery at 50% | |
| The yellow indicator stops ashing and the green start to ash indicates the third and ‑nal stage of the charging process | Battery at 25% | |
|
| All lights on full battery charge achieved disconnect the charger | Flashing Red: The battery is low and the unit will shut-down automatically | |
Charge Adapter for the Verification Unit:5V DC / 3-A 15W
Notes
 report this ad
Metal and Water Finder
United States of America – illinoiswww.mwf-usa.com[email protected]+1 ( 708 ) 364 9602
Turkey – Istanbulwww.mwf-metaldetectors.com[email protected]+90 ( 212 ) 222 0946+90 ( 212 ) 222 0947
References
[xyz-ips snippet=”download-snippet”]