Mxmoonan Integrated Ultrasonic Processor
User Manual
Mxmoonan Amazon Brand StoreEmail: [email protected]
1. Overview
After in-depth study of user needs, our technicians come up this new INTEGRATED ultrasonic processor. It is an updated product of the original separate soundproof box model. We also has many detail improvements to realize better user experience. Due to its compact size (15lb (6.8KG); 18.5×12.6×20.6in (470×320×525mm) and improvement in details, it will become a popular trend in small lab.
2. Working Principle
First, the supply electric power is converted into high frequency and high voltage power. This energy is transferred to the transducer and converted into high-frequency mechanical vibration, which is then amplified by amplitude displacement and then the energy is aggregated by the titanium alloy probe. When this energy is applied on the liquid, it will generate a powerful pressure wave. This pressure wave will form millions of microscopic bubbles, which will grow rapidly with high frequency vibration and then suddenly close. When the bubbles are closed, a strong shock wave is generated due to collision between the liquids, and the pressure is equal to thousands of atmospheric pressures (ie, ultrasonic cavitation). It causes strong shearing motion on the top of the titanium alloy probe and shears the molecules in gas into smaller fragment. Ultrasonic cavitation is a unique physical process when strong ultrasound is emitted in liquid. It is accompanied by many effects, mainly as follows: high temperature effect, discharge effect , luminescence effect and jet, impact, pressure effect, etc. This energy is sufficient to crush cells, degrade, reorganize and homogenize various inorganic substances or pulverize nanomaterials.
3.Parts of the Machine
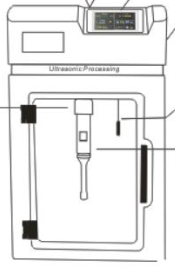
Front
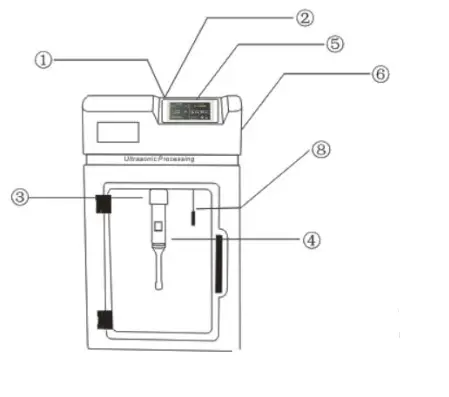
Back
① Power Cord
② Sleeve
③ Power Transducer
④ Horn
⑤ LCD Screen
⑥ Chassis
⑦ Output Socket (connecting power transducer)
⑧ Temperature Sensor
⑨ Fuse Holder
⑩ Power Socket
4. Electrical Diagram
TransducerThe pressure transducer has a sandwich single screw structure. For different models, the transducers are equipped with different specifications and quantities of voltage ceramic sheets.
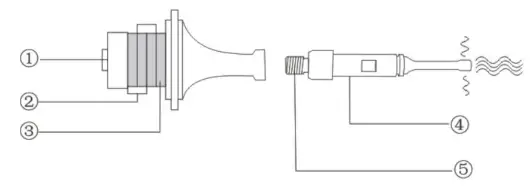
① Fastening Screw
② Electrode Sheet
③ Voltage Ceramic Sheet
④ Titanium Alloy Horn
⑤ Connecting Screw
5. Product Features
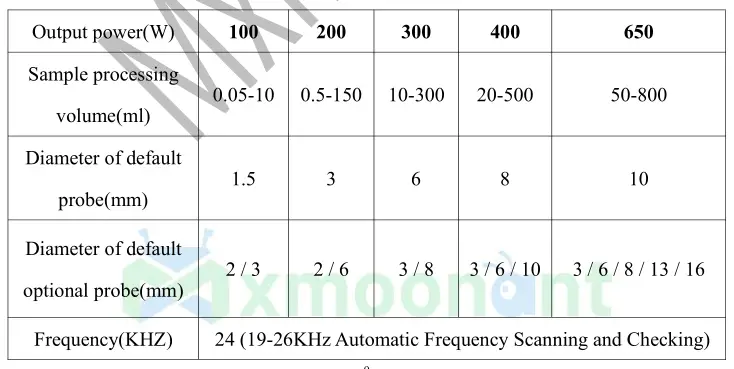
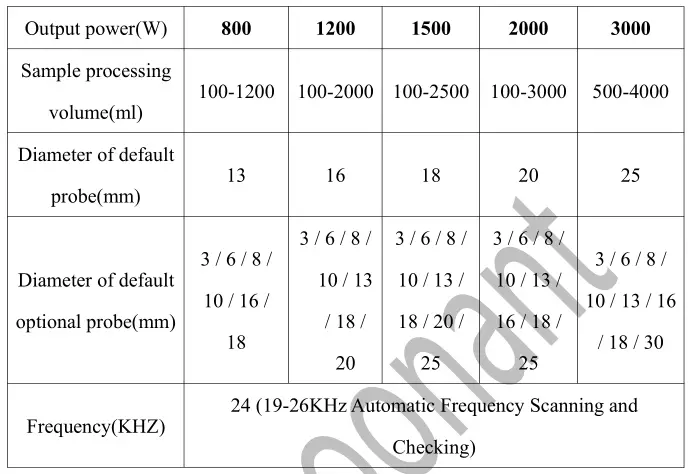
- Automatic resonance point, 24KHz (19-26KHz Automatic Frequency Scanning and Checking);
- Automatic amplitude compensation, which can automatically work at the optimal frequency point and output point according to the fluidity of the sample;
- Adopt color touch screen controller, all functions are displayed integrated;
- Scientific design, 10 groups of users store settings and directly implemented on a single machine;
- Independent on/off pulse with 3 modes of continuous use, pulse and timed continuous use.
- 2D and 3D ultrasound probe design, which greatly improves efficiency and reduces the loss of the horn compared to conventional ultrasound;
- The device is equipped with a temperature sensor for temperature-sensitive sample;
- Automatic overload protection, over temperature and fault alarm.
- Small bulb inside the box allows to observe the status of the sample during processing.
6. Working Conditions
- Working Temperature: 0~40℃
- Humidity: ≤85% (T=20℃)
- Power Supply: 85~240V/50Hz±10%
- Transducer Temperature: 0~120℃
- Processing Objects: Solution or solution mixture
Attention!Do not use it continuously for over 1 hour when processing common sample!Do not use it continuously for over 30 minutes for ultrasonic processing!
7. Installation and Operation
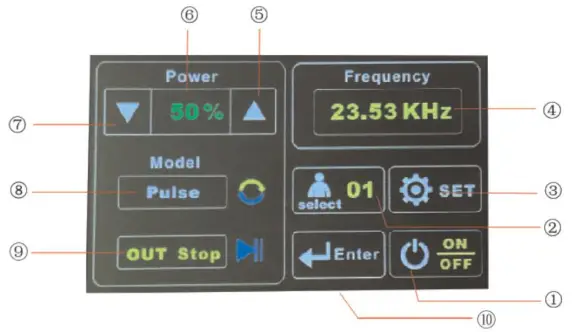
① ON/ OFF
② User Group
③ Set
④ Current Frequency Display
⑤ Power Increase
⑥ Current Power Percentage Display
⑦ Power Reduce
⑧ Current Operating Mode
⑨ Current Operating Status
⑩ Enter
Operating StepsThe time controller is designed and manufactured by digital circuit and microcomputer control technology, featured with high precision, good reliability, strong anti-interference ability and memory function. Its full-scale time control range is from 1 minute to 99 hours, which can be set according to users’ needs.
Power ConnectionThe ultrasonic generator must be connected with the ultrasonic transducer before use! Then hold the sleeve of the transducer with the soundproof box (you can also use a bracket to fix the sleeve or hold the sleeve with your hand, but you can’t touch the transducer). Immerse the horn head in the solution for 10-15 mm. Turn on the power switch on the back of the chassis, and the LCD screen works.
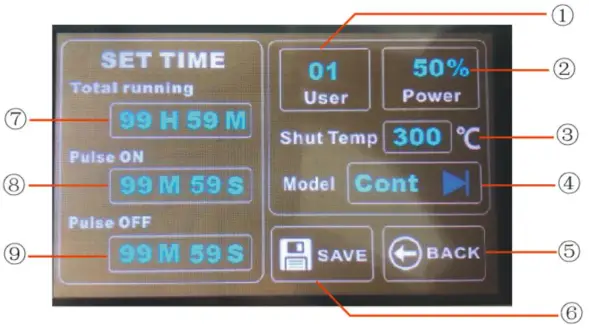
① User Number
② Power Display
③ Temperature Display
④ Operation Model
⑤ Back
⑥ Save
⑦ Total Running Time
⑧ Pulse ON Time
⑨ Pulse OFF Time
Power Regulation“ ∧、∨ ”button are the ultrasonic power setting buttons. Press “∧” button to increase its output power and press “∨”to reduce its output power.
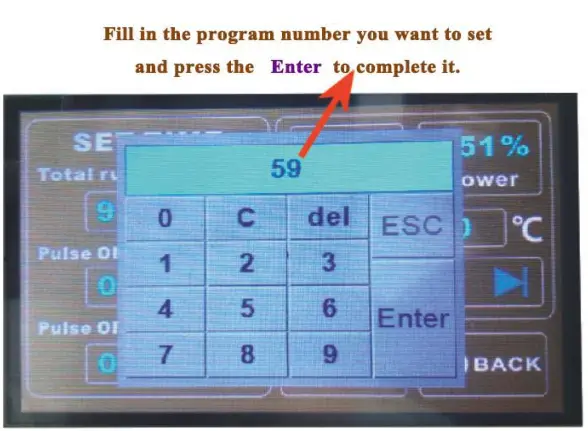
Programming
- Full digital electronic timer for 1 minute to 99 hours
- Touch SET to enter the settings interface
- First, choose your user number and set the parameters.
- Click Time Setting, input the time you want, press Enter, Time setting is done.
- After setting up the program, click SAVE to save the program. The next time you want to use it, you can select the user number directly to call out the set program.
NotesModel function, there are three modes for you to choose: Pulse, Time, Cont
- Pulse: Pulse is suitable for most users, you can set the working and pausing time, and effectively avoid overheat of the sample.
- Time: Ultrasonic processor continues to work until it reaches the set time: This mode is for samples that are not easy to process and do not sensitive to high temperature.
- Cont: As long as the electric power is on, or if you do not stop it, the machine will run all the time: This mode is for samples that are difficult to process and needs to be crushed. Attention should be paid that under this mode, the temperature of the sample and the ultrasonic transducer will increase, and the ultrasonic horn will worn out quickly.
8. Technical Parameters
9.Maintenance
- The equipment should be placed in a clean, dry and ventilated place.
- Handle the transducer gently to prevent the it from breaking.
- When the oscillator is hot, please use it after cooling.
- After each use, the power plug should be pulled out and the power supply should be cut off.
- The equipment can work under the power supply 85-240V.
- When the equipment fails to work, please contact us asap. It is forbidden to open the machine without authorization. (Email: [email protected])
10.Package List:
Main Machine : 1Probe : 1Lifting Platform, Anti-skid Cushion : 1Temperature Sensor : 1Power Cord : 1Cable Line : 1Fuses : 3
 report this ad
Mxmoonan Integrated Ultrasonic Processor User Manual – Mxmoonan Integrated Ultrasonic Processor User Manual –
[xyz-ips snippet=”download-snippet”]