
![]() The expert for robots in your home
The expert for robots in your home
With one click to the online shop
 |
 |
| myRobotcenter.eu | myRobotcenter.co.uk |

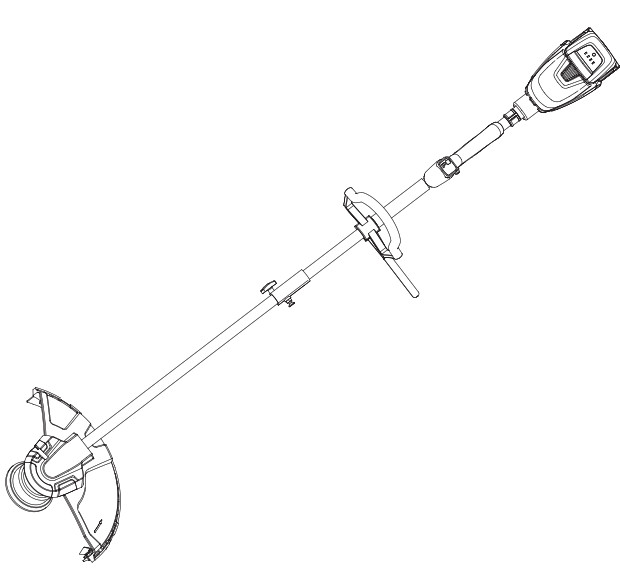
![]() LT G33ST094040V CORDLESS GRASS TRIMMEROriginal Instructions
LT G33ST094040V CORDLESS GRASS TRIMMEROriginal Instructions
 READ & UNDERSTANDINSTRUCTION MANUALSave all warnings and instructions for future reference.

INTENDED USE
This Li-ion cordless grass trimmer is intended for cutting weed, grass or similar soft vegetation in areas that are hard to reach, e.g. under bushes, on slopes and edges. It may not be used to work on unusual thick, dry or wet grass, e.g. pasture grass, or to shred leaves. For safety reasons, it is essential to read the entire instruction manual before the first operation and to observe all the instructions therein. This product is intended for private domestic use only, not for any commercial trade use. It must not be used for any purposes other than those described.
GENERAL SAFETY WARNINGS
WARNING: When using line trimmers, basic safety precautions should always be followed to reduce the risk of fire, electric shock, and personal injury, including the following:Save all warnings and instructions for future reference.DANGER: Do not rely on the tool’s insulation against electric shock. To reduce the risk of electrocution, never operate the machine in the vicinity of any wires or cables(power, etc.) which may carry electric current.
TRAINING
- Read the instructions carefully. Be familiar with the controls and the proper use of the machine.
- Never allow people unfamiliar with these instructions or children to use the machine. Local regulations can restrict the age of the operator.
- Keep in mind that the operator or user is responsible for accidents or hazards occurring to other people or their property.
PREPARATION
- Never operate the machine while people, especially children, or pets are nearby.
- Wear eye protection and stout shoes at all times while operating the machine.
- The distance between the machine and bystanders shall be at least 15m.
- Do not use metal blades.
- Avoid using the machine in bad weather conditions especially when there is a risk of lightning.
OPERATION
- Use the machine only in daylight or good artificial light.
- Never operate the machine with damaged guards or shields or without guards or shields in place.
- Switch on the motor only when the hands and feet are away from the cutting means.
- Always disconnect the machine from the power supply (i.e. remove the plug from the mains or remove removable battery).• Whenever leaving the machine unattended;• Before clearing a blockage;• Before checking, cleaning or working on the machine; after striking a foreign object;• Whenever the machine starts vibrating abnormally.
- Take care against injury to feet and hands from the cutting means.
- Always ensure that the ventilation openings are keptclear of debris.
MAINTENANCE AND STORAGE
- Disconnect the machine from the power supply (i.e. remove the plug from the mains or remove removable battery) before carrying out maintenance or cleaning work.
- Use only the manufacturer’s recommended replacement parts and accessories.
- Inspect and maintain the machine regularly. Has the machine been repaired only by an authorized repairer?
- When not in use, store the machine out of the reach of children.
PRODUCT SAFETY WARNINGS
OTHER SAFETY WARNINGS
- Avoid Dangerous Environments – Don’t use trimmers in damp or wet locations.
- Always turn the line trimmer off or remove the battery pack whenever leaving the trimmer unattended.
- Don’t Use In Rain.
- Keep Children Away – All visitors should be kept at a distance from the work area.
- Dress Properly – Do not wear loose clothing or jewelry. They can be caught in moving parts.Use of rubber gloves and substantial footwear is recommended when working outdoors. Wear protective hair covering to contain long hair.
- Use Safety Glasses – Always use a face or dust mask if the operation is dusty.
- Use the Right Tool – Do not use the tool for any job except that for which it is intended
- Don’t Force the Trimmer – It will do the job better and with less likelihood of a risk of injury at the rate for which it was designed.
- Don’t touch moving hazardous parts before the machine is turned off or removed the battery pack and the moving hazardous parts have come to a complete stop.
- Don’t Overreach – Keep proper footing and balance at all times.
- Stay Alert – Watch what you are doing. Use common sense. Do not operate the trimmer when you are tired.
- Do not operate the trimmer while under the influence of alcohol or drugs.
- Keep guards in place and in working order.
- Store Trimmer Indoors – When not in use the trimmer should be stored indoors in a dry and high or locked-up place with the battery pack removed – out of reach of children.
- Maintain Trimmer With Care – Keep the cutting attachment clean for best performance and to reduce the risk of injury. Follow instructions for changing accessories. Keep handles dry, clean, and free from oil and grease.
- Check Damaged Parts – Before further use of the trimmer, a guard or other part that is damaged should be carefully checked to determine that it will operate properly and perform its intended function. Check for alignment of moving parts, binding of moving parts, breakage of parts, mounting, and any other condition that may affect its operation. A guard or other part that is damaged should be properly repaired or replaced by an authorized service center unless indicated elsewhere in this manual.
- Clear the area to be cut before each use. Remove all objects such as rocks, broken glass, nails, wire, or the line that can be thrown or become entangled in the cutting attachment. Make sure that other persons and pets are at least 15m away.
- Before using the machine and after any impact, check for signs of wear or damage and repair as necessary.
- Always hold the trimmer firmly, with both hands on the handles while operating. Wrap your fingers and thumbs around the handles.
- Avoid Accidentally Starting–Don’t carry the trimmer with your finger on the trigger.
- Do not operate the trimmer in petrolic or explosive atmospheres. Motors in these appliances normally spark, and the sparks might ignite fumes.
- Damage to Trimmer – If you strike a foreign object with the trimmer or it becomes entangled, stop the tool immediately, remove the battery pack from the line trimmer, check for damage, and have any damage repaired before further operation is attempted. Do not operate with a broken guard or spool.
- If the equipment should start to vibrate abnormally, stop the motor, remove the battery pack from the line trimmer. and check immediately for the cause. Vibration is generally a warning of trouble. A loose head may vibrate, crack, break or come off the trimmer, which may result in serious or fatal injury. Make sure that the cutting attachment is properly fixed in position. If the head loosens after fixing it in position, replace it immediately. Never use a trimmer with a loose cutting attachment.
- Replace a cracked, damaged or worn-out cutting head immediately, even if damage is limited to superficial cracks. Such attachments may shatter at high speed and cause serious or fatal injury.
- Check the cutting attachment at regular short intervals during operation, or immediately if there is a noticeable change in cutting behavior.
- Only use Yard force authorized polymer trimmer line accessories and trimmer lines that are designed for use with this machine. Although certain unauthorized attachments might be fitted to the Yard force line trimmer, their use may be extremely dangerous, and/ or damage to the tools.
- To reduce the risk of serious injury, never use wire or metal-reinforced line or other material in place of the nylon cutting lines. Pieces of wire could break off and be thrown at high speed toward the operator or bystanders.
- To reduce the risk of injury from loss of control, never work on a ladder or on any other insecure support. Never hold the cutting attachment above the waist height.
- If situations occur that are not covered in this manual, use care and good judgment. Contact the Yard force Service Center for assistance.
- Do not charge the battery pack in rain, or in wet locations.
- Use only with Yard force battery packs and chargers.
- The battery pack must be removed from the appliance before it is scrapped.
- The battery shall be disposed of safely.
- Do not dispose of the battery in a fire. The cells may explode. Check with local authorities for possible special disposal instructions.
- Do not open or mutilate the battery. Released electrolyte is corrosive and may cause damage to the eyes or skin. It may be toxic if swallowed.
- Exercise care in handling batteries in order not to short the battery with conducting materials such as rings, bracelets, and keys. The battery or conductor may overheat and cause burns.
- When servicing, use only identical Yard force replacement parts. Use of any other accessory or attachment may increase the risk of injury.
- Battery tools do not have to be plugged into an electrical outlet; therefore, they are always in operating condition. Be aware of possible hazards even when the tool is not operating. Take care when performing maintenance or service.
- Do not wash with a hose; avoid getting water in the motor and electrical connections.
- Save these instructions. Refer to them frequently and use them to instruct others who may use this tool. If you loan this tool to someone else, also loan these instructions to them to prevent misuse of the product and possible injury.
- Always wear substantial footwear and long trousers while operating the machine.
- Always be sure of the footing on slopes and to walk, never run.
SYMBOLS
Safety symbolsThe purpose of safety symbols is to attract your attention to possible dangers. The safety symbols and the explanations with them require your careful attention and full understanding. The symbol warnings do not, by themselves, eliminate any danger. The instructions and warnings they give are no substitutes for proper accident prevention measures.WARNING: Be sure to read and understand all safety instructions in this operator’s manual, including all safety alert symbols such as “DANGER,” “WARNING,” and “CAUTION” before using this tool. Failure to follow all instructions listed below may result in electric shock, fire, and/or serious personal injury.
SAFETY ALERT SYMBOL: Indicates DANGER, WARNING, or CAUTION. May be used in conjunction with other symbols or pictographs.Symbol meaning This page depicts and describes safety symbols that may appear on this product. Read, understand and follow all instructions on the machine before attempting to assemble and operate.
 |
This symbol, before a safety comment, indicates a precaution, a warning, or a danger. Ignoring this warning can lead to an accident for yourself or for others. To limit the risk of injury, fire, or electrocution always apply the recommendations indicated. |
|
To reduce the risk of injury, the user must read the instruction manual carefully. |
 |
Wear protective goggles. |
 |
Wear suitable protective gloves. |
 |
Wear ear protection |
 |
Wear a dust mask. |
 |
Wear foot protection |
 |
Protect against rain and wet. Do not expose and operate the tool in rain. |
 |
Ensure that other people and pets remain at least 15m away from the line trimmer when it is in use. |
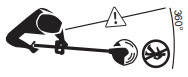 |
Beware of thrown or flying objects to bystanders. Keep bystanders a safe distance away from the machine. |
 |
Guaranteed sound power level value in 96 dB. |
 |
WEEE symbol. Waste electrical products should not be disposed of with household waste. Please recycle where facilities exist. Check with your Local Authority or local store for recycling advice. |
 |
The product complies with the applicable European directives and an evaluation method of conformity for these directives was done. |
| Warning symbols on the battery pack | |
 |
To reduce the risk of injury, the user must read the instruction manual carefully. |
 |
Do not throw into the water. |
 |
Do not throw to fire. |
 |
Do not subject the battery to strong sunlight over long periods of time. Do not leave on a heater (max.45°C). |
 |
Batteries contain Li-ion. Do not dispose of waste batteries in domestic waste. Contact local authority to find out how to dispose of batteries. |
|
WEEE symbol. Waste electrical products should not be disposed of with household waste. Please recycle where facilities exist. Check with your Local Authority or local store for recycling advice. |
| Warning symbols on the charger | |
|
To reduce the risk of injury, the user must read the instruction manual carefully. |
 |
The charger is for indoor use only. |
 |
Double insulation |
|
WEEE symbol. Waste electrical products should not be disposed of with household waste. Please recycle where facilities exist. Check with your Local Authority or local store for recycling advice. |
|
The product complies with the applicable European directives and an evaluation method of conformity for these directives was done. |
 |
Protective 3.15 A limited |
TECHNICAL DATA
| Model | LT G33 | |
| Mains voltage | 40 V |
|
| No-load speed |  |
4500/5000/5500 min.’ |
| Cutting width |  |
380 mm |
| Cutting line dia. |  |
2 mm |
| Line Feed | Dual Line, Tap-Feed | |
| Sound pressure level: Ls, | 79.7 dB(A) K=3 dB(A) | |
| Sound power level: L„„ | 91.81 dB(A) K=3 dB(A) | |
| Guaranteed sound power level L „ (according to 2000/14/EC) | 96 dB | |
| Vibration front handle | 5.1 m/s’ K=1.5 m/s2 | |
| Weight: | 3.6 kg | |
| Battery pack model | BOP-SPO4-4025ZA | |
| Capacity |  |
40 V |
| Charger model | VDE: B0O-SP03-4030ZA BS: BOO-SP03-4030ZB | |
| Input | 220-240 V-, 50/60 Hz 160 W | |
| Output: | 40 V |
|
| Protection class | II |
The declared vibration total value has been measured in accordance with a standard test method and may be used for comparing one tool with another;The declared vibration total value may also be used in a preliminary assessment of exposure.NOTICE: The vibration emission during actual use of the power tool can differ from the declared value in which the tool is used. In order to protect the operator, the user should wear gloves and ear protectors in the actual conditions of use.
DESCRIPTION OF PRODUCT
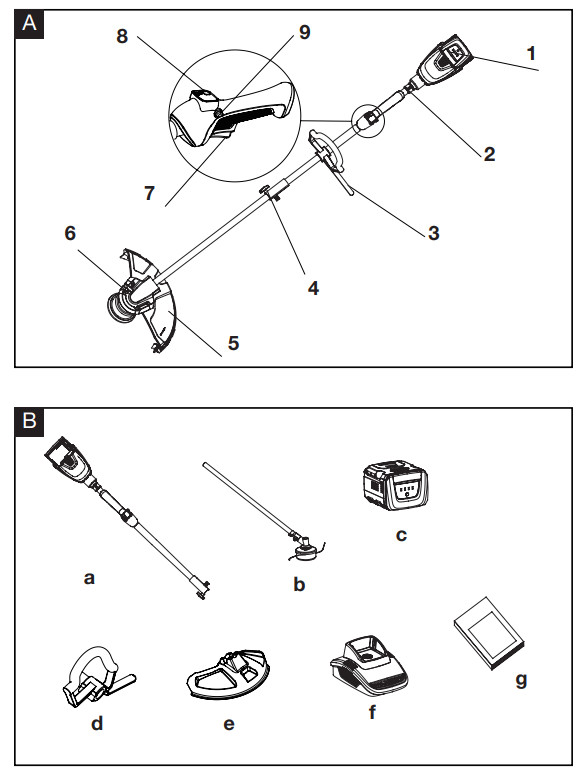
Parts description (Fig. A)
- Battery pack
- Harness hook
- Auxiliary handle
- Shaft connector
- Guard
- Cutting head
- Main switch
- Speed control button
- Battery pack
Delivery contents (Fig. B)Carefully unpack the appliance and check that it is complete. Dispose of the packagingmaterial correctly.a. Powerhead unitb. Trimmer shaft assyc. Battery packd. Auxiliary handlee. Safety guardf. Chargerg. Instruction manual
WARNING: If any parts are damaged or missing, do not operate this tool until these parts are replaced. Failure to heed this warning could result in serious personal injury. NOTE: Always recycle the packaging in accordance with local recycling guidelines.
ASSEMBLY
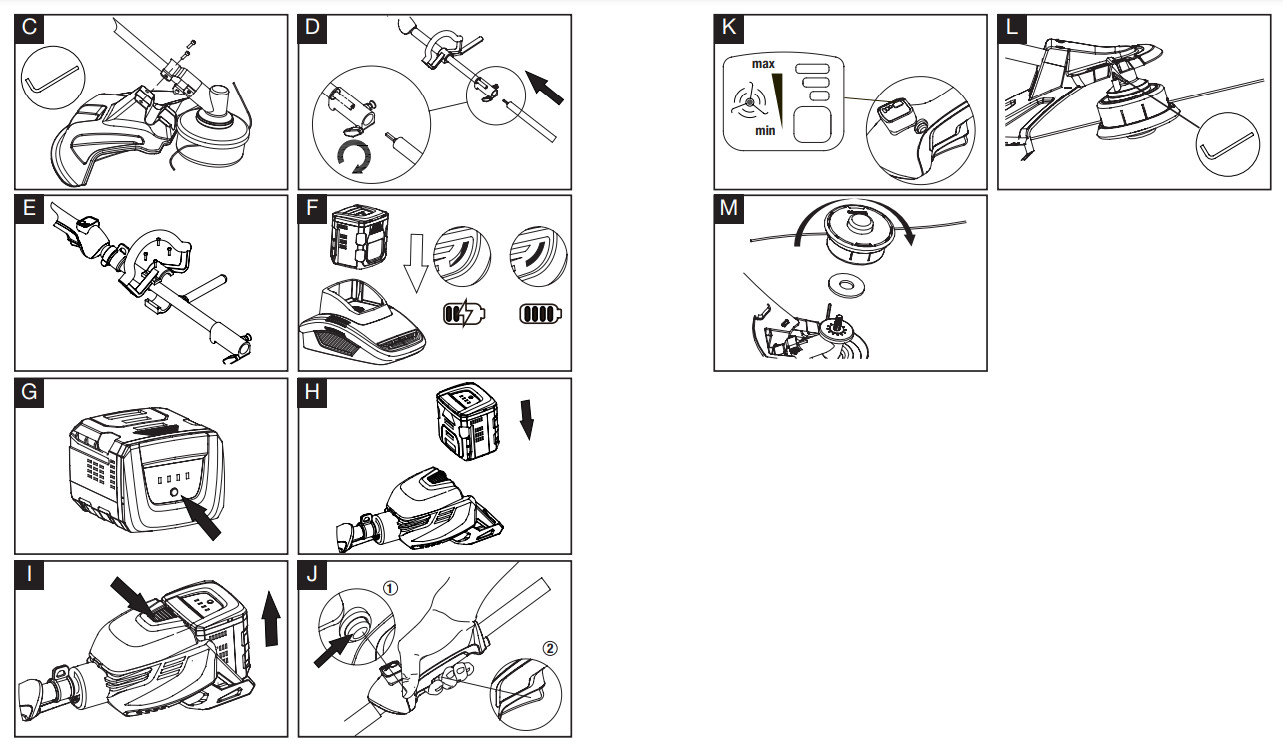
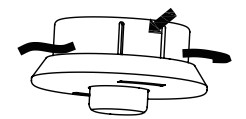
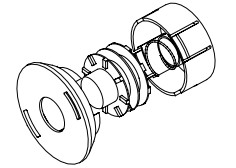
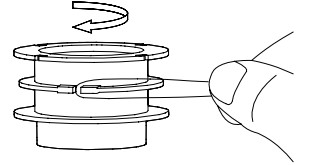
WARNING: If any parts are damaged or missing, do not operate this product until the parts are replaced. Use of this product with damaged or missing parts could result in serious personal injury.WARNING: Do not attempt to modify this product or create accessories not recommended for use with this line trimmer. Any such alteration or modification is misuse and could result in a hazardous condition leading to possible serious personal injury.WARNING: To prevent accidental starting that could cause serious personal injury, always remove the battery pack from the tool when assembling parts.Attaching the guard (Fig. C)Loosen and remove the two screws from the shaft base, align the guard mounting holes with the assembly holes and then lock the guard onto the shaft base with the two screws, together with two spring washers. Make sure the guard is fixed, any reverse fixing will cause great danger!Installing the grass trimmer attachment shaft (Fig. D)WARNING: Read the Instruction Manual for the attachment used on this powerhead and follow all warnings and instructions. Failure to follow all instructions may result in electric shock, fire, and/or serious personal injury.WARNING: Never install, remove, or adjust the attachment while the powerhead is running.Failure to stop the motor can cause serious personal injury. Never operate powerhead without the attachment.Note: Remove the battery if fitted before making any adjustments.
- Loosen the coupling connector knob by rotating anticlockwise
- Align the trimmer shaft arrow to the coupler connector position hole until the release pin locks in positionNOTE: You may have to rotate the shaft for the pin to lock
- Re-tighten the connector knob and make sure the shaft is fully secured in place
Installing auxiliary handle (Fig. E)
- Uninstall four bolts on the Auxiliary handle.
- Install the auxiliary handle on the Shaft and align the bottom handle clamp and assemble the bolts.
- Tighten the bolts and make sure the handle is firmly secured in place.
OPERATION
Charging the battery pack
NOTE: Remove the battery pack from the charger after it has been fully charged.NOTE: The battery should be fully charged before first use.NOTE: Make sure the mains voltage is the same as the rating label which is located on the charger.
- Connect the charger to a power supply. Red LED will light up.
- To insert the battery pack into the charger, align the raised ribs of the battery pack with the grooves of the charger then push it in. (Fig. F)
- The red LED light of the charger will off and then the green light flashes during normal charging.
- After charging is complete, the charger light will turn to a solid green light.
- Once the battery is fully charged, remove the battery pack.
Power indicator (Fig. G)This Li-Ion battery pack is equipped with a power indicator which is used to show the battery pack’s remaining charge. Press the power indicator button to check the battery charge as the picture showed. The indicator will stay lit for approximately 4 seconds.To obtain the best life from the battery
- Never allow the battery to completely discharge before recharging. The battery pack should be placed on the charger whenever the battery pack is noticeably running downor the tool no longer performs a task it previously performed.
- Avoid conducting short charges. Make sure that the battery is fully charged each time by allowing the charger to complete its full charging cycle.
- Avoid allowing loose items like screws or nails etc. to be stored with battery packs as these or similar items can short battery packs and cause a fire or explosion.
- Always unplug the charger when not in use and store in a dry and secure place.
- Avoid charging or storing your battery in temperatures below 5°C and above 45°C.
- After use, allow the battery pack to cool down for approximately 30 minutes before attempting to recharge.
Attaching/Detaching the battery packFully charge before first use. To AttachAlign the battery ribs with the mounting slots and press the battery pack down until you hear a “click”. (Fig. H)To Detach Depress the battery-release button and pull the battery pack out (Fig. I).
WARNING: Dress properly to reduce the risk of injury when operating this tool. Do not wear loose clothing or jewelry. Wear eye and ear/hearing protection. Wear heavy-duty, long trousers, boots and gloves. Do not wear short trousers, sandals or go barefoot.Before operating, look around you to ensure a safe working area without other people, animals or any loose objects. And then check for eye protection, proper clothing, and balanced footing.STARTING/STOPPING THE LINE TRIMMERTo Start (Fig. J)Press down the lock-off lever and hold it in that position. Depress the trigger to start.To StopRelease the trigger.NOTE: Always remove the battery pack from the line trimmer during work breaks and after finishing work.Speed adjustment (Fig. K)– This machine has 3-speed settings which can be changed with a press of a button. (Fig. I)
- Press the speed adjustment button and set it to your selected cutting speed.
- If the speed is set to MAX, press the speed adjust button again and this will reduce the speed.
ADJUSTING CUTTING LINE LENGTHThe bump head allows the operator to release more cutting line without stopping the motor.As the line becomes frayed or worn, the additional line can be released by lightly tapping the bump knob on the ground while operating the trimmer.NOTE: Line release will become more difficult as the cutting line becomes shorter.WARNING: Do not remove or alter the line cutting blade assembly. Excessive line length will cause the motor to overheat and may result in serious personal injury.
Removing/replacing the cutting bump headWARNING: Before performing any assembly, always ensure that the battery pack has been removedIf the nylon cutting line is broken and the nylon spool needs replacing
WARNING: Wearing working gloves when doing any replacements.
- Line up the spacer hole up with the hole in the gearbox.
- Place a small screwdriver or metal rod in the spacer hole. (Fig. L)
- Rotate the head clockwise to loosen and remove. (Fig. M)
- Reverse steps 1-3 to reinstall the same cutting bump head.5. Make sure that the cutting head is securely located.
Removing old trimmer line
- Press the two release tabs on the spool base and pull the spool retainer out.

- Remove any excess trimmer line or obstructions from the spool.
- Use a clean cloth to wipe away any debris from the spool, spool cover, or spool housing.
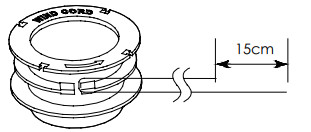
- Take an approximately 5m of 2.0mm diameter cutting line, fold and wind it onto the spool. 15cm
- Then place the line ends through the two opposite notches in the spool and place the spool into its retainer with notches aligned with retainer eyelets.
- Re-install the bump head. Align the tabs of the spool cover with the posts on the spool housing. Push the spool cover until the tabs securely snap into the posts.
MAINTENANCE AND STORAGE
WARNING: Before performing any repair work, always remove the battery pack and wait until the cutting blade has come to a standstill.CLEANING
- Clean the unit using a damp cloth with a mild detergent.
- Do not use any strong detergents on the plastic housing or the handle. They can be damaged by certain aromatic oils, such as pine and lemon, and by solvents such as kerosene. Moisture can also cause a shock hazard. Wipe off any moisture with a soft dry cloth.
- Use a small brush or the air discharge of a small vacuum cleaner brush to clean the air vents on the rear housing.
STORING THE UNIT
- Remove the battery pack from the line trimmer when it is not in use.
- Clean the tool thoroughly before storing it.
- Store the unit in a dry, well-ventilated area, locked up or up high, out of the reach of children. Do not store the unit on or adjacent to fertilizers, petrol, or other chemicals.
TransportUse the original packaging to ship whenever possible.
| Fault/malfunction | Cause | Remedy |
| Line trimmer fails to start | The battery pack is not attached to theline trimmer. | Attach the battery pack to the line trimmer |
| No electrical contact between the trimmer and battery. | Remove battery, check contacts and reinstall thebattery pack. | |
| The battery pack isdepleted | Charge the battery pack. | |
| The lock-off lever and trigger are not depressed simultaneously. | Press down the lock-off lever and hold it, then depress the trigger to turn on the line trimmer. | |
| Line trimmer stops while cutting | The motor shaft or trimmer head is bound with grass. | Stop the trimmer, remove the battery, and remove the grass from the motor shaft and trimmer head. |
| The motor is over-loaded | Remove the trimmer head from the grass. The motor will recover to work as soon as the load is removed. When cutting, move the trimmer head in and out of the grass to be cut and remove no more than 20cm of length in a single cut. | |
| The battery pack or line trimmer is too hot. | Allow the battery pack or trimmer to cool until the temperature drops below 50°C. | |
| Trimmer head will not ad- Vance line | The motor shaft or trimmer head is bound with grass. | Stop the trimmer, remove the battery, and remove the grass from the motor shaft and trimmer head. |
| There is not enough line on the spool. | Remove the battery and replace the cutting line;follow the section “LINE REPLACEMENT” in this manual |
CE DECLARATION
To the provisions of Council DirectivesWeSUMEC UKUnit A&B Escrick Business Park Escrick, York YO19 6 FD/ United KingdomDeclare that the product:Description: 40V Grass TrimmerModel No. LT G33 / ST0940Function: cutting GrassComplies with the essential health and safety requirements of thefollowing directives:Machinery Directive 2006/42/ECElectromagnetic Compatibility Directive 2014/30/EUEC Directive 2011/65/EU and its amendment Directive (EU) 2015/863 (RoHS)Outdoor Noise Directive 2000/14/EC & 2005/88/ECMeasured Sound Power Level: 91.81 dB(A). K=3 dB(A)Guaranteed Sound Power Level: 96 dB(A).Standards and technical specification referred to:EN 60335-1:2012+A11EN 60335-2-29: 2004+A2:2010EN 50636-2-91:2014EN 62233:2008EN 55014-1:2006+A1:2009+A2:2011EN 55014-2:1997+A1:2001+A2:2008, EN 55014-2:2015EN 61000-3-2:2014EN 61000-3-3:2013EN 50581:2012Authorized SignatoryDate: 23.04.2020Signature: Place: YorkName: Mariana HallGeneral ManagerSUMEC UK Co., Ltd.Unit A&B Escrick Business ParkEscrick, York YO19 6FD/ United Kingdom Place: YorkName: Mariana HallGeneral ManagerSUMEC UK Co., Ltd.Unit A&B Escrick Business ParkEscrick, York YO19 6FD/ United Kingdom |
To the provisions of Council DirectivesWeMEROTEC GmbH,Otto-Brenner-Straße 8,47877 Willich/ DeutschlandDeclare that the product:Description: 40V Grass TrimmerModel No. LT G33 / ST0940Function: cutting GrassComplies with the essential health and safety requirements of thefollowing directives:Machinery Directive 2006/42/ECElectromagnetic Compatibility Directive 2014/30/EUEC Directive 2011/65/EU and its amendment Directive (EU) 2015/863 (RoHS)Outdoor Noise Directive 2000/14/EC & 2005/88/ECMeasured Sound Power Level: 91.81 dB(A). K=3 dB(A)Guaranteed Sound Power Level: 96 dB(A).Standards and technical specification referred to:EN 60335-1:2012+A11EN 60335-2-29: 2004+A2:2010EN 50636-2-91:2014EN 62233:2008EN 55014-1:2006+A1:2009+A2:2011EN 55014-2:1997+A1:2001+A2:2008, EN 55014-2:2015EN 61000-3-2:2014EN 61000-3-3:2013EN 50581:2012Authorized SignatoryDate: 23.04.2020Signature: Place: WillichName: Roland MenkenGeneral ManagerMEROTEC GmbH,Otto-Brenner-Straße 8,47877 Willich/ Deutschland Place: WillichName: Roland MenkenGeneral ManagerMEROTEC GmbH,Otto-Brenner-Straße 8,47877 Willich/ Deutschland |
To the provisions of Council DirectivesWeSUMEC France Sarl59 bis Rue du Mûrier37540 Saint Cyr Sur Loire, FranceDeclare that the product:Description: 40V Grass TrimmerModel No. LT G33 / ST0940Function: cutting GrassComplies with the essential health and safety requirements of thefollowing directives:Machinery Directive 2006/42/ECElectromagnetic Compatibility Directive 2014/30/EUEC Directive 2011/65/EU and its amendment Directive (EU) 2015/863 (RoHS)Outdoor Noise Directive 2000/14/EC & 2005/88/ECMeasured Sound Power Level: 91.81 dB(A). K=3 dB(A)Guaranteed Sound Power Level: 96 dB(A).Standards and technical specification referred to:EN 60335-1:2012+A11EN 60335-2-29: 2004+A2:2010EN 50636-2-91:2014EN 62233:2008EN 55014-1:2006+A1:2009+A2:2011EN 55014-2:1997+A1:2001+A2:2008, EN 55014-2:2015EN 61000-3-2:2014EN 61000-3-3:2013EN 50581:2012Authorized SignatoryDate: 23.04.2020Signature: Place: Saint Cyr Sur LoireName: Rodolphe DuboisGeneral ManagerSUMEC France Sarl59 bis Rue du Mûrier37540 Saint Cyr Sur Loire, France
References
[xyz-ips snippet=”download-snippet”]