
Myson Decor Vertical Flat Tube
Radiator V10 and V20 User Guide

Installation Procedure:
- Decide on the position of the radiator and mark the mounting bracket positions according to Fig 1.

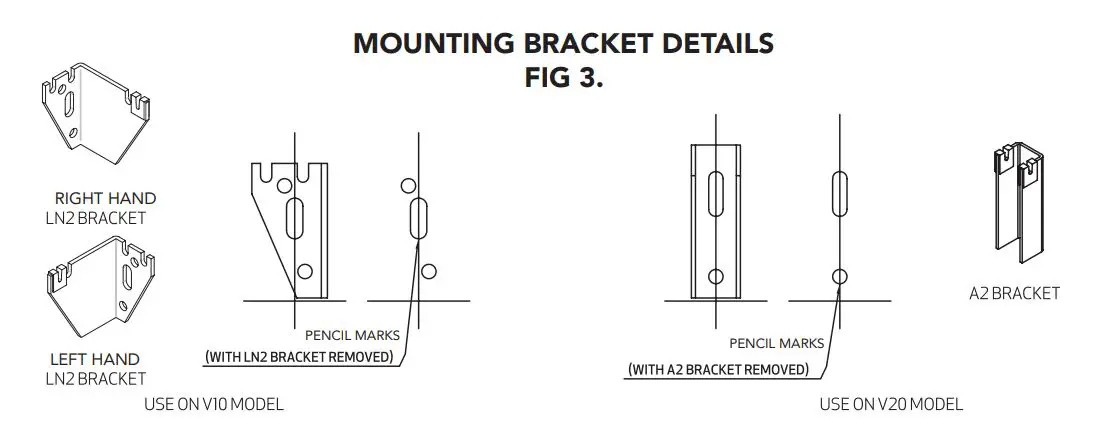
- Align the wall brackets according to Fig 3 and mark the hole fixing hole positions.
- Drill and plug the bracket fixing holes and fix the brackets securely to the wall.
- Mount the radiator on the brackets and connect the radiator to the heating system.
- Fit the plugs and vent to the radiator.
- Fill the system and vent the radiator.
- Balance the system to ensure correct flow through all radiators.

Safety Precaution:
Radiators are hot when in use, and as such, present a risk of burns to users on prolonged contact.The temperature of a radiator is dependent on the temperature of the system water, as set by the system installer or end user. Installers and users should ensure that those who come in to close proximity to hot radiators are aware of the risks of burns. Installers and users should take all necessary steps to minimize the risk of burns. If the risk is significant, consideration should be given to installing low temperature radiators, or to placing guards in front of radiators.
For the correct installation of radiators it is essential that the fixing of the radiator is carried out in such a way that it is suitable for intended use AND predictable misuse. A number of elements need to be taken into consideration including fixing method used to secure the radiator to the wall, the type and condition of the wall itself, and any additional potential forces or weights, prior to finalizing installation.
IN ALL CASES IT IS STRONGLY RECOMMENDED THAT A SUITABLY QUALIFIED PROFESSIONAL INSTALLER OR SIMILAR TRADESPERSON CARRIES OUT THE INSTALLATION.
PLEASE NOTE: The fixing materials provided are only intended for installation on walls made of solid wood, bricks, concrete or on timber frame stud walls where the fixing is in to the timber. All walls being considered should have no more than a maximum of 3 mm wall finishing. For walls made of other materials, for example hollow bricks, please consult your installer or specialist supplier. ONCE AGAIN, IF YOU ARE UNSURE, IT IS STRONGLY RECOMMENDED THAT A SUITABLY QUALIFIED PROFESSIONAL INSTALLER OR SIMILAR TRADESPERSON CARRIES OUT THE INSTALLATION.
Important Notes:
- The header with the flow/return connections contains a baffle and is identified by a sticker (shown on the right).
- Connections in the opposite header are to be used as vents or drains depending on the orientation of the radiator.
- Ensure there is no trapped air in the radiator by adequately bleeding the system during installation.
- Flow rate may need to be adjusted/balanced for optimum performance.
Information for the installer:
These radiators are for use on two pipe pumped indirect domestic and commercial heating installations, with a maximum working temperature of 100°C.
The system should be designed in accordance with BS EN 12828:2012+A1:2-14 or BS EN 12831-1:2017 as appropriate, with particular care to avoid air entry or water discharge.
The installation work must be carried out in accordance with recognized good practice, and precautions taken to avoid contamination which could lead to corrosion. In accordance with current Building Regulations a corrosion inhibitor or other suitable water treatment must be used. The manufacturer’s instructions must be strictly followed.
Failure to comply with these standards might invalidate the manufacture’s warranty.
10 Year warranty.
The recommendations of BS 7593, Code of Practice for treatment of water in domestic hot water central heating systems, should be followed where appropriate.
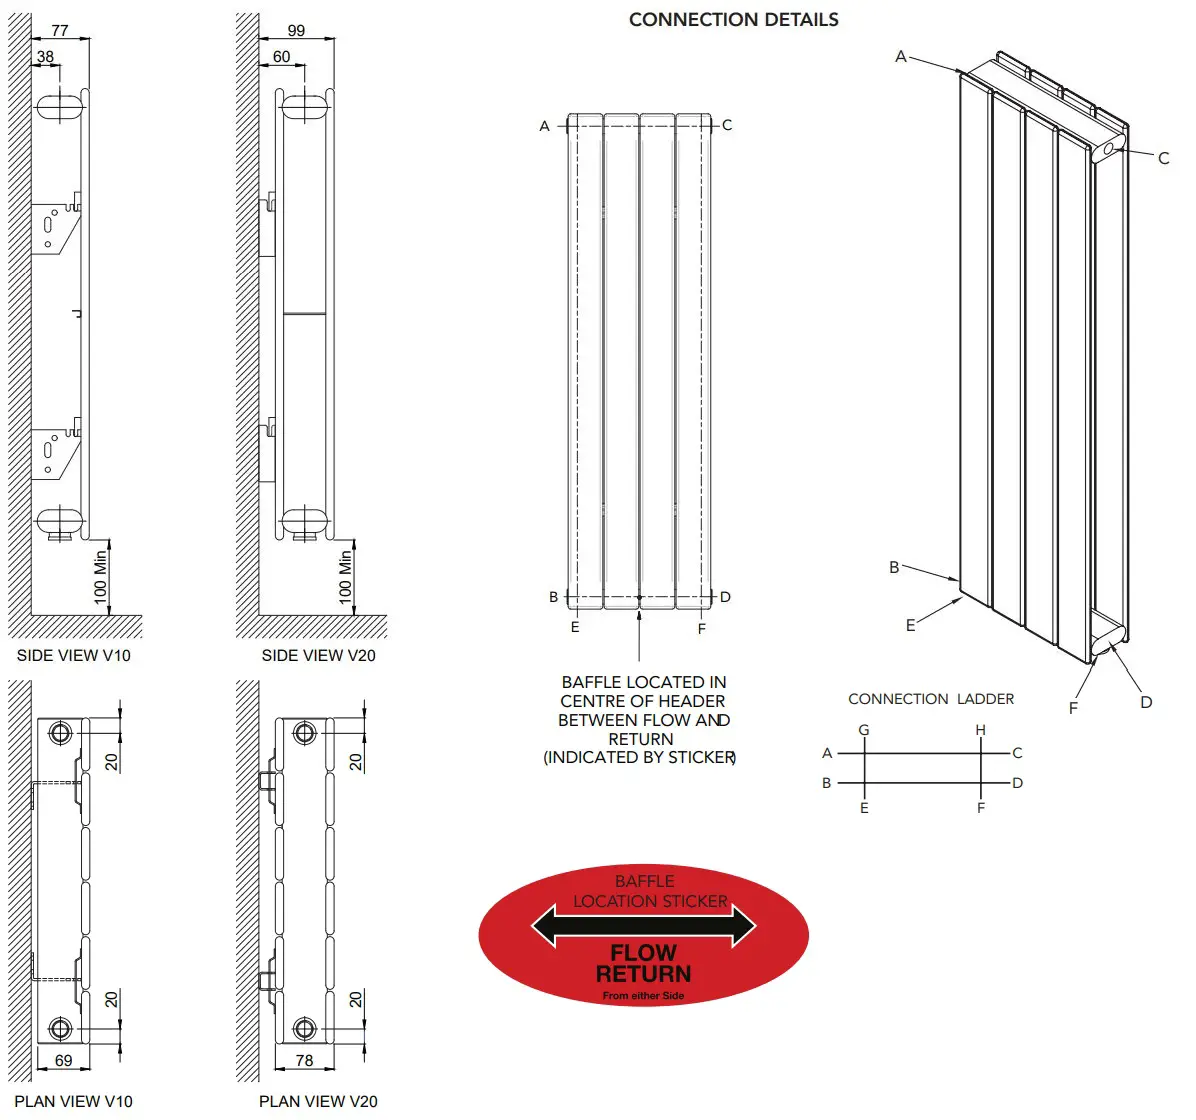
Notes: Radiator should be connected BOE(BD/DB) or BBOE (EF/FE) OR For TTOE or TOE the radiator must be inverted. The header containing the baffle (depicted by the baffle sticker), must always be fitted flow/ return.
Purmo Group, Gateshead, NE11 0PG; Purmo Group Newcastle West, V42 TD39
[xyz-ips snippet=”download-snippet”]