MyWeigh PD750L Heavy Duty Wireless Scale
![]() Capacity: 340kg/7501b/54stAccuracy: 0.1kg/0.21b
Capacity: 340kg/7501b/54stAccuracy: 0.1kg/0.21b
Thank you fur purchasing the My Weigh• PD-7SOL heavy duty wireless scale. This scale is designed to provide years of accurate weighing. Please read this entire manual before use. If you have any questions about your scale or have troubleshooting concerns, please visit our website at www.MyWeigh.com.
POWER SUPPLYThe PD-7SOLscale was designed to run with 6.0V / 100 mA AC power (AC adapter included) or optional M batteries. The AC adaptor plugs into the socket on the rear of the sc.ales weighing indicator. If you prefer to use batteries, please install them in the battery compartment on the underside of the base of the scale and the Indicator.
Battery Installation
For battery installation, tum over the scale, you’ll see the battery compartment on the underside of the base of the scale , lift and open the battery cover, remove and/or install the batteries (6xAA). Be sure that the batteries are installed correctly following the polarity Indicators in the battery compartment Reinstall the battery cover. There is also a battery compartment on the back of the indicator which requires 6 x M batteries.
Wireless ModeThe PD7SOL comes equipped with a wireless indicator whim will work within a maximum range of18ft/ S meters. To use this option follow these steps:
- Make sure the indicator and scale have the necessary batteries installed. You also have the option of using an AC adapter with the Indicator.
- Tum over the scale platform and press the [ON/OFF] button and a red light will flash.
- Now tum on the Indicator and wait 5 seconds to allow the platform and indicator to sync. The [ Tl symbol wm flash continuously while the platform and base are synching.
- Begin weighing when [Tl stops flashing.
- The platform will deactivate once the user turns the indicator off.
Wired ModeTo save on battery power please use the cable that is included. Simply connect the indicator to the base. Once connected there is no need to use batteries In the base. Users also have the option of using the Indicator with batteries or with the included Ar. adapter.
OPERATION INSTRUCTIONS
Only operate the scale on a flat, level surface that Is stable and durable enough to support the scale and the Items being placed on the scale. Place the indicator away from the scale at a position that is easy to read.Weighing ProceduresPress the [ONIOFF] key to tum on the scale, the display will show”750.0lllb”. The display will then show •o.00″. The scale is now ready for use. To begin weighing, follow these steps:
- Press and release the [ON/OFF) the key, the scale Is now set at Its zero point If you press and hold the key, then the scale will turn off.
- Press the [Ml key to toggle the weighing unit lb. kg and st
- Press the ITT key to TARE or Zero the scale.
- Press the [DI key to transmit the data through the use port
Programming the Auto-off time
- Press and hold [DJ release when the display shows “A.OFF.X” (X=O. 1 .23.4.5.6.7.8.9 minutes), the display value”X” is the auto offtime. when the”X”value is” the auto-off function is disabled. NOTE: The default factory setting is X=O.
- To change the auto-off time press the [Ml or [DI key; press them key to confirm the auto-off time setting.
- To exit the auto-off timer programming, press the [ONIOFF] key, the display will then reset.
Connecting to a PC computer
- Insert the installation m provided and follow the on screen instructions.
- Connect the scale indicator to the PC using the use cable.
- Open the software by clicking PD750 icon and the display will show on screen.
CALIBRATION
Calibration Is only far ADVANCED USERS or scale and should only be performed If 1bsollltl!ly necessary. There are two calibration methods available: one is using standard professional calibration weights, the other is the selection of different geographic location codes (gravity mode).
- Press and hold them key until the indicator displays.GE. •GE.oxx” or•GE. FAC
- “GE.Uxx” means: USA geographic location code “is selected.
- GE. FAC” means: Factory geographic location code Is selected.
- “GE.Oxx ” means Other(except for USA and Factory) geographic location code “n’is selected.
- Press the [Ml or [DJ key to manage the geographic location code; please refer the geographic location code table and maps at the back of this manual.
- After selecting the appropriate geographic location code, press the [T] key, the scale will store your selection and display “CAL.V or•Ga.onr(? will flash).
- lf”CAL-O” is displayed, that means the scale must be calibrated once more by using standard weights and you should proceed to the next step.
- lf”Ga.onr is displayed and the [ON/OFF] key is pressed, the scale will use the selected geographic location code and reset automatically to resume normal weighing mode.
- lf”Go.onris displayed and them key is pressed, the scale will display”CAL.Vand you should proceed to the next calibration step.
- Remove all weights from the scale platform, press the [II key , the”O”ln”CAL 0 will flash.
- After the reading (0.00) becomes stable, the scale will display”CAL-F”; place the correct standard weight(s) on the platform (300kg) press them key, the”F” in “CAL-F” will flash.
- After the readings are stable, the Indicator will dlsplay·CAL.v; remove the weight(s) from the platform, press them key; the “O”in”CAL-f” will flash, and then the display will reset after 2-3 seconds.
- Calibration is now complete.
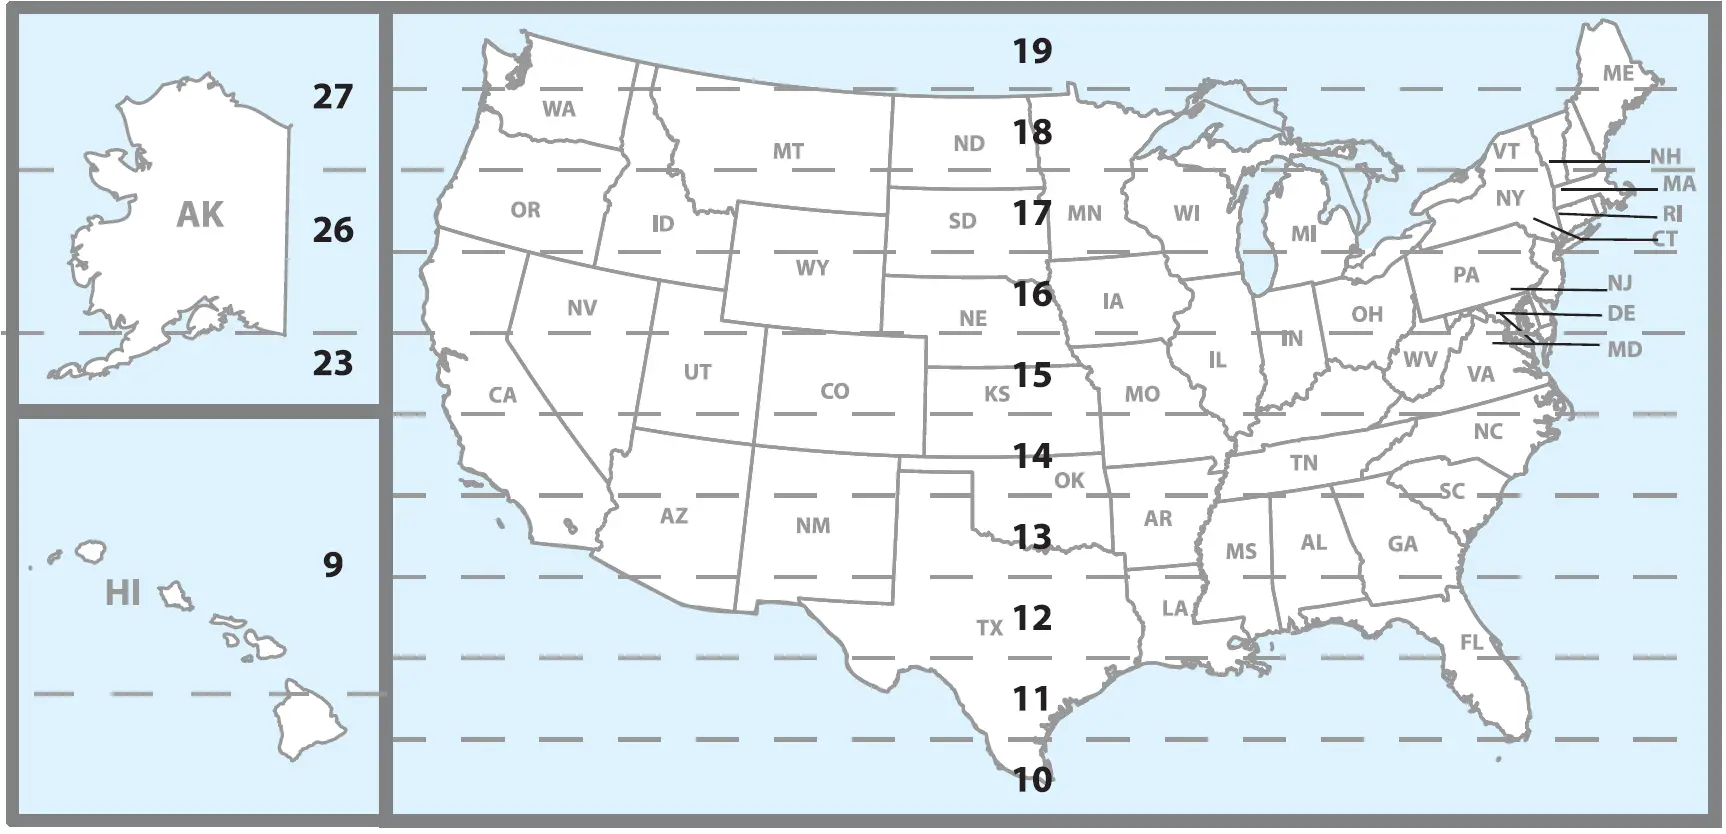
GRAVITY MODEThe Gravity Mode feature provides a means of adjusting the scale’s internal calibration factors to compensate for variations in acceleration due to gravity at different geographic locations. These differences can cause a given mass to indicate a slightly different weight at an end-users (local) site than It did at the Callbratlon (CAL) site.The scale maintains two gravity setting values: one is local site gravity value; the other is calibration site gravity value. The scale will use the relationship between calibration and local gravity for its weight calculations.We have compiled a list of local gravity values for some areas of the world. You only need select the Index number of them according to the above step to The latitude and altitude of your location both affect gravity and the calibration of your scale. It is important to select the proper code. If your location is not listed, select the dosest one. This kind of adjustment needs no calibration weights. However, whenever possible, we strongly recommend that you calibrate the scale by using standard professional calibration weights.
USA Geographic Location Codes
CANADA Geographic Location Codes
EUROPE Geographic Location Codes

report this ad![]()
[xyz-ips snippet=”download-snippet”]