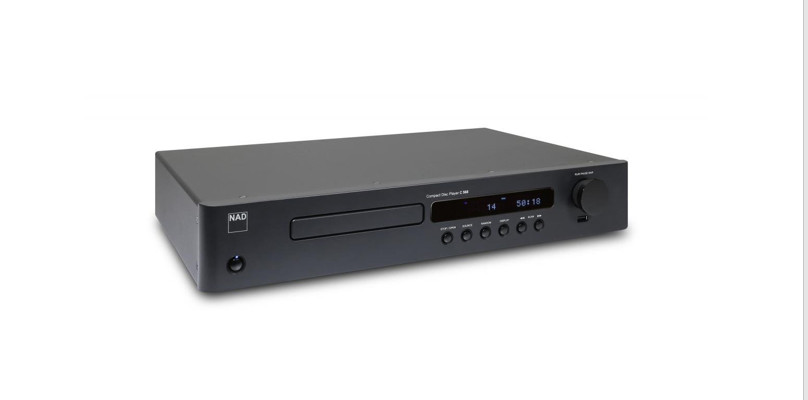
![]() C 538Compact Disc Player
C 538Compact Disc Player

Owner’s Manual
IMPORTANT SAFETY INSTRUCTIONS
- Read these instructions.
- Keep these instructions.
- Heed all warnings.
- Follow all instructions.
- Do not use this apparatus near water.
- Clean only with dry cloth.
- Do not block any ventilation openings. Install in accordance with the manufacturer’s instructions.
- Do not install near any heat sources such as radiators, heat registers, stoves, or other apparatus (including amplifiers) that produce heat.
- Do not defeat the safety purpose of the polarized or grounding-type plug. A polarized plug has two blades with one wider than the other. A grounding type plug has two blades and a third grounding prong. The wide blade or the third prong is provided for your safety. If the provided plug does not fit into your outlet, consult an electrician for replacement of the obsolete outlet.
- Protect the power cord from being walked on or pinched particularly at plugs, convenience receptacles, and the point where they exit from the apparatus.
- Only use attachments/accessories specified by the manufacturer.
- Use only with the cart, stand, tripod, bracket, or table specified by the manufacturer, or sold with the apparatus. When a cart is used, use caution when moving the cart/apparatus combination to avoid injury from tip-over.

- Unplug this apparatus during lightning storms or when unused for long periods of time.
- Refer all servicing to qualified service personnel. Servicing is required when the apparatus has been damaged in any way, such as power-supply cord or plug is damaged, liquid has been spilled or objects have fallen into the apparatus, the apparatus has been exposed to rain or moisture, does not operate normally, or has been dropped.
![]() THE LIGHTNING FLASH WITH ARROWHEAD SYMBOL, WITHIN AN EQUILATERAL TRIANGLE, IS INTENDED TO ALERT THE USER TO THE PRESENCE OF UNINSULATED”DANGEROUS VOLTAGE” WITHIN THE PRODUCT’S ENCLOSURE THAT MAYBE OF SUFFICIENT MAGNITUDE TO CONSTITUTE A RISK OF ELECTRIC SHOCK TO PERSONS.
THE LIGHTNING FLASH WITH ARROWHEAD SYMBOL, WITHIN AN EQUILATERAL TRIANGLE, IS INTENDED TO ALERT THE USER TO THE PRESENCE OF UNINSULATED”DANGEROUS VOLTAGE” WITHIN THE PRODUCT’S ENCLOSURE THAT MAYBE OF SUFFICIENT MAGNITUDE TO CONSTITUTE A RISK OF ELECTRIC SHOCK TO PERSONS.
![]() THE EXCLAMATION POINT WITHIN AN EQUILATERAL TRIANGLE IS INTENDED TO ALERT THE USER TO THE PRESENCE OF IMPORTANT OPERATING AND MAINTENANCE (SERVICING) INSTRUCTIONS IN THE LITERATURE ACCOMPANYING THE APPLIANCE.
THE EXCLAMATION POINT WITHIN AN EQUILATERAL TRIANGLE IS INTENDED TO ALERT THE USER TO THE PRESENCE OF IMPORTANT OPERATING AND MAINTENANCE (SERVICING) INSTRUCTIONS IN THE LITERATURE ACCOMPANYING THE APPLIANCE.
![]() CAUTION: TO REDUCE THE RISK OF ELECTRIC SHOCK, DO NOT REMOVE COVER (OR BACK). NO USER-SERVICEABLE PARTS INSIDE REFER SERVICING TO QUALIFIED SERVICE PERSONNEL.
CAUTION: TO REDUCE THE RISK OF ELECTRIC SHOCK, DO NOT REMOVE COVER (OR BACK). NO USER-SERVICEABLE PARTS INSIDE REFER SERVICING TO QUALIFIED SERVICE PERSONNEL.
CAUTIONThe C 538 employs a Laser System. To ensure proper use of this product, please read this owner’s manual carefully and retain for future reference. Should the unit require maintenance, contact an authorized service location. Use of controls, adjustments, or the performance of procedures other than those specified may result in exposure to laser radiation. To prevent direct exposure to laser beam, do not try to open the enclosure. Visible laser radiation when the enclosure is opened. DO
DO NOT STARE INTO BEAM.This device complies with Part 15 of the FCC Rules. Operation is subject to the following two conditions: (1) this device may not cause harmful interference, and (2) this device must accept any interference received, including interference that may cause undesired operation.
NOTE: This equipment has been tested and found to comply with the limits for a Class B digital device, pursuant to Part 15 of the FCC Rules. These limits are designed to provide reasonable protection against harmful interference in a residential installation. This equipment generates, uses and can radiate radio frequency energy and, if not installed and used in accordance with the instructions, may cause harmful interference to radio communications.However, there is no guarantee that interference will not occur in a particular installation. If this equipment does cause harmful interference to radio or television reception, which can be determined by turning the equipment off and on, the user is encouraged to try to correct the interference by one or more of the following measures:– Reorient or relocate the receiving antenna.– Increase the separation between the equipment and receiver.– Connect the equipment into an outlet on a circuit different from that towhich the receiver is needed. – Consult the dealer or an experienced radio/TV technician for help.
CAN ICES-3(B)/NMB-3(B)WARNING
- The apparatus shall not be exposed to dripping or splashing and that no objects filled with liquids, such as vases, shall be placed on apparatus.
- To reduce the risk of fire or electric shock, do not expose this apparatus to rain or moisture.
- Use of controls or adjustments or performance of procedures other than those specified may result in hazardous radiation exposure.
- Mains plug is used as disconnect device and it should remain readily operable during intended use. In order to disconnect the apparatus from the mains completely, the mains plug should be disconnected from the mains socket outlet completely.
- Battery shall not be exposed to excessive heat such as sunshine, fire or the like.
- No naked flame sources such as lighted candles should be placed on the apparatus.
- Attention should be drawn to the environmental aspects of battery disposal.
- The apparatus should only be used in moderate climates.
- The power cord used in the apparatus is rated 125VAC for use in the USA and Canada only. If the apparatus will be used in another country, with different mains voltage, or is connected to a higher input voltage, the power cord must be changed to one with a suitable rating and fully compliant with local regulations.
- Changes or modifications not expressly approved by the party responsible for compliance could void the user’s authority to operate the equipment.
CAUTION REGARDING PLACEMENTTo maintain proper ventilation, be sure to leave a space around the unit (from the largest outer dimensions including projections) that is equal to or greater than shown below.Left and Right Panels: 10 cmRear Panel: 10 cmTop Panel: 10 cmThe ventilation should not be impeded by covering the ventilation openings with items such as newspaper, table-cloths, curtains, etc.
IMPORTANT SAFETY INSTRUCTIONS
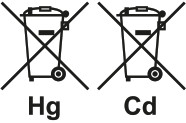
INFORMATION ABOUT COLLECTION AND DISPOSAL OF WASTE BATTERIES (DIRECTIVE 2006/66/EC OF THE EUROPEAN PARLIAMENT AND THE COUNCIL OF EUROPEAN UNION) (FOR EUROPEAN CUSTOMERS ONLY) Batteries bearing any of these symbols indicate that they should be treated as “separate collection” and not as municipal waste. It is encouraged that necessary measures are implemented to maximize the separate collection of waste batteries and to minimize the disposal of batteries as mixed municipal waste.
End-users are exhorted not to dispose waste batteries as unsorted municipal waste. In order to achieve a high level of recycling waste batteries, discard waste batteries separately and properly through an accessible collection point in your vicinity. For more information about collection and recycling of waste batteries, please contact your local municipality, your waste disposal service or the point of sale where you purchased the items. By ensuring compliance and conformance to proper disposal of waste batteries, potential hazardous effects on human health is prevented and the negative impact of batteries and waste batteries on the environment is minimized, thus contributing to the protection, preservation and quality improvement of the environment.
NOTES ON ENVIRONMENTAL PROTECTION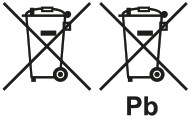 At the end of its useful life, this product must not be disposed of with regular household waste but must be returned to a collection point for the recycling of electrical and electronic equipment. The symbol on the product, user’s manual and packaging, point this out.
 The materials can be reused in accordance with their markings. Through re-use, recycling of raw materials or other forms of recycling of old products, you are making an important contribution to the protection of our environment. Your local administrative office can advise you of the responsible waste disposal point.
RECORD YOUR MODEL NUMBER (NOW, WHILE YOU CAN SEE IT)The model and serial number of your new C 538 are located on the back of the cabinet. For your future convenience, we suggest that you record these numbers here:Model no. : . . . . . . . . . . . . . . . . . . . . . . . . . . . . . . . . . . . . . . . . . .Serial no. : . . . . . . . . . . . . . . . . . . . . . . . . . . . . . . . . . . . . . . . . . .

THIS DIGITAL APPARATUS DOES NOT EXCEED THE CLASS B LIMITS FOR RADIO NOISE EMISSIONS FROM DIGITAL APPARATUS AS SET OUT IN THE RADIO INTERFERENCE REGULATIONS OF THE CANADIAN DEPARTMENT OF COMMUNICATIONS.
WARNING! INVISIBLE LASER RADIATION WHEN OPEN AND INTERLOCKS DEFEATED. AVOID EXPOSURE TO BEAM.
NAD is a trademark of NAD Electronics International, a division of Lenbrook Industries Limited Copyright 2018, NAD Electronics International, a division of Lenbrook Industries Limited
INTRODUCTION
GETTING STARTED
WHAT’S IN THE BOXPacked with your C 538 you will find
- Audio cable connector
- Detachable power cord
- CD 8 remote control with 2 (two) AAA batteries
- Quick Setup Guide
SAVE THE PACKAGINGPlease save the box and all the packaging in which your C 538 arrived. Should you move or otherwise need to transport your C 538, this is by far the safest container in which to do so. We’ve seen too many otherwise perfect components damaged in transit for lack of a proper shipping carton, so please: Save that box!
CHOOSING A LOCATIONChoose a location that is well ventilated (with at least several inches to both sides and behind), and that will provide a clear line of sight, within 25 feet/8 meters, between the C 538’s front panel and your primary listening/viewing position. This will ensure reliable infrared remote control communications. The C 538 generates a modest amount of heat, but nothing that should trouble adjacent components. It is perfectly possible to stack the C 538 on top of other components.
NOTE ON INSTALLATION IMPORTANT!Install the C 538 Compact Disc player on a level, vibration-free surface. Severe vibration or operation in a tilted position may cause the player to not track correctly. The player may be stacked with other stereo components, if there is adequate ventilation around it. If the C 538 is placed near a radio tuner (AM or FM), a VCR or a television set, the operation of its digital circuits may produce static that would interfere with reception of weak broadcast signals. If this occurs, move the C 538 away from other devices or switch it off when viewing or listening to broadcasts.
QUICK STARTIn case you simply cannot wait to experience the performance of your new C 538, the following “Quick Start” instructions is provided to get you underway.Please make all the connections to your C 538 with the unit unplugged. It is also advisable to power-down or unplug all associated components while making or breaking any signal or AC power connections.
PLAY A CD
- Connect compatible connectors from DIGITAL AUDIO OUT and LINE OUT ports of C 538 to corresponding audio input sources on your amplifier.
- Ensure that the supplied power cord’s female connector end is firmly secured to C 538’s AC Mains input socket and the male plug connected to the mains power source.
- Press the front panel Standby button to turn ON the player.
- Press [OPEN/CLOSE] to open the disc drawer.
- Place a CD, label side up, in the tray’s circular recess. Be certain that the disc is centered within the recess.
- Press [PLAY/PAUSE]. The drawer closes automatically, and the disc begins to play.
- At any time you may press [ SKIP ] to select different tracks on the disc.
- Press [PLAY/PAUSE] if you want to stop play temporarily while keeping the pickup at its current position on the disc.
- Press [PLAY/PAUSE] again when you want to resume playback.
- Press [STOP] if you want to end play and reset the pickup to the beginning of the disc.
IDENTIFICATION OF CONTROLS
FRONT PANEL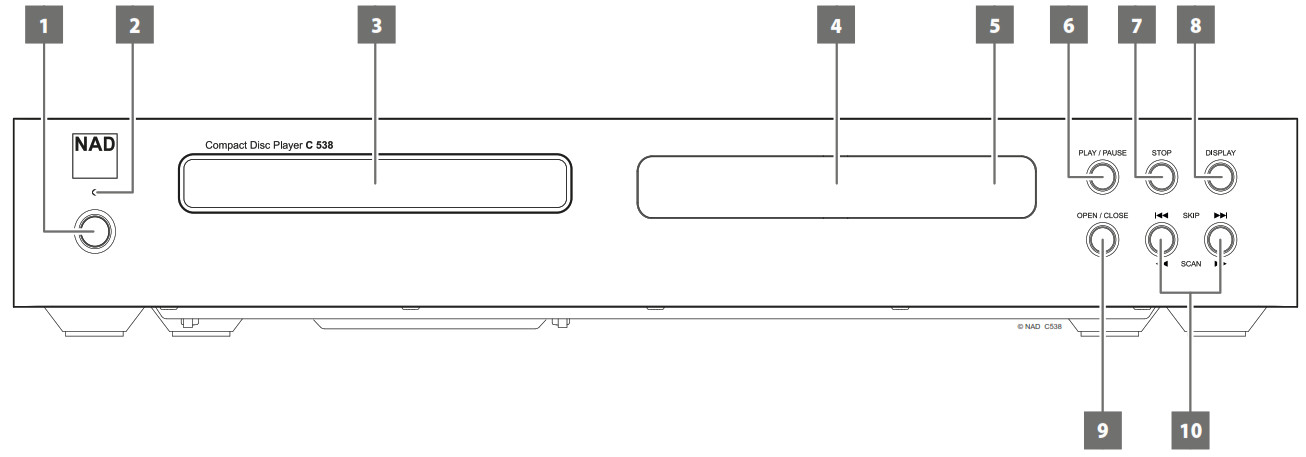
- STANDBY BUTTON• Press this button to switch ON the C 538 from standby mode. The Standby LED indicator will turn from amber to blue and illuminate the Vacuum Fluorescent Display (VFD).• Pressing the Standby button again turns the unit back to standby mode. The Standby LED indicator will change to amber color.
- STANDBY LED• This indicator will light up amber when the C 538 is at standby mode. When the C 538 is at ON state, this indicator will illuminate blue.
- DISC TRAY• With the disc tray open, insert a CD or other compatible media disc face down onto the tray. Place the disc in the drawer, centered in the smaller circular recess, with its label facing up.• “NO DISC” appears on the C 538’s VFD if the disc is placed upside down or there is no disc loaded.
- ACUUM FLUORESCENT DISPLAY (VFD)• The Vacuum Fluorescent Display (VFD) provides disc playback information, settings and other indicators.
- INFRARED (IR) SENSOR• The Infrared (IR) sensor receives IR commands from the supplied remote control. An unobstructed line of sight between the remote control and the IR sensor is required. · Do not expose the IR sensor to a strong light source such as direct sunlight or illumination. If you do so, you may not be able to operate the remote control with the C 538.Distance: About 23ft (7m) from the front of the IR sensor.Angle: About 30° in each direction of the front of the IR sensor.
- PLAY/PAUSE• This dual-function button alternates between initiating disc playback and pausing playback. Toggle this button to start, pause or resume disc playback.• If the disc tray is open, press this button to automatically close the tray and start playback if a disc is loaded.
- STOP• Playback is stopped and pickup is reset to the beginning of the disc. Display reverts to showing the number of tracks and total playing time on the disc. For WMA/MP3 files, display will revert to total number of files.• If the C 538 was programmed to play a selection of tracks/files, the program will be retained in the player’s memory. Pressing [STOP] twice at program mode will delete the program.
- DISPLAY• Use this button to enable or disable auto standby mode. Refer to section about “AUTO STANDBY”.• The following display information is shown by repeatedly pressing DISPLAY button.
INFORMATION AUDIO CD MP3/WMA Elapsed playback time of the current track ✓
Remaining playback time of the current track ✓
Remaining playback time of the disc ✓
Song information ✓
Song Title ✓
Artist Name ✓
Album Name ✓
Elapsed playback time of the current file ✓
NOTES• Some information may not be displayed on some discs. Display is dependent on the disc’s information content.• If the file has no available information about the song title, artist or album, the display will show “No ID3”.
- OPEN/CLOSE• Disc tray is activated to slide open or draw close.• When in standby mode, this button will also power up the C 538 and at the same time open the disc tray.
- SKIP / SCAN • SKIP : Press once to Skip forward to the next track or file.• SKIP: Press once to Skip backward to the beginning of current track or file. Press again to Skip backward to previous track or file.• SCAN : Press and hold to scan backward or forward through tracks or files.
REAR PANEL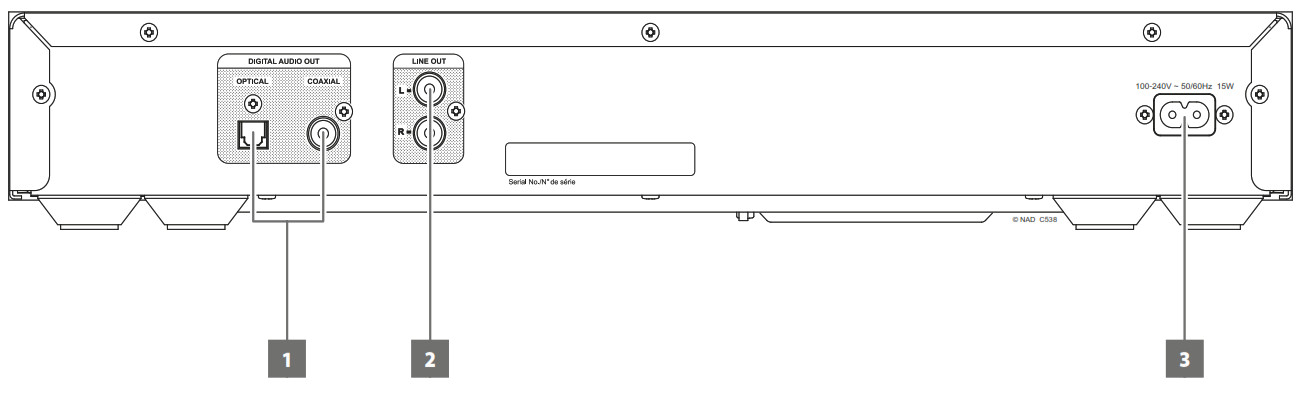
- DIGITAL AUDIO OUT (OPTICAL/COAXIAL)• Connect optical or coaxial digital audio output ports to corresponding digital input of a receiver, amplifier, computer soundcard or other digital processors.• Use a high quality 75 ohms digital RCA interconnect cable to obtain best results.
- LINE OUT• Use good quality RCA interconnect cables to connect these sockets to any line level input of a receiver, amplifier or any compatible audio system.
- AC MAINS INPUT• Ensure that the supplied power cord’s female connector end is firmly secured to C 538’s AC Mains input socket and the male plug connected to the mains power source.• Always unplug the power cord from the mains power source before disconnecting the female connector end from C 538’s AC Mains input socket.
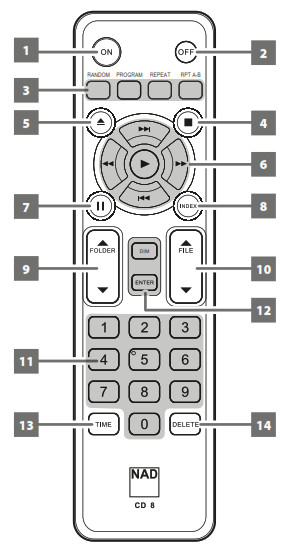
CD 8 REMOTE CONTROL
- ON: Unit is powered up from Standby mode to operating mode.
- OFF: Unit goes to Standby mode.
- RANDOM: Tracks/files are played at random mode.PROGRAM: Enter or exit program mode.REPEAT: Track, file, folder, or whole disc is repeated.RPT A-B: Playback sequence is repeated.
- STOP: Playback is stopped.
- OPEN: Disc tray is opened and closed.
- : Next track/ file is played.: Beginning of current track/file or previous track/file is played.: Playback is scanned or searched fast forward.: Playback is scanned or searched fast reversed.: Playback is started.
- : Playback is paused.
- INDEX: Playback is started from any desired index number.
- FOLDER: Scroll up or down the folder list.
- FILE: Scroll up or down the WMA or MP3 file list.
- Number buttons 0 – 9: Track or file number is directly accessed or selected.
- DIM: Display brightness is reduced, restored or turned off. ENTER: MP3 or WMA file is selected for playback.
- TIME: Playback time and other information are shown. This has the same function as the front panel DISPLAY button.
- DELETE: Programmed track/file is cleared.
OPERATION
USING THE C 538 FEATURES
CD-R AND CD-RW AUDIO DISCS C 538 can playback CD-R or CD-RW audio discs that have been recorded on a computer or CD recorder. The quality of CD-R, CD-RW audio discs varies widely which may affect playability. Some factors that affect playability:
- The quality of the disc itself. Generally speaking, CD-R or CD-RW blanks from well-renowned companies give better results than unbranded ones.
- The quality of CD-recorder or computer CD re/writer. Some recorders and writers produce better results than others.
- The CD-R and CD-RW were created with high-speed writing. In general, the quality of a CD-R or CD-RW is better when produced at a lower speed against a higher speed on the same recorder or re/writer.
PLAYING MP3/WMA FILESThe C 538 can play MP3/WMA formatted recordings on CD-R or CD-RW discs. You may mix any of the file types on the disc. Using the CD 8 remote control, one can select through the MP3/WMA folders and files as well as start playback through the following steps
- Load the applicable disc.
- Press [FOLDER ] to select desired folder. Press [ENTER].
- Press [FILE ] to select desired file number.
- Press [ENTER] to start playback. For each file type being played, the C 538 will display information about the Song Title, Album and Artist name (if available) and other indicators.NOTES• The file number is recognized per disc, not per folder that is, the number assigned to each file corresponds to their sequence in the disc.• If you want to select file number “9” in a disc where there are 100 or more MP3/WMA files, press “0” twice and then “9.”
PROGRAMMINGThe program function enables you to store your favorite tracks from any disc in the player memory. When programming a sequence of tracks, the C 538 must be in STOP mode.The following programming procedure applies to both CD tracks and MP3/ WMA files. CD tracks are used for reference in this procedure.
- Press [PROGRAM] button on the remote control. The display indicates “PRO1- 01” (The display will be”PRO1- 001″when programming MP3/ WMA files). “PRO1” is the first program number available while “01” is the first track of the disc and the default programmed track.
- Use the number buttons (also / or FILE ) on the remote control to enter the track number you want to program. For this sample procedure, we will use track number “5” as our first programmed track.
- Press [PROGRAM] again and track number “5” is recorded as programmed track number 1. Display will change to “PRO2- 05”. “PRO2” is the second program number available while “05” was the previous programmed track.
- For program number 2, we will use track number “9” as reference. Press [PROGRAM] again and track number “9” is recorded as programmed track number 2. Display will change to “PRO3- 09”.
- Repeat steps 2 to 4 until all your desired tracks are entered. A maximum of 20 CD tracks or 65 MP3/WMA files can be programmed. If you attempt to program more than the maximum tracks or files, “FULL” will be shown in the display.
- Press [] to start program playback.
NOTES
- Press [DELETE] at any time to clear programmed tracks and return to normal playback mode. “PROGCLEAR” is briefly shown in the VFD to indicate deletion of programmed tracks.
- Pressing STOP key twice during program playback will delete the whole program list.
PROGRAM PLAYBACK
- Press [PLAY] while you are in “PROGRAM” mode to play the stored program. During Program Play, the SKIP buttons will access only the tracks in the program list. “PROGRAM” is shown intermittently in the VFD to indicate program playback mode.
- If you want to play only a portion of a stored program, initiate play and press [9 SKIP 0] to jump over the programmed tracks that you don’t want to hear.
STOP OR DELETE PROGRAM
- Press [STOP] once to terminate Program play. The stored track list remains in memory. If you want to play the program again, simply press [PLAY].
- To clear the program memory, perform any of the following steps• Press [STOP] twice during program playback.• Press [OPEN] to open the disc tray.• Set the unit to standby mode.
AUTO STANDBYAuto Standby feature is an integral feature of C 538 that conforms to ecodesign regulations. Auto standby mode can be enabled or disabled by the following steps.Enable Auto Standby mode
- At standby mode, press and hold front panel’s DISPLAY button until the display shows “ERP ON”.
- With auto standby mode enabled, C 538 will automatically go to standby mode after being left for 10 minutes under the following conditions
- No disc
- Stop mode
- Pause mode
Disable Auto Standby mode
- At standby mode, press and hold front panel’s DISPLAY button until the display shows “ERP OFF”.
- With auto standby mode disabled, C 538 will remain at operating mode until manually powered off.
USING THE C 538 FEATURESUSING THE CD 8 REMOTE CONTROL The CD8 remote control is provided with your compact disc player, enabling you to operate playback functions from the comfort of your chair or from virtually anywhere in the room. For reliable operation there should be a clear line-of-sight path from the remote control to the front of the CD player. If the player does not respond to remote commands, it may be that this line-of-sight path is obstructed by clothing, paper or furnishings.Most of the buttons on the remote control handset have the same effect as the corresponding buttons on the front panel of the player. The following function keys are further described.
NUMERIC KEY PAD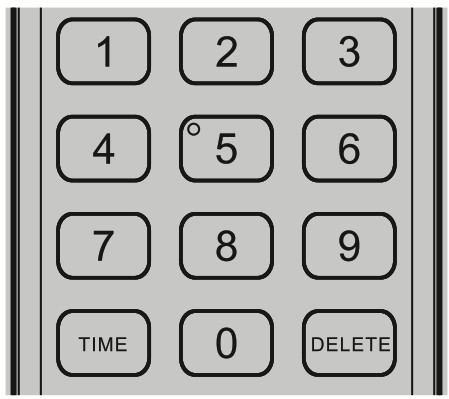
Using the direct-entry numeric keypad (0 to 9) causes the C 538 to jump directly to the beginning of a numbered track/file and commence play. To play Track 5, simply press “5”. To play File 20, press “2” and “0”.
REPEAT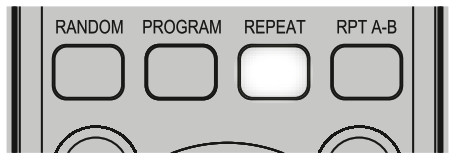 A particular track or file can be repeatedly played back by pressing [REPEAT] button.
- Toggle this button to repeat a track/file, folder, all tracks or files. The VFD will show RPT ONE, RPT FOLD or RPT ALL respectively as the particular repeat mode is selected.
- Turn off repeat mode by pressing the REPEAT button until the RPT OFF is displayed in the VFD.
REPEAT A-B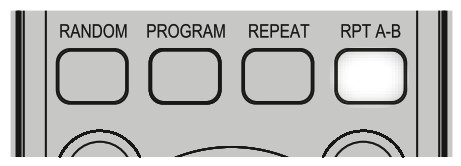 Implement the following procedures to repeat a playback sequence.
- Press [RPT A-B] at your chosen starting point.
- Press [RPT A-B] again at your chosen end point. The repeat sequence begins. “RPT A-B” is shown intermittently in the VFD to indicate repeat sequence playback mode.
- Press [RPT A-B] again to cancel the sequence.
RANDOM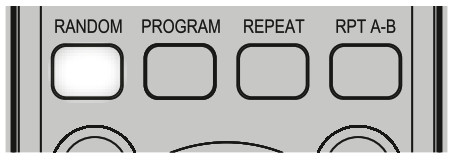
- Press [RANDOM] key during playback or stop mode. “RANDOM” is shown intermittently in the VFD to indicate random playback mode.
- Playback of the first randomly selected track or file automatically begins.
- Press [RANDOM] again to return to normal playback. The disc will continue playing to the end in the correct order.
INDEX
The index system is a method of subdividing tracks into smaller divisions for easier location of those parts. If a disc includes index numbers, playback can be started from any desired index number through the following steps
- Press [INDEX] during playback.
- Using the numeric buttons, press the desired index number – for example “0” and “3”. The VFD will show “INDEX 03 TR10” with “03” the entered index number.
- To revert to normal display information, press [INDEX] again.
REFERENCE
SPECIFICATIONSGENERAL PARAMETERS
| Output level | Analog: 2.2 ± 0.1 V |
| Frequency response | ±0.5 dB (ref. 0 dB 20 Hz-20 kHz) |
| Total harmonic distortion | ≤0.01% (ref. 1 kHz, Audio LPF) |
| Signal/Noise ratio | ≥110 dB (ref. 1 kHz, A-weighted ) |
| Channel balance | ±0.5 dB (ref. 0dB 1kHz) |
| Channel separation | ≥90 dB (ref. 1 kHz) |
| De-emphasis | -4.6 ±0.8 dB (ref. 0dB 1 kHz, 5 kHz) |
| -9.0 ±1.0 dB (ref. 0dB 1 kHz, 16 kHz) | |
| Standby power | <0.5W |
| Idle power | <7.5W |
DIMENSION AND WEIGHT
| Unit Dimensions (W x H x D) | 435 x 70 x 249 mm (Gross)* |
| 17 3/16 x 2 13/16 x 9 13/16 inches | |
| Net weight | 3.0 kg |
| 6.6 lbs | |
| Shipping weight | 4.3 kg |
| 9.5 lbs |
* – Gross dimensions include feet, extended buttons and rear panel terminals.
NAD SHALL NOT BE HELD LIABLE FOR ANY TECHNICAL OR USER INTERFACE DISCREPANCIES IN THIS MANUAL. THE C 538 OWNER’S MANUAL MAY BE SUBJECT TO CHANGE WITHOUT NOTICE. CHECK OUT WWW.NADELECTRONICS.COM FOR THE LATEST VERSION OF THE C 538 OWNER’S MANUAL.
![]() www.NADelectronics.com©2018 NAD ELECTRONICS INTERNATIONALA DIVISION OF LENBROOK INDUSTRIES LIMITED
www.NADelectronics.com©2018 NAD ELECTRONICS INTERNATIONALA DIVISION OF LENBROOK INDUSTRIES LIMITED
All rights reserved. NAD and the NAD logo are trademarks of NAD Electronics International, a division of Lenbrook Industries Limited. No part of this publication may be reproduced, stored or transmitted in any form without the written permission of NAD Electronics International. While every effort has been made to ensure the contents are accurate at the time of publication, features and specifications may be subject to change without prior notice.C538_ENG_OM_V05 – FEB 2018
References
[xyz-ips snippet=”download-snippet”]