INSTRUCTION MANUAL
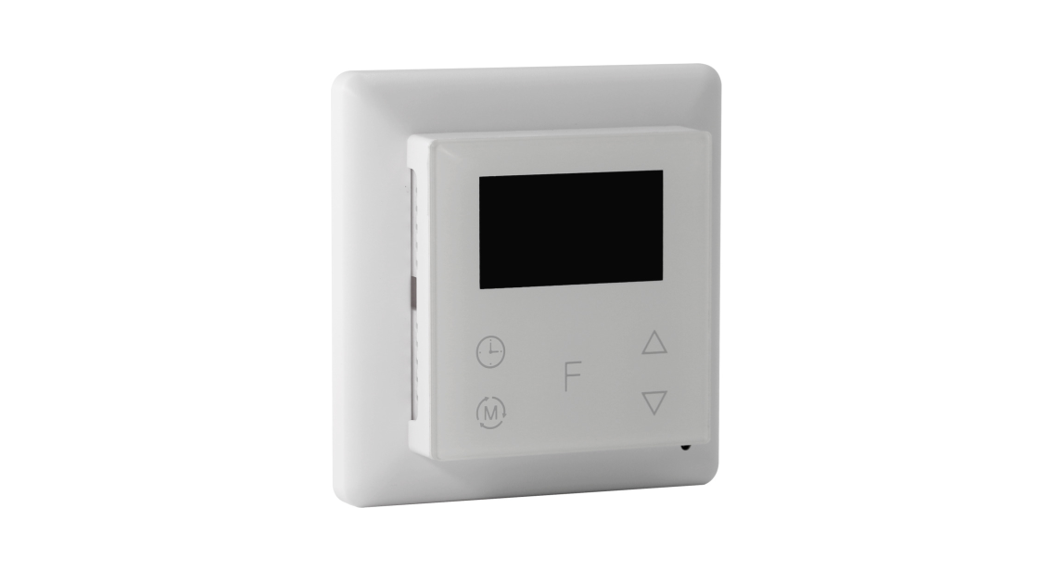
NAMRON THERMOSTATTOUCH Z-WAVE 16A
INSTRUCTION MANUAL
Namron termostat touch Z-Wave 16A
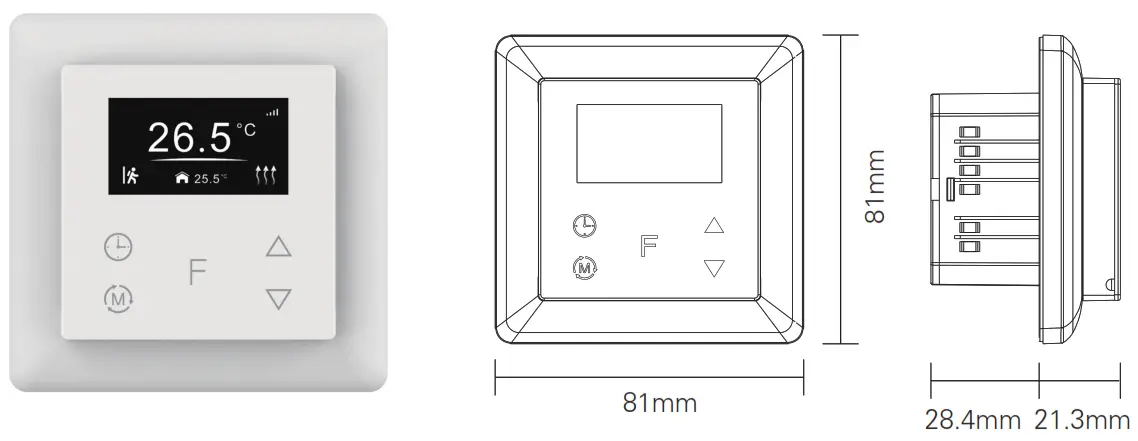
Technical data
| Z-Wave frequency | 868.42MHz (EU) |
| Operation voltage | 220-240V, 50/60Hz |
| Maximum load | 16A |
| Power consumption | <2W |
| Ambient temperature | 0°C to 40°C (during operation) |
| Temperature range | 0°C to 40°C |
| Hysteresis | 0.5°C to 2°C (default 0.5°C) |
| Floor sensor | NTC R25=10K±1%@25°C, B25/50=3950K±1%, (3m included) |
| Floor sensors supported | NTC R25=10K±1%@25°C, B25/50=3950K±1% (factory setting)NTC R25=15K±1%@25°C, B25/50=3950K±1%NTC R25=50K±1%@25°C, B25/50=3950K±1%NTC R25=100K±1%@25°C, B25/50=3950K±1% |
| Control modes | 1. Away 2. Auto 3. Manual 4. Drying 5. Off |
| Control types | Room sensor (factory default)Floor sensorRoom + floor sensorThis parameter can also be configured through advanced config parameter 10 |
| IP rating | IP21 |
| Relative humidity | 8% to 80% |
| Standard | 60730-1:2016;A1, IEC 60730-2-9:2019;A1IEC 61000-3-2:2019, 61000-3-3:2013+A1:2019,60730-1:2016+A1:2019,60730-2-19:2019+A1:2019+A2:2020,50663:2017;ETSI301 489-1V2.2.3,ETSI301 489-3V2.1.1 ETSI300 220-1 v3.1.1., ETSI300 220-2 V3.2.1RED:2014/53/EU |
| Certificate | Z-Wave plus, CE, RED |
Installation
a.Installation must be done by a qualified electrician.b.The power supply must be turned off during installation.
(1) Wiring diagram
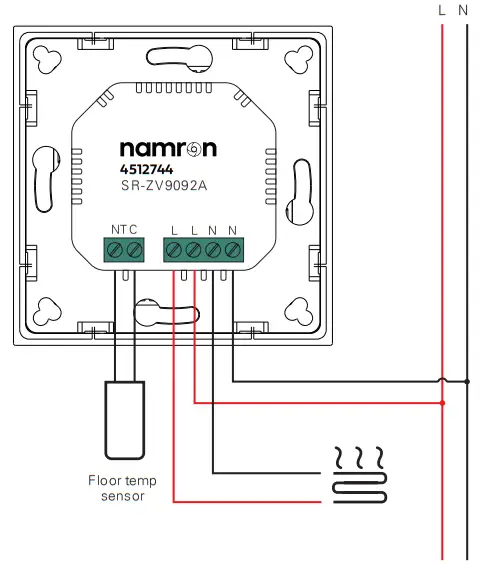
(2) Mountinga.Remove the display unit and front cover by using a small screwdriver.b.Insert the wires to the correct terminals as presented in the wiring diagram above. The suggested wire-stripping length is 8-10mm.c.Fix the thermostat into the connection box by tightening the screws. Make sure that the thermostat is fixed without deformation. Suggested torque is 0.2-0.4Nm (2.0-4.1kgf.cm).
Symbol overview
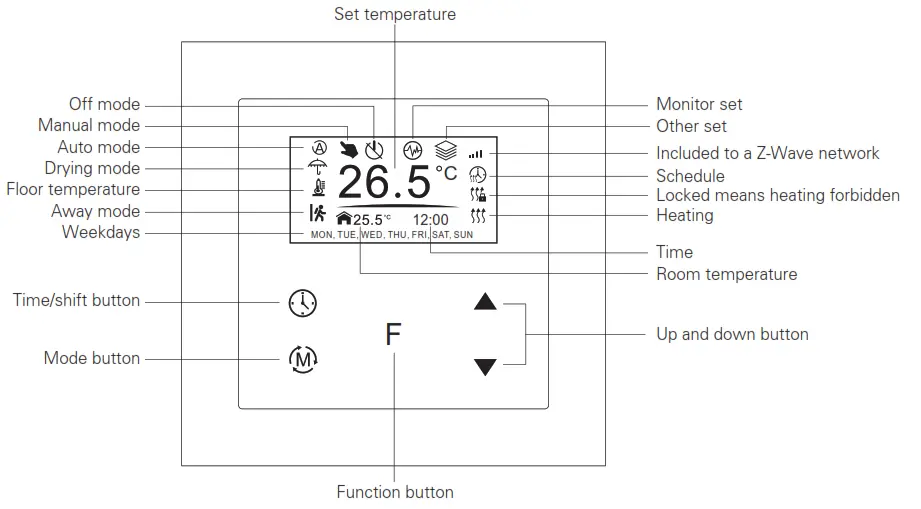
Settings Menu
Select TIME/DATE on Home Interface to enter into TIME/DATE SET interface as follow:Enter settings menu (needs to be added)
- Under Home Interface, meanwhile, the device is at OFF mode (Off icon), press and hold up and down buttons at the same time for over 5 seconds to enter Settings Menu.
- Short press moves up and down button to select a settings item, then short press button F to enter selected item.
- Settings menu include Preview menu, Z-Wave settings, Schedule, Monitor settings, Time/Date settings, Other settings
Time SettingSelect TIME/DATE on Home Interface to enter into TIME/DATE SET interface as follow: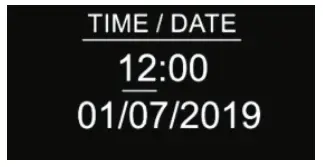
Short press button![]() to select the item you would like to modify, then short press up and down buttons to modify the value of the selected item, then short press button F to save and quit, the short pressing button
to select the item you would like to modify, then short press up and down buttons to modify the value of the selected item, then short press button F to save and quit, the short pressing button ![]()
![]()
![]()
![]()
![]()
![]()
![]()
![]()
2. Preview interfaceOn Home Interface, the user can enter into PREVIEW interface, the interface will display some basic configurations, energy consumption, date, floor temperature, etc.
Control Mode
Short press button ![]()
![]()
![]()
![]()
![]()
![]()
![]()
![]()
![]()
![]()
![]()
![]()
![]()
![]()
![]()
![]()
![]()
![]()
![]()
![]()
![]()
![]()
![]()
![]()
1. Away Mode: the device will control the heating system according to the set temperature within the set period.Users can set time to leave home and time to go home according to their requirements of, and set how thethe device will control the temperature during this period.1.1. If away mode has already been activated, the end time for away mode is valid, the device will execute Away ModeTemperature Schedule before the end time.1.2. If away mode has already been activated, the values of the end time for away mode are set as 0, the device will alwaysexecute the current set temperature with no time limitation. The device will consider the mode as anti-freeze mode, therecommended temperature setting is 4-10°C.
2. Auto Mode: the device will control the heating system according to the configured time schedule or Z-Wave protocolEnergy_Save_Heating Setpoint.2.1. When configuration parameter 8 value is set as 1, the device will control the temperature of energy save mode according to the temperature set by Command Class Energy_Save_Heating Setpoint or set by using the move up and down buttons, the following mentioned schedule will be invalid.2.2. When configuration parameter 8 value set as 0, the temperature set by Command Class Energy_Save_HeatingSetpoint and set by using the move up and move down buttons will both be invalid, Energy Save Mode will control the temperature according to the following user schedule.For instance, if the user would like to keep the room temperature at 18C during 18:00-23:00 on every Monday, and keep the room temperature at 20C after 22:30 on every Monday, then the user can set the schedule by himself.
Schedule setting method 1: user can enter into the schedule on Z-Wave Set Interface, the schedule interface is as follows:
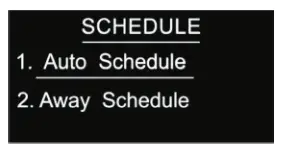

Short press button to select “Auto F Schedule”, then short press button Schedule weekly setting interface.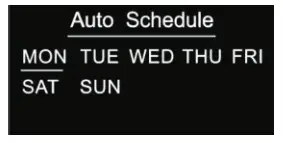

Schedule setting method 2: on Home Interface, meanwhile the device is under Auto Mode, short press button ![]()
![]()
![]()
![]()
![]()
![]()
![]()
![]()
![]()
![]()
![]()
![]()
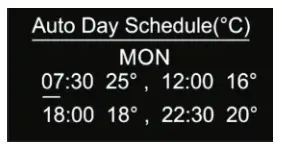

For each schedule, the latter time should be later than the former time, otherwise saving will fail with the error remind “Time setting error!!!”. The default time schedules are as follows:
| Monday-Friday | 7:30,24C-12:00,20C | Saturday-Sunday | 7:30,24C-12:00,20C |
| 18:00,16C-22:30,18C | 18:00,18C-22:30,18C |
3. Manual Mode: the device will control the heating system according to the current set temperature. The temperature can beset by a move up and move down button on the Home interface, or configured by Z-Wave gateway.
4. Drying Mode: The device will judge the set temperature for heating within a short period of time.I.e.: in order to dry the water in the bathroom in a short time, the device could be set to quickly heat to dry the floor. Enter the configuration interface is as follow:Duration: set how long the dry mode should lastAfter Mode: set the mode after the drying mode endsRemain: shows the remaining time of the drying mode
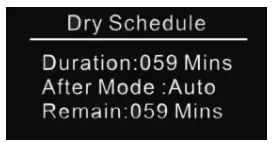

For configuration method and modification, please refer to Automatic Mode (Energy Save Mode) Schedule:
5. Off Mode: this mode only enables the device to turn on the heating system when the anti-freezing mode is enabled and the device meets all required conditions, otherwise, the device will not work, meanwhile, the standby interface will only showroom temperature.
| Monitor Set |
|
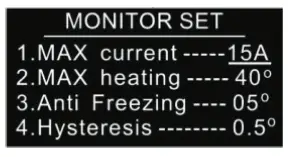
The function of the monitor set is a real-time monitor of over current, overheat, and freezing. On Home Interface, short press MONITOR SET to enter into monitor set interface as follows: Short press button |
| Over-current Alarm |
If the current is over the set value, the relay will be forced off by the device, and the state will be reported to the gateway. The over-current alarm function can be disabled, which can be set directly through the device. Or can be configured through Advance Config parameter 2 by setting the value as 0 to disable the function, please refer to the part “Advance Config”. |
|
| Over-heat Alarm | 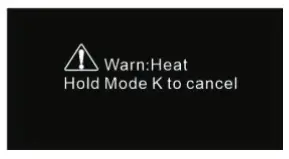  |
If room temperature or floor temperature is over the set value, the relay will be forced off by the device, and an overheat alarm will be reported to the associated devices, meanwhile, the buzzer or vibrator will beep 3 times every 10 seconds. The overheat alarm function can be disabled, which can be set directly through the device. Or can be configured through Advance Config parameter 6 by setting the value as 0 to disable the function, please refer to the part “Advance Config”. Overheat alarm interface is as follow: Note: to cancel over the current alarm or overheat the alarm, just press and hold the button |
| Hysteresis |
To prevent the undulation of sensor temperature when the sensor temperature is approaching the set temperature, which will cause that the controller may keep switching on/off the relay. Here hysteresis enables the controller to control the relay only when the sensor temperature is a bit lower than the set temperature, this value can be set. This hysteresis is only valid when the control type is a single sensor, please refer to the part Control Type. For instance, when hysteresis is set as 0.5 degrees, then only when the current sensor temperature is 0.5 degrees lower than the set temperature, will the controller heat, if the sensor temperature >= set temperature, the controller will not heat. |
|
| Key Vibration Set |
Set the level of the vibration sensor under the buttons or buzzer level. OFF: vibration or buzzer off Low Level, High Level: low vibration or buzzer level, high vibration or buzzer level. The level can also be configured through Advance Config parameter 03. |
|
| Display Brightness Set |
The OLED displays brightness when operating the device. High Level, Mid Level, Low Level.This parameter can also be configured through the Advance Config parameter [22]. |
|
| Display Temperature Set |
This parameter defines which sensor temperature will be displayed on the Home page.Floor Temp: floor temperature (external sensor). Home Temp: indoor air temperature.This parameter can also be configured through the Advance Config parameter [23]. |
|
| Other Set | 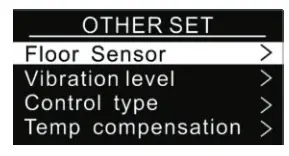  |
Select |
| Temperature Compensation |
The displayed temperature may have big tolerance caused by the sensor or other factors, so it is necessary to do temp compensation to the room sensor and floor sensor. The compensation range is -5 ~ +5°C, stepping is 0.5°C.This parameter can also be configured through Advance Config parameters [11] and [12]. |
|
| Re-power Status |
Device state after reset power of the device.If set as “last status”, the device will go to the status before power failure after power on again.If set as “default”, the device will go to default mode after power on again.This parameter can also be configured through the Advance Config parameter [4]. |
|
| Internal Over Heat Protection |
To ensure the safety of the device, if the internal temperature of the device (not displayed on the interface) is over a certain value during the heating process, the device will execute a short temporary action to turn off the relay, and the icon will appear on the interface, after the temperature decreases to a certain value, the device |
Z-Wave Set Introduction
1. Z-Wave Network ManagementSelect![]()
![]()
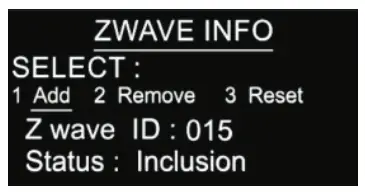

Adding to a Z -Wave Network ( Inclusion)Method 1: Select “Add”, then short press button F, the device will send out inclusion request, “Status” will show “Inclusion…”. Ifthere is no response from a gateway within 30 seconds, or inclusion failed, “Status” will show “Fail”. If included successfully,“Status” will show “Inclusion OK” and device ID.Method 2: Operate the gateway into inclusion mode, make sure the device is already removed from the previous network, resetpower of the device, the device will be included in the gateway automatically.
Removing from a Z-Wave Network (Exclusion)Select “Remove”, then short press button, the device will send out exclusion request, “Status” will show “Exclusion…”. Ifthere is no response from a gateway within 30 seconds, or exclusion failed, “Status” will show “Fail”. If excluded successfully,“Status” will show “Exclusion OK” and device ID will be shown as 0.Factory Reset (Reset)Factory resetting will reset all Advance Config parameters to the default value, and the device will be removed from the Z-Wavenetwork.Select “Reset”, then short press button F , the device will start reset, “Status” will show “Reset…”. If there is no response froma gateway within 6 seconds, or exclusion failed, “Status” will show “Fail”. If reset successfully, “Status” will show “Reset OK”.Note 1: if the device is excluded or reset successfully, the Auto Mode Schedule will be reset to the default value.Note 2: the sent frame of inclusion and exclusion is the INFO frame.
2. Basic set command classSet the device operation mode as Comfort Mode (Manual Mode) by sending command class basic set = 0XFF. Set the deviceoperation mode as OFF mode by sending command class basic set = 0x00
Z-Wave Technical Specifications1. Supported Notification Report and Sensor Type
|
Notification Type |
Triggering Event |
Description |
| POWER_MANAGEMENT | POWER_MANAGEMENT_OVERCURRENT_DETECTED | Over Current Alarm |
| Heat Alarm | Overheat detected | Over Heat Alarm |
| SENSOR MULTILEVEL Type support | Scale |
| Air temperature | Celsius (℃) |
2. Technical Specifications
|
Item |
Definition |
| SDK | 6.82.00 |
| Explorer Frame Support | Yes |
| Device Type | Thermostat(HVAC) |
| Generic Device Class | GENERIC_TYPE_THERMOSTAT |
| Specific Device Class | SPECIFIC_TYPE_THERMOSTAT_HEATING |
| Role Type | Always On Slave (AOS)) |
| Routing | Yes |
Thermostat Related Specifications
|
Command |
Support |
| ThermostatMode | ThermostatMode_OFF(off) ThermostatMode_HEAT(UI displays Manual) ThermostatMode_DRY ThermostatMode_EnergyHeat(UI displays Auto)
ThermostatMode_Away(UI displays Away) |
| ThermostatSetPoint | ThermostatSetPointType_Heating(set manual temperature) ThermostatSetPointType_Energy_Save_Heating(set auto temperature) ThermostatSetPointType_DRY
ThermostatSetPointType_Away_Heating(set away temperature) |
3. Supported Command ClassRoot Device
| Suppourt Command class |
Support S2/s0 |
|
| COMMAND_CLASS_ZWAVEPLUS_INFO | V2 | |
| COMMAND_CLASS_SECURITY | V1 | |
| COMMAND_CLASS_SECURITY_2 | V1 | |
| COMMAND_CLASS_TRANSPORT_SERVICE | V2 | |
| COMMAND_CLASS_SUPERVISION | V1 | |
| COMMAND_CLASS_THERMOSTAT_MODE | V3 | YES |
| COMMAND_CLASS_THERMOSTAT_OPERATING_STATE | V1 | YES |
| COMMAND_CLASS_THERMOSTAT_SETPOINT | V2 | YES |
| COMMAND_CLASS_ASSOCIATION | V2 | YES |
| COMMAND_CLASS_MULTI_CHANNEL_ASSOCIATION | V3 | YES |
| COMMAND_CLASS_ASSOCIATION_GRP_INFO | V1 | YES |
| COMMAND_CLASS_VERSION | V3 | YES |
| COMMAND_CLASS_MANUFACTURER_SPECIFIC | V2 | YES |
| COMMAND_CLASS_DEVICE_RESET_LOCALLY | V1 | YES |
| COMMAND_CLASS_POWERLEVEL | V1 | YES |
| COMMAND_CLASS_TIME_PARAMETERS | V1 | YES |
| COMMAND_CLASS_CONFIGURATION | V1 | YES |
| COMMAND_CLASS_NOTIFICATION | V8 | YES |
| COMMAND_CLASS_METER | V3 | YES |
| COMMAND_CLASS_MULTI_CHANNEL | V4 | YES |
| COMMAND_CLASS_FIRMWARE_UPDATE_MD | V4 | YES |
|
Controlled command class |
Support S2/s0 |
|
| COMMAND_CLASS_THERMOSTAT_MODE | V3 | YES |
| COMMAND_CLASS_THERMOSTAT_SETPOINT | V2 | YES |
Note: the EndPoint01 mirrors equivalent effect root endpoint.EndPoint1 command list:
| Support command class | Support S2/s0 | |
| COMMAND_CLASS_ZWAVEPLUS_INFO | V2 | |
| COMMAND_CLASS_SECURITY | V1 | |
| COMMAND_CLASS_SECURITY_2 | V1 | |
| COMMAND_CLASS_SUPERVISION | V1 | |
| COMMAND_CLASS_SENSOR_MULTILEVEL | V5 | YES |
| COMMAND_CLASS_ASSOCIATION | V2 | YES |
| COMMAND_CLASS_MULTI_CHANNEL_ASSOCIATION | V3 | YES |
| OMMAND_CLASS_ASSOCIATION_GRP_INFO | V1 | YES |
| COMMAND_CLASS_THERMOSTAT_MODE | V3 | YES |
| COMMAND_CLASS_THERMOSTAT_OPERATING_STATE | V1 | YES |
| COMMAND_CLASS_THERMOSTAT_SETPOINT | V2 | YES |
EndPoint2 (floor temperature sensor) command list:
| Support command class | Support S2/S0 | |
| COMMAND_CLASS_ZWAVEPLUS_INFO | V2 | |
| COMMAND_CLASS_SECURITY | V1 | |
| COMMAND_CLASS_SECURITY_2 | V1 | |
| COMMAND_CLASS_SUPERVISION | V1 | |
| COMMAND_CLASS_SENSOR_MULTILEVEL | V5 | YES |
| COMMAND_CLASS_ASSOCIATION | V2 | YES |
| COMMAND_CLASS_MULTI_CHANNEL_ASSOCIATION | V3 | YES |
| COMMAND_CLASS_ASSOCIATION_GRP_INFO | V1 | YES |
5. AssociationRoot device
|
Group ID |
NAME | Profile | Max nodes |
Description |
| 1 | Lifeline | AGI_LIFE_LINE(0x0001) | 5 | 1. Send Command Class DEVICE_RESET_LOCALLY_NOTIFICATION to associated devices of this group when the factory reset the device.2. Send Command Class THERMOSTAT_SETPOINT_REPORT, THERMOSTAT_MODE_REPORT,THERMOSTAT_OPERATING_STATE_REPORT to associated devices of this group When operation mode and temperature change.3. Send Command Class NOTIFICATION_REPORT to associated devices of this group when over-current, overheat detected4. Send Command Class METER_REPORT to associated devices of this group to report metering parameters. |
| 2 | Heat Set | AGI_CONTROL_ KEY01 (0x2001) | 5 | Transfer Command Class THERMOSTAT_SETPOINT_SET THERMOSTAT_MODE_SET to control other temperature control devices when operation changes |
EndPoint01 :
| Group ID | NAME | Profile | Max nodes |
Description |
| 1 | Lifeline | AGI_LIFE_LINE (0x0001) | 0 | Lifeline(0x0001) |
Note: the EndPoint01 has an equivalent effect of the root function. EndPoint02
| Group ID | NAME | Profile | Max nodes |
Description |
| 1 | Lifeline | AGI_LIFE_LINE(0x0001) | 0 | Lifeline(0x0001) |
6. Advance Config Parameters
|
Parameter |
Size | Description | Default Value |
Parent Menu |
| 0x02(2) | 1 |
Over-current detection max. value, unit is A. When the detected current is over this value, the device will turn off the relay and send NOTIFICATION CC. 0, disable overcurrent detection 5-16, over current detection max. value |
16 | Monitor Set |
| 0x03(03) | 1 | Vibration level and buzzer level triggered by pressing buttons 0, disable vibration and buzzer1, Low Level2, High Level | 1 | Other Set |
| 0x04(4) | 1 | Whether to recover to settings before power failure or power reset 0, use default settings 1, recover to settings before power failure, or power reset | 1 | Other Set |
| 0x06(6) | 1 |
High-temperature detection max. value, unit is ℃ when either temperature sensor is higher than this value, the device will turn off the relay and send NOTIFICATION CC. 0, disable this function 20-60, the high-temperature value |
45 | Monitor Set |
| 0x07(7) | 1 |
Temperature control hysteresis value setting, setting range 0.5℃- 2℃ 5-20, unit is 0.1℃ |
5 | Monitor Set |
| 0x08(8) | 1 | Auto mode (Energy save mode) temperature schedule 0, use schedule set by the user 1, use Energy_Save_Heating temperature set by THERMOSTAT_SETPOINT_SET |
0 |
None |
| 0x09(9) | 1 | Select floor temperature sensor type1, NTC/10KB(25/50°C)=39502, NTC/15KB(25/50°C)=39503, NTC/50KB(25/50°C)=39504, NTC/100KB(25/50°C)=3950 | 1 | Other Set |
|
0x0A(10) |
1 |
Temperature control reference selection 1, room sensor2, floor sensor 3, room+floor sensor |
1 |
Other Set |
| 0x0B(11) | 1 | ROOM SENSOR temperature compensation setting -10~10, unit is 0.5℃ | 0 | Other Set |
| 0x0C(12) | 1 | FLOOR SENSOR temperature compensation setting -10~10, unit is 0.5℃ | 0 | Other Set |
| 0x0D(13) | 1 | Set how long the drying mode lasts 5~100, the unit is minute | 30 | Dry Mode Schedule |
| 0x0E(14) | 1 | Set the mode a fter the drying mode ends 0x00 = OFF 0x01 = Manual mode (comfort mode) 0x02 = Auto mode (energy save mode) 0x03 = Away mode | 2 | Dry Mode Schedule |
| 0x10(16) | 1 | When to report temperature relative change threshold value actively, the unit is 0.1℃ 0, disabled let report2- 10, rep or t when the threshold value is 2- 10 | 2 | None |
| 0x11(17) | 1 | Time interval value for a periodic report of temperature, humidity, unit is S 0, disable to report 30~28800, report when time interval value is 30~28800 | 300 (5mins) | None |
| 0x12(18) | 1 | When to report power change absolute threshold, the unit is W 0, disable to report 1~100, report when the absolute threshold is 1~100 | 5 | None |
| 0x13(19) | 1 | When to report current change absolute threshold, the unit is 0.1A 0, disable to report 1~10, report when the absolute threshold is 1~10 | 10 | None |
| 0x14(20) | 1 | When to report voltage change absolute threshold, the unit is 1 V 0, disable to report 1~10, report when the absolute threshold is 1~10 | 2 |
None |
| 0x15(21) | 4 | Time interval value for periodic active report of Meter 60-2678400 (31 days), unit is S | 600 (10mins) | None |
| 0x16(22) | 1 | The OLED displays brightness when operating the device. 0, low level1, mid-level2, high level |
1 |
Other Set |
| 0x17(23) | 1 | This parameter defines which sensor temperature will be displayed on the Home page.0x00: indoor air temperature0x01: external temperature (floor temperature) |
0 |
Other Set |
| 0x18(24) | 1 | The time zone that the time parameters command adopts is UTC, the time zone needs to be set: +12 ~ -12 | 0 | Other Set |


Namron ASNedre kalbakkvei 88B1081 OsloNorway[email protected]
[xyz-ips snippet=”download-snippet”]

