
User Manual
![]()

NANOCAM Barrel Dash Camera
Full HD Discreet Barrel Dash Camera with inbuilt GPS & WIFI.
1. CAUTION
- Ensure you are using your Dash Camera within your countries’ road laws. Please make sure you are familiar with your local road legislation before use.
- Please set time and date before you use this device to record.
- The notifications given by the Dash Camera are suggestions only, please drive to the actual conditions.
- The system is to be used only for non-commercial use, within the limits permitted by the relevant laws
- Avoid using the Dash Camera in the vicinity of any devices that emit radio interference (eg. Microwave Ovens).
- It is considered normal operation for the Dash Camera to get warm during use.
2. BATTERY WARNING
- Always charge the Dash Camera using the provided charger. Improper charging of the Dash Camera may result in failure of the internal battery.
- Never dismantle the Dash Camera or expose the internal battery.
- Do not dispose of the Dash Camera in fire.
- Dispose of the Dash Camera observing local regulations being mindful of the internal battery.
- Do not attempt to replace or expose the internal battery.
3. SD CARD WARNING
This Dash Camera can only be used with Micro SD Cards, Class 1 Dor above with 32GB – 128GB storage capacity. Not Included. Please format your SD card before use.
NOTE,
- Formatting the Micro SD card will delete all information on the inserted Micro SD Card and prepare the card for use with the Car DVR.
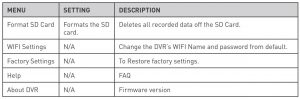
3. 1 FORMATTING THE INSERTED MICRO SD CARD
Please download Iha NCPBDVR app and connect your Dash camera with tha downloaded appby following the steps as mentioned on page 10.
Please enter into Settings Section and press Formal SD card.DVR will format SD card and will give audio notification that the SD card has been formatted.
NOTES ON INSTALLATION
- It is advised that the Dash Camera is installed near the rear view mirror, at the top center of the windshield for optimal operation.
- Make sure that the lens is within the range of the windscreen wiper to ensure a clear view when it rains.
- Do not touch the lens with your fingers. F inger prints Left on the Lens will result in unclear videos or photos. If photos or videos are blurred, please clean the lens gently with a microfiber cloth.
- Only use the included charging cable to power the Dash Camera.
4. INTRODUCTION
Thank you for purchasing a Nanocam Plus Dash Camera. We are certain that our product will give you trouble free operation while providing you with a safety feature that enhances your driving experience. Our products, like most after-market safety enhanced devices, are designed to assist and aid the driver, not to replace the manual function of the person operating the vehicle. Please read through these instructions before attempting to install this product.
For the latest manual and product updates, please visit our website atwww.nanocamplus.com.au or www.nanocamplus.co.nz
5. PACKAGE CONTENTS
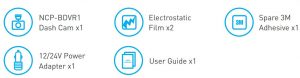
6. PRODUCT OVERVIEW
FRONT CAMERA

- Adhesive Sticker
- Speaker Vent
- Camera Lens
- Recording indicator LED
- Mini USB connector (for power)
- Reset button
- SD card Slot
- Power button/WIFI ON & OFF/Lock file
- Microphone
7. INSTALLATION INSTRUCTIONS
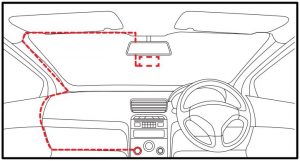
7.1 NCP-BDYR1 INSTALLATION
- OPTIONAL, Select the electrostatic film from the box and install it on the front windshield in the recommended position as shown below. Please wipe 1he glass before ins1alla1ion and push ou11he bubbles between the static film and the glass before installation.

- Remove the protective film off the NCP-BDVR1 and position the DVR in the middle of the electros1atic film [optional]. Press down on the base of the bracket by hand for 30 seconds to ensure that the sticker adhesive is attached to the electrostatic film, adjus1 the camera by rotating the barrel until it is capturing the entire road.
- Run the NCP-BDVR1 cable along the top of the front windshield through the A pillar and around and under the storage compartment of the passenger seat 10 the car’s 12/24v adapter port. Connect the 12/24v adapter to the car power.

NOTE:
- Electrostatic film helps for easy removal of dash camera from the windshield. Included in package contents.
8. SOUND ALERTS
The NCP·BDVR1 will provide a sound alert to keep you updated with the status of your dashcamera. Audio notifications will come through the in-built speaker of the NCP-BDVR1, seebelow.
- Recording Started/Stopped
- Turning On/Ott WIFI
- Emergency Recording Started/Stopped
- Rear camera is not Connected,Please check the connection
- Please insert SD card
- Factory Reset Started/ Completed
8. 1 REAL· TIME AUDIO ROAD ALERTS
Your Dash Camera comes with the added feature of providing real time road safety alerts. Anaudio warning will alert you of your actual live speed, speed limit Iii applicable] and distance to the alert leg. Speed Camera!. These alerts can be individually disabled from the settings menu on the NCP-BDVR App.
Here Maps does not support School Zone & accident Block-spot Alerts for New Zealand.
8.2 SPEED CAMERA ALERTFixed Speed camera alerts you on the speed limit with your current speed and the distancecount down.
8.3 BLACKSPOT ALERTBlackspot alerts you before you enter a high accident zone .
8.4 SCHOOL ZONE ALERTThe School Zone alerts will appear 24/7 and cannot be setup to appear only during specificSchool Zone times.
8.5 RAILWAY CROSSING ALERTRailway Crossing alert gives you a warning before a railway crossing.
NOTE
- Sound ALerts can be disabled or sound can be Lowered through NCP-BDVR App VolumeSettings. Please refer to the App section.
9. 24 HOUR PARKMODE
When activated, Parkmode will monitor the DVR’s G Sensor after you have turned off yourvehicle. If an impact is detected the DVR will power up and record a 60 second clip.
NOTES
- Park mode requires the DVR’s internal battery to be fully charged.
- Park Mode is activated when an impact is detected and will record from that point onward.
- Can record a maximum of 10 impact videos in 24 Hours when fully charged.
10. KEY FUNCTIONS
By pressing the Power button multiple times you can access several quick key functions.

11. DOWNLOAD AND INSTALLING THE NCP-BDVR APP
The NCP-BDVR1 needs to be used in combination with NCP-BDVR App to function correctly.All major settings on the NCP-BDVR1 ere edited through the NCP-BDVR App. The system requirements for your smart phone are noted below.
iPhone: 5 or later using iOS 8.0 and above.Samsung Galaxy: 53 and later using Android 4.2.2 and above.
For you to correctly connect your smart device to your NCP-BDVR you will need to have theNCP-BDVR App from the App store. You will also need to connect your smart phone to theNCP-BDVR1 ‘s WiFi signal using your smartphones WiFi settings.
For Android devicesPlease search NCP-BDVR in Play Store for installation.
For iOS devicesPlease search NCP-BDVR in App Store for installation.For a step by step guide on connecting to your Dash Cam please follow the steps below.
- On your smart device download the NCP-BDVR App from the Google Play store if you are using an Android device, or the iOS App store if you are using an iPhone.
- Power up the NCP-BDVR1 and allow 2 minutes for the WiFi connection to start.
- Once the App is downloaded and installed on your phone and the Dash Cam is powered up, open your phones WiFi settings and connect to the wireless connection named NCPBDVR1.
- When prompted enter the password 12345678WIFI Name: NCP-BDVR1 Password: 12345678
- Once the connection has been made, open the NCP-BDVR App. You will now be able to access the live recording screen for the front and rear cameras, the stored videos, and the Dash Cams settings.
12. NCP-BDVR APP OPERATION
To use the NCP-BDVR App your smart device will need to be connected to the Dash Camswireless connection. For instructions on connecting please see the section of the manual named WiFi Connection.
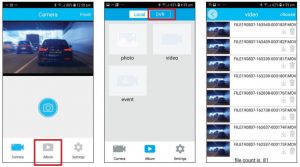
12.1 APP VIDEO PLAYBACK
For Video Playback, please follow the instructions below.
- Open the NCP-BDVR APP.
- Press the Album Button.
- Click on the Video Folder and select the video you want to view.
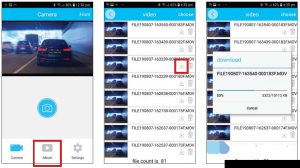
12.2 DOWNLOADING VIDEOS FROM THE APPFor downloading videos, please follow the instructions below.
- Open the NCP-BDVR App.
- Press the Album Button.
- Select the video/videos and press the download button.
- The download will start and will save to your phone which can also be accessed throughthe NCP-BDVR App in Folder name Local.
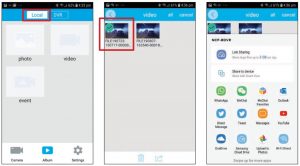
12.3 SHARING VIDEOS ON SOCIAL MEDIA
To share videos on Social Media. please follow the instructions below.
- Open the NCP-BDVR App.
- Press the Album Button.
- Open the Local folder on the NCP-BDVR App, all downloaded files can be accessed via the local folder.
- Select the files you want to share. and then press the share button below.
- Select the Social media application you wish to share on.
12.4 NCP-BDYR APP SETIINGS

NCP-BDVR APP SETTINGS CONT
13. WARRANTY TERMS & CONDITIONS
Our goods come with guarantees that cannot be excluded under the Australian & New Zealand Consumer Law. You are entitled to a replacement or refund for a major failure and for compensation for any other reasonably foreseeable loss or damage. You are also entitled to have the goods repaired or replaced if the goods fail to be of acceptable quality and the failure does not amount to a major failure.
This warranty is provided in addition to your rights under the Australian & New Zealand Consumer Law.
NanoCam Plus warrants that this product is free from defects in material and workmanship for a period of 12 months from the date of purchase or for the period stated on the packaging. This warranty is only valid where you have used the product in accordance with any recommendations or instructions provided by NanoCam Plus.
This warranty excludes defects resulting from alterations of the product, accident, misuse, abuse or neglect.
In order to claim the warranty, you must return the product to the retailer from which it was purchased or if that retailer is part of a National network, a store within that chain, along with satisfactory proof of purchase. The retailer will then return the goods to NanoCam Plus.NanoCam Plus will repair, replace or refurbish the product at its discretion. The retailer will contact you when the product is ready for collection. All costs involved in claiming this warranty, including the cost of the retailer sending the product to NanoCam Plus, will be borne by you.
Ph: +61 03 8331 4800Email:
Your Safety. Our Priority

All Images, Information and Content are Copyright © 2020 Directed Electronics Australia Pty Ltd. All Rights Reserved. www.nanocamplus.com.au | www.nanocamplus.co.nz

References
[xyz-ips snippet=”download-snippet”]