
NASH Smart WIFI Stand Fan Instruction Manual
For time-efficient troubleshooting, see “most common issues” at the end of this manual.
Introduction
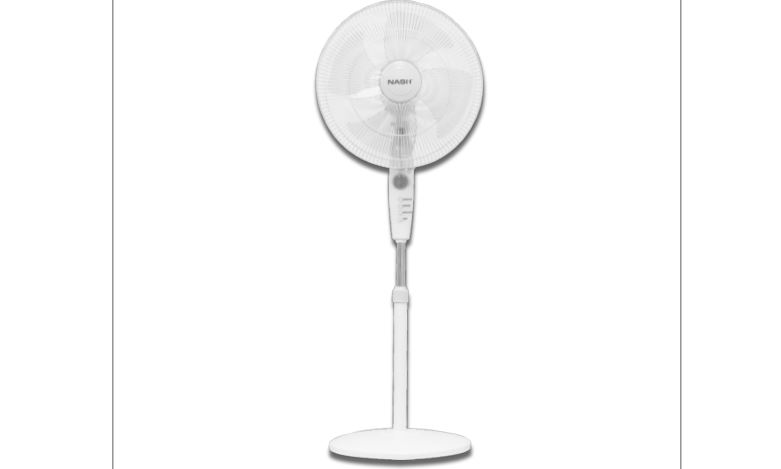
Thank you for choosing NASH! We are certain that you will enjoy how easy the NASH PF-1 CoolSmart is to use. If you ever do experience troubles or have any questions about your new smart fan, we will be very happy to take your call. Alternatively, you can send us an email!
1 888 2246 604 (Toll free) 9AM – 3PM PST[email protected]
You can control this device via:
Manual operation: Control panel on deviceSmartphone: NASH Smart APPVoice: Amazon Alexa APP or Amazon Echo/Dot/Plus/Show/Spot Smart SpeakerOR Google Home: Google Home APP or Google Home/Mini Smart Speaker
For voice control, you can use the Amazon Alexa or Google Home APP together with the NASH Smart APP. Instructions on how to link APPs and set up your device can be found in this manual.
NOTE that you do not necessarily need a smart speaker like Amazon Echo or Google Home for the voice feature to work, as you can communicate with the APP directly, but it is suggested that you use the device with a smart speaker for the best possible user experience.

If you prefer to follow a video guide or view this manual in pdf format, please scan the QR codes.

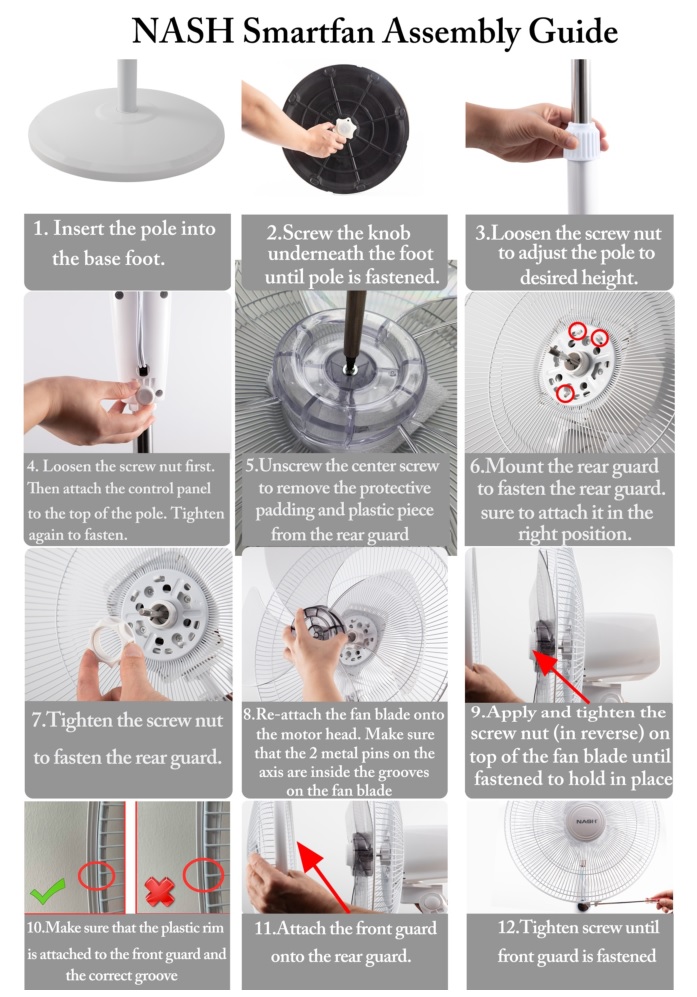
Assembly Guide
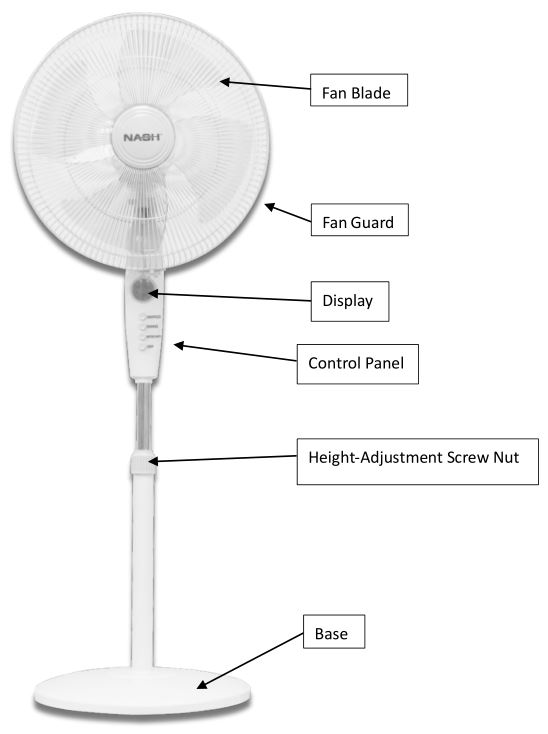
Product Features
In order to prevent the risk of a fire, an electrical shock, burns and other injuries, it is imperative to observe basic safety measures when using electrical appliances.
Please read the following information carefully before using the appliance for the first time for your own safety and to ensure correct use.
Control Panel Layout

There are 2 ways to operate your device, either manually or by using your Smart phone/Smart speaker (NASH APP, Alexa, Google home).
How to use Manual operation (Without APP):
ON/SPEED: Use this button to power ON the fan, and change between the three speed settings: 1,2,3. The corresponding indicator will light.
SWING: Use this button to activate oscillation.
MODE/WIFI: Use this button to change between the three modes: Normal (Standard 3-gear mode), Sleep (Silent), Nature (Variating wind speeds to simulate natural winds). This button is also used when connecting the CoolSmart to your WIFI. For instructions on connecting the device, see the “Setting up your device” section later in this manual.
OFF: Use this button to power OFF the fan.
Setting up NASH Smart APP (Also needed to control the CoolSmart with Amazon Alexa, Google Home):
1. Download the NASH Smart APP
![]()
Depending on your smartphone type (iPhone or Android), please go to either App Store or Google Play Store and search “nash smart” to find the NASH Smart APP. Look for the icon as displayed above.
*Note: This device also works with the Smart Life APP by tuya. If you already have devices set up with the Smart Life APP, we recommend that you also use this same APP for your new CoolSmart! Instructions are identical.
![]()
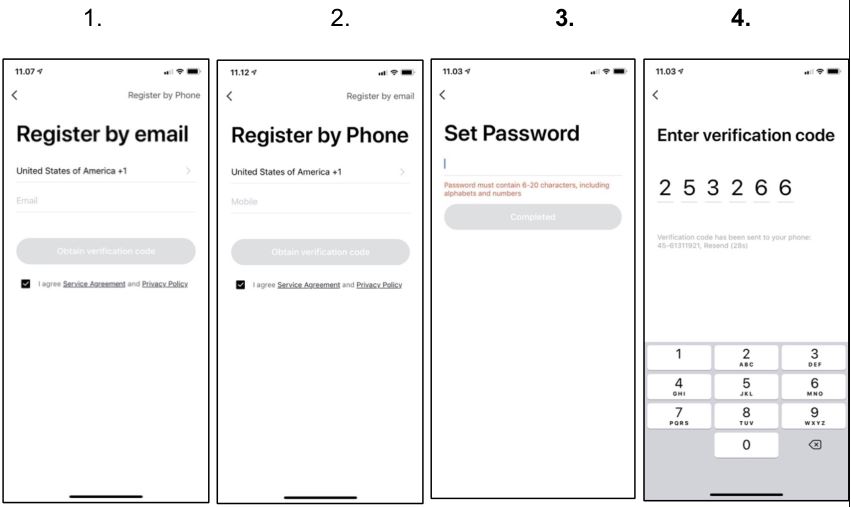
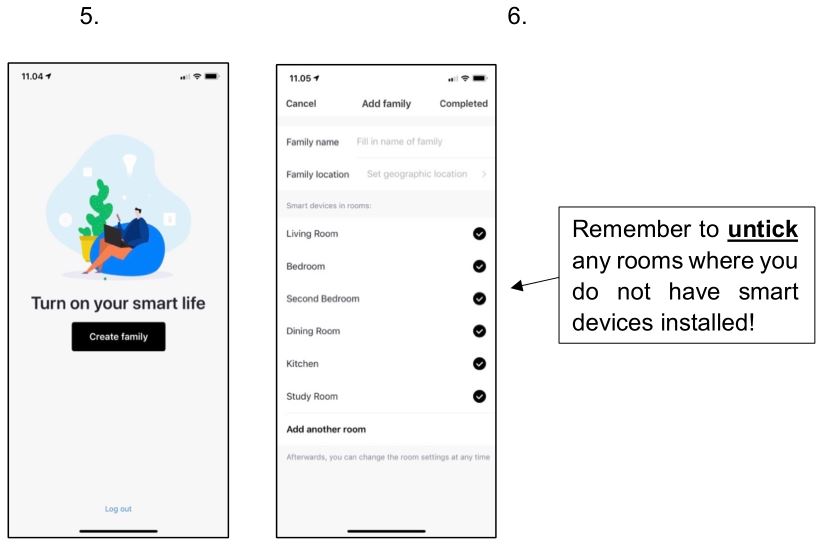
2. RegistrationEnter the register/login interface and input your phone number to receive your verification code. Alternatively, you can get your verification code by email. Then proceed to enter your family/home information.
3. Setting up your deviceConnect your phone to your 2.4GHz WIFI and open the NASH Smart app. Note the CoolSmart only supports 2.4GHz connection, and not 5GHz.
- Preparation: Plug in and turn ON the device, press and hold the “MODE/WIFI” button for 5 seconds until the indicator light blinks rapidly. The device can now be found in the “My Device” interface.
- Connect your phone to your 2.4GHz WIFI.
- Tap the icon “+” on the top right corner of “My Device”, choose “All devices”, and choose “Fan”.
- Make sure the WIFI indicator light on the fan is blinking rapidly, then tap “Confirm the indicator is rapidly blinking” in the application. If the WIFI indicator light on the fan is not blinking, then press and hold the “MODE/WIFI” button for 5 seconds again until successful.
- Choose the same 2.4GHz WIFI, enter the correct password and tap “Next”.
- Wait for configuration to be successful and tap “Complete”.
- Congratulations! Your new CoolSmart is now connected. You can go ahead and skip to the voice control setup guide! However before you do that, consider reading the next part about how to use the app itself!
NASH Smart APP walkthrough
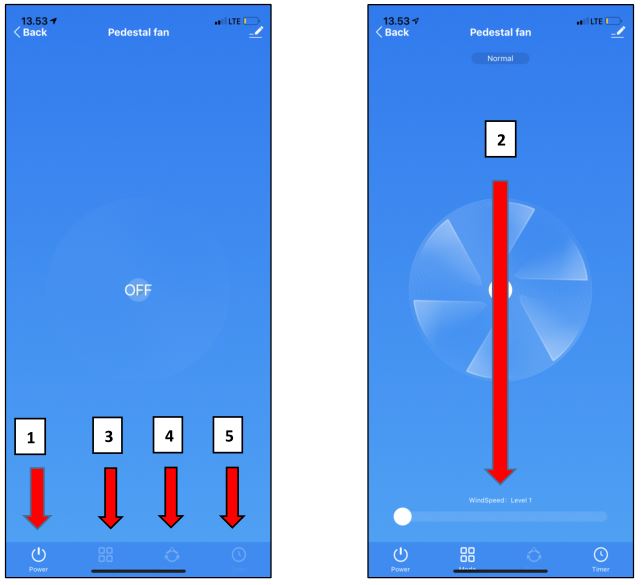
Device menuThe “Device menu” is the first page you enter when you choose the “Fan” device after having successfully connected your CoolSmart to the WIFI. From this page, you will be able to:
- Turn the device on/off.
- Choose between 3 wind speeds (1, 2, 3).
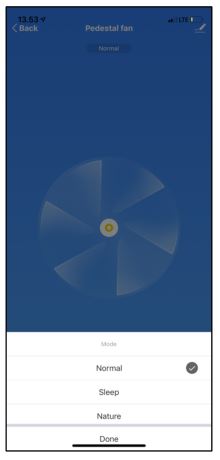
- Choose between 3 modes: Normal (Standard 3-speed), Sleep (Silent mode), Nature (Variating wind speeds that simulate a natural breeze).
- Turn on/off oscillation/swing.
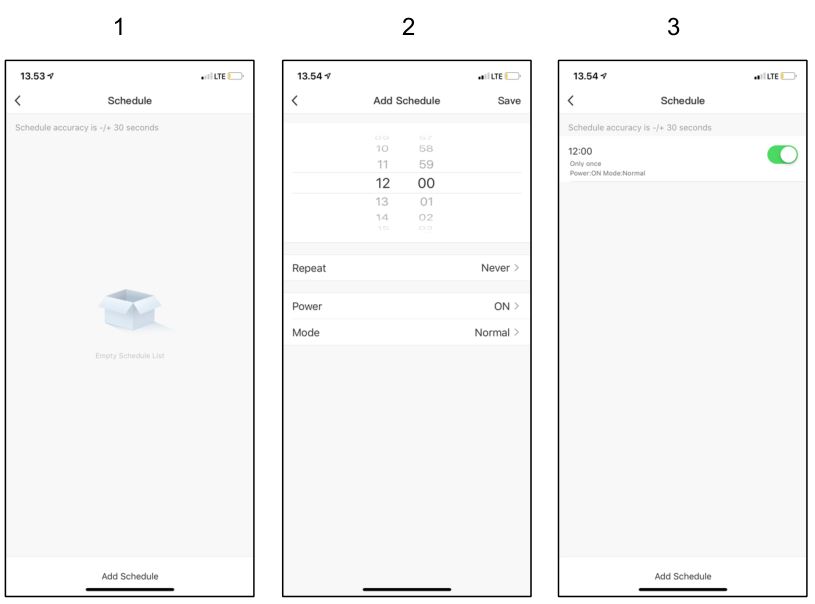
- Set up a time schedule.
Modes
Timer
Settings
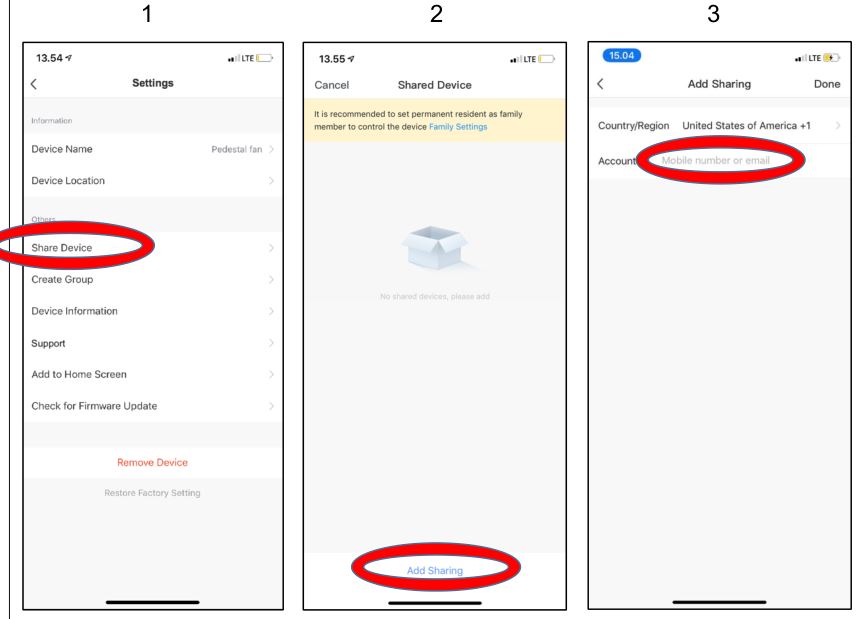
Share device
In order to allow multiple users to control the fan from their smartphones, the primary user must follow the below procedure to share the device with additional users.
Create Group

If you own multiple devices you can group them here. Multiple devices can then be controlled collectively with one command.
Device Information

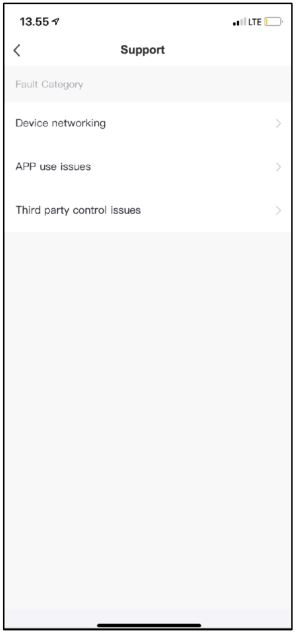
Support
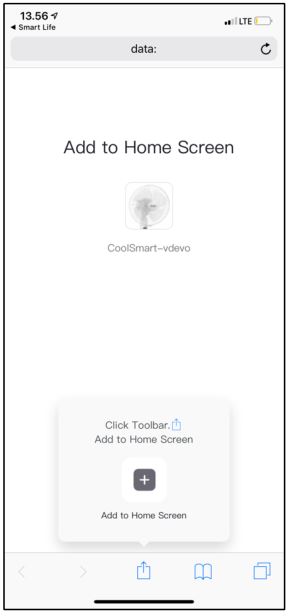
Add device to Home Screen
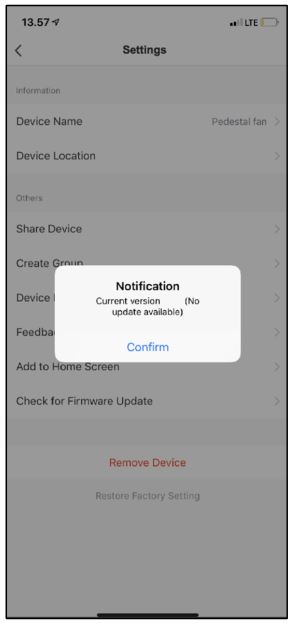
Check for update
“Me” page
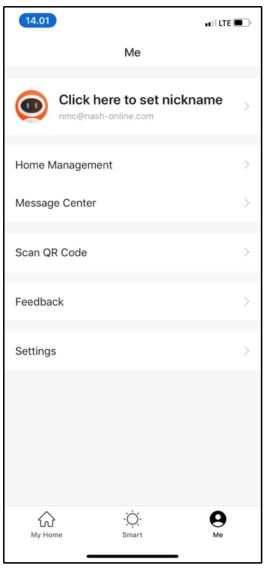
The “Me” page is your profile page where your personal information can be edited. This is also where you will receive notifications from NASH and where you will have the option to reach out for support.
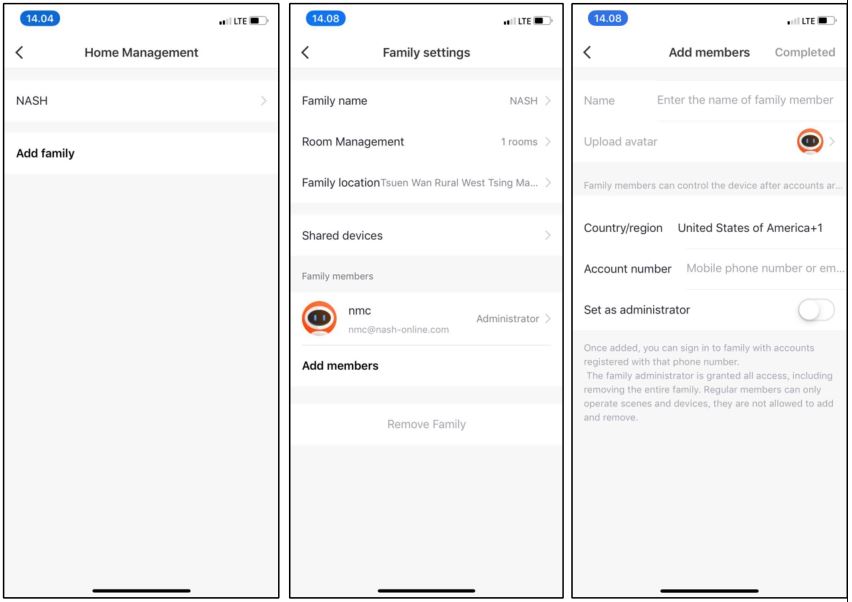
Home ManagementAdd members to your Family so you can share the device!
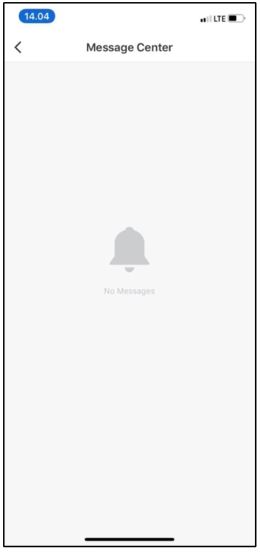
Message CenterThis is where you will receive app notifications. For example, when adding a family member to use your device from their app login too, they will receive a notification that they have been added to your family.
Automation in the NASH Smart APP
Automatic execution according to outside weather conditions (Scene/Automation):
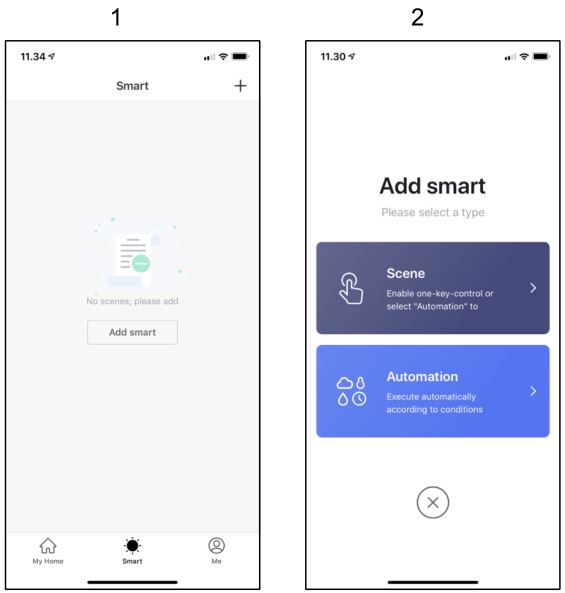
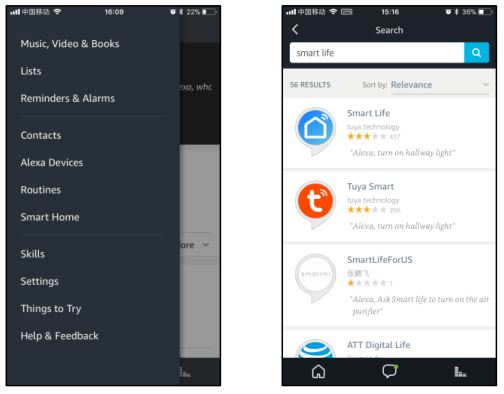
In order to enable your new fan to execute certain actions according to outside weather conditions, first click “Smart” at the bottom center of the home screen. You will then have the option to choose “Scene” or “Automation”.
Scene“Scene” is the action itself, which you will need to have to set up firstly, before you can set up “Automation”. In the “Scene” menu, you can choose the name of the scene (At the top) and which action this scene will execute.

Automation
The “Automation” menu is where you can program you fan to take action on the scenes you have made according to either (1) A number of changes in weather conditions; hereunder Temperature, Humidity, Weather, AQI, Sunrise/Sunset, or (2) A fixed schedule where you can select any day of the week and time where the fan should take action on a certain scene. For example you can set the fan to automatically turn on each weekday at 8AM, and automatically turn off again at 9AM when you leave for work.

Voice control with Alexa (Requires you to complete above step setting up the NASH Smart APP
Enable voice control via the “Smart life” skill in Alexa APP (If you are using Google Home, skip further). * NOTE that you do not necessarily need a smart speaker like Amazon Echo for the voice feature to work, as you can communicate with the APP directly, but it is suggested that you use the device with a smart speaker for the best possible user experience.
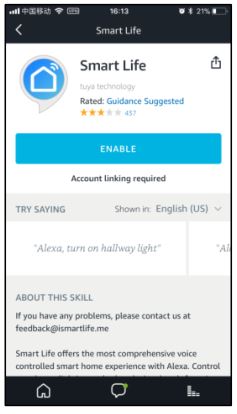
Open the Alexa app and log in with your amazon account. Then choose ‘Skills’ in the options bar located at the top left on the main menu, and enter “Smart life” in the search field.
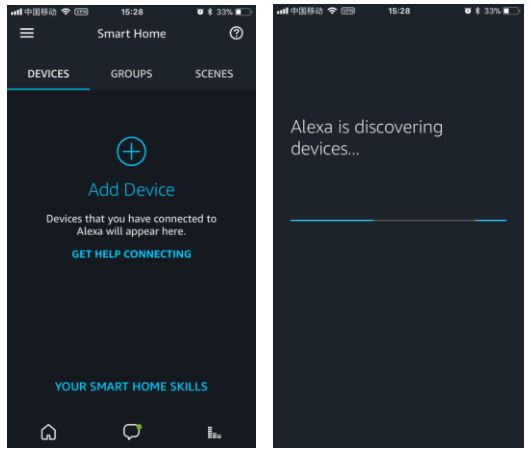
Select Smart life in the search results, and then click “Enable Skill”.
Input the same username and password you registered in the NASH Smart APP just before.

Go back to the Alexa main menu, choose `smart home’ in the option bar, press ‘+\'(add device) button. The device search will start automatically.
After the above operation is successful, you can control the device with Alexa. The supported commands are:“Alexa, turn on/off fan”“Alexa, set the fan to level one” (Wind speed)“Alexa, set the fan to level two” (Wind speed)“Alexa, set the fan to level three” (Wind speed)
Voice control with Google Home (Requires you to complete above step setting up the NASH Smart APP
Enable voice control via “Smart life” skill in Google Home* NOTE that you do not necessarily need a smart speaker like Google Home for the voice feature to work, as you can communicate with the APP directly, but it is suggested that you use the device with a smart speaker for the best possible user experience.
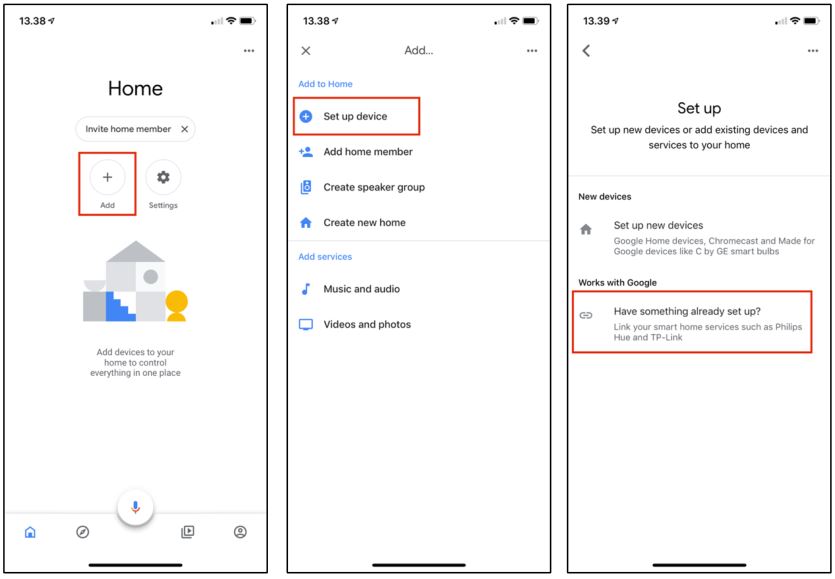
Tap “+” in the Google Home APP’s main page, then tap “Set up device”. Tap “Have something already set up?”.
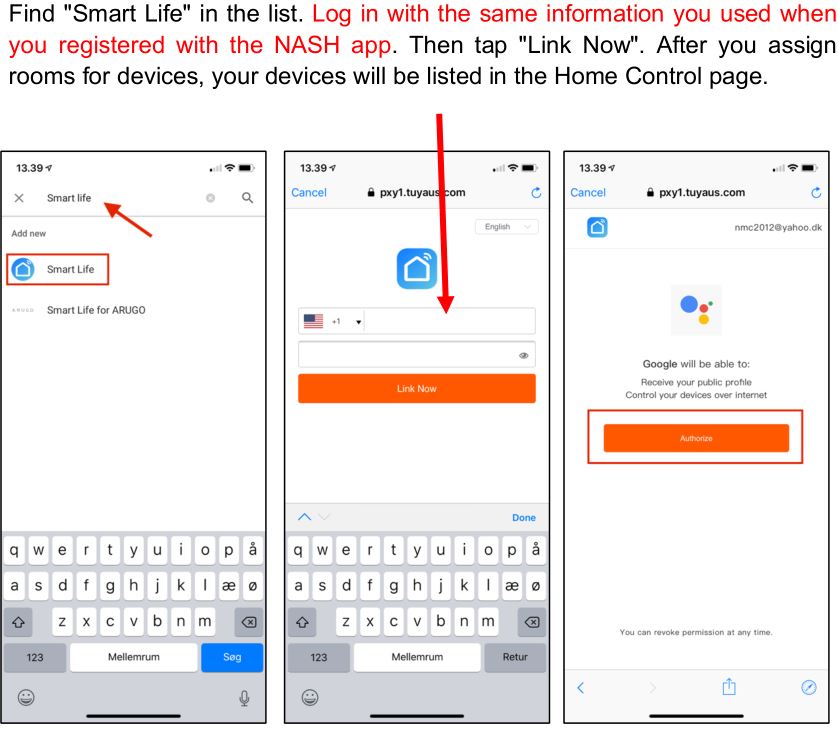
Now you can control your smart devices through Google Home. The supported commands are:“Hey Google, turn on/off fan”“Hey Google, set the fan to level one” (Wind speed)“Hey Google, set the fan to level two” (Wind speed)“Hey Google, set the fan to level three” (Wind speed)
Precautions
- Polarized Plug: To reduce the risk of electric shock, this equipment has a polarized plug (One blade is wider than the other). This plug will fit in a polarized outlet only one way. If the plug does not fit fully in the outlet, reverse the plug. If it still does not fit, contact customer service for help on installing the outlet properly. Do not alter the plug in any way by yourself.
- Do not place the device in direct sunlight! Direct sunlight or other heated places may cause deformation, deterioration, discoloration, and failure. Equipment accessories such as TVs and radios may cause distortion and noise. Please place it at a distance of at least 4ft. If you use the same socket as used with these devices, image distortion and noise may occur when the power plug is inserted. If this happens, plug the power plug into a different outlet. It is also strongly discouraged to place magnets and metal objects anywhere near the unit!
- The unit should at no point be moving or shaking while it is running. Do not pull the unit by the power cord while moving it, as doing so may cause a short circuit or serious damage to the inside of the power cord, possibly resulting in fire or electric shock.
- Do not damage the power cord or plug, and do not cut, excessively twist, pull, or twist the power cord. If the power cord is damaged, it must be replaced by a service department or a professional to avoid danger. Non-professionals are discouraged from disassembling the machine to avoid electric shock.
- The plug and hand should not be exposed to water before plugging in the power plug, otherwise there is a risk of electric shock.
- Do not use power supplies, universal sockets or connected devices that exceed the rated value 110V ~ 5A AC power. Using a universal outlet that exceeds the rated value may cause the power cord to overheat and cause a fire.
- Do not touch the power plug with wet hands, as it may result in electric shock.
- Do not put your fingers or metal objects into the gap of the fan guard, as it may also cause electric shock or injury. Do not allow water, flammable detergents or other liquids to enter the product.
- This product is not a substitute for normal ventilation equipment, daily vacuum cleaning or detergents used in the kitchen.
- Do not use this product in a wet or hot environment such as a bathroom, toilet or kitchen.
- If any of the following conditions occur, please power off the unit immediately and contact customer service: · The switch does not work.
- The power cord or plug is abnormally hot.
- Abnormal sound or vibration
- Any other abnormalities or malfunctions
- Never place products in these locations:
- Unstable locations (Otherwise the product may fall over, resulting in injury, electric leakage, electric shock or fire.)
- Locations that are hot, humid, or wet, such as bathrooms
- Always switch off and unplug the fan before performing any cleaning. Do not use harsh detergents, chemical cleaners or solvents as they may damage the surface finish of the components. Use a soft duster or a rag to dust off all the surfaces. Wipe all external surfaces with a soft, damp (not wet) cloth dipped in mild, soapy water. Ensure that water doesn’t get inside the unit. Use a dry cloth to thoroughly dry the fan before plugging it into the power source.
CORRECT DISPOSAL OF THIS PRODUCT
![]() If you do not plan to use the fan for extended periods of time, it is recommended that it’s cleaned and stored (preferably in its original packaging) in a cool, dry place. The crossed-out wheelie bin symbol on electrical goods means that you should not put this item in your normal household waste bin. If electrical appliances are disposed of in landfills or dumps, hazardous substances can leak into the groundwater and get into the food chain, damaging your health and well-being.
If you do not plan to use the fan for extended periods of time, it is recommended that it’s cleaned and stored (preferably in its original packaging) in a cool, dry place. The crossed-out wheelie bin symbol on electrical goods means that you should not put this item in your normal household waste bin. If electrical appliances are disposed of in landfills or dumps, hazardous substances can leak into the groundwater and get into the food chain, damaging your health and well-being.
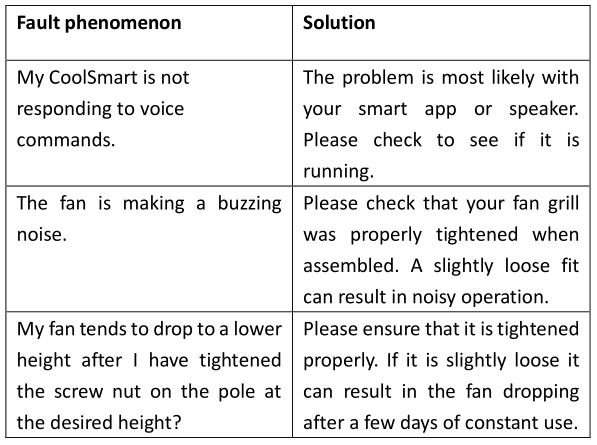
Troubleshooting
Most common faults and how to solve them:
Box Contents
NASH PF-1 CoolSmart – 1 pcs
Instruction Manual – 1 pcs
Technical Specifications
Model No – PF-1Voltage – 120V~Frequency – 60HzRated power: (W) – 75W
[xyz-ips snippet=”download-snippet”]