60062 Nature Power MPPT Solar Charge
Controller User Manual
Important safety instructions
Save these instructions
This manual contains important safety, installation and operating instructions for the MPPT solar controller.The following symbols are used throughout this manual to indicate potentially dangerous conditions or mark important safety instructions.
WARNING:
Indicates a potentially dangerous condition. Use extreme caution when performing this task.
CAUTION:
Indicates a critical procedure for safe and proper operation of the controller.
NOTE:
Indicates a procedure or function that is important for the safe and proper operation of the controller.
Safety Information
- Read all of the instructions and cautions in the manual before beginning installation.
- There are no user serviceable parts inside the MPPT charger. Do not disassemble or attempt to repair the controller.
- Disconnect all sources of power to the controller before installing or adjusting the controller setting.
- Mount the controller indoor. Prevent exposure to the elements and do not allow water to enter the controller.
- Install the controller in a location that prevents casual contact. The controller can become very hot during operation.
- Use insulated tools when working with batteries.
- Avoid wearing jewelry during installation.
- The battery bank must be comprised of batteries of same type, make, and age.
- Do not smoke in the vicinity of the battery bank.
- Power connections must remain tight to avoid excessive heating from a loose connection.
- Use properly sized conductors and circuit interrupters.
WARNING: A battery can present a risk of electrical shock or burn from large amounts of short-circuit current, fire, or explosion from vented gases. Observe proper precautions.
CAUTION: When replacing batteries, use properly specified sizes ,type, and rating based on application and system design.
CAUTION: Proper disposal of batteries is required. Refer to local regulations or codes for requirements.
About this Manual
This manual provides detailed installation and usage instructions for the MPPT solar charge controller. Only qualified electricians and technicians who are familiar with solar system design and wiring practices should install the MPPT controller. The usage information in this manual is intended for the system owner/operator.
WARNING
This product can expose you to chemicals, including Di (2-ethylhexyl) phthalate (DEHP) which is known to the State of California to cause cancer, birth defects or other reproductive harm. For more information, go to www.p65warnings.ca.gov
Getting Started
Overview
Thank you for selecting our MPPT solar charge controller. The MPPT controller is an advanced maximum power point tracking solar battery charger. The controller features a smart tracking algorithm that finds and maintains operation at the solar array peak power point, maximizing energy harvest.
The MPPT controller charging process has been optimized for long battery life and improved system performance. Self-diagnostics and electronic error protections prevent damage when installation mistakes or system faults occur. The controller also features four adjustable setting switches, RS485 communication port and terminal for remote battery temperature measurement.
Versions and Rating

Model naming rule: SCF: Solar charger Fan cooling design SCH: Solar charger Heatsink cooling design 80A: Rating charge current L: 12V/24V E: Economic plastic casing ‘ H: PV Voc 18~150Vdc, Identify from Voc 18~100Vdc comparing with same output model.
Features
The features of the MPPT controller are shown in figure below. An explanation of each feature is provided
- HeatsinkAluminum heatsink to dissipate controller heat
- Mounting holeKeyhole slot for mounting
- Setting SwitchesFour setting switches to configure operation of the MPPT controller
- RS-485 PortTerminal for RS-485 communication
- DC Load output
- Battery temperature SensorTerminal for battery temperature detect and provide compensation
- LCD screenIndicate the operating status
- LED indicatorsLED indicators show charging status and controller faults
- Wiring Box coverSheet metal wiring box cover protect power connections
- . Solar Positive TerminalPower connection for Solar(+)Solar Negative TerminalPower connection for solar(-)
- Battery Positive TerminalPower connection for battery(+)Battery Negative TerminalPower connection for battery(-)
Installation
General Information
The mounting location is important to the performance and operating life of the controller. The environment must be dry and protected from water ingress. If required, the controller may be installed in a ventilated enclosure with sufficient air flow. Never install the controller in a sealed enclosure. The controller may be mounted in an enclosure with sealed batteries, but never with vented/flooded batteries. Battery fumes from vented batteries will corrode and destroy the controller circuits.
Multiple controllers can be installed in parallel on the same battery bank to achieve higher charging current. Additional parallel controllers can also be added in the future. Each controller must have its own solar array.
CAUTION: Equipment Damage or Risk of Explosion
Never install the controller in an enclosure with vented/flooded batteries. Battery fumes are flammable and will corrode and destroy the controller circuits.
CAUTION: Equipment Damage
When installing the controller in an enclosure, ensure sufficient ventilation. Installation in a sealed enclosure will lead to over-heating and decreased product lifetime.
The installation is straight-forward, but it is important each step is done correctly and safety. A mistake can lead to dangerous voltage and current levels. Be sure to carefully follow each instruction. Read all instructions first before beginning installation.
Recommended Tools:
- Wire strippers
- Wire cutters
- Phillips screwdriver
- Slotted screwdrivers
- Pliers
- Drill
- Drill bit
- Level
- Hack saw(cutting conduit)
Controller Installation
Step 1-Remove the wiring box cover
CAUTION: Shock Hazard
Disconnect all power sources to the controller before removing the wiring box cover. Never remove the cover when voltage exists on any of the power connections.
![]()
Use a #4 Phillips screw driver to remove the four screws that secure the wiring box cover as show in figure below.
Battery charging setting
It is important to select the battery type that match the system battery to ensure proper charging and long battery life. Refer to the specifications provided by the battery manufacturer and choose a setting that best fits the recommended charging profile.
![]()
Battery type-The most common battery type associated with the specified charging settings.
Bulk stage-This stage limits input current, as the battery become more charged ,the charging current continues to taper down until the battery is fully charged.Float stage- When the battery is fully charged, the charging voltage will be reduced to the float voltage setting.Equalize stage-During an equalization cycle, the charging voltage will be held constant at the specified voltage setting.
Network connections
Network connections allow the MPPT controller to communicate with computers. A network can be as simple as one controller and one PC, or as complex as dozens of controllers monitored via the Internet.
Power connections
Wire size
The six large power terminals are sized for 6AWG wire. The terminals are rated for copper and aluminum conductors. Good system design generally requires large conductor wires for the solar and battery connection that limit voltage drop losses to 2% or less.
Minimum wire size
Minimum wire sizes for ambient temperatures to 45°C are provided in table 3-2 below.
![]()
Connect the power wires
WARNING: Shock Hazard
The solar PV array can produce open-circuit voltages in excess of 100VDC or 150VDC (Depend on different Model of the controller) when in sunlight. Verify that the solar input breaker or disconnect has been opened (disconnected) before installing the system wires.
![]()
Model:20A 30A 40A
![]() Model: 50A 60A 70A 80A 90A 100A
Model: 50A 60A 70A 80A 90A 100A
Connect the six power conductors shown in figure above the following steps:
- Confirm that the system input and output disconnect switches are both turned off before connecting the power wires to the controller. There are no disconnect switches inside the controller.
- Put the wires into the wiring box.
WARNING: Risk of Damage
Be very certain that the battery connection is made with correct polarity. Turn on the battery breaker/disconnect and measure the voltage on the open battery wires before connect to the controller. Disconnect the battery breaker/disconnect before wiring to the controller.
3. Connect the battery+ (Positive) wire to the battery+ terminal on the controller,Connect the battery – (Negative) wire to the battery- terminal on the controller.4. Connect the Solar+ (Positive) wire to the PV+ terminal on the controller,Connect the Solar- (Negative) wire to the PV- terminal on the controller.
Power-Up
WARNING: Risk of Damage
Connecting the solar array to the battery terminal will permanently damage the controller.
WARNING: Risk of Damage
Connecting the solar array or battery connection with reverse polarity will permanently damage the controller
- Confirm that the Solar and Battery polarities are correct.
- Turn the battery disconnect switch on first. Observe that the LCD indicate a successful start-up.(LCD display turn on)
- Note that a battery bank must be connected to the controller to start and operate the controller. The controller will not operate only from solar input.
- Turn the solar disconnect on. If the solar array is in full sunlight. The controller will begin charging.
Power-Down
WARNING: Risk of Damage
Only Disconnect the battery from the controller AFTER the solar input has been disconnected. Damage to the controller may result if the battery is removed while the controller is charging.
To prevent damage, Power-down must be done in the reverse order as power-up.
Operation
The MPPT controller is fully automatic. After installation is completed, there are few operator tasks to perform. However, the operator should be familiar with the operation and care of the controller as described in this section.
The MPPT controller utilizes Solar Maximum Power Point
Tracking (MPPT) technology to extract maximum power from the solar array. The tracking algorithm is fully automatic and does not require user adjustment. MPPT technology tracks the array maximum power point as it varies with weather conditions, ensuring that maximum power is harvested from the array throughout the course of the day.
Current Boost
Under most conditions, MPPT technology will “boost” the solar charge current. For example, a system may have 36 Amps of solar current flowing into the controller and 44 Amps of charge current flowing out to the battery. The controller does not create current! Rest assured that the power into the controller is the same as the power out of the controller. Since power is the product of voltage and current (Volts x Amps), the following is true*:
(1) Power Into the MPPT 150V = Power Out of the MPPT 150V(2) Volts In x Amps In = Volts Out x Amps Out
If the solar module’s maximum power voltage (Vmp) is greater than the battery voltage, it follows that the battery current must be proportionally greater than the solar input current so that input and output power are balanced. The greater the difference between the Vmp and battery voltage, the greater the current boost. Current boost can be substantial in systems where the solar array is of a higher nominal voltage than the battery as described in the next section.
Battery Charging Information
The MPPT controller has 4-stage battery charging algorithm for rapid, efficient, and safe battery charging. Figure 4-2 shows the sequence of the stages.

Figure4-2. MPPT controller Charging Algorithm
Bulk Charge Stage
In bulk charge stage, the battery is not at 100% stage of charge and battery voltage has not yet charged to the absorption voltage set-point. The controller will deliver 100% of available solar power to recharge the battery. The green LED will blink once 0.5second during bulk charging.
Absorption Stage
When the battery has recharged to the absorption voltage set-point, constant-voltage regulation is used to maintain battery voltage at the absorption set-point, This prevents heating and excessive battery gassing. The battery is allowed to come to full state of charge at the absorption voltage set-point. The green/blue LED will blink once per two second during absorption charging.
Float Stage
After the battery is fully charged in the absorption stage, The controller reduces the battery voltage to the Float voltage set-point, When the battery is fully recharged, there can be no more chemical reactions and all the charging current is turned into heat and gassing. The float stage provides a very low rate of maintenance charging while reducing the heating and gassing of a fully charged battery. The purpose of float is to protect the battery from long-term over-charge. The green/blue LED will keep green during float charging.
Equalize Stage
Equalize charging will start working in a period of 30 days. It will charges in a higher voltage so as to active the battery activity, usually 30mins, depending on different battery type. Equalize charge will longer battery lifetime.
WARNING: Risk of Explosion
Equalizing vented batteries produces explosive gases. The battery bank must be properly ventilated.
CAUTION: Equipment Damage
Equalization increases the battery voltage to levels that may damage sensitive DC loads. Verify all system loads are rated for the temperature compensated Equalize voltage before beginning an Equalization charge. Excessive overcharging and gassing too vigorously can damage the battery plates and cause shedding of active material from the plates. An equalization that is too high or for too long can bedamaging. Review the requirements for the particular battery being used in your system.
Temperature CompensationAll charging setting are based on 25°C (77°F). If the battery temperature varies by 5°C, the charging setting will change by 0.15volts from a 12v battery. This is a substantial change in the charging of the battery, and the use of the Battery sensor is recommended to adjust charging to the actual battery temperature.
Protections, Faults & Alarms
The MPPT controller protections and automatic recovery are important features that ensure the safe operation of the system. Additionally, the controller features real-time self diagnostics that report Fault and Alarm condition as they occur.
Faults are events or conditions that require the controller to cease operation. A Fault usually occurs when a limit such as voltage, current, or temperature has been surpassed. Fault conditions are indicated with unique LED sequences and are also displayed on the LCD screen.
Protections
– Solar overload
The controller will limit battery current to the maximum battery current rating. An over-sized solar array will not operate at peak power. The solar array should be less than the controller nominal maximum input power rating for optimal performance.
-Solar short circuit
The controller will disconnect the solar input if a short circuit is detected in the solar wiring. Charging automatically resumes when the short is cleared.
-Very Low battery VoltageIf battery discharge below 9 Volts the controller will go into brownout and shut down. When the battery voltage rises above the 10 Volts minimum operating voltage, the controller will restart.
Alarms
-High temperature current limit
The MPPT controller will limit the solar input current if the heatsink temperature exceeds safe limit. Solar charge current will be tapered back (to 0 amps if needed) to reduce the heatsink temperature. The controller is designed to operate at full rated current at the maximum ambient temperature. This alarm indicates that there is insufficient airflow and that the heatsink temperature is approaching unsafe limits. If the controller frequently reports this alarm condition, corrective action must be taken to provide better air flow or to relocate the controller to a cooler spot.
-High Input voltage current limit
The MPPT controller will limit the solar input current as the solar array Voc approaches the maximum input voltage rating. The array Voc should never exceed the maximum input voltage(100VDC or 150VDC).
Current limit
The array power exceeds the rating of the controller, this alarm indicates that the controller is limiting battery current to the maximum current rating.
Uncalibrated
The controller was not factory calibrated. Return the controller to an authorized dealer for service.
Inspection and Maintenance
The following inspections are recommended two times per year for best long-term performance.
System Inspection
- Confirm the controller is securely mounted in a clean and dry environment.
- Confirm that the air flow around the controller is not blocked. Clean the heatsink of any dirt or debris.
- Inspect all exposed conductors for insulation damage due to sun damage, rubbing on nearby objects, dry rot, insects, or rodents. Repair or replace conductors as necessary.
- Tighten all power connections per the manufacturers’ recommendations.
- Verify the LED and LCD indications are consistent with the equipment operation. Note any fault or error indications. Take corrective action if necessary.
- Inspect the battery bank. Look for cracked or bulging cases and corroded terminals.
- Inspect the system earth grounding for all components .Verify all grounding conductors are appropriately secured to earth ground.
Inside the MPPT controller Wiring Box
![]() CUATION: Shock Hazard
CUATION: Shock Hazard
Disconnect all power sources to the controller before removing the wiring box cover. Never remove the cover when voltage exists on the controller power connections.
- Check all wire terminals. Inspect connection for corrosion, damaged insulation, signs of high temperature or burning/discoloration. Tighten the terminal screws to the recommended torque.
- Inspect for dirt, nesting insects, and corrosion. Clean as required.
Display and parameter setting, Monitoring
The MPPT controllers possess: Two different screen model as following:
![]()
20A 30A 40A
![]()
50A 60A 70A 80A 90A 100A
Marks:
- LED Indicator
- LCD Display
- Load Off / Return to menu
- Up
- Load on/Saved for the parameter setting
- Down
![]()
Customer can revise and set the default parameter according to your system design. Battery type,Bulk charge, Float charge voltage, Load off voltage, Load Off/On, Date/Time , Communication ID are able to change through the screen button setting.
Function Keys
![]()
Troubleshooting
Battery Charging and Performance Issues
Problem:
No LCD or LED indications, controller does not appear to be power.
Solution:
With a multi-meter, check the voltage at the battery terminals on the controller. Battery voltage must be 9 VDC or greater. If the voltage on the battery terminals of the controller is between 9 and 60 VDC and no LED or LCD indicate, contact your authorized dealer for service. If no voltage is measured, check wiring connections, fuses
Problem:
The controller is not charging the battery.
Solution:
If the LCD indication is normal, check the fuses, breakers and wiring connections in the solar array wiring. With a multi-meter, check the array voltage directly at the controller solar input terminals. Input voltage must be greater than the Minimum startup voltage before charging will begin.
Network and Communication Issues.
Problem:
Can not connect to the controller Via communication port.
![]()
communication port pin define
Make sure that your cable match the RS485 communication port. the communication port is RS485.
Warranty , Claim Procedure and Datasheet
All of MPPT controllers are warranted to be free from defects in material and workmanship for a period of two years from the date of shipment to the original end user. We will, at its option, repair or replace any such defective products.
WARRANTY EXCLUSIONS AND LIMITATIONS
This warranty does not apply under the following conditions:
- Damage by accident, negligence, abuse or improper use.
- PV or Load current exceeding the rating of the product.
- Unauthorized product modification or attempted repair.
- Damage occurring during shipment.
- Damage results from acts of nature such as lightning and weather extremes.
The warranty and remedies set forth above are exclusive and in lieu of all others, express or implied. We specifically disclaims any and all implied warranties, including, without limitation, warranties of merchantability and fitness for a particular purpose. No our distributor, agent or employee is authorized to make any modification or extension to this warranty.
We are NOT RESPONSIBLE FOR INCIDENTAL OR CONSEQUENTIAL DAMAGES OF ANY KIND, INCLUDING BUT NOT LIMITED TO LOST PROFITS ,DOWN-TIME, GOODWILL OR DAMAGE TO EQUIPMENT OR PROPERY
WARRANTY CLAIM PROCEDURE
Before proceeding, please refer to product manual, including trouble shooting section.
- Contacting your authorized distributor or dealer from whom you purchase the unit is the first step in the warranty process. Local dealers can often address warranty issues quickly.
- Please offer below informaitons when you contact for warranty.(A) Purchase location-business or company name(B) Full model and serial number (SN is 18-digits on unit bar label)(C) Failure behavior, including LCD indications(D) Array configuration, panel Pmax, Voc, Vmp, Isc, and battery voltage; These specifications are needed to receive assistance.
- After warranty replacement has been approved and new unit(s) received, please return failed unit(s) using pre-paid shipping label, and follow any product specific instructions if requested by our Warranty Dept.
- If instructed by our controller after warranty replacement shipment has been received, return of failed unit(s) is required before further warranty replacements can be considered for the original or future cases.
NOTE: PLEASE DO NOT RETURN UNITS WITHOUT AN RMA CASE NUMBER. DOING SO WILL INCREASE THE TIME REQUIERED TO RESOLVE YOUR CLAIM.
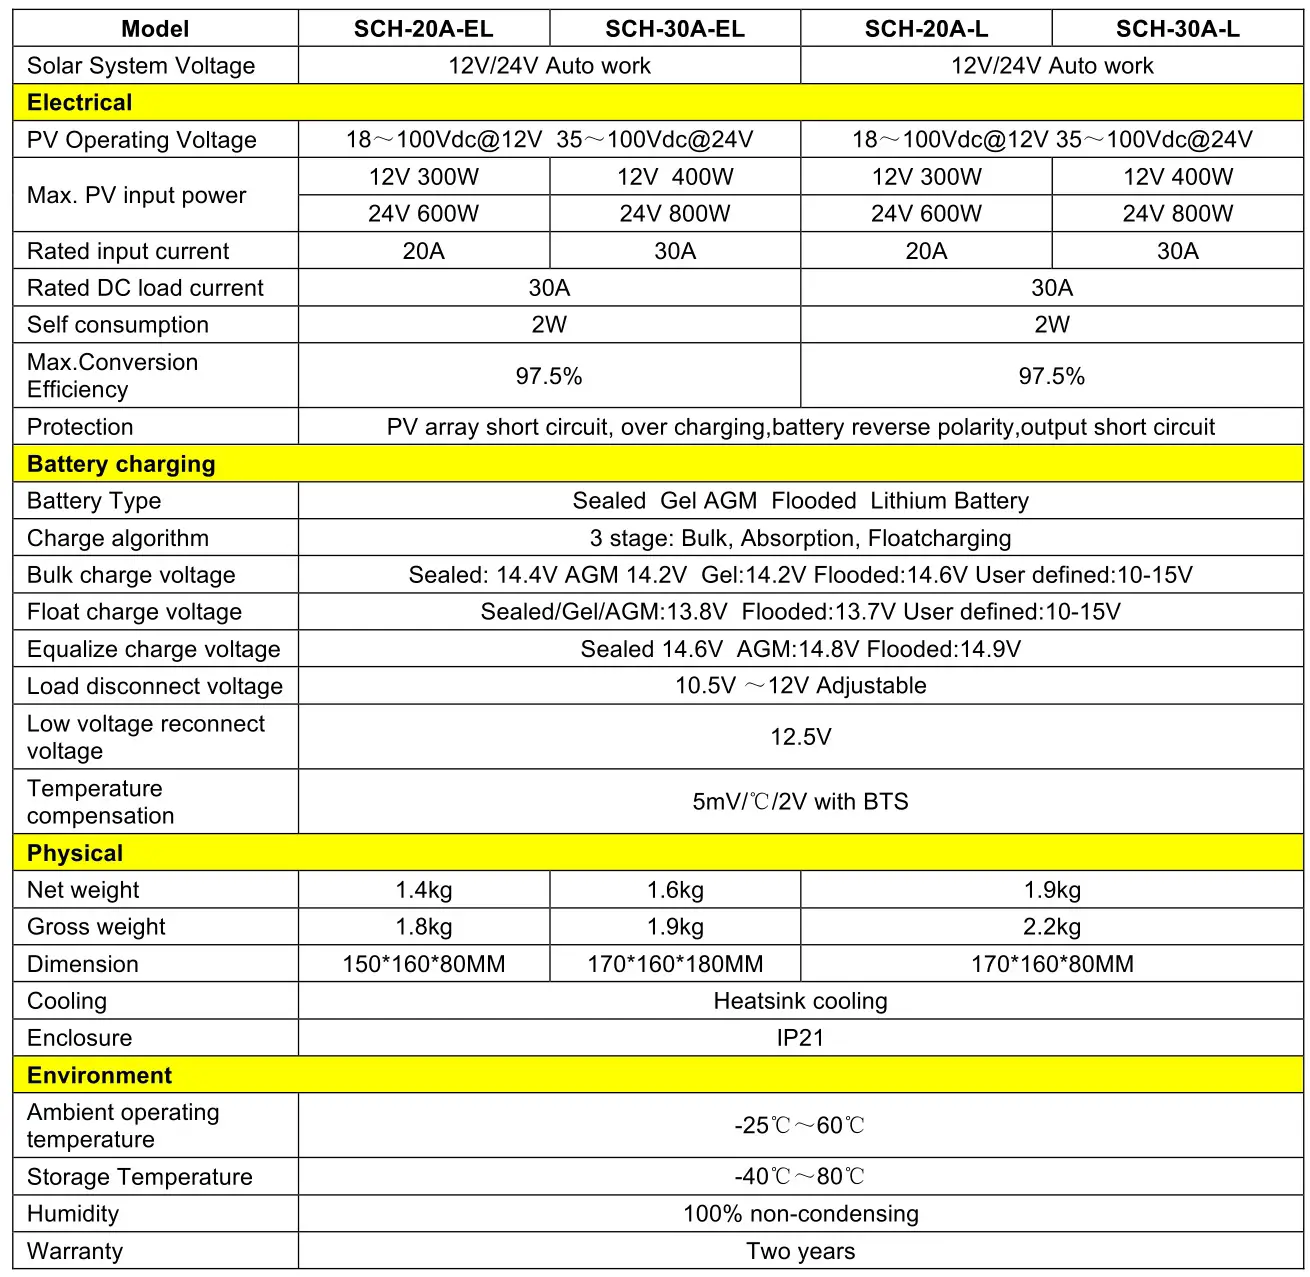
Data Sheet:
![]()
Part List
 report this ad
Please contact Nature Power Products to acquire more information:1-800-588-0590[email protected]www.naturepowerproducts.com
References
[xyz-ips snippet=”download-snippet”]