
![]()
Nature POWER 21030 Hanging Solar Shed Light User Manual
![]() WARNING: Read carefully and understand all ASSEMBLY AND OPERATIONINSTRUCTIONS before operating. Failure to follow the safety rules and other basic safetyprecautions may result in serious personal injury.
WARNING: Read carefully and understand all ASSEMBLY AND OPERATIONINSTRUCTIONS before operating. Failure to follow the safety rules and other basic safetyprecautions may result in serious personal injury.
SAVE THESE INSTRUCTIONS
Important Safety Information
Thank you for choosing a Nature Power Product.Save the receipt and these instructions. It is important that you read the entire manual to becomefamiliar with this product before you begin using it.This product is designed for certain applications only. the distributor cannot be responsible forissues arising from modification. We strongly recommend this product not be modified and/or used for any application other than that for which it was designed. If you have any question relative to a particular application, Do not use the product until you have first contacted the distributor to determine if it can or should be performed on the product.For technical question please call 1800-588-0590
![]() WARNING
WARNING
- Read and understand all instructions. Failure to follow all instructions may result in serious injury or property damage.
- The warnings, cautions, and instructions in this manual cannot cover all possible conditions or situations that could occur. Exercise common sense and caution when using this tool. Always be aware of the environment and ensure that the tool is used in a safe and responsible manner.
- Do not allow persons to operate or assemble the product until they have read this manual and have developed a thorough understanding of how it works.
- Do not modify this product in any way. Unauthorized modification may impair the function and/or safety and could affect the life of the product. There are specific applications for which the product was designed.
- Use the right tool for the job. DO NOT attempt to force small equipment to do the work of larger industrial equipment. There are certain applications for which this equipment was designed. It will be a safer experience and do the job better at the capacity for which it was intended. DO NOT use this equipment for a purpose for which it was not intended.
- Industrial or commercial applications must follow OSHA requirements.
![]() WARNINGThis product can expose you to chemicals, including Di (2-ethylhexyl) phthalate (DEHP)which is known to the State of California to cause cancer, birth defects or other reproductiveharm. For more information, go to www.p65warnings.ca.gov
WARNINGThis product can expose you to chemicals, including Di (2-ethylhexyl) phthalate (DEHP)which is known to the State of California to cause cancer, birth defects or other reproductiveharm. For more information, go to www.p65warnings.ca.gov
Intended Use
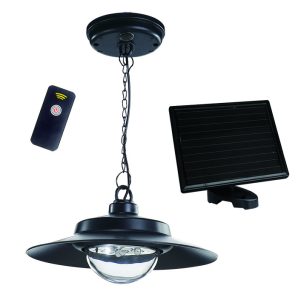
The 4-LED Solar-Powered Pendant Shed Light provides safety and security with the addedbenefit of remote control convenience. No electricity is required, making this light great for garages, sheds, barns and any area where electricity is unavailable or difficult to access. The included remote control allows you to activate the light at the touch of a button.
Technical Specifications

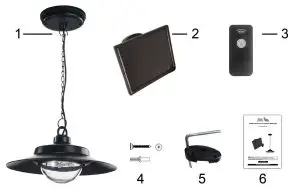
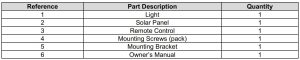
Parts List
Assembly Instructions
There are two ways to assemble the solar panel. Make sure to install the solar panel close enough to the light so that the wire can reach from the solar panel to its plug in on the lamp.
Post or Pole Mounted
- Carefully remove all the fittings from the box.
- Setting the bracket screw to solar panel with Screw.(figure 1)
- Connect “L” shape screw and Bracket for solar panel and “U” Shape Screw.(figure 2)
- Tumble in the “L” Shape Screw to Pillar and twist the “U” Shape Screw tightly.(figure3)

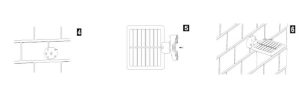
Wall or Deck Mounted
- Choose the desired location for mounting the solar panel. Use the bracket to mark the fourscrew holes. You may need to drill into the surface depending on the material the wall or deck is made (figure 4).
- Attach the bracket to the solar panel with the provided screw (figure 5).
- Attach the bracket to the wall or deck with the provided screws (figure 6).
- Adjust the angle of the solar panel to make sure it receives optimal sunlight during the day.
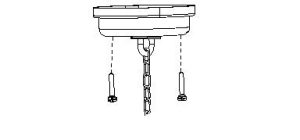
Lamp InstallationUse the two pre-drilled holes on the ceiling bracket and mark the location. Install the two screws into the holes and attach the ceiling bracket with the two screws.
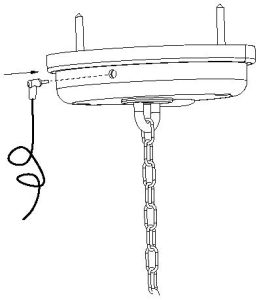
Connection of the Solar Panel and LampInsert the plug of the wires into the socket at the side of the ceiling bracket
Before Each Use
Solar lights require sunlight to function properly. Extended periods of cloudy weather will cause shorter run times. Shade on the solar panel is to be avoided. The solar panel may be cleaned with a clean damp cloth. Do not use soap, solvents, or abrasives. A regular visual inspection is recommended. Ensure the solar panel is free from debris and in a location where it will receive several hours of sunlight each day. Ensure the light is facing the desired direction and that there are no nearby alternate light sources that may interfere with the motion sensor.
Operating Instructions
Before the light can operate to its full capacity, allow the unit to charge in sunlight for 2 days with the solar panel wire connected to the light. When Charging should turn the light to the ON position and turn off the light by remote control.
- Twist off the glass cover: The light has 3 positions: OFF I AUTO / ON.
- Switch to the OFF position and the light will stay off.
- Switch to the AUTO position and the light fixture will be off during the day and turn on at night. The light brightness can be controlled from low light or high light mode with the remote control. Please noted the light can not turn off by remote control when the light in AUTO position.
- Switch to the ON position and the light fixture will stay on or stay off day and night with the remote control. The brightness can be controlled from low light or high light mode with the remote control.
- Pull the tape out before using the remote control

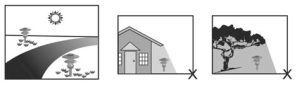
Location of Solar LightSolar powered lights require sunlight to recharge the internal batteries. For best results, locate thesolar panel in a position where it will receive direct sunlight, generally free from cover and shade.
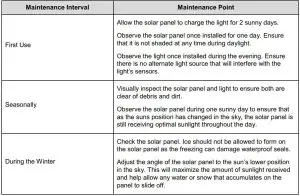
Maintenance
Maintain the solar powered light by adopting a program of conscientious repair and maintenance in accordance with the following recommended procedures
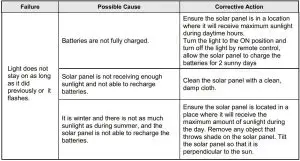
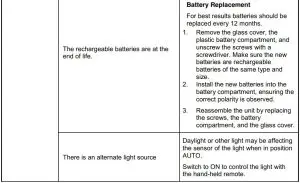
Troubleshooting
Use the table below to troubleshoot problems before contacting service personnel or your localdealer. If the problem continues after troubleshooting, call your local dealer for assistance.

Limited Warranty
Nature Power warrants our products to the original purchaser that this product is free from defects in materials and workmanship for the period of one year from date of purchase. In the case of product defect, contact Nature Power customer service to receive troubleshooting. If defective part or unit should be returned, a Return Authorization Number must be issued by Nature Power and the defective part or unit should be returned to the authorized location at the purchasers’ expense. A dated proof of purchase is required to receive warranty service. Once received at authorized location and defect proves to be the result of defective material and workmanship, the defective part or unit will be replaced at warrantors’ option and returned to the original purchaser at warrantors’ expense. No refunds will be granted by the warrantor, in the event of buyer’s remorse please contact your point of purchase within and in adherence to their return policy. Refunds are granted at the retailers’ discretions.
![]()
Please contact Nature Power Products to acquire more information:1-800-588-0590[email protected]www.naturepowerproducts.comMade in China
 report this ad
References
[xyz-ips snippet=”download-snippet”]